A brief introduction to canvas Api
ImageData object stores the canvas object, which contains the following read-only attributes:
width : the width of the image, in pixelsheight : the height of the image, in pixelsdata : Uint8ClampedArray , containing integer data in RGBA format, ranging from 0 to 255 (including 255).
data property returns a Uint8ClampedArray , which can be used to view the initial pixel data. Each pixel is represented by 4 1-bytes values (in the order of red, green, blue and transparency values; this is the "RGBA" format). Each color value part is represented by 0 to 255. Each part is assigned a continuous index in the array, and the red part of the upper left pixel is at index 0 of the array. The pixels are processed from left to right, and then down, traversing the entire array.
simple terms, we need to set every four to be taken each pixel rgba value
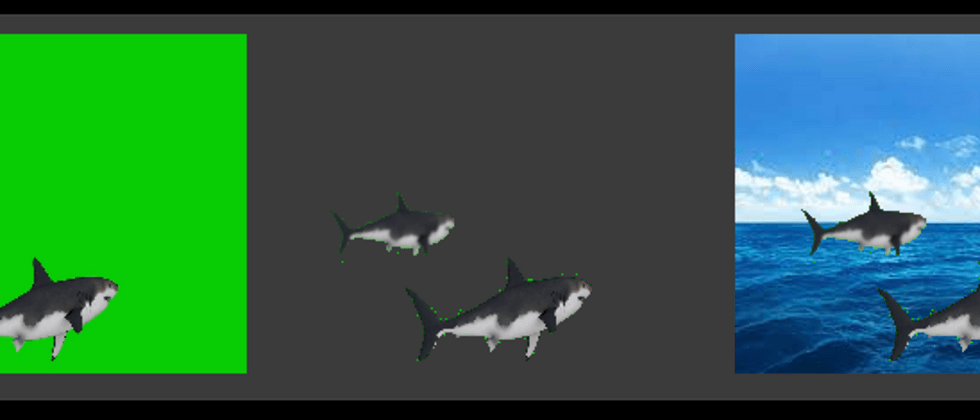
Then we combined with canvas used to manipulate the video, to carry out the green screen cutout and change the background.
First on the renderings:
code address : gitee
Preview Address : Ali cloud , githubPage (gitee recent renovation giteepage, the first with a github, if not open to download the source code from the local static service View )
Realization ideas
video ==> video screenshot ==> processing green pixels to be transparent ==> map to the top of the background image
Take a screenshot of the video, and then make the green pixel block in the video transparent
Put the processed picture on top of the prepared background picture
accomplish
1. Prepare the video and canvas
<body onload="processor.doLoad()">
    <div>
      <video id="video" src="./q.mp4" width="350" controls="true"></video>
    </div>
    <div>
      <!-- 视频截图 -->
      <canvas id="c1" width="260" height="190"></canvas>
      <!-- 处理绿色像素为透明 -->
      <canvas id="c2" width="260" height="190"></canvas>
      <!-- 贴图至背景图上方 -->
      <canvas id="c3" width="260" height="190"></canvas>
    </div>
</body>
2. Add video playback monitor
doLoad: function doLoad() {
  this.video = document.getElementById("video");
  this.c1 = document.getElementById("c1");
  this.ctx1 = this.c1.getContext("2d");
  this.c2 = document.getElementById("c2");
  this.ctx2 = this.c2.getContext("2d");
  this.c3 = document.getElementById("c3");
  this.ctx3 = this.c3.getContext("2d");
  let self = this;
  this.video.addEventListener(
    "play",
    function() {
      self.width = self.video.videoWidth / 5;
      self.height = self.video.videoHeight / 3;
      self.timerCallback();
    },
    false
  );
}
3. Add a timer
Call after the video is played, and take screenshots of each frame
timerCallback: function timerCallback() {
  if (this.video.paused || this.video.ended) {
    return;
  }
  this.computeFrame();
  let self = this;
  setTimeout(function () {
    self.timerCallback();
  }, 0);
}
4. Perform video frame operations
Set the green background to transparent and map it to the custom background image
computeFrame: function computeFrame() {
  this.ctx1.drawImage(this.video, 0, 0, this.width, this.height);
  let frame = this.ctx1.getImageData(0, 0, this.width, this.height);
  let l = frame.data.length / 4;

  for (let i = 0; i < l; i++) {
    let r = frame.data[i * 4 + 0];
    let g = frame.data[i * 4 + 1];
    let b = frame.data[i * 4 + 2];
    //rgb(8 204 4)
    if (r > 4 && g > 100 && b < 100) {
      frame.data[i * 4 + 3] = 0;
    }
  }
  this.ctx2.putImageData(frame, 0, 0);
  this.ctx3.putImageData(frame, 0, 0);
  return;
}
5. Fine-tuning
    //rgb(8 204 4)
    绿色的视频颜色不纯,不是一直都是rgb(8 204 4),所以进行了简单的微调。。
    if (r > 4 && g > 100 && b < 100) {
      frame.data[i * 4 + 3] = 0;
    }
end
Code address: gitee
Preview address: Cloud , githubPage
Green screen video download: pixabay


**粗体** _斜体_ [链接](http://example.com) `代码` - 列表 > 引用。你还可以使用@来通知其他用户。