If it is a native 32-bit system, you don’t need to read this article
OpenFansx64 system are notraspistill,raspivid, it is not possible to operate the camera by this commandPythonoperating classPiCameraneedlibmmal.so, but this so no x64 version , can not be usedPiCamera
The error is as follows OSError: libmmal.so: cannot open shared object file: No such file or directoryBut you can use opencv/ffmpeg directly operate /dev/video0 to get the video/picture
equipment
- Raspberry Pi 4B
- CSI camera 1.3 is worth about 13 yuan
- OpenFans x64 Raspberry Pi system
step
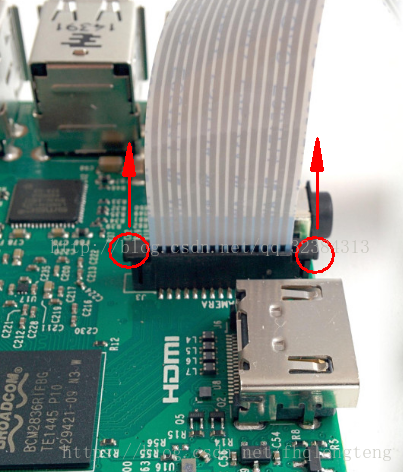
Insert the CSI camera
The blue side is on the USB port side
Change setting
Since this system does not have raspi-config ,rpi-update etc., you need to modify /boot/config.txt to increase the camera
start_x=1             # essential
gpu_mem=128           # at least, or maybe more if you wish
disable_camera_led=1  # optional, if you don't want the led to glow
Read bcm2835-v4l2 module
modprobe bcm2835-v4l2Configure automatic loading at bootecho 'bcm2835-v4l2' >> /etc/modules
Reboot
After the system restarts, a /dev/video0 device will appear, and the installation is successful without reporting an error when executing the following command
ls /dev/video0Multiple access
At this time, the camera can only be accessed by one process. If you want multiple processes to access at the same time, you can perform the following steps. Skip if there is no such requirement
Reference source:
https://gist.github.com/brutella/a71e8d7aa90af2c53ab500c4125bc178
https://raspberrypi.stackexchange.com/questions/19630/take-picam-image-while-motion-is-running/19897
1. Install the loop drive
apt install v4l2loopback-dkmsOr compile and install
The openfans system may not be able to compile and install
The following applies to the 32-bit Raspberry Pi native system
apt install raspberrypi-kernel-headers
git clone https://github.com/umlaeute/v4l2loopback
cd v4l2loopback
make
sudo make install
2. Create /dev/video1
This device is a multi-access device
modprobe v4l2loopback video_nr=1Configure automatic creation at startupecho 'options v4l2loopback video_nr=1' > /etc/modprobe.d/v4l2loopback.conf
3. Flow diversion
Any one of the following operations
3.1. Use ffmpeg to video0 to multiple video1
apt install ffmpeg
ffmpeg -f video4linux2 -i /dev/video0 -vcodec copy -f v4l2 /dev/video1
3.2. Use gstreamer to video0 to multi-channel video1
apt install gstreamer1.0-tools gstreamer1.0-plugins-good
gst-launch-1.0 v4l2src device=/dev/video0 ! v4l2sink device=/dev/video1
3.3. Use v4l2tools to video0 to multiple video1
git clone https://github.com/mpromonet/v4l2tools
sudo apt install liblog4cpp5-dev
make v4l2copy
./v4l2copy /dev/video0 /dev/video1
opencv2 read camera
Install opencv2
You can install opencv2 as follows, but the version is not the latest
apt install python3-opencvOr install through pip, the latest version, but the speed is very slow, it takes a long time to compile numpy
pip3 install opencv-pythonScreenshot & video
image-0~9.jpg and one video.avi in the current directory
import cv2 as cv

# 读取设备
cap = cv.VideoCapture('/dev/video0', cv.CAP_V4L)
# 读取摄像头FPS
fps = cap.get(cv.CAP_PROP_FPS)

# set dimensions 设置分辨率
cap.set(cv.CAP_PROP_FRAME_WIDTH, 800)
cap.set(cv.CAP_PROP_FRAME_HEIGHT, 400)

video = cv.VideoWriter('video.avi', cv.VideoWriter_fourcc('I', '4', '2', '0'), fps, (800, 400)) # 初始化文件写入 文件名 编码解码器 帧率 文件大小

# 录制10帧
for i in range(10):
    # take frame 读取帧
    ret, frame = cap.read()
    if ret:
        # write frame to file
        cv.imwrite('image-{}.jpg'.format(i), frame) # 截图
        video.write(frame) # 录制视频

# release camera 必须要释放摄像头
cap.release()
The picture is the picture of the camera

**粗体** _斜体_ [链接](http://example.com) `代码` - 列表 > 引用。你还可以使用@来通知其他用户。