Use Jupyter Notebooks (using Jupytext and Papermill) to automatically generate reports
Download the source code of this article: github
Jupyter notebook is one of the best available tools for interactively running code and writing narratives with data and graphs. What is less known is that they can be easily version controlled and run automatically.
Do you have a Jupyter notebook that contains drawings and graphics that you manually run on a regular basis? Wouldn't it be nice to use the same notebook instead of using a script to start the automatic reporting system? What if this script can even pass some parameters to the notebook it is running on?
This article explains in a few steps how to do this specifically, including in a production environment.
Sample notebook
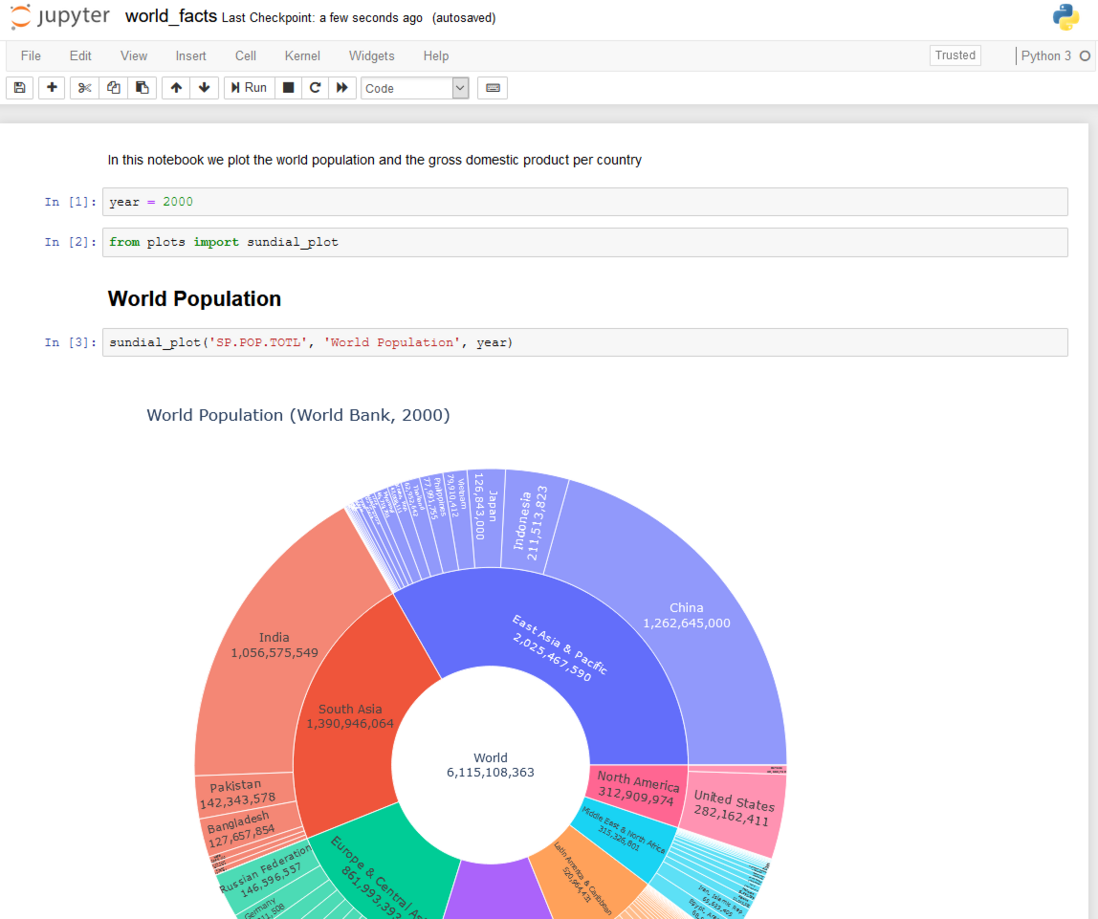
We will show you how to perform version control, automatically run and publish notebooks that depend on parameters. For example, we will use a notebook to describe the world population and GDP in a particular year. Simple to use: just change the variable year in the first cell, and then re-run, you can get the chart of the selected year. But this requires manual intervention. It will be more convenient if you can automatically perform the update and generate a report for each possible year parameter value (more generally speaking, the notebook computer can not only update the results based on some user-supplied parameters, but also connect to the parameters. .Database, etc.).
version control
In a professional environment, the laptop is designed by a data scientist, but the task of running the laptop in a production environment may be handled by other teams. Therefore, in general, people must share notebooks. This is best done through a version control system.
Jupyter notebooks are known for the difficulty of version control. Let us consider the above notebook, the file size is 3 MB, most of which is contributed by the embedded Plotly library. If we delete the output of the second code unit, the notebook will be less than 80 KB. After deleting all the output, the size is only 1.75 KB. This shows how much of its content has nothing to do with pure code! If we are not paying attention, the code changes in the notebook will lose a lot of binary content.
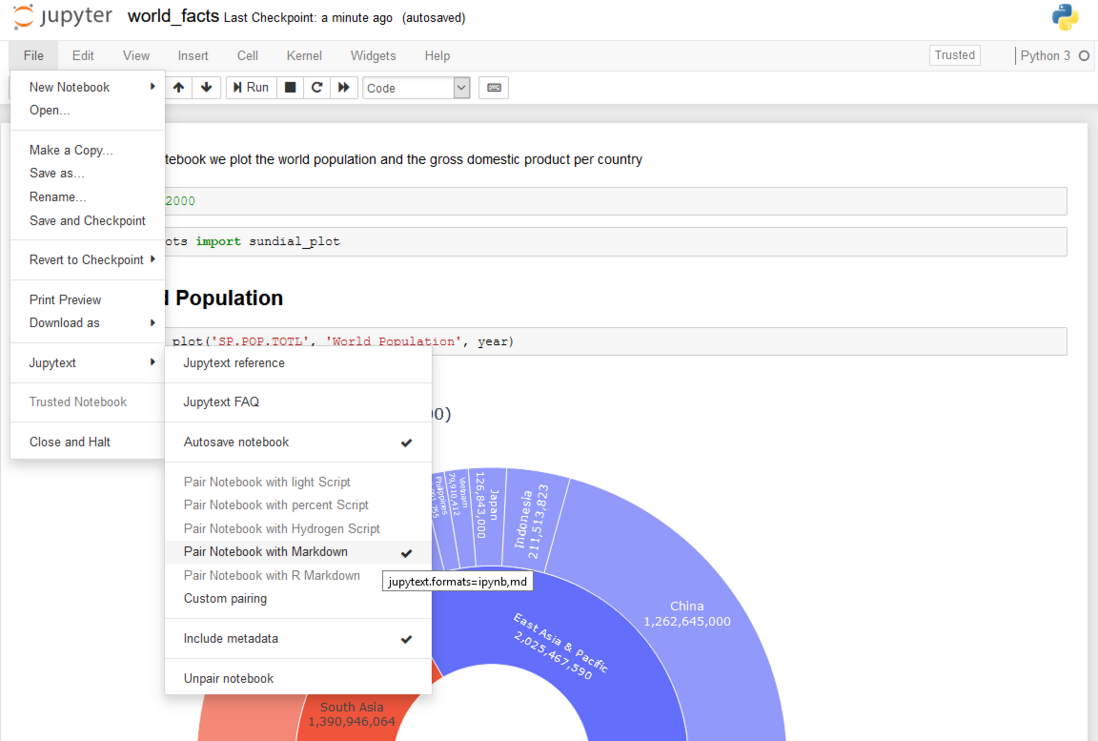
To get meaningful differences, we use Jupytext (disclaimer: I am the author of Jupytext). Jupytext can use pip or install conda. After restarting the notebook server, a Jupytext menu will appear in Jupyter:
We click to pair the notebook with Markdown, save the notebook..., and then get two representations of the notebook: (world_fact.ipynb has input and output cells) and world_fact.md (only has input cells).
Jupytext represents notebooks as Markdown files and is compatible with all major Markdown editors and viewers, including GitHub and VS Code. The Markdown version is presented by GitHub as:
As you can see, the Markdown file does not contain any output. In fact, since we only need to share the notebook code, we don't want to use it at this stage. Markdown files also have a very clear history of differences, which makes the notebook version control simple.
The world_facts.md file is automatically updated by Jupyter when you save it in the notebook. vice versa! If world_facts.md is modified using a text editor, or by extracting the latest content from the version control system, the changes will be displayed in Jupyter when the notebook is refreshed in the browser.
In our version control system, we only need to keep track of Markdown files (you can even explicitly ignore all .ipynb files). Obviously, the team executing the notebook needs to regenerate the world_fact.ipynb document. To do this, they use Jupytext on the command line:
$ jupytext world_facts.md --to ipynb
[jupytext] Reading world_facts.md
[jupytext] Writing world_facts.ipynb
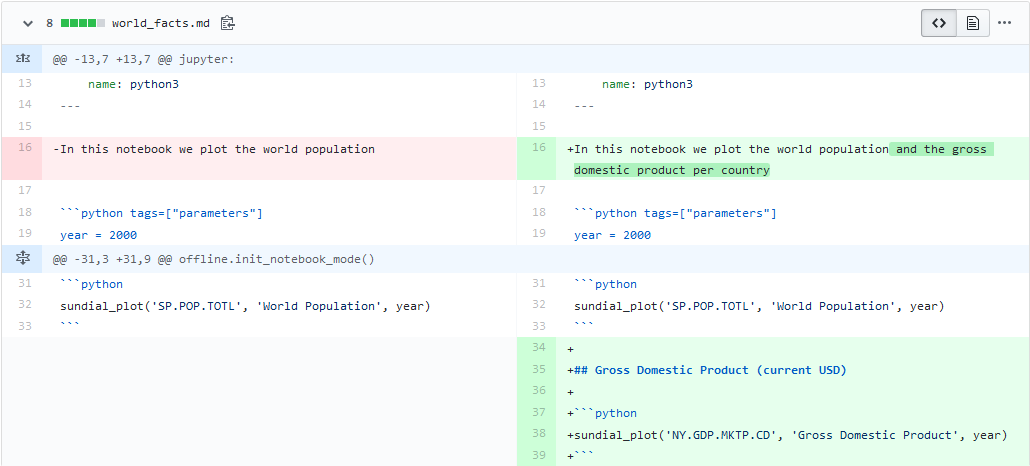
Now, we are properly versioning the notebook. The history of differences is clearer. For example, look at what the added GDP in our report looks like:
Jupyter notebook as a script?
As an alternative to Markdown representation, we can use Jupytext to pair notebooks with scripts in world_facts.py. If your notebook contains more code than text, you should give it a try. This is usually the first step towards a complete and efficient long notebook refactoring. Once the notebook is represented as a script, you can extract any complex code and use the refactoring tool in the IDE to move it to (unit tested的) In the library.
JupyterLab, JupyterHub, Binder, Nteract, Colab and Cloud notebooks?
Are you using JupyterLab instead of Jupyter Notebook? Don't worry: the above method also works in this case. You only need to use the Jupytext extension for JupyterLab, not the Jupytext menu. If you want to know, Jupytext can also be used in JupyterHub and Binder.
If you use other notebook editors, such as Nteract desktop, CoCalc, Google Colab or other cloud notebook editors, you may not be able to use Jupytext as a plugin in the editor. In this case, you only need to use Jupytext in the command line. Close your laptop and inject the pairing information into world_facts.ipynb with
$ jupytext --set-formats ipynb,md world_facts.ipynbAnd then keep the two representations with
$ jupytext --sync world_facts.ipynbNotebook parameters
Papermill is a reference library for implementing notebooks with parameters.
The paper mill needs to know which cell contains the notebook parameters. Just use the cell toolbar in Jupyter Notebook for parameter to add a label to the cell to complete this operation:
In JupyterLab, you can use the celltags extension.
And, if you want, you can directly edit world_facts.md here and add tags:
year = 2000Automatic execution
Now we have all the information needed to execute the notebook on the production server.
Production Environment
In order to execute a notebook, we need to know in which environment it should run. In this example, when we work with a Python notebook, we list its dependencies in the requirements.txt file, which is the standard for Python projects.
For simplicity, we also include the notebook tool in the same environment, that is, adding jupytext and adding papermill to the same requirements.txt file. Strictly speaking, these tools can be installed and executed in another Python environment.
Use any of the following methods to create the corresponding Python environment
$ conda create -n run_notebook --file requirements.txt -y
or
$ pip install -r requirements.txt
(If in a virtual environment).
Please note that the requirements.txt file is just a way to specify the execution environment. The binder team that repeatedly enforces environmental specifications is one of the most complete references on the subject.
Continuous integration
It is good practice to test every new contribution to the notebook computer or its requirements. For this, you can use, for example, Travis CI (Continuous Integration Solution). You only need the following two commands:
pip install -r requirements.txtinstall dependenciesjupytext world_facts.md --set-kernel - --executetests the execution of the notebook in the current Python environment.
You can find a specific example .travis.yml
We are already running the notebook automatically, aren't we? Travis will tell us if regressions have been introduced in the project...how is it going! But we are not 100% finished yet, because we promised to execute the notebook with parameters.
Use the correct kernel
A Jupyter notebook is associated with a kernel (that is, a pointer to the local Python environment), but that kernel may not be available on your production computer. In this case, we only need to update the notebook kernel to point to the environment we just created:
$ jupytext world_facts.ipynb --set-kernel-
Please note that --set-kernel - indicates the current Python environment. In our example, we get:
[jupytext] Reading world_facts.ipynb
[jupytext] Updating notebook metadata with '{"kernelspec": {"name": "python3", "language": "python", "display_name": "Python 3"}}' [jupytext] Writing world_facts.ipynb (destination file replaced)
If you want to use another kernel, just pass the kernel name to the --set-kernel option (you can use to get a list of all available kernels, jupyter kernelspec list and/or use to declare a new kernel python -m ipykernel install --name kernel_name --user ).
Execute notebook with parameters
Now, we can use Papermill to execute the notebook.
$ papermill world_facts.ipynb world_facts_2017.ipynb -p year 2017
Input Notebook: world_facts.ipynb Output Notebook: world_facts_2017.ipynb 100%|██████████████████████████████████████████████████████| 8/8 [00:04<00:00, 1.41it/s]
That's it! The notebook has been executed and the file world_facts_2017.ipynb contains the output.
Publish notebook
Now it's time to deliver the notebook that was just executed. Maybe you want to find it in your mailbox? Or maybe you want a URL where you can view the results? We have introduced several methods.
GitHub can display Jupyter notebooks. This is a convenient solution because you can easily choose who can access the repository. As long as you don't include any interactive JavaScript diagrams or widgets in your notebook, this method will work well (GitHub ignores the JavaScript part). As far as our notebook is concerned, the interactive drawing does not appear on GitHub, so we need another method.
Another option is to use Jupyter Notebook Viewer. The nbviewer service can enable any laptop to be public on GitHub. Therefore, our notebook is rendered correctly here. If your notebook is not public, you can choose to install nbviewer locally.
Alternatively, you can convert the executed notebook to HTML and publish it on a GitHub page, or on your own HTML server, or send it via email. Easily convert notebooks to HTML
$ jupyter nbconvert world_facts_2017.ipynb --to html
[NbConvertApp] Converting notebook world_facts_2017.ipynb to html [NbConvertApp] Writing 3361863 bytes to world_facts_2017.html
The generated HTML file includes the following code units:
But maybe you don't want to see the input cell in HTML? You only need to add --no-input:
$ jupyter nbconvert --to html --no-input world_facts_2017.ipynb --output world_facts_2017_report.html
You will get a clearer report:
It is easy to send a standalone HTML file as an attachment to an email. It is also possible to embed the report in the body of the email (but interactive plots are not available).
Finally, if you are looking for a complete report and have some understanding of LaTeX, you can try the PDF export option of Jupyter's nbconvert command.
Use pipe
An alternative to using named files is to use pipes. Jupytext, nbconvert and papermill all support them. The one-line replacement of the previous command is:
$ cat world_facts.md \
| jupytext --from md --to ipynb --set-kernel - \
| papermill -p year 2017 \
| jupyter nbconvert --stdin --output world_facts_2017_report.html
in conclusion
Now you should be able to build a complete pipeline for generating reports in production based on the Jupyter laptop. We have seen how:
- Use Jupytext version control notebook
- Share notebooks and their dependencies among multiple users
- Continuous Integration Test Notebook
- Use Papermill to execute a notebook with parameters
- Finally, how to publish the notebook (on GitHub or nbviewer), or render it as a static HTML page.
The technology used in this example is completely based on the Jupyter Project, which is the de facto standard for data science. The tools used here are all open source and can work well with any continuous integration framework.
You have everything you need to plan and deliver fine-tuned, code-free reports!
Conclusion
The tools used here are written in Python. But they have nothing to do with language. Thanks to the Jupyter framework, they are actually applicable to any of the more than 40 programming languages that exist in the Jupyter kernel.
Now, suppose you have written a document containing some Bash command lines, just like this blog post. Install Jupytext and the bash kernel, and the blog post will become this interactive Jupyter notebook!
Furthermore, should we ensure that every instruction in the post is effective? We do this through continuous integration... Spoiler alert: just like jupytext --execute README.md! It's as simple as that!
Thanks
Marc thanks Eric Lebigot and Florent Zara for their contributions to this article, and thanks CFM for supporting this work through its open source program.
About the author
This article was written by Marc Wouts. Marc joined CFM's research team in 2012 and has worked on a series of research projects from best deals to investment portfolio construction.
Marc has always been interested in finding effective workflows for collaborative research involving data and code. In 2015, he wrote an internal tool for publishing Jupyter and R Markdown notebooks on Atlassian's Confluence Wiki, providing the first solution for collaborating on notebooks. In 2018, he wrote Jupytext, an open source program, which simplifies version control of Jupyter notebooks. Marc is also interested in data visualization and coordinates working groups on this topic at CFM.
Marc received his PhD in probability theory from Paris Diderot University in 2007.
Disclaimer
All opinions contained in this document constitute the judgment of its author and do not necessarily reflect the opinions of the Capital Fund Management Company or any of its affiliates. The information provided in this document is general information only and does not constitute investment or other advice, and is subject to change without notice. The above results are derived from Google Translate. If there is a mistake, it is Google’s fault, and it is right to scold him. WeChat yujiabuao.


**粗体** _斜体_ [链接](http://example.com) `代码` - 列表 > 引用。你还可以使用@来通知其他用户。