
As a top distributed open source project, ZooKeeper has a wide range of applications. Well-known open source projects such as Dubbo and Kafka are all in use. I've only heard of it before and haven't studied it carefully. Today, I will take you to learn about ZooKeeper, mainly from the three aspects of ZooKeeper installation, visualization tools, and applications. I hope it will be helpful to everyone!
SpringBoot actual combat e-commerce project mall (40k+star) address: https://github.com/macrozheng/mall
Introduction
ZooKeeper is a distributed coordination framework that can provide consistency services for distributed systems. ZooKeeper was originally developed by Yahoo and later donated to the Apache Foundation. It has now been a top-level Apache project, and currently has 9.5k+Star on Github.
Distributed coordination
To understand ZooKeeper we first need to understand what is distributed coordination? Let's take the example of the registry in Spring Cloud.
There are many services in a microservice (distributed) system, and there are multiple instances of the same service. In the application, we can call the services in a load-balanced manner by the service name, and these services may hang or have new ones. Instances were added. At this time, we need something to coordinate, save the corresponding relationship between the service name and the available instance 3 call IP. At this time, the registry is the role of a distributed coordinator, and ZooKeeper can be used to act as the coordinator.
installation
The installation of ZooKeeper is very convenient whether it is Windows or Linux, let's learn its installation first.
Windows installation
- First download the ZooKeeper installation package, download address: https://www.apache.org/dyn/closer.lua/zookeeper/zookeeper-3.7.0/apache-zookeeper-3.7.0-bin.tar.gz

- Unzip to the specified directory, the directory structure is as follows after the unzip is complete;

- Create a configuration file
zoo.cfgin theconfdirectory, the content is as follows;
# 设置心跳时间,单位毫秒
tickTime=2000
# 存储内存数据库快照的文件夹
dataDir=I:/developer/env/apache-zookeeper-3.7.0-bin/data
# 监听客户端连接的端口
clientPort=2181- Enter the
bindirectory and start the ZooKeeper service;
zkServer.cmd- After the service is started successfully, the console will output the following information.

Linux installation
- Using Docker to install ZooKeeper is undoubtedly the most convenient, first we download its Docker image;
docker pull zookeeper:3.7.0- Create the ZooKeeper configuration file directory, and switch to this directory to create the configuration file
zoo.cfg;
mkdir /mydata/zookeeper/conf/ -p
cd /mydata/zookeeper/conf/
touch zoo.cfg- The content of configuration file
zoo.cfgis as follows, just use VIM to edit directly;
# 设置心跳时间,单位毫秒
tickTime=2000
# 存储内存数据库快照的文件夹
dataDir=/tmp/zookeeper
# 监听客户端连接的端口
clientPort=2181- Run the ZooKeeper container.
docker run -p 2181:2181 --name zookeeper \
-v /mydata/zookeeper/conf/zoo.cfg:/conf/zoo.cfg \
-d zookeeper:3.7.0
Command line operation
Next, we use the command line to operate ZooKeeper, familiar with the use of ZooKeeper.
- First use the
zkClicommand line tool to connect to ZooKeeper;
zkCli.cmd -server 127.0.0.1:2181- Through
helpyou can order to view the common commands of ZooKeeper;
[zk: 127.0.0.1:2181(CONNECTED) 0] help
ZooKeeper -server host:port -client-configuration properties-file cmd args
        addWatch [-m mode] path # optional mode is one of [PERSISTENT, PERSISTENT_RECURSIVE] - default is PERSISTENT_RECURSIVE
        addauth scheme auth
        close
        config [-c] [-w] [-s]
        connect host:port
        create [-s] [-e] [-c] [-t ttl] path [data] [acl]
        delete [-v version] path
        deleteall path [-b batch size]
        delquota [-n|-b|-N|-B] path
        get [-s] [-w] path
        getAcl [-s] path
        getAllChildrenNumber path
        getEphemerals path
        history
        listquota path
        ls [-s] [-w] [-R] path
        printwatches on|off
        quit
        reconfig [-s] [-v version] [[-file path] | [-members serverID=host:port1:port2;port3[,...]*]] | [-add serverId=host:port1:port2;port3[,...]]* [-remove serverId[,...]*]
        redo cmdno
        removewatches path [-c|-d|-a] [-l]
        set [-s] [-v version] path data
        setAcl [-s] [-v version] [-R] path acl
        setquota -n|-b|-N|-B val path
        stat [-w] path
        sync path
        version
whoami- We all know that Redis is by
key-valuestored data, and ZooKeeper byznode-valueform of stored data, znode a bit like a catalog, and/directory is ZooKeeper in the root directory, you can view all znode the following command;
[zk: 127.0.0.1:2181(CONNECTED) 1] ls /
[zookeeper]- Create a znode called
/zk_test, store the stringmy_data, which is a bit like Redis;
[zk: 127.0.0.1:2181(CONNECTED) 2] create /zk_test my_data
Created /zk_test- View all znodes, you can see the
zk_test060d3e02a94572;
[zk: 127.0.0.1:2181(CONNECTED) 3] ls /
[zk_test, zookeeper]- Get the data stored in znode;
[zk: 127.0.0.1:2181(CONNECTED) 4] get /zk_test
my_data- Modify the data in znode;
[zk: 127.0.0.1:2181(CONNECTED) 5] set /zk_test test_data
[zk: 127.0.0.1:2181(CONNECTED) 6] get /zk_test
test_data- Delete the data in znode;
[zk: 127.0.0.1:2181(CONNECTED) 7] delete /zk_test
[zk: 127.0.0.1:2181(CONNECTED) 8] ls /
[zookeeper]
Visual management
PrettyZoo is a Zookeeper graphical management client based on Apache Curator and JavaFX. The appearance is very high, it is recommended to use.- First download the installation package of
PrettyZoohttps://github.com/vran-dev/PrettyZoo/releases

- We need to create a connection and connect to ZooKeeper, we can find that
PrettyZoosupports connection through SSH channel;

- Double-click the connection, we can view the data stored in ZooKeeper, it is clear that ZooKeeper stores data according to the directory structure;

- Right-click the directory, we can create and delete znode, with this tool, we can basically say goodbye to command line operations;

- If you still think the command line is cool,
PrettyZooalso implements the command line function, and you can type commands happily by opening the command line tab.

Node type
The node (znode) in ZooKeeper has a life cycle, which depends on the type of node. There are four main types:
- Persistent: The default node type. After the node is created, it will always exist.
- Persistent Sequential: It has the characteristics of a persistent node. After the node name, an auto-increasing number suffix will be added.
- Ephemeral: Temporarily exists. When the session that created the node is closed, the node is deleted.
- Ephemeral Sequential: It has the characteristics of a temporary node. After the node name, an auto-increasing number suffix will be added.
If you use the command line to create a node, the order feature corresponds to the -s option, and the temporary feature corresponds to the -e option. For example, the following command:
# 创建持久顺序节点
create -s /test/seq segText
# 创建临时节点
create -e /test/tmp tmpText
# 创建临时顺序节点
create -s -e /test/seqTmp setTmpText
After the creation is successful, the following is displayed:

If you use PrettyZoo to create it, just check one option.

Use as a registry
CAP is an important theory in distributed architecture, which includes consistency (Consistency), availability (Availability) and partition tolerance (Partition tolerance). Eureka, which we often use, supports AP, while ZooKeeper supports CP. Next we learn about the application of ZooKeeper as a registry in Spring Cloud.
- ZooKeeper is used as a registry. The usage is basically the same as Eureka and Consul. First, we need to add the service discovery component of ZooKeeper to
pom.xml
<dependency>
    <groupId>org.springframework.cloud</groupId>
    <artifactId>spring-cloud-starter-zookeeper-discovery</artifactId>
</dependency>- Then modify the configuration file
application.ymland add ZooKeeper related configuration;
spring:
  cloud:
    zookeeper:
      # zookeeper连接地址
      connect-string: localhost:2181
      discovery:
        # 作为服务注册
        register: true
        # 注册时使用IP地址而不是hostname
prefer-ip-address: true- Here is still using the example in "Spring Cloud Learning Tutorial", there are two services
zookeeper-ribbon-serviceandzookeeper-user-service, the former calls the latter remotely through Ribbon;

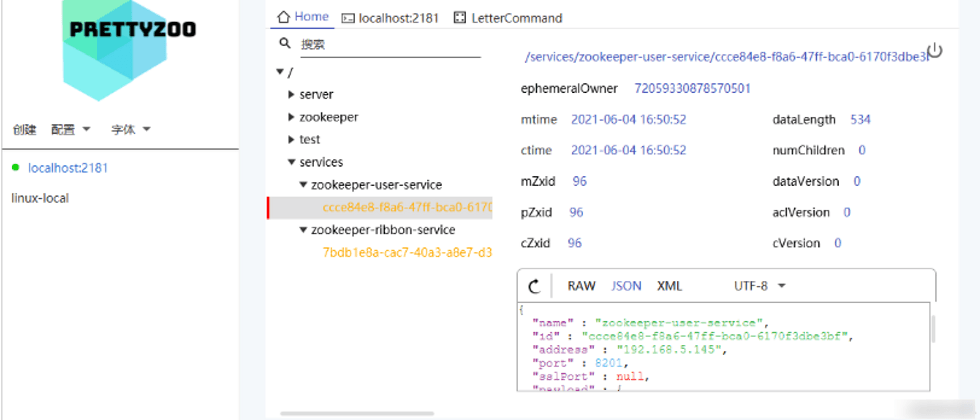
- Start the two services separately. We
PrettyZoothat when ZooKeeper is used as the registry, the name, IP, and port of the registered service are stored in it;

- We call
zookeeper-ribbon-serviceand found that it can be accessed normally. The interface address: http://localhost:8301/user/1

- If we
zookeeper-user-serviceservice at this time, we can find that ZooKeeper will automatically delete the stored data;

- It can be seen that ZooKeeper as the microservice registration center is implemented through temporary nodes. When the service goes online, it will register with ZooKeeper, and when the service goes offline, it will be deleted by ZooKeeper, ensuring the high availability of microservices.
to sum up
Today we learned about the installation of ZooKeeper, the use of the visualization tool PrettyZoo, and the application of ZooKeeper as a registry in Spring Cloud. In fact, ZooKeeper still has many applications in distributed systems, such as making distributed locks, implementing the main selection function, and replacing UUIDs to generate unique IDs. If you are interested, you can study it in depth!
Reference
Official document: https://zookeeper.apache.org/doc/current/zookeeperStarted.html
Project source code address
https://github.com/macrozheng/springcloud-learning
This article GitHub https://github.com/macrozheng/mall-learning has been included, welcome to Star!


**粗体** _斜体_ [链接](http://example.com) `代码` - 列表 > 引用。你还可以使用@来通知其他用户。