1 Introduction
Hello everyone, my name is . Welcome to follow my public Vision 1613e2474b80f7, recently organized source code reading activity, interested can add my WeChat ruochuan12 , long-term exchange study.
The previously written "Learning Source Code Overall Architecture Series" contains jQuery , underscore , lodash , vuex , sentry , axios , redux , koa , vue-devtools , vuex4
Writing relatively difficult source code consumes my time and energy, and I didn't get many reading likes. In fact, it was quite a blow. From the perspective of reading volume and reader benefits, it cannot promote the author's continuous output of articles.
So change your mind and write some relatively easy-to-understand articles. In fact, the source code is not as difficult as imagined, at least a lot of them can understand .
You Yuxi recently released version 3.2. The minor version is already 3.2.4 . This article is to learn how vuejs released 0613e2474b81be, and learn the source code for your own use.
vue-next/scripts/release.js file involved in this article, although the number of lines of code in the entire file is only 200 , it is very worthy of our study.
Goethe once said: Reading a good book is talking to a noble person. The same is true: reading the source code can also be regarded as a way of learning and communicating with the author.
After reading this article, you will learn:
1. 熟悉 vuejs 发布流程
2. 学会调试 nodejs 代码
3. 动手优化公司项目发布流程
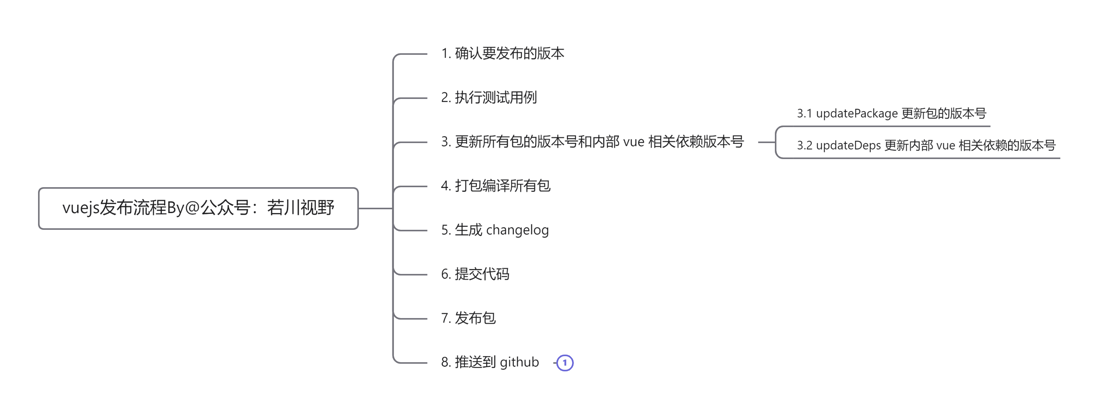
Before preparing the environment, let's preview the release process vuejs
2. Environmental preparation
Open vue-next ,
Open source projects in general can README.md or .github / contributing.md find contribution guidelines.
The contribution guide writes a lot of information about participating in project development. For example, how to run, what is the project directory structure. How to invest in development, what knowledge reserves are needed, etc.
You need to make sure that the Node.js version is 10+ , and the yarn version is 1.x Yarn 1.x .
Node.js you installed is probably lower than 10 . The easiest way is to go to the official website to reinstall. You can also use nvm etc. to manage the Node.js version.
node -v
# v14.16.0
# 全局安装 yarn
# 克隆项目
git clone https://github.com/vuejs/vue-next.git
cd vue-next

# 或者克隆我的项目
git clone https://github.com/lxchuan12/vue-next-analysis.git
cd vue-next-analysis/vue-next

# 安装 yarn
npm install --global yarn
# 安装依赖
yarn # install the dependencies of the project
# yarn release
2.1 Strictly verify the use of yarn to install dependencies
Then we look at the vue-next/package.json file.
// vue-next/package.json
{
    "private": true,
    "version": "3.2.4",
    "workspaces": [
        "packages/*"
    ],
    "scripts": {
        // --dry 参数是我加的,如果你是调试 代码也建议加
        // 不执行测试和编译 、不执行 推送git等操作
        // 也就是说空跑,只是打印,后文再详细讲述
        "release": "node scripts/release.js --dry",
        "preinstall": "node ./scripts/checkYarn.js",
    }
}
If you try to npm , you should get an error. Why would it report an error?
Because package.json has a front preinstall node ./scripts/checkYarn.js judges that the mandatory requirement is to use yarn install.
scripts/checkYarn.js file is as follows, that is, find the execution path npm_execpath process.env environment variable. If it is not yarn , output a warning and the process ends.
// scripts/checkYarn.js
if (!/yarn\.js$/.test(process.env.npm_execpath || '')) {
  console.warn(
    '\u001b[33mThis repository requires Yarn 1.x for scripts to work properly.\u001b[39m\n'
  )
  process.exit(1)
}
If you want to ignore this pre-hook judgment, you can use the yarn --ignore-scripts command. There is also a rear hook post . more details, please check the npm document
2.2 Debug the vue-next/scripts/release.js file
Then we will learn how to debug the vue-next/scripts/release.js file.
Here I declare under the VSCode version 1.59.0 should 1.50.0 play can debug the following steps.
code -v
# 1.59.0
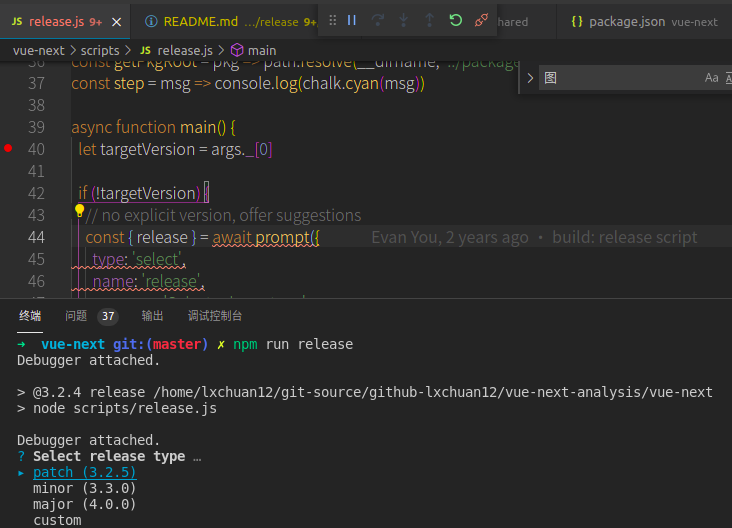
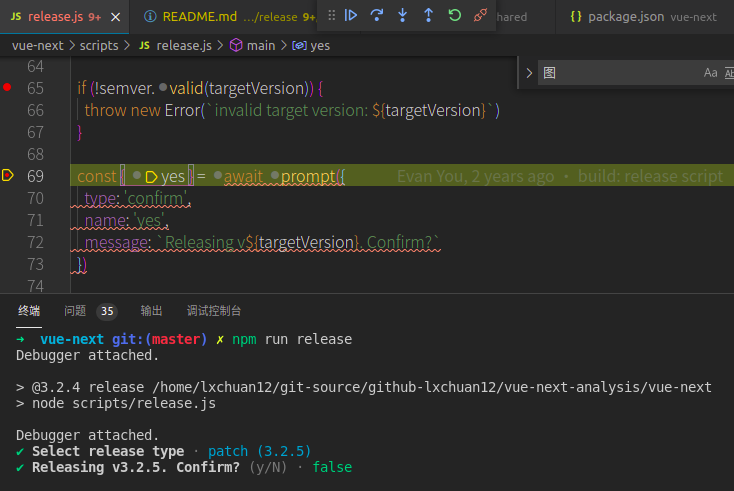
Find the vue-next/package.json file and open it, and then scripts , there will be a debug (Debug) button. After clicking it, select release . You can enter the debugging mode.
At this time, the terminal will be as shown in the figure below, with Debugger attached. output. Now put a picture.
more nodejs debugging related, please refer to the official document
After learning to debug, first walk through the process roughly, set a few more breakpoints at key places, and go through a few more times, you can guess the source code intent.
3 Some dependency introductions and function declarations at the beginning of the file
We can follow the breakpoints, first look at some dependency introductions and function declarations at the beginning of the file
3.1 Part One
// vue-next/scripts/release.js
const args = require('minimist')(process.argv.slice(2))
// 文件模块
const fs = require('fs')
// 路径
const path = require('path')
// 控制台
const chalk = require('chalk')
const semver = require('semver')
const currentVersion = require('../package.json').version
const { prompt } = require('enquirer')

// 执行子进程命令   简单说 就是在终端命令行执行 命令
const execa = require('execa')
Through dependencies, we can find the dependencies of the corresponding installation node_modules You can also find its README and github warehouses.
3.1.1 Minimist command line parameter analysis
Simply put, this library parses command line parameters. Looking at the examples, it is easier for us to understand the parameter transfer and analysis results.
$ node example/parse.js -a beep -b boop
{ _: [], a: 'beep', b: 'boop' }

$ node example/parse.js -x 3 -y 4 -n5 -abc --beep=boop foo bar baz
{ _: [ 'foo', 'bar', 'baz' ],
  x: 3,
  y: 4,
  n: 5,
  a: true,
  b: true,
  c: true,
  beep: 'boop' }
const args = require('minimist')(process.argv.slice(2))Which process.argv first and the second element is Node executable files and JavaScript files are executed fully qualified path to the file system, so whether you enter them.
3.1.2 Chalk terminal multi-color output
Simply put, this is for the terminal to display multi-color output.
3.1.3 Semantic version of semver
The semantic version of nodejs is implemented for version verification and comparison. For the semantic version, please see this semantic version 2.0.0 document
Version format: major version number. minor version number. revision number, the version number increment rules are as follows:
Major version number: When you make an incompatible API modification,
Minor version number: when you have added a downward compatibility feature,
Revision number: When you have done a downward compatibility problem correction.
The previous version number and version compilation information can be added to the back of "major version number. minor version number. revision number" as an extension.
3.1.4 enquirer interactive query CLI
Simply put, it is interactively asking the user for input.
3.1.5 execa execute command
Simply put, it is to execute commands, similar to our own input commands in the terminal, such as echo Ruochuan.
// 例子
const execa = require('execa');

(async () => {
  const {stdout} = await execa('echo', ['unicorns']);
  console.log(stdout);
  //=> 'unicorns'
})();
After reading the first part, let's look at the second part.
3.2 Part Two
// vue-next/scripts/release.js

// 对应 yarn run release --preid=beta
// beta
const preId =
  args.preid ||
  (semver.prerelease(currentVersion) && semver.prerelease(currentVersion)[0])
// 对应 yarn run release --dry
// true
const isDryRun = args.dry
// 对应 yarn run release --skipTests
// true 跳过测试
const skipTests = args.skipTests
// 对应 yarn run release --skipBuild
// true
const skipBuild = args.skipBuild

// 读取 packages 文件夹,过滤掉 不是 .ts文件 结尾 并且不是 . 开头的文件夹
const packages = fs
  .readdirSync(path.resolve(__dirname, '../packages'))
  .filter(p => !p.endsWith('.ts') && !p.startsWith('.'))
The second part is relatively simple, continue to see the third part.
3.3 Part Three
// vue-next/scripts/release.js

// 跳过的包
const skippedPackages = []

// 版本递增
const versionIncrements = [
  'patch',
  'minor',
  'major',
  ...(preId ? ['prepatch', 'preminor', 'premajor', 'prerelease'] : [])
]

const inc = i => semver.inc(currentVersion, i, preId)
This piece may not be well understood. inc is to generate a version. For more information, please see semver document
semver.inc('3.2.4', 'prerelease', 'beta')
// 3.2.5-beta.0
3.4 Part Four
The fourth part declares some execution script functions, etc.
// vue-next/scripts/release.js

// 获取 bin 命令
const bin = name => path.resolve(__dirname, '../node_modules/.bin/' + name)
const run = (bin, args, opts = {}) =>
  execa(bin, args, { stdio: 'inherit', ...opts })
const dryRun = (bin, args, opts = {}) =>
  console.log(chalk.blue(`[dryrun] ${bin} ${args.join(' ')}`), opts)
const runIfNotDry = isDryRun ? dryRun : run

// 获取包的路径
const getPkgRoot = pkg => path.resolve(__dirname, '../packages/' + pkg)

// 控制台输出
const step = msg => console.log(chalk.cyan(msg))
3.4.1 bin function
Get node_modules/.bin/ directory, the entire file is used once.
bin('jest')./node_modules/.bin/jest command in the command terminal and the project root directory.
3.4.2 run、dryRun、runIfNotDry
const run = (bin, args, opts = {}) =>
  execa(bin, args, { stdio: 'inherit', ...opts })
const dryRun = (bin, args, opts = {}) =>
  console.log(chalk.blue(`[dryrun] ${bin} ${args.join(' ')}`), opts)
const runIfNotDry = isDryRun ? dryRun : run
run actually run the command in the terminal, such as yarn build --release
dryRun does not run, but console.log(); build --release'
runIfNotDry executes the command if it is not an empty run. The isDryRun parameter is entered through the console. yarn run release --dry This is true . runIfNotDry just prints and does not execute the command. The advantage of this design is that sometimes you don't want to submit it directly, you have to look at the result of executing the command first. I have to say, Yuda just knows how to play.
At the main function, you can also see a similar prompt. You can use git diff to look at the file modification first.
if (isDryRun) {
  console.log(`\nDry run finished - run git diff to see package changes.`)
}
After reading some dependency imports and function declarations at the beginning of the file, let's look at the main main entry function.
4 main main flow
Section 4 is mainly for the disassembly and analysis of the main
4.1 Process combing main function
const chalk = require('chalk')
const step = msg => console.log(chalk.cyan(msg))
// 前面一堆依赖引入和函数定义等
async function main(){
  // 版本校验

  // run tests before release
  step('\nRunning tests...')
  // update all package versions and inter-dependencies
  step('\nUpdating cross dependencies...')
  // build all packages with types
  step('\nBuilding all packages...')

  // generate changelog
  step('\nCommitting changes...')

  // publish packages
  step('\nPublishing packages...')

  // push to GitHub
  step('\nPushing to GitHub...')
}

main().catch(err => {
  console.error(err)
})
The above main function omits many specific function implementations. Next we disassemble the main function.
4.2 Confirm the version to be released
Although the first code is relatively long, it is easy to understand.
The main thing is to confirm the version to be released.
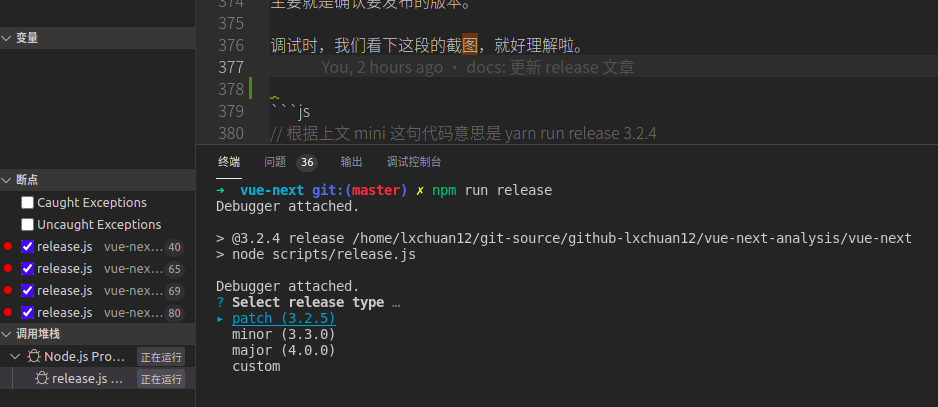
When debugging, let's take a look at the two screenshots of this paragraph, and it will be easy to understand.
// 根据上文 mini 这句代码意思是 yarn run release 3.2.4
// 取到参数 3.2.4
let targetVersion = args._[0]

if (!targetVersion) {
  // no explicit version, offer suggestions
  const { release } = await prompt({
    type: 'select',
    name: 'release',
    message: 'Select release type',
    choices: versionIncrements.map(i => `${i} (${inc(i)})`).concat(['custom'])
  })

// 选自定义
  if (release === 'custom') {
    targetVersion = (
      await prompt({
        type: 'input',
        name: 'version',
        message: 'Input custom version',
        initial: currentVersion
      })
    ).version
  } else {
    // 取到括号里的版本号
    targetVersion = release.match(/\((.*)\)/)[1]
  }
}

// 校验 版本是否符合 规范
if (!semver.valid(targetVersion)) {
  throw new Error(`invalid target version: ${targetVersion}`)
}

// 确认要 release
const { yes } = await prompt({
  type: 'confirm',
  name: 'yes',
  message: `Releasing v${targetVersion}. Confirm?`
})

// false 直接返回
if (!yes) {
  return
}
4.3 Executing test cases
// run tests before release
step('\nRunning tests...')
if (!skipTests && !isDryRun) {
  await run(bin('jest'), ['--clearCache'])
  await run('yarn', ['test', '--bail'])
} else {
  console.log(`(skipped)`)
}
4.4 Update the version numbers of all packages and internal vue related dependency version numbers
This section is updated in the root directory package.json version number and all packages version number.
// update all package versions and inter-dependencies
step('\nUpdating cross dependencies...')
updateVersions(targetVersion)
function updateVersions(version) {
// 1. update root package.json
updatePackage(path.resolve(__dirname, '..'), version)
// 2. update all packages
packages.forEach(p => updatePackage(getPkgRoot(p), version))
}4.4.1 updatePackage Update package version number
function updatePackage(pkgRoot, version) {
  const pkgPath = path.resolve(pkgRoot, 'package.json')
  const pkg = JSON.parse(fs.readFileSync(pkgPath, 'utf-8'))
  pkg.version = version
  updateDeps(pkg, 'dependencies', version)
  updateDeps(pkg, 'peerDependencies', version)
  fs.writeFileSync(pkgPath, JSON.stringify(pkg, null, 2) + '\n')
}
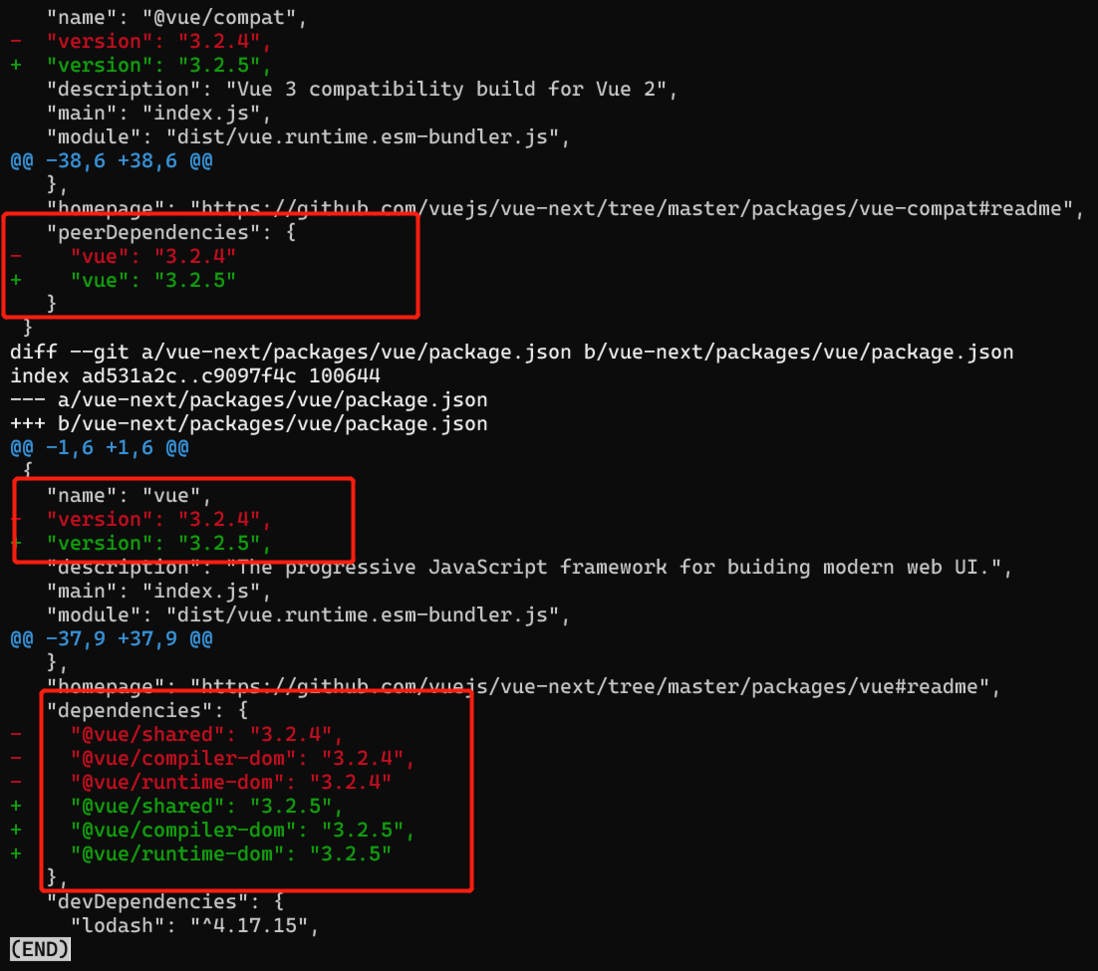
There are mainly three modifications.
1. 自己本身 package.json 的版本号
2. packages.json 中 dependencies 中 vue 相关的依赖修改
3. packages.json 中 peerDependencies 中 vue 相关的依赖修改
A picture is worth a thousand words. We perform yarn release --dry after git diff view git modifications, some screenshots below.
4.4.2 updateDeps updates the version number of internal vue-related dependencies
function updateDeps(pkg, depType, version) {
  const deps = pkg[depType]
  if (!deps) return
  Object.keys(deps).forEach(dep => {
    if (
      dep === 'vue' ||
      (dep.startsWith('@vue') && packages.includes(dep.replace(/^@vue\//, '')))
    ) {
      console.log(
        chalk.yellow(`${pkg.name} -> ${depType} -> ${dep}@${version}`)
      )
      deps[dep] = version
    }
  })
}
A picture is worth a thousand words. yarn release --dry in the terminal. You will see this is the output.
That is the output of this code.
console.log(
  chalk.yellow(`${pkg.name} -> ${depType} -> ${dep}@${version}`)
)
4.5 Package and compile all packages
// build all packages with types
step('\nBuilding all packages...')
if (!skipBuild && !isDryRun) {
  await run('yarn', ['build', '--release'])
  // test generated dts files
  step('\nVerifying type declarations...')
  await run('yarn', ['test-dts-only'])
} else {
  console.log(`(skipped)`)
}
4.6 Generate changelog
// generate changelog
await run(`yarn`, ['changelog'])
yarn changelog corresponding script is conventional-changelog -p angular -i CHANGELOG.md -s .
4.7 Submit code
After updating the version number, there are file changes, so git diff .
Are there any file changes, and if so, submit it.
git add -Agit commit -m 'release: v${targetVersion}'
const { stdout } = await run('git', ['diff'], { stdio: 'pipe' })
if (stdout) {
  step('\nCommitting changes...')
  await runIfNotDry('git', ['add', '-A'])
  await runIfNotDry('git', ['commit', '-m', `release: v${targetVersion}`])
} else {
  console.log('No changes to commit.')
}
4.8 Release package
// publish packages
step('\nPublishing packages...')
for (const pkg of packages) {
  await publishPackage(pkg, targetVersion, runIfNotDry)
}
This section of function is relatively long, so you don't need to look at it yarn publish . Simply put, it is the 0613e2474b8f36 release package.
After we yarn release --dry , the output of this function in the terminal is as follows:
It is worth mentioning that if it is vue default is tag is next . Delete when Vue 3.x is the default.
} else if (pkgName === 'vue') {
  // TODO remove when 3.x becomes default
  releaseTag = 'next'
}
That is why we now install the vue3 or npm i vue@next command.
async function publishPackage(pkgName, version, runIfNotDry) {
  // 如果在 跳过包里 则跳过
  if (skippedPackages.includes(pkgName)) {
    return
  }
  const pkgRoot = getPkgRoot(pkgName)
  const pkgPath = path.resolve(pkgRoot, 'package.json')
  const pkg = JSON.parse(fs.readFileSync(pkgPath, 'utf-8'))
  if (pkg.private) {
    return
  }

  // For now, all 3.x packages except "vue" can be published as
  // `latest`, whereas "vue" will be published under the "next" tag.
  let releaseTag = null
  if (args.tag) {
    releaseTag = args.tag
  } else if (version.includes('alpha')) {
    releaseTag = 'alpha'
  } else if (version.includes('beta')) {
    releaseTag = 'beta'
  } else if (version.includes('rc')) {
    releaseTag = 'rc'
  } else if (pkgName === 'vue') {
    // TODO remove when 3.x becomes default
    releaseTag = 'next'
  }

  // TODO use inferred release channel after official 3.0 release
  // const releaseTag = semver.prerelease(version)[0] || null

  step(`Publishing ${pkgName}...`)
  try {
    await runIfNotDry(
      'yarn',
      [
        'publish',
        '--new-version',
        version,
        ...(releaseTag ? ['--tag', releaseTag] : []),
        '--access',
        'public'
      ],
      {
        cwd: pkgRoot,
        stdio: 'pipe'
      }
    )
    console.log(chalk.green(`Successfully published ${pkgName}@${version}`))
  } catch (e) {
    if (e.stderr.match(/previously published/)) {
      console.log(chalk.red(`Skipping already published: ${pkgName}`))
    } else {
      throw e
    }
  }
}
4.9 Push to github
// push to GitHub
step('\nPushing to GitHub...')
// 打 tag
await runIfNotDry('git', ['tag', `v${targetVersion}`])
// 推送 tag
await runIfNotDry('git', ['push', 'origin', `refs/tags/v${targetVersion}`])
// git push 所有改动到 远程  - github
await runIfNotDry('git', ['push'])
// yarn run release --dry
// 如果传了这个参数则输出 可以用 git diff 看看更改
// const isDryRun = args.dry
if (isDryRun) {
console.log(`\nDry run finished - run git diff to see package changes.`)
}
// 如果 跳过的包,则输出以下这些包没有发布。不过代码 `skippedPackages` 里是没有包。
// 所以这段代码也不会执行。
// 我们习惯写 arr.length !== 0 其实 0 就是 false 。可以不写。
if (skippedPackages.length) {
console.log(
chalk.yellow(
`The following packages are skipped and NOT published:\n- ${skippedPackages.join(
'\n- '
)}`
)
)
}
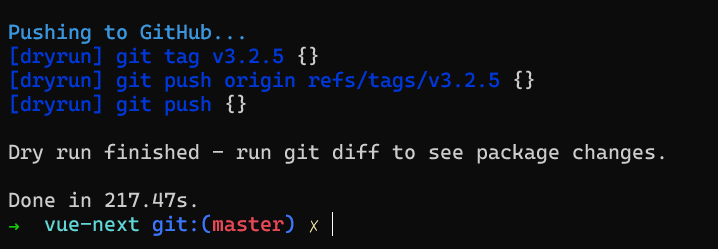
console.log()After we yarn release --dry , the output of this function in the terminal is as follows:
At this point we have disassembled and analyzed the main function.
The whole process is very clear.
1. 确认要发布的版本
2. 执行测试用例
3. 更新所有包的版本号和内部 vue 相关依赖版本号
    3.1 updatePackage 更新包的版本号
    3.2 updateDeps 更新内部 vue 相关依赖的版本号
4. 打包编译所有包
5. 生成 changelog
6. 提交代码
7. 发布包
8. 推送到 github
To summarize with a picture:
After reading vue-next/scripts/release.js , if you are interested, you can also look at vue-next/scripts folder. The relative number of lines is small, but the benefits are relatively large.
5. Summary
Through the study of this article, we have learned these.
1. 熟悉 vuejs 发布流程
2. 学会调试 nodejs 代码
3. 动手优化公司项目发布流程
At the same time, it is recommended to use VSCode to debug more by yourself, execute it several times in the terminal, and understand and digest it more.
We can directly copy and paste many codes in the files released by vuejs For example, writing small programs is relatively likely to be released frequently. This set of codes can be used with miniprogram-ci , plus some customization, to be optimized.
Of course, you can also use the open source release-it .
At the same time, we can:
Introduce git flow and manage the git branch. It is estimated that many people do not know that windows git bash already supports the git flow command by default.
Introduce husky and lint-staged submitting commit , use ESLint check whether the submission can pass the test.
Introduce unit test jest , test key tool functions, etc.
Introduce conventional-changelog
Introduce git-cz interactive git commit .
And so on to standardize the process of their own projects. If a candidate, by looking at vuejs , actively optimize his project. I think the interviewer will think that this candidate is a plus.
The advantage of looking at the source code of an open source project is: on the one hand, you can expand your horizons, on the other hand, you can use it for your own use, and the benefits are relatively high.



**粗体** _斜体_ [链接](http://example.com) `代码` - 列表 > 引用。你还可以使用@来通知其他用户。