TNTWeb-the full name of Tencent News Central Taiwan Front-end Team, the small partners in the group have practiced and accumulated in the front-end web, NodeJS development, UI design, mobile APP and other big front-end fields.
At present, the team mainly supports the front-end development of Tencent News's various businesses. In addition to business development, it has also accumulated some front-end infrastructure to empower business efficiency and product innovation.
The team advocates open source and co-construction, and has a variety of technical experts. The team’s Github address: https://github.com/tnfe
The author of this article Cold Leaf Project address: https://github.com/tnfe/clean-state
I. Introduction
React has gone through nearly a hundred iterations from the beginning of its design to the latest v17 version. Around the design philosophy of one-way data flow, Redux state management based on Flux ideas and Mobx based on responsive monitoring emerged. One emphasizes the unity of concepts and the other emphasizes the ultimate in performance experience. But through materialist dialectics, we know that opposition and unity are the final form of the development of all things. So since React@v16.8.0, the Hooks function has been introduced, which complements the shortcomings of logical abstraction without changing its mental model. With this ability, we can open up a new vision of state management.
2. Background
In the current software development model with MVVM as the core, we know that the essence of view is the expression of data, and any sudden change in data will bring feedback on the view. When faced with a large-scale project development, in order to improve the efficiency of subsequent maintenance iterations, the first thing we have to do is to disassemble the modules to make each part as fragmented and reusable as possible. This is also the primary concept of micro-components.
In the entire process of dismantling, what we fragmented is actually the UI layer. For example, a pop-up window has a uniform design standard for a specific business, and only the copywriting is changed; or a large list, each time the metadata is updated, the outline of the card remains uniform. So how to deal with the data, imagine if you follow the components, then when a project gets bigger and bigger, the data and logic scattered in various places will drastically increase the entropy of the software, causing subsequent iterations of requirements, troubleshooting, debugging and maintenance The difficulty increases exponentially. Therefore, a certain degree of centralization of data has become the correct development concept for the front-end.
Three, the plan
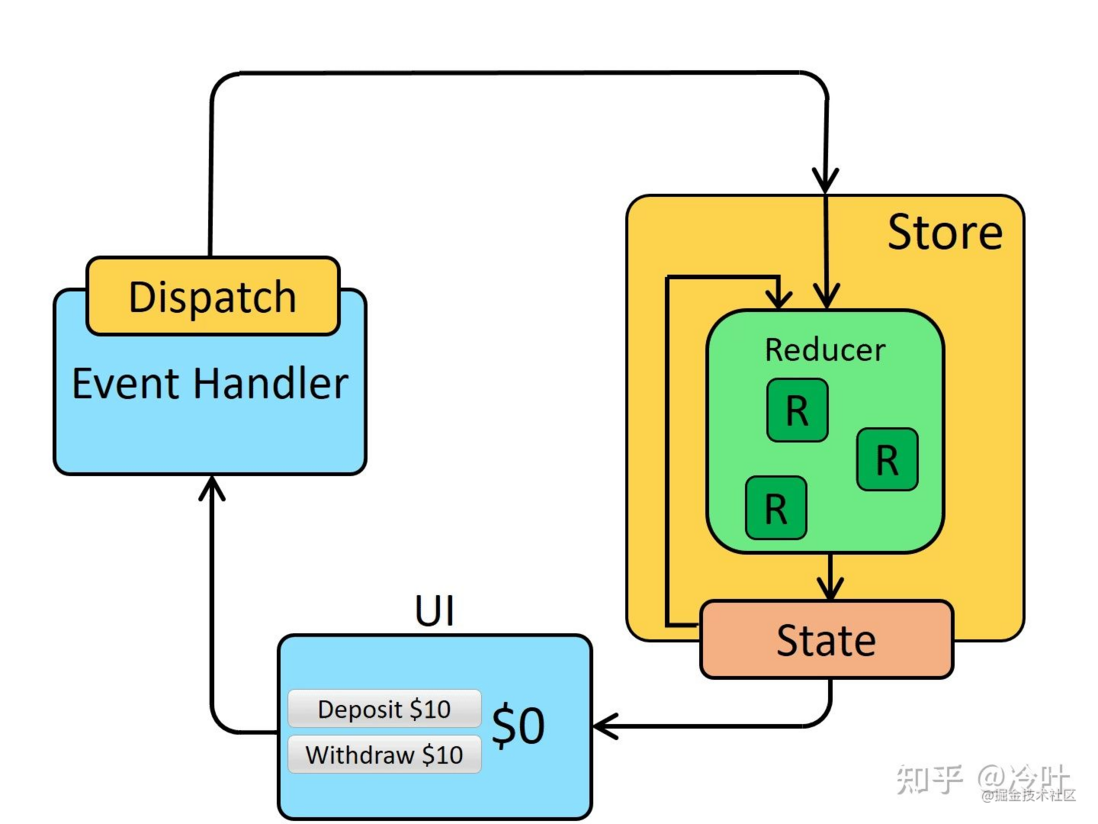
In React, we call the data corresponding to the view state, and the solution related to state management has also experienced an era of slash and burn. The most famous is Redux, although it has been criticized in terms of performance, but it is used to the greatest extent with correct thinking. It centralizes the data into State and stores it in the store, and releases an action through dispatch to trigger the reducer to update.
The design concept is very good, but when it is actually used in the project, we will find several problems:
- How is the structure level organized? Here we have to introduce a lot of third-party development libraries, such as react-redux, redux-thunk, redux-saga, etc., which undoubtedly increases the cost of learning a lot, and at the same time introduces an oversized package on the mobile terminal with a small amount of money. .
- How to avoid invalid rendering in terms of performance? After we bridge through react-redux, students who have followed the source code will find that the essence of redux update in react is variable promotion, and the top-level setState will be triggered after each dispatch by raising the state. According to React's update mechanism, this will trigger the execution of the Render function of all child nodes.
// Provider 注入
import React from 'react'
import ReactDOM from 'react-dom'

import { Provider } from 'react-redux'
import store from './store'
import App from './App'

const rootElement = document.getElementById('root')
ReactDOM.render(
  <Provider store={store}>
    <App />
  </Provider>,
  rootElement
)

// connect 使用
import { connect } from 'react-redux'
import { increment, decrement, reset } from './actionCreators'

// const Counter = ...
const mapStateToProps = (state /*, ownProps*/) => {
  return {
    counter: state.counter,
  }
}

const mapDispatchToProps = { increment, decrement, reset }
export default connect(mapStateToProps, mapDispatchToProps)(Counter)
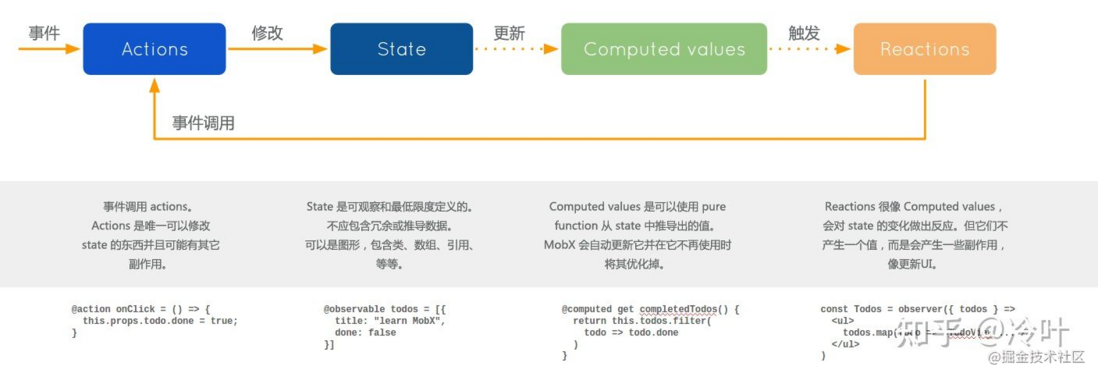
The second solution is Mobx. Although it can accurately update the target components, it follows another genre. Of course, it also has a large crowd but many people do not like it. His core idea is: Anything that originates from the application state should be obtained automatically. This sentence means that whether the component is updated or not is not up to the father, but should be notified by the bound data. This responsive monitoring method is ultimately contrary to React's single data flow concept.
// 声明可观察状态
import { decorate, observable } from "mobx";

class TodoList {
    @observable todos = [];
    @computed get unfinishedTodoCount() {
        return this.todos.filter(todo => !todo.finished).length;
    }
}

// 声明观察组件
import React, {Component} from 'react';
import ReactDOM from 'react-dom';
import {observer} from 'mobx-react';

@observer
class TodoListView extends Component {
    render() {
        return <div>
            <ul>
                {this.props.todoList.todos.map(todo =>
                    <TodoView todo={todo} key={todo.id} />
                )}
            </ul>
            Tasks left: {this.props.todoList.unfinishedTodoCount}
        </div>
    }
}

const TodoView = observer(({todo}) =>
    <li>
        <input
            type="checkbox"
            checked={todo.finished}
            onClick={() => todo.finished = !todo.finished}
        />{todo.title}
    </li>
)

const store = new TodoList();
ReactDOM.render(<TodoListView todoList={store} />, document.getElementById('mount'));
4. Lightweight and flexible solution: Clean-State
Maybe you can have a different choice. First of all, let's take a look at the design motivation of Hooks:
- Solve the problem of difficulty in reusing logic states between components.
- Too many life cycles make components difficult to understand.
- Eliminate differences between class components and function components and simplify module definitions.
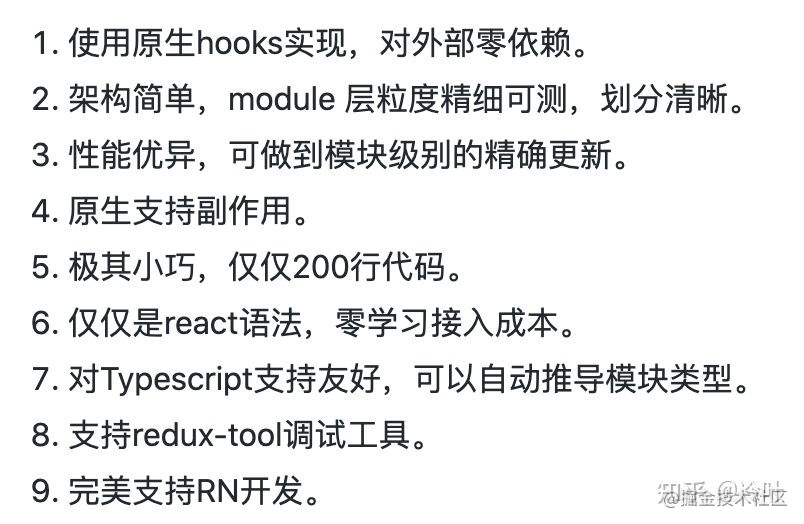
From these points, we can find that hooks are essentially to simplify the mental curve of React learning and use, and go one step further in terms of logical abstraction. And Clean-State was born on the shoulders of this idea. It bids farewell to the concept of ReactContext and proposes a new way of state management in an extremely streamlined way. Through CS, we don’t have more learning burdens, and we don’t need an artificial organizational structure. It provides a unified solution. In terms of performance, we no longer do variable enhancements and abandon the Provider injection method, so we can do it. The precise update of the module level, the following figure lists some of its characteristics.
In CS, we respect the principle of minimalism to the greatest extent, allowing development to construct the product building in the simplest way.
1. How to divide the modules
In terms of module division, it is recommended to distinguish by routing entry or data model, which is in line with the natural way of thinking.
Each state management module is called a module, which is managed in a single directory, and finally exported by the index file.
|--modules
|   |-- user.js
|   |-- project.js
|   |-- index.js
2. How to define the module
In terms of definition, we did not make more concepts, and followed the most reasonable way in daily development.
state as the module state; effect handles side effects; reducer returns the updated state.
// modules/user.js
const state = {
  name: 'test'
}

const user = {
  state,
  reducers: {
    setName({payload, state}) {
      return {...state, ...payload}
    }
  },
  effects: {
    async fetchNameAndSet({dispatch}) {
      const name = await Promise.resolve('fetch_name')
      dispatch.user.setName({name})
    }
  }
}

export default user;
3. How to register the module
You only need to call bootstrap in the module entry file, it will automatically connect multiple modules in series, and return the useModule and dispatch methods.
// modules/index.js
import user from './user'
import bootstrap from 'clean-state'

const modules = { user }
export const {useModule, dispatch}  = bootstrap(modules);
4. How to use the module
We use the module state or trigger the execution method through the useModule and dispatch exported from the modules entry file.
// page.js
import {useCallback} from 'react'
import { useModule, dispatch } from './modules'

function App() {
  /**
   * 这里你也能够传入数组同时返回多个模块状态
   * const {user, project} = useModule(['user', 'project'])
   */
  const { user } = useModule('user')
  const onChange = useCallback((e)=> {
    const { target } = e
    dispatch.user.setName({name: target.value})
  }, [])

  const onClick = useCallback(()=> {
    dispatch.user.fetchNameAndSet()
  }, [])

  return (
    <div className="App">
      <div>
        <div>
          name: {user.name}
        </div>
        <div>
          修改用户名: <input onChange={onChange}></input>
        </div>
        <button onClick={onClick}>获取用户名</button>
      </div>
    </div>
  );
}

export default App;
5. How to access across modules
For each reducer and effect, we have injected the rootState parameter to access other module properties; the effect has also injected a dispatch method that can be called across modules.
 async fetchNameAndSet({dispatch, rootState, state, payload}) {
      const name = await Promise.resolve('fetch_name')
      dispatch.user.setName({name})
 }
6. Mixing mechanism
In many cases, there will be a common state, reducer, or effect between multiple modules. Here we expose the mixing method to prevent users from making repeated declarations in each module.
// common.js
const common = {
  reducers: {
    setValue<State>({payload, state}: {payload: Record<string, any>, state: State}): State {
      return {...state, ...payload}
    }
  }
}
export default common;

// modules/index.js
import commont from './common'
import user from './user'
import { mixin } from 'clean-state';

// Mix Common's setValue method into the User module
const modules = mixin(common, { user })

// You can now call the dispatch.user.setValue method on other pages
export const {useModule, dispatch}  = bootstrap(modules);
7. How to debug
How to debug in the development process, CS provides a plug-in mechanism to friendly support redux-devtool debugging.
/**
 * 安装: npm install cs-redux-devtool
 */

// modules/index.js
import user from './user'
import bootstrap from 'clean-state'
import devTool from 'cs-redux-devtool'

bootstrapfrom.addPlugin(devTool)

...
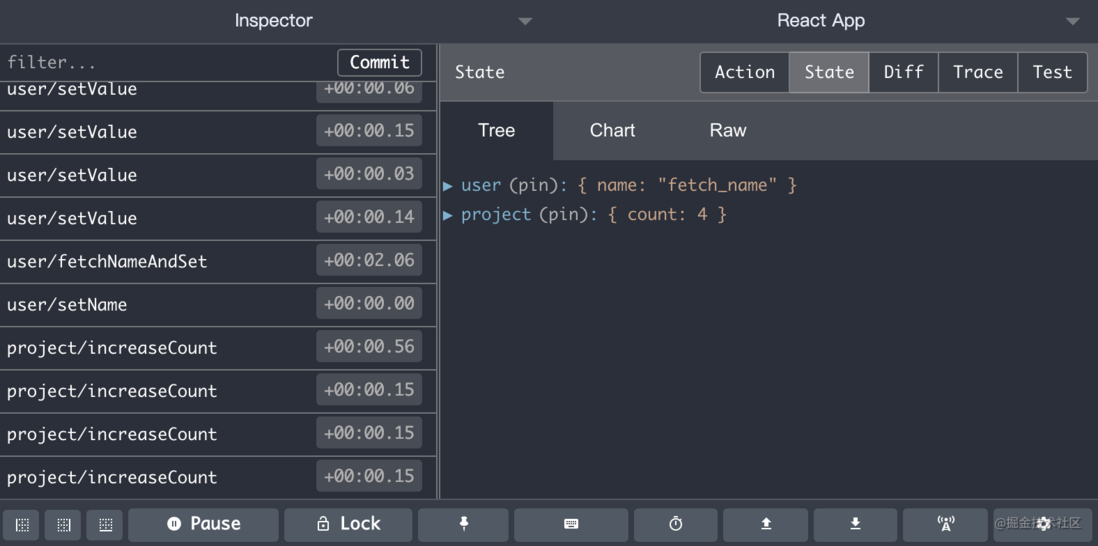
After the above brief configuration, we can track state changes through Redux DevTool!
Five, technical realization
Not much to say, first of all, let's take a look at the overall architecture of CS:
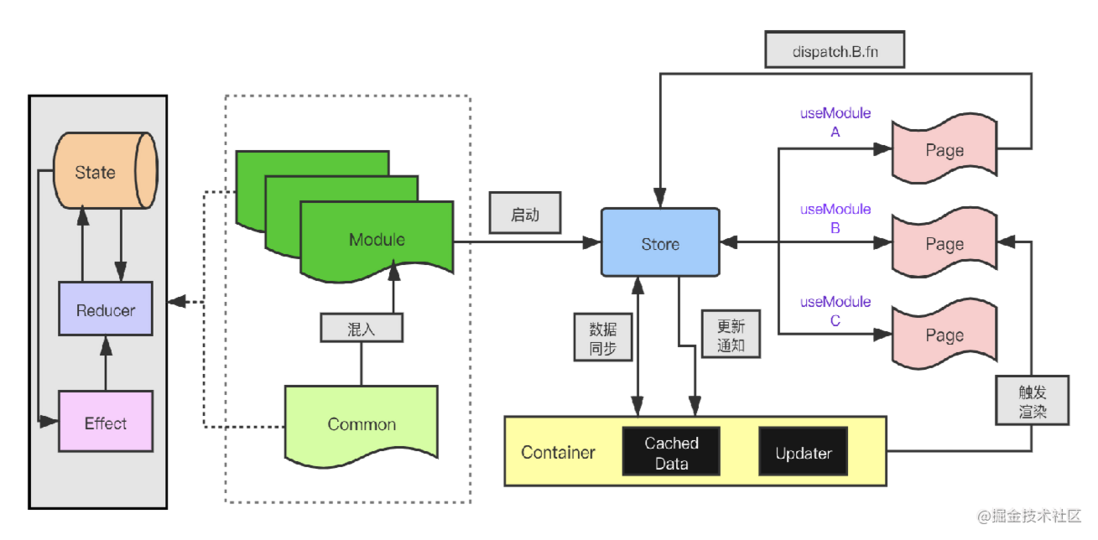
The Module layer is divided into three parts: State, Reducer, and Effect. We provide a mixing mechanism for the public part. After the project is started, the Store will be generated, and the Container and Store will be initialized for data synchronization.
When we call useModule in page, component or hooks, we associate the corresponding module state with the object method, and the update function is added to the Container. Then when the A page triggers the B module method, we can accurately execute only the dependent render function of B.
Below we give the code execution of redux and cs without any optimization logic, we can see that we have reduced all the useless component rendering.
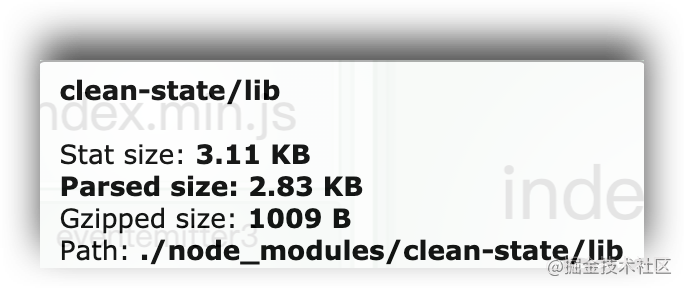
The picture below is the package dependency diagram of my actual landing project. It can be seen that after Gzip compression, the overall size of CS is less than 1KB. I hope to help the user experience and performance of C-side project development.
So how is all this achieved? Next, I will explain in detail step by step.
1、entry
// index.js
import bootstrap from './bootstrap';

export { default as mixin } from './mixin';
export default bootstrap;
First, let’s look at the entry file code. We only exported two APIs. The first is mixin to handle the module mixing of public properties, and the second is bootstrap to start the state manager. Let’s take a look at the main process of startup. accomplish.
2、bootstrap
// bootstrap.js
const bootstrap: Bootstrap = <Modules>(modules: Modules) => {
  const container = new Container(modules);
  const pluginEmitter = new EventEmitter();
  ...
  return { useModule: useModule as any, dispatch };
};
The bootstrap input parameter is a collection of modules, and then we will initialize a container container to cache the data state and store the updater. pluginEmitter is part of the cs plug-in mechanism and will track the execution of all functions. Finally, we exported two methods, one is useModule to read the module status, and the other is dispatch to distribute events.
In essence, these two methods can be exported uniformly in the index. The reason for doing this is that we provide support for multiple data centers. Next, we will look at the specific implementation in detail around these two apis.
3、useModule
// bootstrap.js
const bootstrap: Bootstrap = <Modules>(modules: Modules) => {
  const container = new Container(modules);
  const pluginEmitter = new EventEmitter();
  ...
  return { useModule: useModule as any, dispatch };
};
The first is the realization of useModule. We see that the input parameter namespace is a parameter of string type or string array type, and then we declare an empty state and provide a setState agent to assign a new object. This step also triggers the update of the associated component.
Finally, we bind the method and state to the container object to implement the update in the observer mode. The finally returned data actually comes from the cache object of the container. This piece of logic is very simple and clear, then let's look at the implementation of dispatch.
4、dispatch
// bootstrap
const bootstrap: Bootstrap = <Modules>(modules: Modules) => {
  ...
  // The only module method call that is exposed to the outside world
  const dispatch: any = (
    nameAndMethod: string,
    payload: Record<string, any>,
  ) => {
    const [namespace, methodName] = nameAndMethod.split('/');
    const combineModule = container.getModule(namespace);

    const { state, reducers, effects } = combineModule[namespace];
    const rootState = container.getRootState();

    // The side effects take precedence over the reducer execution
    if (effects[methodName]) {
      return effects[methodName]({ state, payload, rootState, dispatch });
    } else if (reducers[methodName]) {
      const newState = reducers[methodName]({
        state,
        rootState,
        payload,
      });
      container.setState(namespace, newState);
    }
  };
  return { useModule: useModule as any, dispatch };
};
The dispatch method accepts two parameters. The first is the module and method name string to be called. The specific format is similar to moduleName/function, and the second is the load object. We will call and execute the corresponding module and method in the container according to nameAndMethod.
In the execution process, the effect takes precedence over the reducer, and the parameters required by each are passed in. In the actual project development, taking into account the development efficiency and usage habits, we have carried out a layer of encapsulation on dispatch, supporting the form of dispatch.module.fun.
5. Dispatch chain call
// bootstrap
const bootstrap: Bootstrap = <Modules>(modules: Modules) => {

  const injectFns = (reducersOrEffects) => {
    Object.keys(reducersOrEffects).forEach((key) => {
      if (!dispatch[key]) dispatch[key] = {};
      const originFns = reducersOrEffects[key];
      const fns = {};
      Object.keys(originFns).forEach((fnKey) => {
        fns[fnKey] = (payload: Record<string, any>) =>
          dispatch(`${key}/${fnKey}`, payload);
      });
      Object.assign(dispatch[key], fns);
    });
  };

  // Inject each module's reducer and effect method into the Dispatch
  const rootReducers = container.getRootReducers();
  const rootEffects = container.getRootEffects();

  injectFns(rootReducers);
  injectFns(rootEffects);
  ...
};
At the end of the method, we take out the rootReducers and rootEffects collections from the container, re-encapsulate them in accordance with the module through the injectFns method, and proxy the wrapped method to dispatch itself to realize the cascading call. The packaged method only has payload payload, which greatly improves the user's development efficiency, and provides complete code hints in TS syntax.
6. Combine redux-devtool
The core point of using Redux debugging tools on the PC side is to establish a virtual Redux-Store to synchronize data with our state management library. Here I developed a library such as cs-redux-devtool separately, let's look at the implementation principle.
First, instantiate a redux store in the install method, which automatically generates the corresponding reducer based on the modules we passed in. Then call the window.__REDUX_DEVTOOLS_EXTENSION__ method to open the Chrome plug-in. This method is automatically injected into the current page context after Redux-Devtools is installed in our browser. Finally, we use the incoming PluginEmitter to monitor status update events and synchronize them to the virtual redux-store.
import { createStore, combineReducers } from 'redux'

var reduxStore = null;
var actionLen = 0

function createReducer(moduleName, initState) {
  return function (state, action) {
    if (state === undefined) state = initState;

    const {newState, type = ''} = action
    const [disPatchModule] = type.split('/')
    if (moduleName === disPatchModule && newState) {
      return newState
    } else {
      return state;
    }
  };
}

function createReducers(modules) {
  var moduleKeys = Object.keys(modules);
  var reducers = {};
  moduleKeys.forEach(function (key) {
    const {state} = modules[key]
    reducers[key] = createReducer(key, state);
  });
  return reducers;
}

function injectReduxDevTool(reducers) {
  reduxStore = createStore(
    combineReducers(reducers),
    window.__REDUX_DEVTOOLS_EXTENSION__ && window.__REDUX_DEVTOOLS_EXTENSION__()
  );
}

function dispatchAction(actionForRedux) {
  if (reduxStore) {
    actionLen++;
    reduxStore.dispatch(actionForRedux);
  }
}

function install(modules, pluginEmitter) {
  const reducers = createReducers(modules)

  injectReduxDevTool(reducers)
  pluginEmitter.on('CS_DISPATCH_TYPE', (action)=> {
    dispatchAction(action)
  })
}

export default install
Then, in Clean-State, we will add the registered plug-in to the plugins array. When the effect or reducer of the corresponding module is triggered, we will transmit the processed result to the public publisher to achieve monitoring synchronization.
const bootstrap: Bootstrap = <Modules>(modules: Modules) => {
  const container = new Container(modules);
  const pluginEmitter = new EventEmitter();

  // The only module method call that is exposed to the outside world
  const dispatch: any = (
    nameAndMethod: string,
    payload: Record<string, any>,
  ) => {
    ...

    // The side effects take precedence over the reducer execution
    if (effects[methodName]) {
      pluginEmitter.emit(DISPATCH_TYPE, {
        type: nameAndMethod,
        payload,
      });
      return effects[methodName]({ state, payload, rootState, dispatch });
    } else if (reducers[methodName]) {
      const newState = reducers[methodName]({
        state,
        rootState,
        payload,
      });
      container.setState(namespace, newState);

      // Sync state to plugin
      pluginEmitter.emit(DISPATCH_TYPE, {
        type: nameAndMethod,
        payload,
        newState,
      });
    }
  };

  ...

  plugins.forEach((plugin) => plugin(modules, pluginEmitter));

  ...
};
Six, finally
Clean-State embraces React's correct design patterns and ideas, and completes architecture-level design and view-level optimization through streamlined code. If you are a new React project, it is strongly recommended to use hooks to write and build your application in a purely functional way. You will experience a faster React development posture. Whether it is a complex logic project on the toB side or the pursuit of high performance on the toC side, you can learn about using CS.


**粗体** _斜体_ [链接](http://example.com) `代码` - 列表 > 引用。你还可以使用@来通知其他用户。