Abstract: introduces the image defogging algorithm in detail. After image enhancement, the image can also be applied to target detection, image classification or IoT detection and other fields, and the effect is better.
This article is shared from the HUAWEI cloud community " image preprocessing detailed image ", author: eastmount.
1. Image dehazing
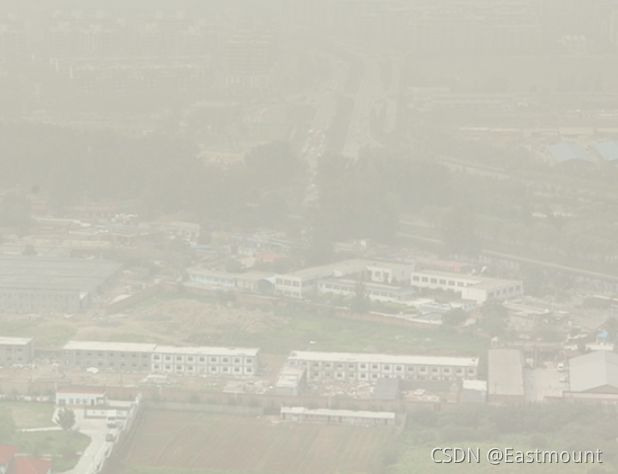
With the development of society, environmental pollution has gradually intensified, and more and more cities have frequent smog. This not only brings harm to people’s health, but also causes adverse effects on computer vision systems that rely on image information. The contrast and saturation of the images collected in foggy days are low, and the colors are prone to shift and distortion. Therefore, finding a simple and effective method for image defogging is crucial for the follow-up research of computer vision.
This part mainly extracts from the following papers to popularize the image defogging algorithm, and cite and refer to Chinese papers:
• Wei Hongwei, et al. Research review of image defogging algorithms[J]. Software Guide, 2021.
• Wang Daolei, et al. Overview and analysis of image defogging algorithms[J]. Journal of Graphics, 2021.
• OpenCV image enhancement 4D detailed explanation (histogram equalization, partial histogram equalization, automatic color equalization)-Eastmount
Image enhancement (Image Enhancement) refers to highlighting useful information in an image and removing or weakening useless information according to a specific requirement. The purpose of image enhancement is to make the processed image more suitable for the visual characteristics of the human eye or easy for machine recognition. In the fields of medical imaging, remote sensing imaging, and portrait photography, image enhancement technology has a wide range of applications. Image enhancement can also be used as a preprocessing algorithm for image processing algorithms such as target recognition, target tracking, feature point matching, image fusion, and super-resolution reconstruction.
In recent years, a large number of single-image defogging algorithms have appeared, and the widely used ones are:
• Histogram equalization and dehazing algorithm
• Retinex dehazing algorithm
• Dark channel prior defogging algorithm
• DehazeNet dehazing algorithm based on convolutional neural network
It can be mainly divided into three categories: defogging algorithms based on image enhancement, defogging algorithms based on image restoration, and CNN-based defogging algorithms.
(1) Dehazing algorithm based on image enhancement
The image enhancement technology highlights the details of the image, improves the contrast, and makes it look clearer. This type of algorithm has a wide range of applicability. The specific algorithms are:
• Retinex algorithm
According to the imaging principle, the influence of the reflection component is eliminated, and the effect of image enhancement and dehazing is achieved
• Histogram equalization algorithm
Make the pixel distribution of the image more uniform and enlarge the details of the image
• Partial differential equation algorithm
Treat the image as a partial differential equation and increase the contrast by calculating the gradient field
• Wavelet transform algorithm
Decompose the image and enlarge the useful part
In addition, many improved algorithms based on the principle of image enhancement have appeared on the basis of such algorithms.
(2) Dehazing algorithm based on image restoration
It is mainly based on the atmospheric scattering physics model. Through the observation and summary of a large number of foggy and non-fog images, some mapping relationships are obtained, and then the inverse calculation is performed according to the formation process of the foggy image to restore the clear image. The most classic one is proposed by Mr. He Yuming:
• Dark channel prior defogging algorithm
Through feature analysis of a large number of fog-free images, the prior relationship between fog-free images and certain parameters in the atmospheric scattering model is found. The algorithm has low complexity and good dehazing effect. Therefore, a large number of improved algorithms based on dark channel priors have appeared on the basis of this algorithm.
(3) Dehazing algorithm based on CNN
Use CNN to build an end-to-end model, and restore fog-free images from foggy images. At present, there are two main ideas for defogging algorithms using neural networks:
- Use CNN to generate certain parameters of the atmospheric scattering model, and then restore the fog-free image based on the atmospheric scattering model
- Use CNN (such as GAN) to directly generate a clear image without fog from the blurred image
CNN has been applied in many fields because of its powerful learning ability, so there are also algorithms that use CNN for defogging. In 2016, CAI et al. first proposed a dehazing network called DehazeNet to estimate the transmittance of foggy images. DehazeNet takes the foggy blurred image as input, outputs its transmittance, and restores a clear image without fog based on the atmospheric scattering model theory.
The following figure is to test the histogram equalization, dark channel prior defogging, DehazeNet and AOD-Net defogging algorithms, and the experimental results are shown in the figure. It can be seen from the figure that the contrast of the defogging image based on the image enhancement histogram equalization algorithm is significantly enhanced. Because the degradation is not considered, the noise is also amplified while the contrast is increased, resulting in loss of detail and color deviation. The dark channel defogging algorithm based on the physical model, the DehazeNet and AOD-Net algorithms based on the neural network have better defogging effects than the histogram equalization algorithm.
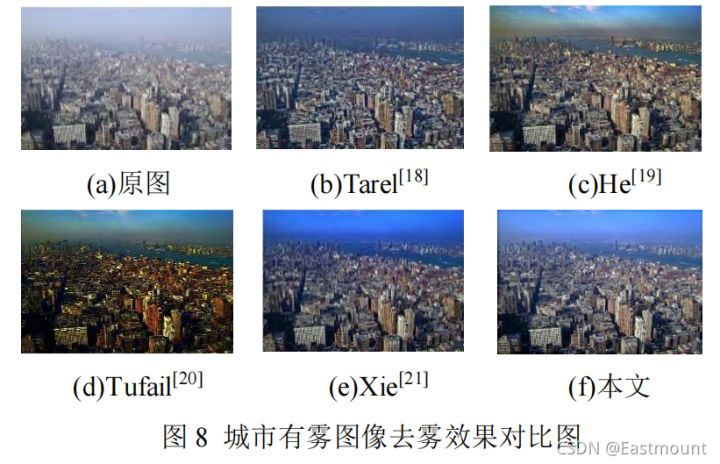
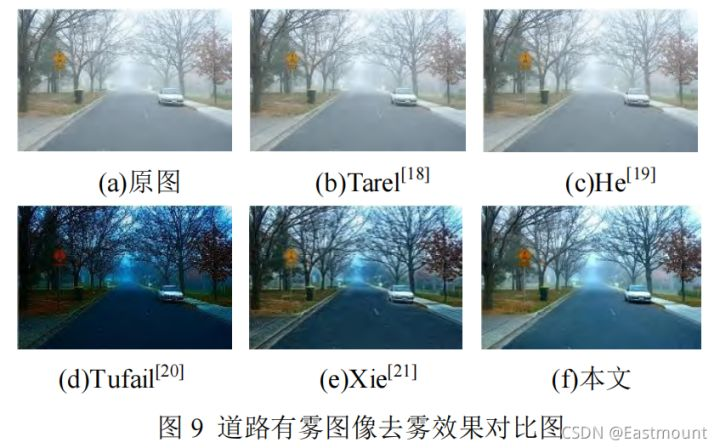
The comparison results of other defogging algorithms are shown in the figure below, such as the comparison of the defogging effect of images of cities and roads.
Finally, as summarized by Mr. Wang Daolei, the current algorithms for defogging foggy images are mainly based on three directions: image enhancement, image restoration and CNN.
• The method based on image enhancement does not consider the formation process of the foggy image, but directly highlights the details of the image and improves the contrast, so that the foggy image looks clearer.
• The method based on image restoration is to trace the physical process of image degradation and restore clear images through physical models.
• The CNN-based method uses the powerful learning ability of neural networks to find the mapping relationship between foggy images and certain coefficients in the image restoration physical model or uses GAN to restore clear images without fog based on foggy images.
The above three types of defogging algorithms have obvious defogging effects on foggy images. Although they have been widely used in real life, the following points may still be the focus and difficulty of future research in the field of image defogging :
• more realistic fog image data set
The algorithm that uses neural network for defogging is better than image enhancement and restoration methods, but because it is difficult to capture a set of foggy and non-fog images with the same background in nature, the current training neural network used The data sets are all obtained through synthesis. Although they can fit the natural environment to a certain extent, there are still some gaps. Therefore, there is an urgent need for a data set constructed from foggy and non-fog images with the same background acquired in a real environment to improve the robustness and stability of the neural network defogging algorithm.
• more convenient defogging algorithm
At present, various algorithms can effectively remove the haze on a single image, but relatively good algorithms have the problem of high time complexity, and it is difficult to apply to video defogging or complex tasks that require more.
• robust defogging algorithm
The above algorithms only have a good dehazing effect on the uniform mist that exists on the image, and the effect is poor for dense fog or unevenly distributed clusters of fog. Therefore, finding a defogging method with a wider application range will It is a very challenging subject.
2. ACE defogging algorithm
1. Algorithm principle
This part mainly introduces the narrative with reference to the author's books and related papers, and briefly introduces the principle knowledge of the ACE algorithm. If readers want to understand the principle in detail, it is recommended to read the original English text. See the references below for details.
Cite and refer to Chinese papers:
• Yin Shengnan, et al. Visual odometer image enhancement method based on fast ACE algorithm[J]. Journal of Electronic Measurement and Instrument, 2021.
• Li Jingwen, et al. Automatic color equalization algorithm based on dark channel a priori improvement[J]. Science Technology and Engineering, 2019.
• Yang Xiuzhang, et al. An improved barcode image enhancement and positioning algorithm in complex environments[J]. Modern Computer, 2020.
• OpenCV—python automatic color equalization (ACE)-SongpingWang
• OpenCV image enhancement 4D detailed explanation (histogram equalization, partial histogram equalization, automatic color equalization)-Eastmount
Original English:
• https://www.ipol.im/pub/art/2012/g-ace/?utm_source=doi
Automatic Color Enhancement (ACE) and its Fast Implementation
• https://www.sciencedirect.com/science/article/abs/pii/S0167865502003239
A new algorithm for unsupervised global and local color correction (original author Rizzi Dao)
The image contrast enhancement algorithm is useful in many occasions, especially in medical images, because in the diagnosis of many diseases, the visual inspection of medical images is necessary. The Retinex algorithm is a representative image enhancement algorithm. It is formed based on the ability of human retina and cerebral cortex to simulate the wavelength light reflection ability of the object color. It has a certain range of dynamic compression for one-dimensional barcodes in complex environments, and has a certain range of dynamic compression for image edges. Certainly adaptive enhancements.
Automatic Color Enhancement (ACE) The algorithm is proposed by Rizzi in the theory of the Retinex algorithm. It corrects the final pixel value by calculating the brightness and relationship between the target pixel of the image and the surrounding pixels. , Realize the contrast adjustment of the image, produce a balance of color constancy and brightness constancy similar to the human retina, and have a good image enhancement effect.
The ACE algorithm consists of two steps:
• The first is to adjust the color and spatial domain of the image, complete the chromatic aberration correction of the image, and obtain a spatially reconstructed image.
Imitate the lateral inhibition and regional adaptability of the visual system to adjust the color space. Lateral inhibition is a physiological concept, which refers to when a certain neuron is stimulated to produce excitement, then the similar neurons are then stimulated, and the excitement of the latter produces an inhibitory effect on the former.
• The second is to dynamically expand the corrected image.
The dynamic range of the image is adjusted globally, and the image meets the gray-scale world theory and white speckle assumption. The algorithm is for a single channel, and then extended to a 3-channel image in the RGB color space, that is, the 3 channels are processed separately and then integrated.
(1) Regional adaptive filtering
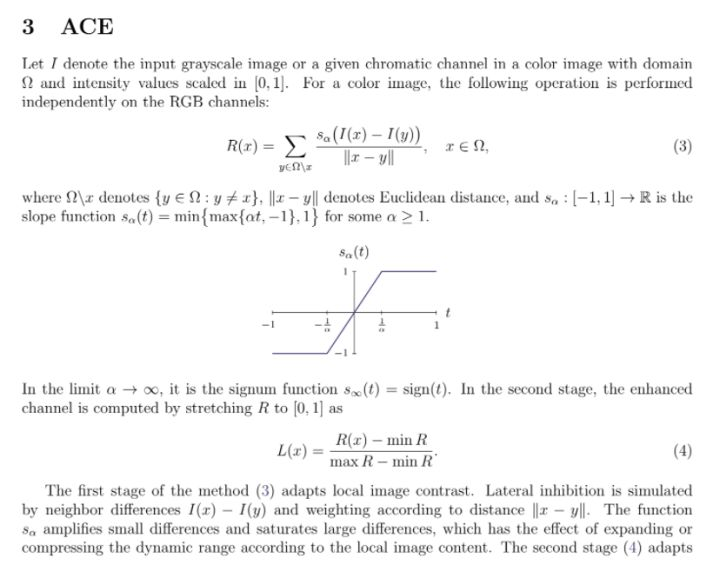
Input image I (grayscale image as an example). This step is to adaptively filter the area of all points p in the single-channel image I to obtain the intermediate result image after chromatic aberration correction and spatial reconstruction. The calculation formula is as follows:
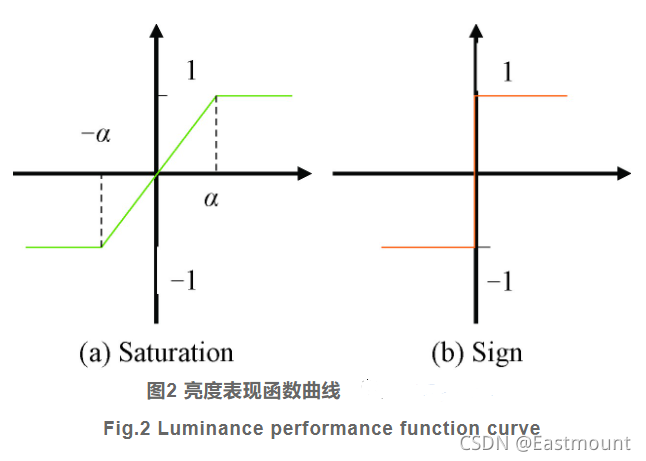
In the formula: Ic§-Ic(j) is the gray-scale difference between the two pixels p and j, which expresses the quasi-biological lateral inhibition; d(p,j) represents the distance measurement function, using the difference between the two points Euclidean distance, the influence weight of the control point j on p, maps out the regional adaptability of the filter; Sa(x) is the brightness performance function (odd function), and the algorithm in this paper selects the classic saturation function.
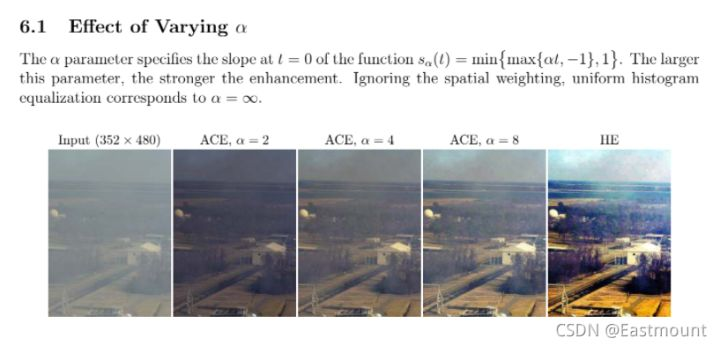
The choice of different brightness functions and parameters controls the degree of contrast enhancement. The classic Saturation function takes the larger the slope before saturation, and the resulting contrast enhancement is more obvious. As shown in Figure 2, the limit is in the form of the sign function, while the Sign function Due to the indiscriminate over-enhancement of the amplification, the noise is also poorly amplified, and finally the Saturation function is selected as the relative brightness performance function. The formula is as follows:
(2) Tone reforming and stretching, dynamically expanding the image
Map the intermediate stretch obtained in formula (1) to [0, 255], occupying the full dynamic range [0, 255] (8-bit grayscale image), the calculation formula is as follows, where: [minR,maxR] It is the entire definition domain of the intermediate quantity L(x). This item makes the image reach the global white balance.
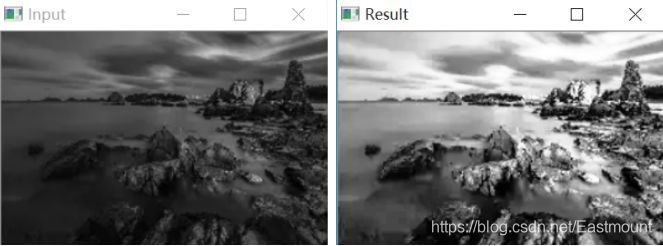
The following picture is the effect picture of the barcode image after ACE image enhancement. The picture (b) after image enhancement has a stronger contrast, which improves the brightness of the original image, while maintaining the authenticity of the image.
The English introduction of the ACE algorithm is as follows:
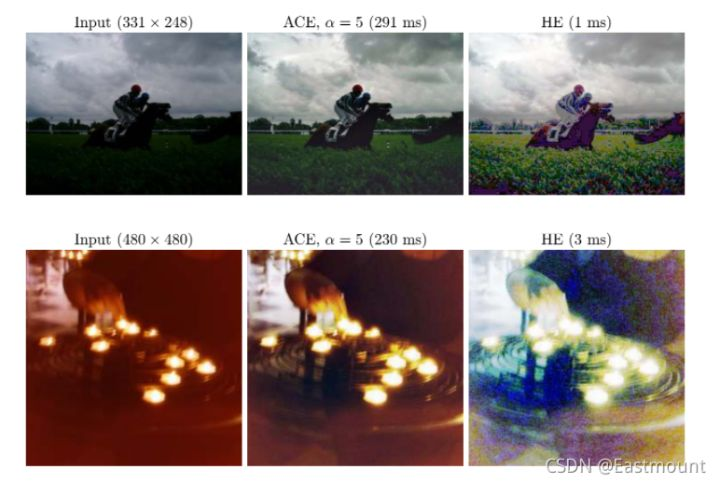
The comparative effect of the experiment is shown in the figure below. When writing the thesis on this topic, pay attention to the comparison with the traditional method.
2. Code implementation
Since there is no ACE algorithm package in OpenCV, the following code is based on the article of teacher "zmshy2128" to modify the color histogram equalization process. Later, there will be an opportunity for the author to analyze the code implementation process in detail.
- Automatic color equalization (ACE) fast algorithm-teacher zmshy2128
# -*- coding: utf-8 -*-
# By:Eastmount CSDN 2021-03-12
# 惨zmshy2128老师文章并修改成Python3代码
import cv2
import numpy as np
import math
import matplotlib.pyplot as plt

#线性拉伸处理
#去掉最大最小0.5%的像素值 线性拉伸至[0,1]
def stretchImage(data, s=0.005, bins = 2000):
    ht = np.histogram(data, bins);
    d = np.cumsum(ht[0])/float(data.size)
    lmin = 0; lmax=bins-1
    while lmin<bins:
        if d[lmin]>=s:
            break
        lmin+=1
    while lmax>=0:
        if d[lmax]<=1-s:
            break
        lmax-=1
    return np.clip((data-ht[1][lmin])/(ht[1][lmax]-ht[1][lmin]), 0,1)

#根据半径计算权重参数矩阵
g_para = {}
def getPara(radius = 5):
    global g_para
    m = g_para.get(radius, None)
    if m is not None:
        return m
    size = radius*2+1
    m = np.zeros((size, size))
    for h in range(-radius, radius+1):
        for w in range(-radius, radius+1):
            if h==0 and w==0:
                continue
            m[radius+h, radius+w] = 1.0/math.sqrt(h**2+w**2)
    m /= m.sum()
    g_para[radius] = m
    return m

#常规的ACE实现
def zmIce(I, ratio=4, radius=300):
    para = getPara(radius)
    height,width = I.shape
    zh = []
    zw = []
    n = 0
    while n < radius:
        zh.append(0)
        zw.append(0)
        n += 1
    for n in range(height):
        zh.append(n)
    for n in range(width):
        zw.append(n)
    n = 0
    while n < radius:
        zh.append(height-1)
        zw.append(width-1)
        n += 1
    #print(zh)
    #print(zw)

    Z = I[np.ix_(zh, zw)]
    res = np.zeros(I.shape)
    for h in range(radius*2+1):
        for w in range(radius*2+1):
            if para[h][w] == 0:
                continue
            res += (para[h][w] * np.clip((I-Z[h:h+height, w:w+width])*ratio, -1, 1))
    return res

#单通道ACE快速增强实现
def zmIceFast(I, ratio, radius):
    print(I)
    height, width = I.shape[:2]
    if min(height, width) <=2:
        return np.zeros(I.shape)+0.5
    Rs = cv2.resize(I, (int((width+1)/2), int((height+1)/2)))
    Rf = zmIceFast(Rs, ratio, radius)             #递归调用
    Rf = cv2.resize(Rf, (width, height))
    Rs = cv2.resize(Rs, (width, height))

    return Rf+zmIce(I,ratio, radius)-zmIce(Rs,ratio,radius)

#rgb三通道分别增强 ratio是对比度增强因子 radius是卷积模板半径
def zmIceColor(I, ratio=4, radius=3):
    res = np.zeros(I.shape)
    for k in range(3):
        res[:,:,k] = stretchImage(zmIceFast(I[:,:,k], ratio, radius))
    return res

#主函数
if __name__ == '__main__':
    img = cv2.imread('car.png')
    res = zmIceColor(img/255.0)*255
    cv2.imwrite('car-Ice.jpg', res)
The result of the operation is shown in the figure. The ACE algorithm can effectively perform image defogging processing to achieve image detail enhancement.
Finally, there is the effect of target detection to fog and goddess to fog, haha, continue to come on!
3. Dark channel a priori defogging algorithm
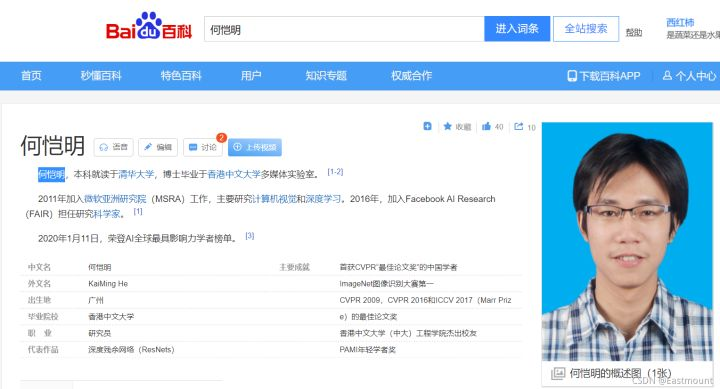
This algorithm is a classic image defogging algorithm proposed by He Yuming in the field of computer vision in 2009, and obtained the best CVPR paper of that year. The title of the paper is "Single Image Haze Removal Using Dark Channel Prior". The picture below is the encyclopedia introduction of the big guys. It is really powerful and worth learning from all of us.
• In May 2003, He Yuming obtained the qualification to be recommended to Tsinghua University. He was the only student who was recommended to Tsinghua University in Zhixin Middle School that year. After the college entrance examination results were released, He Yuming obtained a score of 900 points and became one of the 9 best students in Guangdong Province that year. .
• In 2009, He Yuming became the first Chinese scholar to win the CVPR "Best Paper Award" in one of the three major international conferences in the field of computer vision.
• In the 2015 ImageNet Image Recognition Competition, He Yuming and his team used the "image recognition depth difference residual learning" system to defeat industry teams such as Google, Intel, and Qualcomm, and won the first place.
• As the first author, He Yuming won the best paper awards of CVPR 2009, CVPR 2016 and ICCV 2017 (Marr Prize), as well as the best student paper award of ICCV 2017.
• In 2018, the 31st Conference on Computer Vision and Pattern Recognition (CVPR) was held in Salt Lake City, USA. He Yuming won the PAMI Young Scholar Award at this conference.
1. Algorithm principle
Closer to home, if you are an author in the field of image processing or research on image defogging, I suggest you read this original English text carefully. It is really amazing to be able to propose this algorithm in 2009.
Cite and refer to Chinese papers:
• He Tao, et al. A new single image defogging algorithm based on dark channel prior[J]. Computer Science, 2021.
• Wang Rong, et al. Research on image defogging based on improved weighted fusion dark channel algorithm[J]. Journal of Zhejiang University of Science and Technology, 2021.
• The principle, realization and effect of image defogging algorithm (speed can be real-time)-beloved image processing
• He Kai light and dark channel priori defogging algorithm principle and C++ code implementation of image defogging-Do it!
Original English:
• https://ieeexplore.ieee.org/document/5567108
Single Image Haze Removal Using Dark Channel Prior
• https://ieeexplore.ieee.org/document/5206515
Single image haze removal using dark channel prior
Dark Channel Prior (Dark Channel Prior, DCP) defogging algorithm relies on the atmospheric scattering model for defogging processing. Through observation and summary of a large number of foggy and non-fog images, some of the mapping relationships that exist are obtained, and then according to The formation process of the fog image is reversed to restore a clear image.
The implementation process and principle of the algorithm are as follows, refer to the papers of Mr. He Yuming and Mr. Tao He.
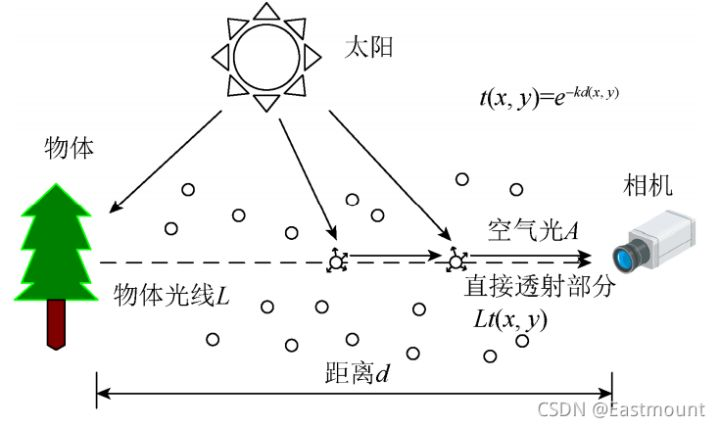
(1) Atmospheric scattering model
In computer vision and computer graphics, the atmospheric scattering model described by the equation is widely used. The parameters are explained as follows:
• x is the spatial coordinates of the image
• I(x) represents the foggy image (the image to be defogged)
• J(x) represents the image without fog (image to be restored)
• A represents the global atmospheric light value
• t(x) represents the transmittance
The first term on the right side of the equation is the direct attenuation term of the scene, and the second term is the ambient light term.
(2) Dark channel definition
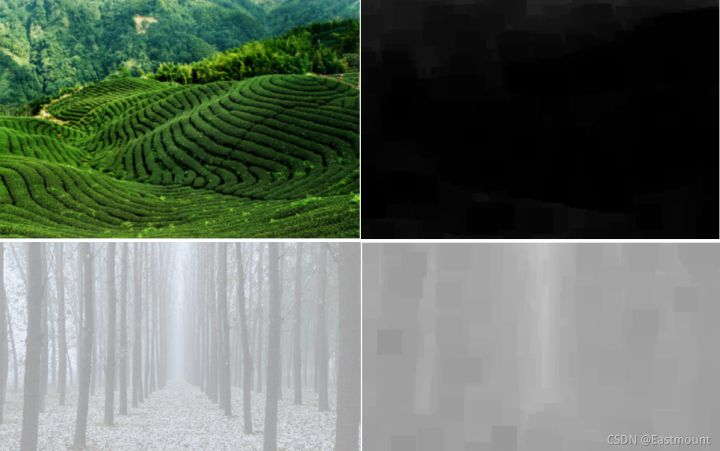
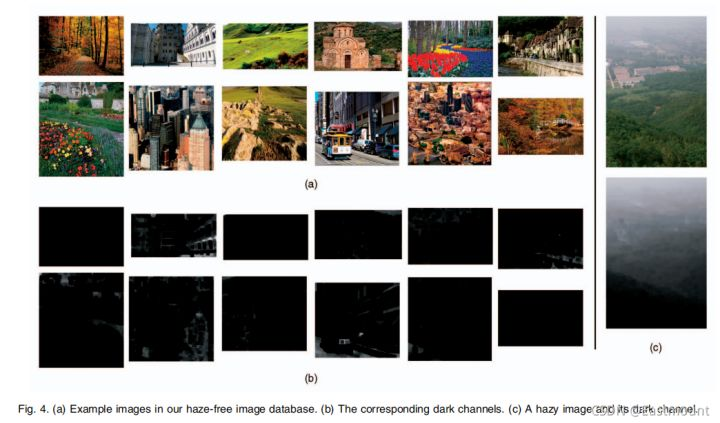
In most non-sky local areas, some pixels will always have at least one color channel with a very low value. For an image J(x), the mathematical definition of its dark channel is expressed as follows:
Among them, Ω(x) represents the local area centered on x, and the superscript c represents the three channels of RGB. The meaning of this formula is also very simple to express in code. First, find the minimum value of the RGB component of each pixel, store it in a grayscale image with the same size as the original image, and then perform the minimum value on this grayscale image Filtering, the radius of the filter is determined by the window size.
(3) Dark channel prior theory
The dark channel prior theory points out that the dark channel of the fog-free image J(x) in the non-sky area tends to 0, that is:
In real life, there are three main factors that cause the low channel value of the dark primary color:
a) The shadows of glass windows in cars, buildings and cities, or the projections of natural landscapes such as leaves, trees and rocks;
b) Brightly colored objects or surfaces, some of the three channels of RGB have low values (such as green grass/trees/plants, red or yellow flowers/leaves, or blue water);
c) Darker objects or surfaces, such as dark gray tree trunks and stones.
In short, there are shadows or colors everywhere in natural scenes. The dark primary colors of the images of these scenes are always very dark, while the foggy images are brighter. Therefore, the universality of the dark channel prior theory can be clearly seen.
(4) Formula transformation
According to the atmospheric scattering model, the first formula is slightly processed and transformed into the following formula:
Assuming that the transmittance t(x) of each window is a constant, denoted as t'(x), and the value of A has been given, two minimum operations are performed on both sides of the equation at the same time, and we can get:
Among them, J(x) is the required fog-free image, according to the aforementioned dark channel prior theory:
Therefore, it can be deduced:
(5) Transmittance calculation
Substituting the above formula to get the estimated value of transmittance t'(x), as shown below:
In real life, even if there is a clear sky, there will be some particles in the air. People can still feel the presence of fog when looking at the distant scenery. In addition, the presence of fog makes people feel the depth of field, so it is necessary to retain a certain degree of fog while removing the fog. The estimated transmittance can be corrected by introducing a factor w between 0 and 1 (generally 0.95), as shown in the formula:
The above derivation process assumes that the atmospheric light value A is known. In practice, it can be obtained from the original fog map with the help of the dark channel map. Specific steps are as follows:
- First obtain the dark channel map, and extract the brightest first 0.1% pixels in the dark channel map according to the brightness
- Find the value of the point with the highest brightness in the corresponding position in the original fog map I(x), and use it as the atmospheric light value A
In addition, because the transmittance t is too small, it will cause J to be too large, and the restored haze-free image as a whole will be excessive to the white field. Therefore, it is necessary to set a lower limit t0 (generally 0.1) for the transmittance, when the value of t is less than At t0, take t=t0. Substituting the transmittance and atmospheric light value obtained above into the formula, the final image recovery formula is as follows:
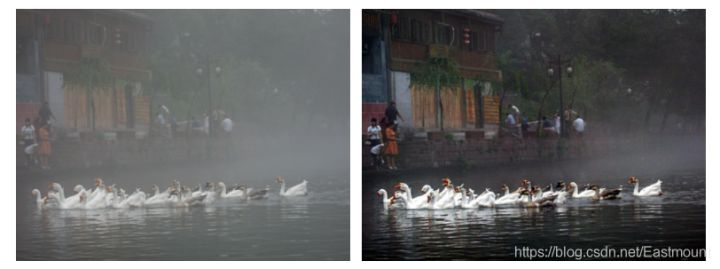
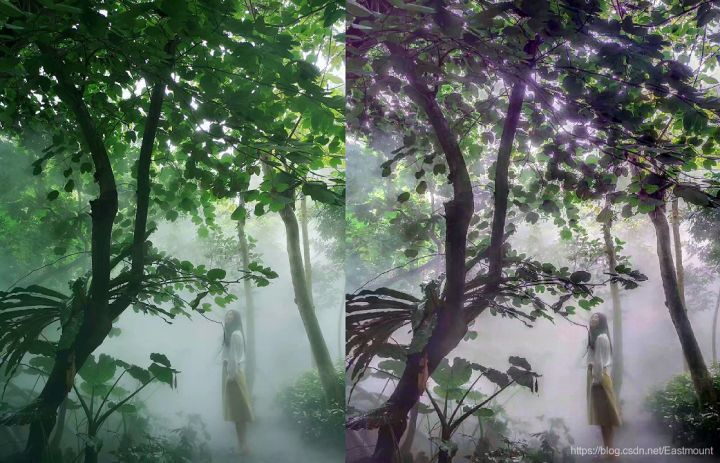
This is the principle process of the dark channel a priori defogging algorithm. The following is a brief supplement to the processing effect diagram in the paper.
Worship idols again, I strongly recommend everyone to read the paper.
2. Algorithm implementation
The implementation code refers to teacher Mu, and it feels better than what I wrote. The reference is as follows:
- openCV+python to achieve image defogging-Teacher Muzhan
# -*- coding: utf-8 -*-
"""
Created on Sat Sep 11 00:16:07 2021
@author: xiuzhang

参考资料:
https://blog.csdn.net/leviopku/article/details/83898619
"""

import sys
import cv2
import math
import numpy as np

def DarkChannel(im,sz):
    b,g,r = cv2.split(im)
    dc = cv2.min(cv2.min(r,g),b)
    kernel = cv2.getStructuringElement(cv2.MORPH_RECT,(sz,sz))
    dark = cv2.erode(dc,kernel)
    return dark

def AtmLight(im,dark):
    [h,w] = im.shape[:2]
    imsz = h*w
    numpx = int(max(math.floor(imsz/1000),1))
    darkvec = dark.reshape(imsz,1)
    imvec = im.reshape(imsz,3)

    indices = darkvec.argsort()
    indices = indices[imsz-numpx::]

    atmsum = np.zeros([1,3])
    for ind in range(1,numpx):
       atmsum = atmsum + imvec[indices[ind]]

    A = atmsum / numpx;
    return A

def TransmissionEstimate(im,A,sz):
    omega = 0.95
    im3 = np.empty(im.shape,im.dtype)

    for ind in range(0,3):
        im3[:,:,ind] = im[:,:,ind]/A[0,ind]

    transmission = 1 - omega*DarkChannel(im3,sz)
    return transmission

def Guidedfilter(im,p,r,eps):
    mean_I = cv2.boxFilter(im,cv2.CV_64F,(r,r))
    mean_p = cv2.boxFilter(p, cv2.CV_64F,(r,r))
    mean_Ip = cv2.boxFilter(im*p,cv2.CV_64F,(r,r))
    cov_Ip = mean_Ip - mean_I*mean_p

    mean_II = cv2.boxFilter(im*im,cv2.CV_64F,(r,r))
    var_I   = mean_II - mean_I*mean_I

    a = cov_Ip/(var_I + eps)
    b = mean_p - a*mean_I

    mean_a = cv2.boxFilter(a,cv2.CV_64F,(r,r))
    mean_b = cv2.boxFilter(b,cv2.CV_64F,(r,r))

    q = mean_a*im + mean_b
    return q

def TransmissionRefine(im,et):
    gray = cv2.cvtColor(im,cv2.COLOR_BGR2GRAY)
    gray = np.float64(gray)/255
    r = 60
    eps = 0.0001
    t = Guidedfilter(gray,et,r,eps)

    return t

def Recover(im,t,A,tx = 0.1):
    res = np.empty(im.shape,im.dtype)
    t = cv2.max(t,tx)

    for ind in range(0,3):
        res[:,:,ind] = (im[:,:,ind]-A[0,ind])/t + A[0,ind]

    return res

if __name__ == '__main__':

    fn = 'car-02.png'
    src = cv2.imread(fn)
    I = src.astype('float64')/255

    dark = DarkChannel(I,15)
    A = AtmLight(I,dark)
    te = TransmissionEstimate(I,A,15)
    t = TransmissionRefine(src,te)
    J = Recover(I,t,A,0.1)

    arr = np.hstack((I, J))
    cv2.imshow("contrast", arr)
    cv2.imwrite("car-02-dehaze.png", J*255 )
    cv2.imwrite("car-02-contrast.png", arr*255)
    cv2.waitKey();
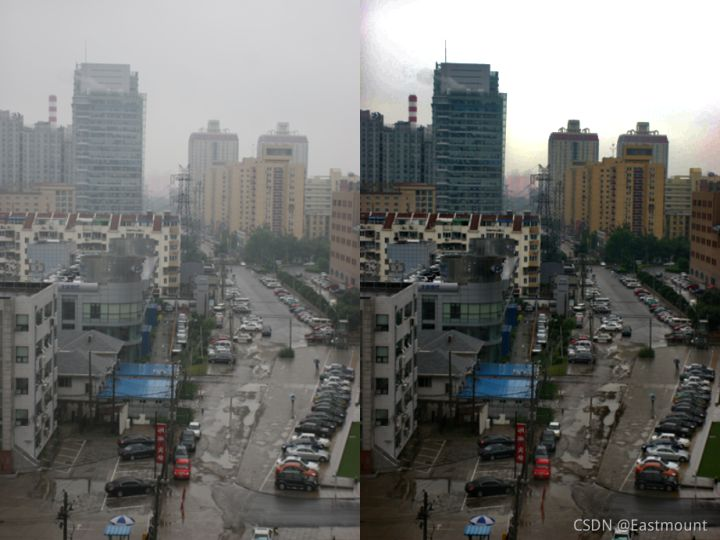
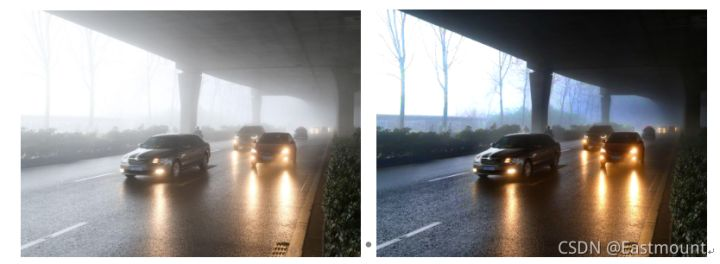
The effect is shown in the figure below:
If you want to combine with the subsequent target car detection, you can also defog first and then perform the detection, as shown in the following figure:
4. Image noise and fog generation
Noise addition or generation is always indispensable for image processing. Below are two simple codes generated by salt and pepper noise and fog simulation. This is closely related to the experiment in this article and can provide us with more GAN generation samples. Later in the series of articles on artificial intelligence, GAN, let's see if we can learn the images of real fogging scenes. It is worth looking forward to, haha!
1. Add salt noise
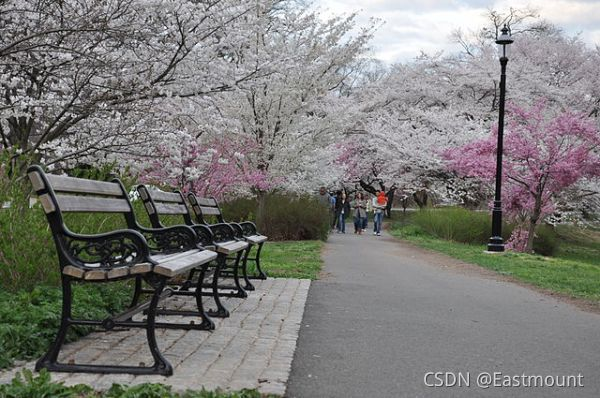
The original image is a landscape image:
code show as below:
# -*- coding:utf-8 -*-
import cv2
import numpy as np

#读取图片
img = cv2.imread("fj.png", cv2.IMREAD_UNCHANGED)
rows, cols, chn = img.shape

#加噪声
for i in range(50000):
    x = np.random.randint(0, rows)
    y = np.random.randint(0, cols)
    img[x,y,:] = 210

cv2.imshow("noise", img)

#等待显示
cv2.waitKey(0)
cv2.destroyAllWindows()
cv2.imwrite('fj-res.png',img)
The output result is shown in the figure below:
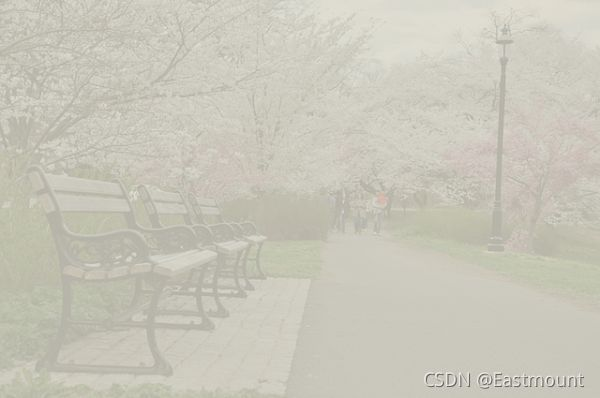
2. Simulated generation of fog
code show as below:
import numpy as np
import cv2 as cv
import os
import random

file = ['fj.png']
output = 'fj-wu.png'

for file_img in file:
    #打开图像
    img = cv.imread(file_img)
    mask_img = cv.imread(file_img)

    #雾的颜色
    mask_img[:, :] = (166, 178, 180)

    #里面参数可调,主要调整雾的浓度
    image = cv.addWeighted(img,
                           round(random.uniform(0.03, 0.28), 2),
                           mask_img, 1, 0)

    #保存的文件夹
    cv.imwrite(output, image)
The output result is shown in the figure below, and the effect is not bad.
Click to follow and learn about Huawei Cloud's fresh technology for the first time~














**粗体** _斜体_ [链接](http://example.com) `代码` - 列表 > 引用。你还可以使用@来通知其他用户。