The previous article GitOps-based cloud-native continuous delivery model introduced the role of Choerodon Agent in the continuous delivery deployment pipeline of the Hogtooth platform based on the helm2 version and its implementation principles.
Now that the latest helm version has reached helm3, continuing to use helm2 will face the following problems:
- The k8s api used by the helm2 version is older, which is not conducive to Choerodon Agent's support for the higher version of k8s
- The helm2 architecture is a client-server architecture. Among them, tiller-pod requires high cluster permissions, which is inconvenient for cluster permissions management. At the same time, it belongs to the client on the Choerodon Agent side, and it is not convenient to debug after a problem occurs.
Therefore, Choerodon Agent needs to support the helm3 version and migrate the instances installed under the helm2 version.
The difference between helm2 and helm3
- tiller is deleted
As shown in the figure, the deployment of Release in helm2 needs to go through tiller-pod, but the instance is deployed directly through kubeconfig in helm3
- Release is a global resource in helm2, and Release is stored in their respective namespaces in helm3
- Values supports JSON Schema validator, which automatically checks the format of all input variables
- Removed the helm serve command used to temporarily build the Chart Repository locally
- helm install no longer generates a Release name by default, unless -generate-name is specified
Helm Cli renamed individually
Migration from helm2 to helm3
The migration of helm2 to helm3 includes the following steps:
- Configuration migration of helm2
- Release migration of helm2
Clear helm2 configuration, release data and Tileer deployment
Use helm-2to3 for data migration
Install 2to3 plugin
helm3 plugin install https://github.com/helm/helm-2to3
Plug-in features
Support function:
- Migrate the configuration of helm2
- Migrate the releases of helm2
Clear the configuration of helm2, rel ease data and Tiller deployment
Migrate the configuration of helm2
First, you need to migrate the configuration and data folders of helm2, including the following:
- Chart starters
- Repositories
- Plugins
Start the migration with the following command:
helm3 2to3 move config
Migrate the instance of helm2
Start the migration with the following command:
helm3 2to3 convert [ReleaseName]
Clear helm2 data
If there is no error after the migration is completed, you can use this command to clear the data of helm2, including the following:
- Configuration(Helm homedirectory)
- v2release data
- Tiller deployment
Start to clear the data with the following command:
helm3 2to3 cleanup
Note: If you run the clear command, all deleted data cannot be restored. So if it’s not necessary, keep the previous data
Upgrade processing of Choerodon Agent
The changes from helm2 to helm3 are very large, so the Choerdon Agent calling helm has also changed dramatically. There are two parts that need to be modified
- The helm client needs to be refactored to obtain, install, upgrade, and uninstall instances
Need to migrate the instance installed by helm2 to helm3, otherwise Choerodon Agent cannot continue to manage the previous instance after the upgrade
helm client refactoring
In helm2, Choerodon Agent directly used the helm source code as part of the Choerodon Agent code. In helm3, the source code of helm3 is directly used for secondary development, and then referenced through dependencies. The advantage of this is to decouple the helm code from the Choerodon Agent code, which is conducive to the update and upgrade of the helm-related code.
In Choerodon Agent, the installation or upgrade instance will add Choeordon Agent-related labels to the resources in the Chart, such as choerodon.io/release, choeroodn.io/command, etc., so the secondary development of helm3 is mainly to add resource labels. Take the installation (Install) operation as an example, the other operations (upgrade, delete) are similar. %E6%93%8D%E4%BD%9C%E4%B8%BE%E4%BE%8B%EF%BC%8C%E5%85%B6%E4%BB%96%E6%93%8D% E4%BD%9C(%E5%8D%87%E7%BA%A7%E3%80%81%E5%88%A0%E9%99%A4)%E5%A4%A7%E5%90%8C% E5%B0%8F%E5%BC%82%E3%80%82)
1. Modify the module name
For secondary development, you first need to modify the module name of the project. This step is also the most troublesome, because after the modification, you need to modify all the package reference paths in the
As shown in the figure, the module in the go.mod file is modified as follows
github.com/choerodon/helm => github.com/open-hand/helm
Then modify the reference path in the code file
2. Add label logic
Through breakpoint debugging, find that the helm3 installation logic is by the 1617656029f4a7 open-hand-helm/pkg/action/install.go::Run() method, and insert the labeling step in the method. The unnecessary code is omitted below
func (i *Install) Run(chrt *chart.Chart, vals map[string]interface{}, valsRaw string) (*release.Release, error) {
  // ···省略的步骤是helm对chart包进行校验渲染,生成k8s对象,并保存到resources变量中

    // 以下为修改的内容,遍历resources对象,添加Label
    for _, r := range resources {
        err = action.AddLabel(i.ImagePullSecret, i.Command, i.AppServiceId, r, i.ChartVersion, i.ReleaseName, i.ChartName, i.AgentVersion, "", i.TestLabel, i.IsTest, false, nil)
        if err != nil {
            return nil, err
        }
    }
  // ···省略的步骤是helm将resources更新到集群中
}
Next look at the open-hand-helm/pkg/agent/action/label.go::AddLabel() method
func AddLabel(imagePullSecret []v1.LocalObjectReference,
    command int64,
    appServiceId int64,
    info *resource.Info,
    version, releaseName, chartName, agentVersion, testLabel, namespace string,
    isTest bool,
    isUpgrade bool,
    clientSet *kubernetes.Clientset) error {
    // 该方法内容比较多,不在这里展示,具体可参考源代码。其作用就是根据不同的资源类型添加不同的Label值
}
3. Choerodon Agent references the secondary development helm library
Refer to the initialization method of the helm3 source code install command, which will be divided into the following steps
Get helm configuration information
// 获取helm的配置信息
func getCfg(namespace string) (*action.Configuration, *cli.EnvSettings) {
settings := cli.New()
settings.SetNamespace(namespace)
actionConfig := &action.Configuration{}
helmDriver := os.Getenv("HELM_DRIVER")
if err := actionConfig.Init(settings.RESTClientGetter(), settings.Namespace(), helmDriver, debug); err != nil {
    log.Fatal(err)
}
return action config, settings
}
Create Install operation object
installClient := action.NewInstall( cfg, chartPathOptions, request.Command, request.ImagePullSecrets, request.Namespace, request.ReleaseName, request.ChartName, request.ChartVersion, request.AppServiceId, envkube.AgentVersion, "", false)- Verify the chart package and generate values
`go ··· valueOpts := getValueOpts(request.Values) p := getter.All(envSettings) vals, err := valueOpts.MergeValues(p) if err != nil {return nil , err}
// Check chart dependencies to make sure all are present in /charts chartRequested, err := loader.Load(cp) if err != nil { return nil, err }
validInstallableChart, err := isChartInstallable(chartRequested) if !validInstallableChart { return nil, err } ···
4. 调用安装方法,执行安装命令···
responseRelease, err := installClient.Run(chartRequested, vals, request.Values)
···
具体的逻辑可查看[choerodon-cluster-agent/pkg/helm/helm.go::InstallRelease()](https://github.com/open-hand/choerodon-cluster-agent/blob/master/pkg/helm/helm.go#L172)
总结来说就是以下4个步骤:
获取配置对象->生成操作对象->校验chart包并生成values值->执行操作
## 对已安装的Release进行迁移
对Release的迁移需要用到helm迁移工具,该工具是直接集成到Choerodon Agent项目代码中的。
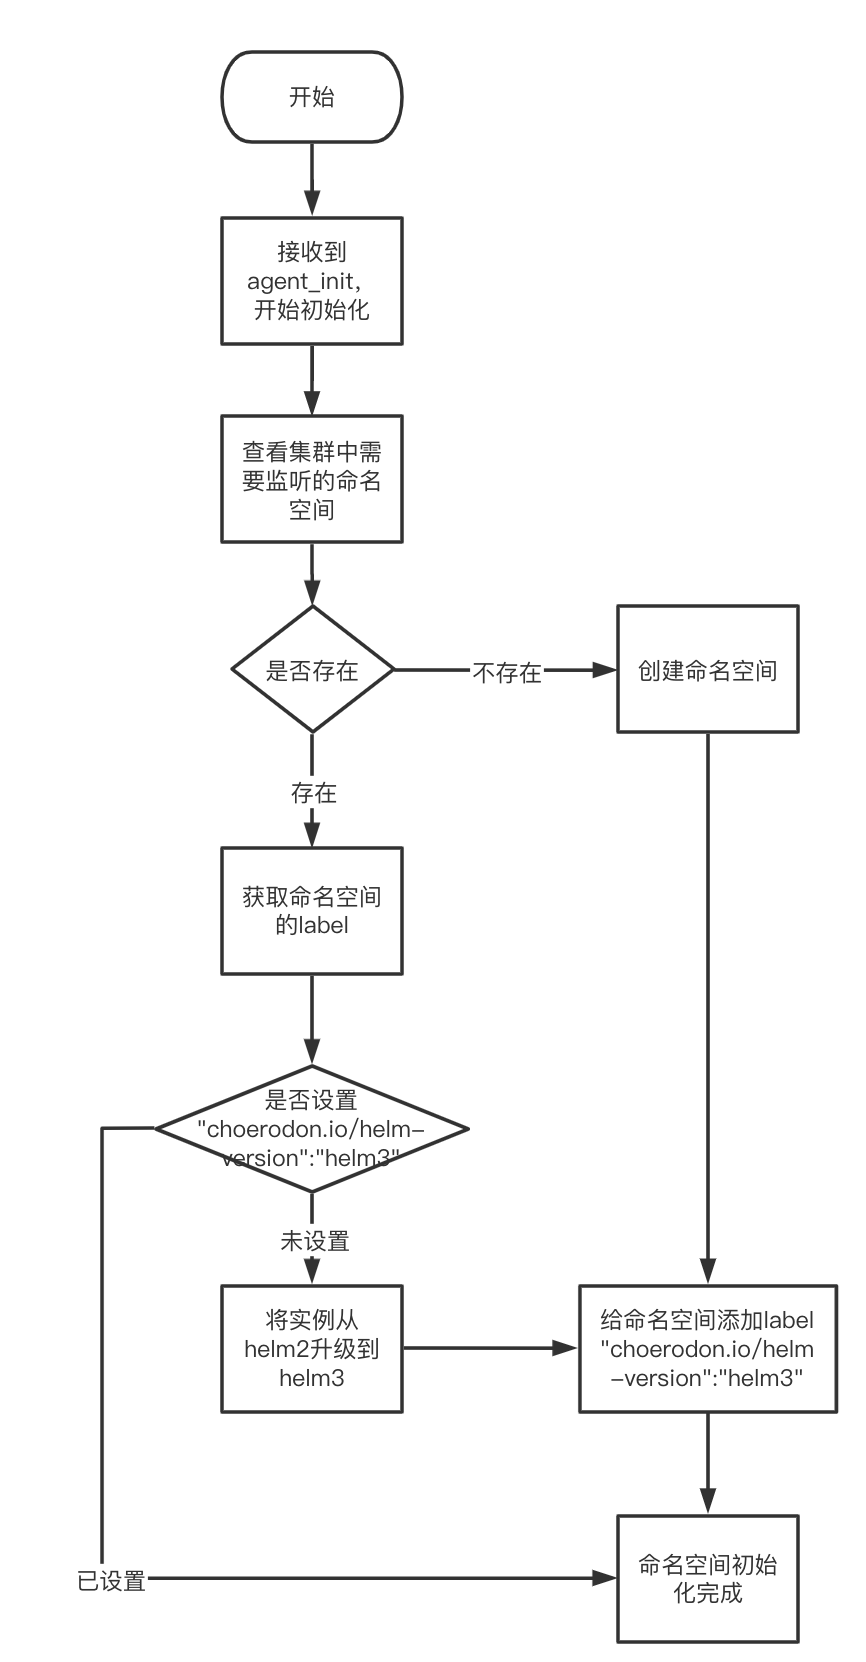
在Choeordon Agent的启动逻辑中,接收到的第一个命令是agent_init。该命令负责命名空间的创建和监听,因此Release迁移逻辑也就放到这一步操作中。
整个流程如下图所示:

1. 首先从[choerodon-cluster-agent/pkg/command/agent/agent.go::InitAgent()](https://github.com/open-hand/choerodon-cluster-agent/blob/master/pkg/command/agent/agent.go#L25)方法开始 ```go func InitAgent(opts \*commandutil.Opts, cmd \*model.Packet) (\[\]\*model.Packet, \*model.Packet) { // ···省略的步骤是处理初始化的参数
// 下面的代码开始对需要监听的命名空间进行初始化 for _, envPara := range agentInitOpts.Envs { nsList = append(nsList, envPara.Namespace) err := createNamespace(opts, envPara.Namespace, envPara.Releases) if err != nil { return nil, commandutil.NewResponseError(cmd.Key, cmd.Type, err) } }
// ···省略的步骤是开启gitops监听、controller监听、以及返回集群信息 }
Start to initialize the namespace at choerodon-cluster-agent/pkg/command/agent/agent.go::createNamespace()
func createNamespace(opts *commandutil.Opts, namespaceName string, releases []string) error {
 ns, err := opts.KubeClient.GetKubeClient().CoreV1().Namespaces().Get(namespaceName, metav1.GetOptions{})
 if err != nil {
     // 如果命名空间不存在的话,则创建
     if errors.IsNotFound(err) {
         _, err = opts.KubeClient.GetKubeClient().CoreV1().Namespaces().Create(&corev1.Namespace{
             ObjectMeta: metav1.ObjectMeta{
                 Name:   namespaceName,
                 Labels: map[string]string{model.HelmVersion: "helm3"},
             },
         })
         return err
     }
     return err
 }

 labels := ns.Labels
 annotations := ns.Annotations
 // 如果命名空间存在,则检查labels标签
 if _, ok := labels[model.HelmVersion]; !ok {
 // 开始迁移实例
     return update(opts, releases, namespaceName, labels, annotations)
 }
 return nil
}
In choerodon-Cluster-Agent / PKG / Command / Agent / agent.go :: Update () migration Examples
`Go FUNC Update (the opts * commandutil.Opts, Releases [] String, String NamespaceName, Labels, Annotations Map [ string]string) error {releaseCount := len(releases) upgradeCount := 0// The instance under the choerodon namespace will not be migrated here. // When installing the agent, the choerodon namespace will be created directly without labeling the model.HelmVersion tag // and then the user will directly create a pv, which will cause choerodon to be included in the environment without a label Management (If prometheus or cert-manager is installed through the agent, there will be problems) // So the direct default choeordon does not require helm migration if namespaceName != "choerodon" && releaseCount != 0 {for i := 0; i <releaseCount ; i++ {getReleaseRequest := &helm.GetReleaseContentRequest{ ReleaseName: releases[i], Namespace: namespaceName,}
    // 查看该实例是否helm3管理,如果是upgradeCount加1,如果不是,进行迁移操作然后再加1
    _, err := opts.HelmClient.GetRelease(getReleaseRequest)
    if err != nil {
        // 实例不存在有可能是实例未迁移,尝试迁移操作
        if strings.Contains(err.Error(), helm.ErrReleaseNotFound) {
            helm2to3.RunConvert(releases[i])
            if opts.ClearHelmHistory {
                helm2to3.RunCleanup(releases[i])
            }
            upgradeCount++
        }
    } else {
        // 实例存在表明实例被helm3管理,尝试进行数据清理,然后upgradeCount加1
        if opts.ClearHelmHistory {
            helm2to3.RunCleanup(releases[i])
        }
        upgradeCount++
    }
}

if releaseCount != upgradeCount {
    return fmt.Errorf("env %s : failed to upgrade helm2 to helm3 ", namespaceName)
}
}
// Add label if labels == nil {labels = make(map[string]string)}
labels[model.HelmVersion] = "helm3"
_, err := opts.KubeClient.GetKubeClient().CoreV1().Namespaces().Update(&corev1.Namespace{
    ObjectMeta: metav1.ObjectMeta{
        Name:        namespaceName,
        Labels:      labels,
        Annotations: annotations,
    },
})
return err
} ` thus completed the migration logic of Choerodon Agent to Release
Common problem solving
- Sometimes after Choerodon Agent restarts, there will be a startup failure. Check the log that the instance migration fails, and there is no error in tiller-pod.
The problem may be that the label of the namespace failed to be added after the instance migration was completed. The solution is to manually add the " choerodon.io/helm-version": tag to the namespace to indicate that the instance migration of the namespace has been completed and does not need to be migrated again
- After modifying the resource, the deployment fails, and the error message indicates timeout
First, check whether the three commit values are the same in the environment layer of devops. There are the following situations:
- The first two commits are inconsistent: it means that devops has a problem with gitlab's webhook callback processing, and it should be checked from gitlab's webhook execution record and devops log.
- The first two are the same, and the third is behind the first two: it shows that the gitops operation related to devops synchronization has been completed, but there is a problem in the Choerodon Agent synchronization gitops library.
At this time, keep a log for developers to find and analyze, and then kubectl -n choerodon delete [podName] deletes Choerodon Agent and restarts it.
If the Choerodon Agent still does not synchronize the gitops library after the restart is complete, you should consider whether the key of the environment library in gitlab is consistent with that stored in the devops database. First verify locally whether the gitops library can be pulled through the key. If it doesn't work, reset the key of the gitops library. The best way is to delete the environment and recreate it. If yes, then there is a problem with the connection between Choerodon Agent and gitlab. Check the port development of gitlab and the connection between Choerodon Agent and the external network.
- The three commits are the same, but the instance deployment fails, and it prompts that access to the chart warehouse is timed out: this problem is often encountered. After investigation, it was found that there was a problem with the network connection between Choerodon Agent and Chart Museum.
This article was originally created by the Toothfish technical team, please indicate the source for reprinting: official website
about pig tooth fish
The Choerodon full-scenario performance platform provides systematic methodology and collaboration, testing, DevOps and container tools to help companies pull through the requirements, design, development, deployment, testing and operation processes, and improve management efficiency and quality in one stop. From team collaboration to DevOps tool chain, from platform tools to systemic methodology, Pigtooth fully meets the needs of collaborative management and engineering efficiency, runs through the entire end-to-end process, and helps the team to be faster, stronger and more stable. here to try the pig tooth fish


**粗体** _斜体_ [链接](http://example.com) `代码` - 列表 > 引用。你还可以使用@来通知其他用户。