I. Introduction
Speaking of multiple data sources, it is generally used in the following two scenarios:
- One is that the business is special and requires multiple libraries to be connected. The class representative once did a new and old system migration, from
SQLServertoMySQL, which involved some business operations. Commonly used data extraction tools could not meet the business needs, so they could only use their bare hands. - The second is the separation of database read and write. Under the database master-slave architecture, write operations fall to the master library, and read operations are handed over to the slave library to share the pressure of the master library.
The realization of multiple data sources, from simple to complex, has a variety of solutions.
This will be SpringBoot(2.5.X)+Mybatis+H2 example to demonstrate a simple and reliable multi data source implementation.
After reading this article, you will gain:
SpringBootautomatically configure the data sourceSpringBootinMybatisconfigured automatically- How to use transactions under multiple data sources
- Get a reliable sample project with multiple data sources
Two, automatically configured data source
SpringBoot 's automatic configuration almost helped us complete all the work, only need to introduce related dependencies to complete all the work
<dependency>
    <groupId>com.h2database</groupId>
    <artifactId>h2</artifactId>
    <scope>runtime</scope>
</dependency>
<dependency>
    <groupId>org.mybatis.spring.boot</groupId>
    <artifactId>mybatis-spring-boot-starter</artifactId>
    <version>2.2.0</version>
</dependency>
H2 database is introduced in the dependencies DataSourceAutoConfiguration.java will automatically configure a default data source: HikariDataSource , first paste the source code:
@Configuration(proxyBeanMethods = false)
@ConditionalOnClass({ DataSource.class, EmbeddedDatabaseType.class })
@ConditionalOnMissingBean(type = "io.r2dbc.spi.ConnectionFactory")
// 1、加载数据源配置
@EnableConfigurationProperties(DataSourceProperties.class)
@Import({ DataSourcePoolMetadataProvidersConfiguration.class,
      DataSourceInitializationConfiguration.InitializationSpecificCredentialsDataSourceInitializationConfiguration.class,
      DataSourceInitializationConfiguration.SharedCredentialsDataSourceInitializationConfiguration.class })
public class DataSourceAutoConfiguration {

   @Configuration(proxyBeanMethods = false)
   // 内嵌数据库依赖条件,默认存在 HikariDataSource 所以不会生效,详见下文
   @Conditional(EmbeddedDatabaseCondition.class)
   @ConditionalOnMissingBean({ DataSource.class, XADataSource.class })
   @Import(EmbeddedDataSourceConfiguration.class)
   protected static class EmbeddedDatabaseConfiguration {

   }

   @Configuration(proxyBeanMethods = false)
   @Conditional(PooledDataSourceCondition.class)
   @ConditionalOnMissingBean({ DataSource.class, XADataSource.class })
   @Import({ DataSourceConfiguration.Hikari.class, DataSourceConfiguration.Tomcat.class,
         DataSourceConfiguration.Dbcp2.class, DataSourceConfiguration.OracleUcp.class,
         DataSourceConfiguration.Generic.class, DataSourceJmxConfiguration.class })
   protected static class PooledDataSourceConfiguration {
   //2、初始化带池化的数据源:Hikari、Tomcat、Dbcp2等
   }
   // 省略其他
}
The principle is as follows:
1. Load the data source configuration
Load the configuration information through @EnableConfigurationProperties(DataSourceProperties.class) and observe the class definition of DataSourceProperties
@ConfigurationProperties(prefix = "spring.datasource")
public class DataSourceProperties implements BeanClassLoaderAware, InitializingBean
Two pieces of information can be obtained:
- The configured prefix is
spring.datasource; - Implemented the
InitializingBeaninterface, with initialization operations.
In fact, the default embedded database connection is initialized according to the user configuration:
    @Override
    public void afterPropertiesSet() throws Exception {
        if (this.embeddedDatabaseConnection == null) {
            this.embeddedDatabaseConnection = EmbeddedDatabaseConnection.get(this.classLoader);
        }
    }
Traverse the built-in database enumeration through the EmbeddedDatabaseConnection.get method to find the embedded database connection that is most suitable for the current environment. Since we introduced H2 , the return value is also the enumeration information of the H2
public static EmbeddedDatabaseConnection get(ClassLoader classLoader) {
        for (EmbeddedDatabaseConnection candidate : EmbeddedDatabaseConnection.values()) {
            if (candidate != NONE && ClassUtils.isPresent(candidate.getDriverClassName(), classLoader)) {
                return candidate;
            }
        }
        return NONE;
    }
This is the SpringBoot of convention over configuration (convention is better than configuration) of SpringBoot . 061b89c637d994 discovered that we introduced the H2 database and immediately prepared the default connection information.
2. Create a data source
By default, because SpringBoot built-in pooled data source HikariDataSource , @Import(EmbeddedDataSourceConfiguration.class) will not be loaded, only a HikariDataSource will be initialized. The reason is that @Conditional(EmbeddedDatabaseCondition.class) does not hold in the current environment. This point has been explained in the comments in the source code:
/**
 * {@link Condition} to detect when an embedded {@link DataSource} type can be used.

 * If a pooled {@link DataSource} is available, it will always be preferred to an
 * {@code EmbeddedDatabase}.
 * 如果存在池化 DataSource,其优先级将高于 EmbeddedDatabase
 */
static class EmbeddedDatabaseCondition extends SpringBootCondition {
// 省略源码
}
So the initialization of the default data source is achieved by: @Import({ DataSourceConfiguration.Hikari.class,//omit others}. The code is also relatively simple:
@Configuration(proxyBeanMethods = false)
@ConditionalOnClass(HikariDataSource.class)
@ConditionalOnMissingBean(DataSource.class)
@ConditionalOnProperty(name = "spring.datasource.type", havingValue = "com.zaxxer.hikari.HikariDataSource",
      matchIfMissing = true)
static class Hikari {

   @Bean
   @ConfigurationProperties(prefix = "spring.datasource.hikari")
   HikariDataSource dataSource(DataSourceProperties properties) {
   //创建 HikariDataSource 实例
      HikariDataSource dataSource = createDataSource(properties, HikariDataSource.class);
      if (StringUtils.hasText(properties.getName())) {
         dataSource.setPoolName(properties.getName());
      }
      return dataSource;
   }

}
protected static <T> T createDataSource(DataSourceProperties properties, Class<? extends DataSource> type) {
// 在 initializeDataSourceBuilder 里面会用到默认的连接信息
return (T) properties.initializeDataSourceBuilder().type(type).build();
}public DataSourceBuilder<?> initializeDataSourceBuilder() {
return DataSourceBuilder.create(getClassLoader()).type(getType()).driverClassName(determineDriverClassName())
.url(determineUrl()).username(determineUsername()).password(determinePassword());
}The use of the default connection information is the same idea: the user-specified configuration is used first, if the user does not write it, then the default is used, taking determineDriverClassName() as an example:
public String determineDriverClassName() {
    // 如果配置了 driverClassName 则返回
        if (StringUtils.hasText(this.driverClassName)) {
            Assert.state(driverClassIsLoadable(), () -> "Cannot load driver class: " + this.driverClassName);
            return this.driverClassName;
        }
        String driverClassName = null;
    // 如果配置了 url 则根据 url推导出 driverClassName
        if (StringUtils.hasText(this.url)) {
            driverClassName = DatabaseDriver.fromJdbcUrl(this.url).getDriverClassName();
        }
    // 还没有的话就用数据源配置类初始化时获取的枚举信息填充
        if (!StringUtils.hasText(driverClassName)) {
            driverClassName = this.embeddedDatabaseConnection.getDriverClassName();
        }
        if (!StringUtils.hasText(driverClassName)) {
            throw new DataSourceBeanCreationException("Failed to determine a suitable driver class", this,
                    this.embeddedDatabaseConnection);
        }
        return driverClassName;
    }
Others such as determineUrl() , determineUsername() , determinePassword() are the same, so I won’t repeat them here.
At this point, the default HikariDataSource is automatically configured!
Next, let’s take a look at how Mybatis is automatically configured in SpringBoot
Three, automatic configuration Mybatis
In order to Spring use Mybatis , need at least a SqlSessionFactory and a mapper interface, so, MyBatis-Spring-Boot-Starter for us to do these things:
- Automatically discover the existing
DataSource DataSourcetoSqlSessionFactoryBeanto create and register an instance ofSqlSessionFactory- Use
sqlSessionFactorycreate and register aSqlSessionTemplateinstance - Automatically scan
mapper, link them withSqlSessionTemplateand register them in theSpringcontainer for injectionBean
Combine the source code to deepen the impression:
public class MybatisAutoConfiguration implements InitializingBean {
    @Bean
    @ConditionalOnMissingBean
    //1.自动发现已有的`DataSource`
    public SqlSessionFactory sqlSessionFactory(DataSource dataSource) throws Exception {
        SqlSessionFactoryBean factory = new SqlSessionFactoryBean();
        //2.将 DataSource 传递给 SqlSessionFactoryBean 从而创建并注册一个 SqlSessionFactory 实例
        factory.setDataSource(dataSource);
       // 省略其他...
        return factory.getObject();
    }

    @Bean
    @ConditionalOnMissingBean
    //3.利用 sqlSessionFactory 创建并注册 SqlSessionTemplate 实例
    public SqlSessionTemplate sqlSessionTemplate(SqlSessionFactory sqlSessionFactory) {
        ExecutorType executorType = this.properties.getExecutorType();
        if (executorType != null) {
            return new SqlSessionTemplate(sqlSessionFactory, executorType);
        } else {
            return new SqlSessionTemplate(sqlSessionFactory);
        }
    }

    /**
     * This will just scan the same base package as Spring Boot does. If you want more power, you can explicitly use
     * {@link org.mybatis.spring.annotation.MapperScan} but this will get typed mappers working correctly, out-of-the-box,
     * similar to using Spring Data JPA repositories.
     */
     //4.自动扫描`mapper`,将他们与`SqlSessionTemplate` 链接起来并注册到`Spring` 容器中供其他`Bean`注入
    public static class AutoConfiguredMapperScannerRegistrar implements BeanFactoryAware, ImportBeanDefinitionRegistrar {
    // 省略其他...

    }

}
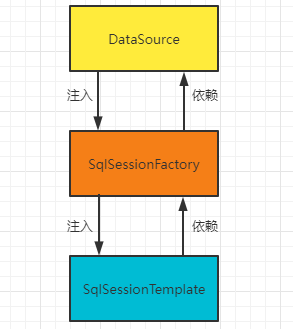
A picture is worth a thousand words, and its essence is layered injection:
Four, from single to more
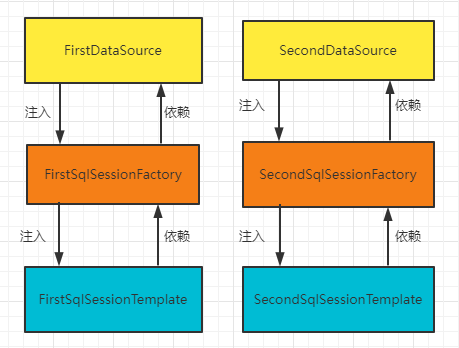
With the knowledge reserves of the second and third summary, the theoretical basis for creating multiple data sources is there: two sets of DataSource and two sets of layer-by-layer injection, as shown in the figure:
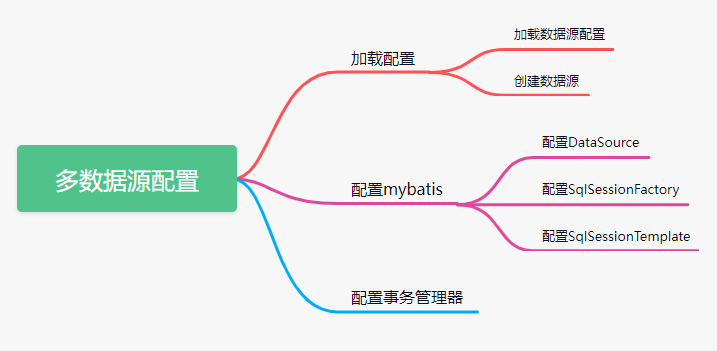
Next, we will copy the routine of automatically configuring a single data source to configure multiple data sources, the sequence is as follows:
First, design the configuration information. In the case of a single data source, the configuration prefix is spring.datasource . In order to support multiple, we add another layer at the back, yml as follows:
spring:
  datasource:
    first:
      driver-class-name: org.h2.Driver
      jdbc-url: jdbc:h2:mem:db1
      username: sa
      password:
    second:
      driver-class-name: org.h2.Driver
      jdbc-url: jdbc:h2:mem:db2
      username: sa
      password:
first data source configuration
/**
 * @description:
 * @author:Java课代表
 * @createTime:2021/11/3 23:13
 */
@Configuration
//配置 mapper 的扫描位置,指定相应的 sqlSessionTemplate
@MapperScan(basePackages = "top.javahelper.multidatasources.mapper.first", sqlSessionTemplateRef = "firstSqlSessionTemplate")
public class FirstDataSourceConfig {

    @Bean
    @Primary
    // 读取配置,创建数据源
    @ConfigurationProperties(prefix = "spring.datasource.first")
    public DataSource firstDataSource() {
        return DataSourceBuilder.create().build();
    }

    @Bean
    @Primary
    // 创建 SqlSessionFactory
    public SqlSessionFactory firstSqlSessionFactory(DataSource dataSource) throws Exception {
        SqlSessionFactoryBean bean = new SqlSessionFactoryBean();
        bean.setDataSource(dataSource);
        // 设置 xml 的扫描路径
        bean.setMapperLocations(new PathMatchingResourcePatternResolver().getResources("classpath:mybatis/first/*.xml"));
        bean.setTypeAliasesPackage("top.javahelper.multidatasources.entity");
        org.apache.ibatis.session.Configuration config = new org.apache.ibatis.session.Configuration();
        config.setMapUnderscoreToCamelCase(true);
        bean.setConfiguration(config);
        return bean.getObject();
    }

    @Bean
    @Primary
    // 创建 SqlSessionTemplate
    public SqlSessionTemplate firstSqlSessionTemplate(SqlSessionFactory sqlSessionFactory) {
        return new SqlSessionTemplate(sqlSessionFactory);
    }

    @Bean
    @Primary
    // 创建 DataSourceTransactionManager 用于事务管理
    public DataSourceTransactionManager firstTransactionManager(DataSource dataSource) {
        return new DataSourceTransactionManager(dataSource);
    }
}
Here, each @Bean adds @Primary to make it the default Bean . @MapperScan using SqlSessionTemplate , mapper with firstSqlSessionTemplate .
Tips:
DataSourceTransactionManagercreated for the data source for transaction management. When using transactions in a multi-data source scenario,@Transactional(transactionManager = "firstTransactionManager")used to specify which transaction management to use for the transaction.
At this point, the first data source is configured, and the second data source is also configured for these items. Because the configured Bean types are the same, you need to use @Qualifier to limit the loaded Bean , for example:
@Bean
// 创建 SqlSessionTemplate
public SqlSessionTemplate secondSqlSessionTemplate(@Qualifier("secondSqlSessionFactory") SqlSessionFactory sqlSessionFactory) {
    return new SqlSessionTemplate(sqlSessionFactory);
}
The complete code can be viewed class representative of GitHub
Five, transactions under multiple data sources
Spring provides us with a simple and easy-to-use declarative transaction, which allows us to focus more on business development, but it is not easy to use it properly. This article only focuses on multiple data sources. Please click here for supplementary lessons on transactions: Spring Statement How to learn style affairs?
In the previous tips, it has been mentioned that there are multiple transaction managers when opening declarative transactions, and it is necessary to display which transaction manager to use, such as the following example:
// 不显式指定参数 transactionManager 则会使用设置为 Primary 的 firstTransactionManager
// 如下代码只会回滚 firstUserMapper.insert, secondUserMapper.insert(user2);会正常插入
@Transactional(rollbackFor = Throwable.class,transactionManager = "firstTransactionManager")
public void insertTwoDBWithTX(String name) {
    User user = new User();
    user.setName(name);
    // 回滚
    firstUserMapper.insert(user);
    // 不回滚
    secondUserMapper.insert(user);

    // 主动触发回滚
    int i = 1/0;
}
This transaction uses firstTransactionManager as the transaction manager by FristDataSource , so when we manually throw an exception from the internal to roll back the transaction, firstUserMapper.insert(user); rolls back, secondUserMapper.insert(user); does not roll back.
The framework code has been uploaded, and friends can design use case verification according to their own ideas.
Six, review
At this point, SpringBoot+Mybatis+H2 has been demonstrated. This should be the most basic multi-data source configuration. In fact, it is rarely used online, unless it is an extremely simple one-time business.
Because the shortcomings of this method are very obvious: the code is too intrusive! There are as many sets of components as there are data sources, and the amount of code grows exponentially.
Writing this case is more about summarizing and reviewing the SpringBoot automatic configuration, annotated statement Bean , Spring of multiple data sources.
Spring officially provided us with a AbstractRoutingDataSource class, by DataSource routing, switching to achieve multiple data sources. This is also the underlying support for most lightweight multi-data source implementations at present.
AbstractRoutingDataSource+AOP attention to class representatives, the next article demonstrates the implementation of multiple data sources based on 061b89c637de5c!


**粗体** _斜体_ [链接](http://example.com) `代码` - 列表 > 引用。你还可以使用@来通知其他用户。