Ready to work
The warehouse address of the template file that needs to be used is
1. JSX
First look at the jsx syntax, what did it do babel.js
At the same time, the document of react also states that
In fact, JSX is just syntactic sugar for the React.createElement(component, props, ...children) function.
It can be seen that these jsx grammars, after being translated by babel, finally call React.createElement , which requires three parameters type, props, children . The return value is the virtual DOM object. That is to say, we can use babel to convert our jsx code into a call to React.createElement , and finally this method converts jsx into a virtual dom object. That is, React.createElement is actually syntactic sugar for 06209dc1fefae5. Now we need to implement our own createElement method
2. Project configuration
Check warehouse address , you can directly get the template file. Here we mainly introduce how to configure our .babelrc , help us parse the jsx code, and automatically call the createElement method we wrote ourselves
You can see how configures react on the babel official website.presets is configured in @babel/prset-react , we will use it to convert the jsx code in our code. Think about the above code, the functional component we wrote, or jsx code, has been converted into the React.createElement code, so we can implement our custom babel function with the help of createElement
{
  "presets": [
    "@babel/preset-env",
    [
      "@babel/preset-react",
      {
        "pragma": "MyReact.createElement" //默认的pragma就是 React.createElement,也就是说,我们要实现一个我们的MyReact.createElement, 那么就需要在这里写成MyReact.createElement (only in classic runtime)
      }
    ]
  ]

}
3. Virtual DOM
3.1 What is Virtual DOM
Use javascript object to describe the real dom object, its structure is generally like this
vdom = {
    type: '',
    props: {} // 属性对象
    children: [] // 子元素,子组件
}
3.2 Create Virtual DOM
3.2.1 Implement a createElement method
In our template file, webpack has been used to configure the entry file of the code, install the dependencies, and then run the project. At this time, nothing happens to the browser. The work of parsing jsx has also been completed for us by babel
If this happens to you, please change the port number of devserver in webpack by yourself
Here is our project directory structure:
At the same time, you can also take a look at the directory structure of our project. Here I have added a createElement.js file. In this file, we will convert the jsx code into a virtual DOM object.
As we mentioned above, React.createElement will receive three parameters type, props, children , and then automatically convert the jsx code into the following type, so what we need to do is to provide such a method, receive these three parameters, and then assemble it into object we want.
vdom = {
    type: '',
    props: {} // 属性对象
    children: [] // 子元素,子组件
}
First create
createDOMElement.jsin the MyReact folder, whose structure we mentioned above, receives three parameters, and returns a vdom objectexport default function createElement(type, props, ...children) { return { type, props, children } }The createElement method is created, then we need to expose it, so in
MyReact/index.js, we expose it// MyReact/index.js import createElement from './createElement' export default { createElement, }Then we introduce our
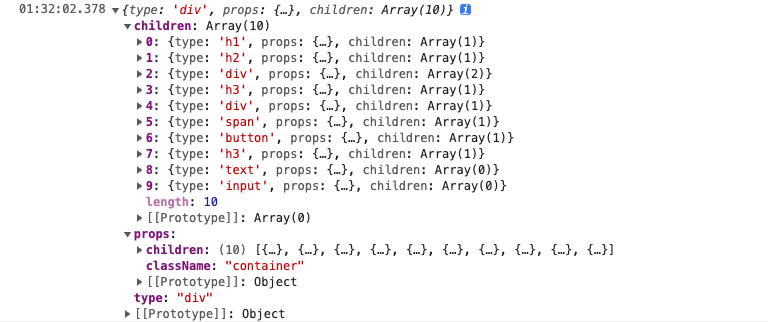
MyReactin the entry file, and write a code ofjsxto see if it can meet our expectations// index.js import MyReact from "./MyReact" // 按照react的使用方法,这里我们先引入我们自定义的MyReact 此处的MyReact会将jsx语法 通过调用MyReact.createElement(),然后返回我们所需要的VDOM // 这个是在.babelrc配置的 const virtualDOM = ( <div className="container"> <h1>你好 Tiny React</h1> <h2 data-test="test">(我是文本)</h2> <div> 嵌套1 <div>嵌套 1.1</div> </div> <h3>(观察: 这个将会被改变)</h3> {2 == 1 && <div>如果2和1相等渲染当前内容</div>} {2 == 2 && <div>2</div>} <span>这是一段内容</span> <button onClick={() => alert("你好")}>点击我</button> <h3>这个将会被删除</h3> 2, 3 <input type="text" value="13" /> </div> ) console.log(virtualDOM)Look at the print result, is it what we expected?
bingo, is exactly what we want. Here you can see
- Among children, some nodes are a
boolean, and we may have a node that is null and does not need to be converted - In children, some nodes are directly text, and text nodes need to be converted
In props, the children node needs to be accessible
The above two special cases are not correctly converted into vDOM, so what we need to do next is to perform acreateElementoperation on the children node.3.2.2 Improved
createElementmethodAs we said above, we need to recursively call the createElement method to generate vDOM. According to the above three problems, we can make the following improvements
export default function createElement(type, props, ...children) {
// 1.循环children对象进行对象转换,如果是对象,那么在调用一次createElement方法,将其转换为虚拟dom,否则直接返回,因为他就是普通节点.
const childrenElements = [].concat(...children).reduce((result, child) => {
  // 2.节点中还有表达式, 不能渲染 null节点 boolean类型的节点, 因此我们这里用的reduce,而不是用map
  if (child !== true && child !== false && child !== null) {
    // child已经是对象了,那么直接放进result中
    if (child instanceof Object) {
      result.push(child)
    } else {
      // 如果他是文本节点,则直接转换为为本节点
      result.push(createElement("text", { textContent: child }))
    }
  }
  return result
}, [])
// 3. props 可以访问children节点,
return {
  type,
  props: Object.assign({ children: childrenElements }, props), // hebing Props
  children: childrenElements
}
}
Now look at our output, you can see that the false and plain text nodes in our children have been processed correctly. At this point, our createElement is over.
3.3 Implement the render method
3.3.1 render method
First create render.js under the MyReact folder.
In render, we also need a diff method. diff algorithm is to ensure that the view only updates the changed part. It is necessary to compare the old and new DOM (vDOM, oldDOM), and then update the DOM (container) of the changed part. Let's write a diff method first, the actual algorithm, which we will add later.
// MyReact/render.js

import diff from "./diff"
export default function render(vDOM, container, oldDOM) {
  // diff算法
  diff(vDOM, container, oldDOM)
}
Then, we export the render method at MyReact/index.js .
import createElement from './createElement'
import render from './render'
export default {
  createElement,
  render
}
3.3.2 diff method
From the analysis just now, we can know that this diff algorithm requires three parameters, newDom, container, oldDom , here, what we need to do is to compare the old and new dom, here, we need a method to create elements, so we now need A mountElement method, which then creates the file mountElement.js , is used to create the element.
// MyReact/diff.js
import mountElement from "./mountElement"

export default function diff(vDOM, container, oldDOM) {
  // 判断oldDOM是否存在
  if (!oldDOM) {
    // 创建元素
    mountElement(vDOM, container)
  }
}
3.3.3 mountElement method
Our element needs to distinguish native dom element or component . Components are divided into class component , and function component . Here we first render the native dom .
mountElement
- mountNativeElement
mountComponentElement
- class component
- functional component
// MyReact/mountElement.js

export default function mountElement(vDOM, container) {
  // 此处需要区分原生dom元素还是组件,如何区分? 这个逻辑我们后面再补充
  mountNativeElement(vDOM, container)
}
3.3.4 mountNativeElement method
In this method, we need to convert the virtual DOM into a real DOM node. Here, we use a method to create a real DOM element and then append it to the container.
// MyReact/mountNativeElement.js
import createDOMElement from "./createDOMElement"
/**
 * 渲染vdom到指定节点
 * @param {*} vDOM
 * @param {*} container
 */
export default function mountNativeElement(vDOM, container) {
  let newElement= createDOMElement(vDOM)
  container.appendChild(newElement)
}
Next, let's implement this createDOMElement method, because we will use it later, so it is used as a public function for easy use in other places.
In this method, we need to do the following things.
- Create the incoming
vDOMinto ahtmlelement - Creating html elements is divided into two cases, plain text nodes, or element nodes
html element that recursively creates child nodes
// MyReact/createDOMElement.js
import mountElement from "./mountElement"
/**
 * 创建虚拟dom
 * @param {*} vDOM
 * @returns
 */
export default function createDOMElement(vDOM) {
  let newElement = null

  // 1. 渲染文本节点, 根据我们之前处理的,纯文本节点,通过text去标记, 值就是props中的textContent
  if (vDOM.type === 'text') {
 newElement = document.createTextNode(vDOM.props.textContent)
  } else {
 // 2.渲染元素节点
 newElement = document.createElement(vDOM.type) // type 就是html元素类型 div input p这些标签等等
 // 注意,这里我们只渲染了节点,并没有将props的属性,放在html标签上,这个我们后面在进行
  }
  // 以上步骤仅仅只是创建了根节点,还需要递归创建子节点
  vDOM.children.forEach(child => {
 // 将其放置在父节点上, 由于不确定当前子节点是组件还是普通vDOM,因此我们再次调用mountElement方法,当前的节点容器,就是newElement
 mountElement(child, newElement)
  })
  return newElement
}
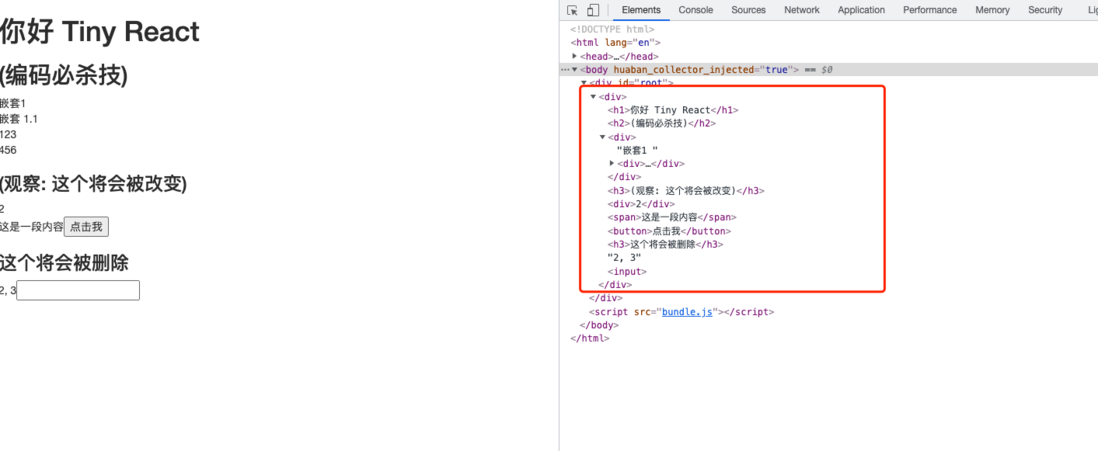
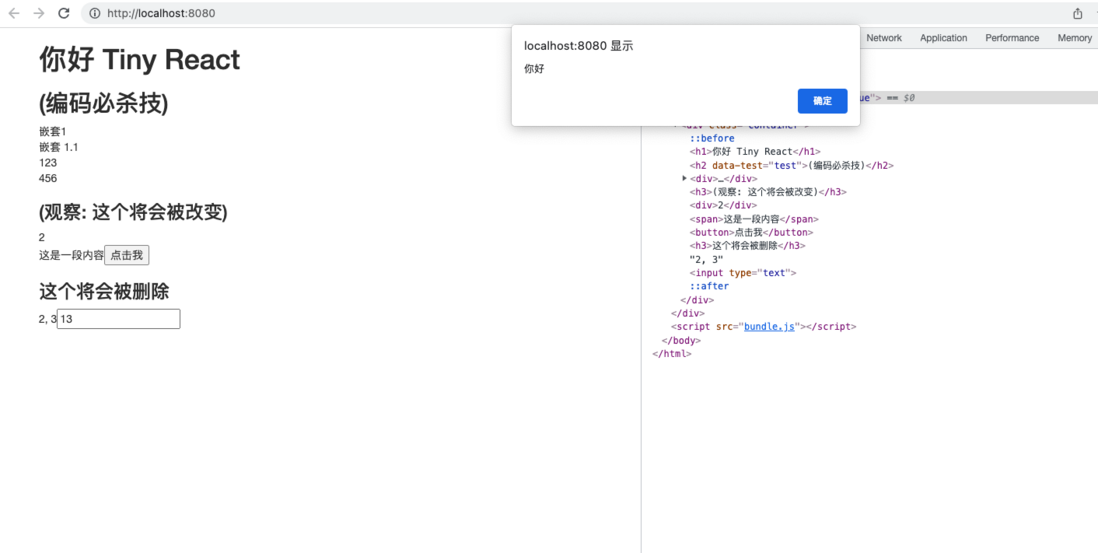
The code is ready, let's go to the browser to see if there is any change. At this time, your browser should look like this. Then let's analyze it again, what are we missing?
3.3.5 Method for updating node attributes (updateNodeElement)
We have now implemented the code of jsx and rendered it to the page. But now look at the structure of our virtual DOM. The following things are missing from our expectations
classNamenot being rendered as classdata-testtypevalueand other native attributes have not been added to the corresponding tags- Response event for
button
Next, we will implement this updateNodeElement method.
Or create the file MyReact/updateNodeElement.js first. Think about a question, when do we call this method to update the properties of the node?
In 3.3.4 above, we are in the step of updating the node, so updating the properties of the node node also needs to be done there
Then to be sure, we need two parameters, one is the container container , and the other is our virtual DOM, in order to determine a complete element .
The next job is to assign props properties to html in turn. Recall, how to set attributes of html? We use element.setAttribute('prop', value) for this.
It is clear how to update the attributes on html. Next, let's analyze which attributes and events we want to deal with
First, we need to traverse the props property of the current vDOM, and determine which way to set the property to use according to the key value
- Event binding: We bind events starting with on, like this onClick;
- For attribute values such as
valuechecked, thesetAttributemethod cannot be used. When we use the native DOM, for the value of the input box, we directly useinput.valueto set the value of the input box; childrenattribute, this is the node attribute we added manually before, therefore, we have to removechildrenfor him;classNameattribute, we need to change it toclass, the rest of the attributes can be set directly using the key
The code is implemented as follows:// MyReact/updateNodeElement.js export default function updateNodeElement (newElement, vDOM) { const { props } = vDOM // 遍历vdom上的key,获取每个prop的值, Object.keys(props).forEach(key => { const currentProp = props[key] // 如果是以on开头的,那么就认为是事件属性,因此我们需要给他注册一个事件 onClick -> click if (key.startsWith('on')) { // 由于事件都是驼峰命名的,因此,我们需要将其转换为小写,然后取最后事件名称 const eventName = key.toLowerCase().slice(2) // 为当前元素添加事件处理函数 newElement.addEventListener(eventName, currentProp) } else if (key === 'value' || key === 'checked') { // input 中的属性值 newElement[key] = currentProp } else if (key !== 'children') { // 抛开children属性, 因为这个是他的子节点, 这里需要区分className和其他属性 newElement.setAttribute(key === 'className' ? 'class' : key, currentProp) } }) }Next, we find
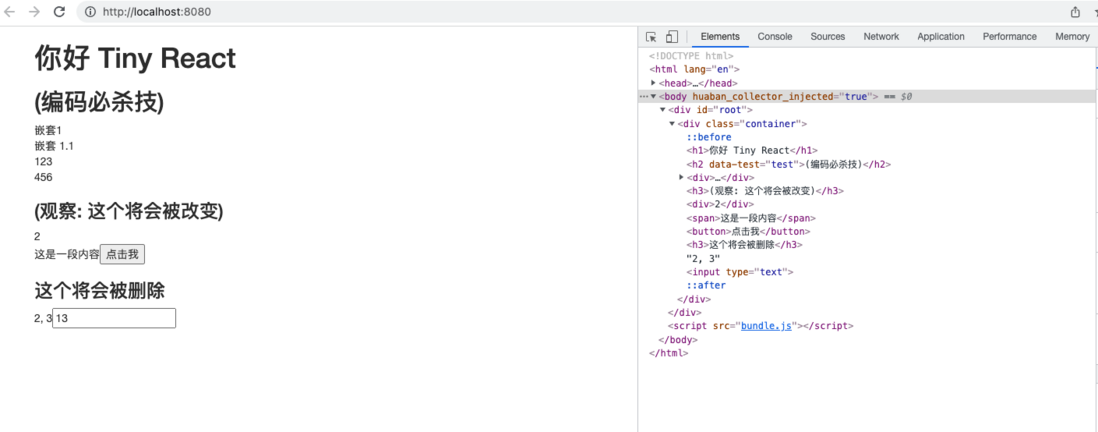
createDOMElement.jsfile, we need to update its attribute value after rendering the element node// MyReact/createDOMElement.js import mountElement from "./mountElement" /** * 创建虚拟dom * @param {*} vDOM * @returns */ export default function createDOMElement(vDOM) { let newElement = null // 1. 渲染文本节点, 根据我们之前处理的,纯文本节点,通过text去标记, 值就是props中的textContent if (vDOM.type === 'text') { newElement = document.createTextNode(vDOM.props.textContent) } else { // 2.渲染元素节点 newElement = document.createElement(vDOM.type) // type 就是html元素类型 div input p这些标签等等 // 更新dom元素的属性,事件等等 updateNodeElement(newElement, vDOM) } // 以上步骤仅仅只是创建了根节点,还需要递归创建子节点 vDOM.children.forEach(child => { // 将其放置在父节点上, 由于不确定当前子节点是组件还是普通vDOM,因此我们再次调用mountElement方法,当前的节点容器,就是newElement mountElement(child, newElement) }) return newElement }At this point, we have completed the attribute setting, and now go back to the browser to see, our result, the
classattribute is correctly loaded on the element, other attributes, and event responses are also ready.
Phase one is complete!
stage summary
jsxsyntax can be converted intobabelunder the blessing ofvDOM, we usebabel-preset-react, and configure.babelrc, which allows us to implement a customcreateElementmethod. Then convertjsxtovirtual DOM.- We use the virtual DOM object generated by the
createElementmethod, pass thediffalgorithm (not implemented in this article), and then update thedom - The virtual dom object requires us to convert all the nodes to the real dom.
- To create a node, we need to use
element.createElement(type)to create a text nodeelement.createElement(type), and to set properties, we need to use the methodelement.setAttribute(key, value). - Node updates need to distinguish between html nodes and component nodes. The component node needs to distinguish between class components and function components
To be continued
It can be seen that we only realized that the jsx code can be correctly rendered into the page, we still have a lot of work to do, such as the following, the subsequent code updates are placed here. source code
- Component rendering function component, class component
- Handling of props in component rendering
- vDOM comparison when dom element is updated, delete node
- setState method
- Implement the ref attribute to get an array of dom objects
- Node marking and comparison of key attributes
2021-12-31 Update
4. Component rendering
As we said above, we only render html nodes, and the next thing we need to do is to render components.react , there are two types of components, one is function component and the other is class component. So how do we differentiate?
Think about how we use it when we use it
// 函数组件
function Hello = function() {
    return <div>Hello </div>
}
// 类组件
class World extends React.Component {
    constructor(props) {
        super(props)
    }
    render(){
        return <div>Hello react</div>
    }

}
Seeing the above method, we consider the difference between functional components and class components. A function component is actually a function, so when we generate virtual DOM , its type should be function , the class component is a class, and of course its type will also be a function, so we can know that the class component The render method can be found through prototype , but this method does not exist for function components. Therefore, we need a method to determine whether the current component is a function component or a class component.
Create MyReact/isFunction.js and MyReact/isFunctionComponet.js .
// isFunction.js
export default function isFunction(vDOM) {
  return typeof vDOM?.type === 'function'
}
// isFunctionComponet.js
export default function isFunctionComponent(vDOM) {
const type = vDOM.type
return type && isFunction(vDOM) && !(type.prototype && type.prototype.render)
}What we need to do now is to distinguish components in mountElement.js . At this time, we need to create a new method, called mountComponentElement , to distinguish function components and class components.
// mountElement.js
import mountNativeElement from "./mountNativeElement"
import mountComponentElement from "./mountComponentElement"
import isFunction from "./isFunction"
/**
 * 挂载元素
 * @param {*} vDOM
 * @param {*} container
 */
export default function mountElement(vDOM, container) {
  // 此处需要区分原生dom元素还是组件,如何区分?
  if (isFunction(vDOM)) {
    mountComponentElement(vDOM, container)
  } else {
    mountNativeElement(vDOM, container)
  }
}
4.1 Rendering of function components
The above analysis shows that we need to create a mountComponentElement method for rendering component elements. How do we render this functional component? Let's first see what happens to the incoming component vDOM after calling the render method
We write such a test code in the entry index.js, and then look at the output below
function Hello() {
return <div>Hello 123!</div>
}
function Heart() {
return (<div>
♥
<Hello />
</div>)
}
MyReact.render(<Heart />, root)
The console can see that the type of the incoming function component is a function , which is the Heart we wrote. Since it is a function, we can execute it directly, and then get the virtual DOM returned by him. .
Here, we need to introduce the previously created isFunctionComponet function to distinguish function components from class components. Then we analyze, if this incoming component, what about other components it embeds? Therefore, after functional the method of this function mountComponentElement , we also need to html class type of component is generated at this time. Also call the method that renders the html component. How we seem to achieve
import isFunction from "./isFunction"; // 判断是否为function
import isFunctionComponent from "./isFunctionComponent"; // 区分函数组件 类组件
import mountNativeElement from "./mountNativeElement"; // mount Native元素
//
export default function mountComponentElement (vDOM, container) {
  console.log(vDOM, 'vDOM')
  let nextElementVDOM = null // 申明一个变量用于保存即将生成的vDOM
  // 区分class组件, 以及函数组件,如果vDOM中 有render方法,那么就是class组件,否则就是函数组件
  if (isFunctionComponent(vDOM)) {
    // 这里生成的可能是一个包含组件的函数式组件
    nextElementVDOM =  buildFunctionComponent(vDOM) // 借用一个方法,去生成函数组件的vDOM
  } else {
    // TODO 生成类组件vDOM
  }
  // 如果这个创建的elemnt还是个函数,那么就继续处理
  if (isFunction(nextElementVDOM)) {
    mountComponentElement(nextElementVDOM, container)
  } else {
    // 如果不是函数,那么就是普通的Dom元素了,直接进行渲染
    mountNativeElement(nextElementVDOM, container)
  }

}

/**
 * build函数式组件,函数式组件直接执行,执行过后就是生成的vdom
 * @param {*} vDOM
 * @returns
 */
function buildFunctionComponent(vDOM) {
  return vDOM.type() // 上面的分析可知,这个vDOM的type就是个函数 执行过后,返回return中的内容
}
At this point, the results should have appeared on our page
4.2 Rendering of class components
Next, we will implement the rendering of class components, and we also need a method to achieve this function. But before that, we need a key thing. That is Component . Because when we use class components, we need class Com extends React.Component , so we also need to implement this Component class, and then our class components can inherit this class to implement other methods
Create a new MyReact/Component.js , now we do nothing here, just expose this class
// Component.js
export default class Component {
}
In index.js, export this Component class
// MyReact/index.js
import createElement from './createElement'
import render from './render'
import Component from './Component'
export default {
  createElement,
  render,
  Component
}
Update our test code, in the index.js file we use Component to declare a class component
// index.js
class MyClass extends MyReact.Component {
  constructor(props) {
    super(props)
  }
  render() {
    return <div>我是类组件-----</div>
  }
}
MyReact.render(<MyClass />, root)
Then on the basis of 4.1, add the buildClassComponent method. According to our previous analysis of the function component, the class component needs to perform an instantiation to generate vDOM, and then manually call the render to release it.
import isFunction from "./isFunction"; // 判断是否为function
import isFunctionComponent from "./isFunctionComponent"; // 区分函数组件 类组件
import mountNativeElement from "./mountNativeElement"; // mount Native元素
//
export default function mountComponentElement (vDOM, container) {
  console.log(vDOM, 'vDOM')
  let nextElementVDOM = null // 申明一个变量用于保存即将生成的vDOM
  // 区分class组件, 以及函数组件,如果vDOM中 有render方法,那么就是class组件,否则就是函数组件
  if (isFunctionComponent(vDOM)) {
    // 这里生成的可能是一个包含组件的函数式组件
    nextElementVDOM =  buildFunctionComponent(vDOM) // 借用一个方法,去生成函数组件的vDOM
  } else {
    // 类组件的渲染
    nextElementVDOM =  buildClassComponent(vDOM)
  }
  // 如果这个创建的elemnt还是个函数,那么就继续处理
  if (isFunction(nextElementVDOM)) {
    mountComponentElement(nextElementVDOM, container)
  } else {
    // 如果不是函数,那么就是普通的Dom元素了,直接进行渲染
    mountNativeElement(nextElementVDOM, container)
  }

}

/**
 * build函数式组件,函数式组件直接执行,执行过后就是生成的vdom
 * @param {*} vDOM
 * @returns
 */
function buildFunctionComponent(vDOM) {
  return vDOM.type() // 上面的分析可知,这个vDOM的type就是个函数 执行过后,返回return中的内容
}

// 新增,build类组件方法
/**
 * build类组件, 需要对其进行实例化,然后手动的调用render方法
 * @param {*} vDOM
 * @returns
 */
function buildClassComponent(vDOM) {
  const component = new vDOM.type()
  return component.render()
}
At this point, our class component rendering method is over, you can go to the browser to see the execution result
4.3 Component props rendering
In 4.1 4.2 , we finished rendering the component, but didn't put the props in. Let's recall how props are passed in React.
// 类组件
class MyComponent extends React.Component {
constructor(props) {
super(props)
}
render() {
return <div>
<p>{this.props.age}</p>
<p>{this.props.name}</p>
<p>{this.props.gender}</p>
</div>
}
}
// 函数组件
function Heart(props) {
return (<div>
♥
{props.title}
<Hello />
</div>)
}- class component
By inheriting the props of the parent class and then using them in the subclass, we need to save the props in the classComponent. How to do it is very simple, that is, save the props passed by the subclass in the constructor, so that the subclass can access the props of the parent class. So we add the following code to theComponentclass.
The next question is, how do we pass the props property to the constructor of the class component? It is also very simple, that is, in ourbuildClassComponentmethod, the class component is instantiated, so we only need to pass the props property here when the class component is instantiated.
// Component.js
export default class Component {
  constructor(props) {
    this.props = props
  }
}
// mountComponentElement.js
function buildClassComponent(vDOM) {
const component = new vDOM.type(vDOM.props) // 将props作为实例化是的参数传递过去
return component.render()
}functional component
The function component is relatively simpler, you only need to pass the props when calling the render method, because it is an ordinary function.// mountComponentElement.js function buildFunctionComponent(vDOM) { return vDOM.type(vDOM.props) // 上面的分析可知,这个vDOM的type就是个函数 执行过后,返回return中的内容, 我们把props传递过去,在组件内部就可以获取到props的值了。 }
At this point, the rendering of the function component has been completed.
The next thing to do is:
- vDOM comparison when dom element is updated, delete node
- setState method
- Implement the ref attribute to get an array of dom objects
- Node marking and comparison of key attributes






**粗体** _斜体_ [链接](http://example.com) `代码` - 列表 > 引用。你还可以使用@来通知其他用户。