1. Environmental preparation
1. Introduction to CM
Cloudera Manager is a tool with automatic cluster installation, centralized management, cluster monitoring, and alarm functions, which shortens the installation time of a cluster from a few days to a few hours, and reduces the operation and maintenance personnel from dozens to a few people. Greatly improve the efficiency of cluster management.
This article describes how to install CDH, the selected version is 6.3.1
2. Environmental preparation
Prepare three test machines, namely centos01, centos02, and centos04. The configuration of my test machine here is 16g memory, 4CPU.
| serial number | IP | hostname |
|---|---|---|
| 1 | 192.168.222.10 | centos01 |
| 2 | 192.168.222.11 | centos02 |
| 3 | 192.168.222.13 | centos04 |
Description: The centos03 (192.168.222.12) node is enlisted for other service deployment.
| software | Version |
|---|---|
| operating system | CentOS 7.6 |
| ClouderaManager | 6.3.1 |
| CDH | 6.3.2 |
| JDK | 1.8 |
| MySQL(MariaDB) | 5.7 |
To build a running environment for virtual machines, please refer to the previous articles:
Big Data Hadoop-2-Virtual Machine Installation
Big Data Hadoop-3-Clone Virtual Machine
2.1 Turn off the firewall (all nodes)
systemctl stop firewalld
systemctl disable firewalld
systemctl status firewalld
2.2 Shut down SeLinux (all nodes)
Execute the getenforce command to check the selinux status. If the output is: enforcing , you need to deal with it, otherwise you can skip this step.
[root@centos01 ~]# getenforce
Enforcing
[root@centos01 ~]#
Modify /etc/selinux/config file (on some systems, it may be the /etc/sysconfig/selinux file)
vi /etc/selinux/configModify SELINUX=enforcing to
SELINUX=disabledAfter updating the configuration, restart the server to take effect, or execute: setenforce 0 to make it take effect immediately.
setenforce 0Note: sed -i s/SELINUX=enforcing/SELINUX=disabled/g /etc/selinux/config can also be used
Check it out again:
[root@centos01 ~]# getenforce
Permissive
3. Configure yum source
Configure yum source
(1) Backup, change CentOS-Base.repo to CentOS-Base.repo.backup
cp /etc/yum.repos.d/CentOS-Base.repo /etc/yum.repos.d/CentOS-Base.repo.backup(2) Download the new http://mirrors.aliyun.com/repo/Centos-7.repo and name it CentOS-Base.repo
wget -O /etc/yum.repos.d/CentOS-Base.repo http://mirrors.aliyun.com/repo/Centos-7.repoor
curl -o /etc/yum.repos.d/CentOS-Base.repo http://mirrors.aliyun.com/repo/Centos-7.repo(3), clear the cache
yum clean all # 清除系统所有的yum缓存
yum makecache # 生成yum缓存
4. NTP service installation and setup
Hadoop has relatively high requirements on the time synchronization of each machine in the cluster, and requires that the system time of each machine cannot be too different, otherwise it will cause many problems. You can configure time synchronization between each machine in the cluster and the time server on the Internet. However, in the actual production environment, most servers in the cluster cannot connect to the external network. At this time, you can build your own time server (NTP server) on the internal network. , each machine in the cluster synchronizes time with this time server. We choose one of the node centos01 machines as the NTP server, and the other machines are automatically synchronized with it.
4.1 Install NTP (all nodes)
yum -y install ntp4.2 Manager node (centos01):
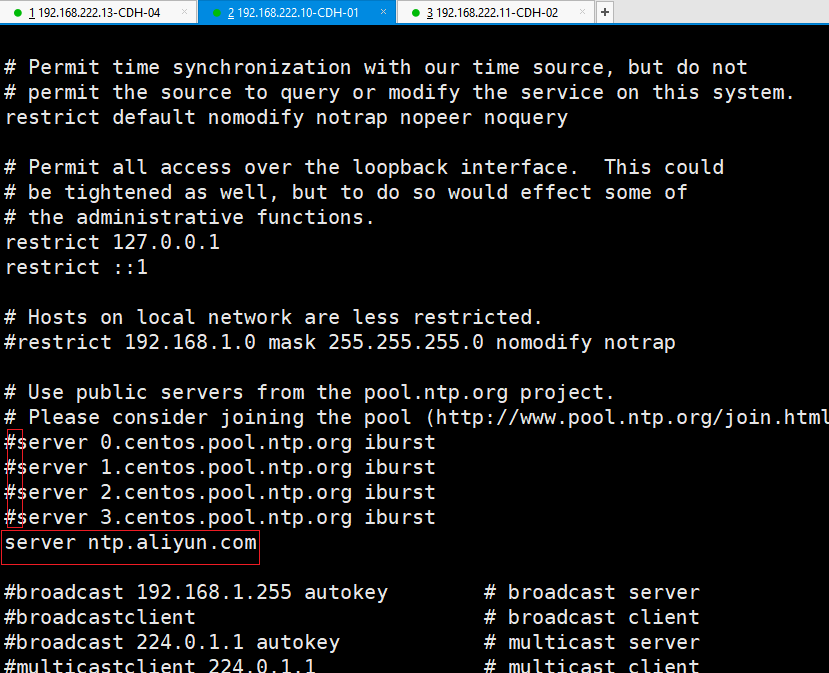
Set to point to the NTP server, if there is a time server in the LAN, you can point to the time server (manager node-centos01)
vi /etc/ntp.confComment out the previous server and add the following NTP server
server http://ntp.aliyun.com4.2 Other nodes:
vi /etc/ntp.confThe other nodes of the cluster point to the first one (centos02, centos04)
server centos01Restart the ntp service and set the bootstrap ( all nodes ):
service ntpd restart
systemctl enable ntpd.service
View and test:
ntpdc -c loopinfo #查看与时间同步服务器的时间偏差
ntpq -p #查看当前同步的时间服务器
ntpstat #查看状态定时同步crontab
crontab -e #可以不用设置
10 * * * * /usr/sbin/ntpdate centos1
Second, configure and install CDH
CDH's official website is no longer able to directly download the installation package (account and password are required), and you need to find someone who has downloaded it before.
链接:https://pan.baidu.com/s/1dpyhF6TRXaqryab6ZVVXfw
提取码:1cuo
Official website download package (slow):
http://ro-bucharest-repo.bigstepcloud.com/cloudera-repos/cm6/redhat/7/x86_64/cm/6.2.0/RPMS/x86_64/

https://archive.cloudera.com/cm6/6.3.1/
1. Configure the CM source
Note: The operating system can configure the local yum first. CDH installation packages are all rpm packages. If it is more complicated to install using the rpm installation method, there will be many dependency problems to be solved, and we need to use yum to help us solve the dependency problems. (It can also be the online Ali yum source. The aliyun yum has been set up after following the good operating system, so the centos yum source is omitted here)
Configure the CM source:
Install and start httpd on the centos01 node
#安装
yum install httpd
#启动
service httpd start
#开机自启
systemctl enable httpd
或者chkconfig httpd on
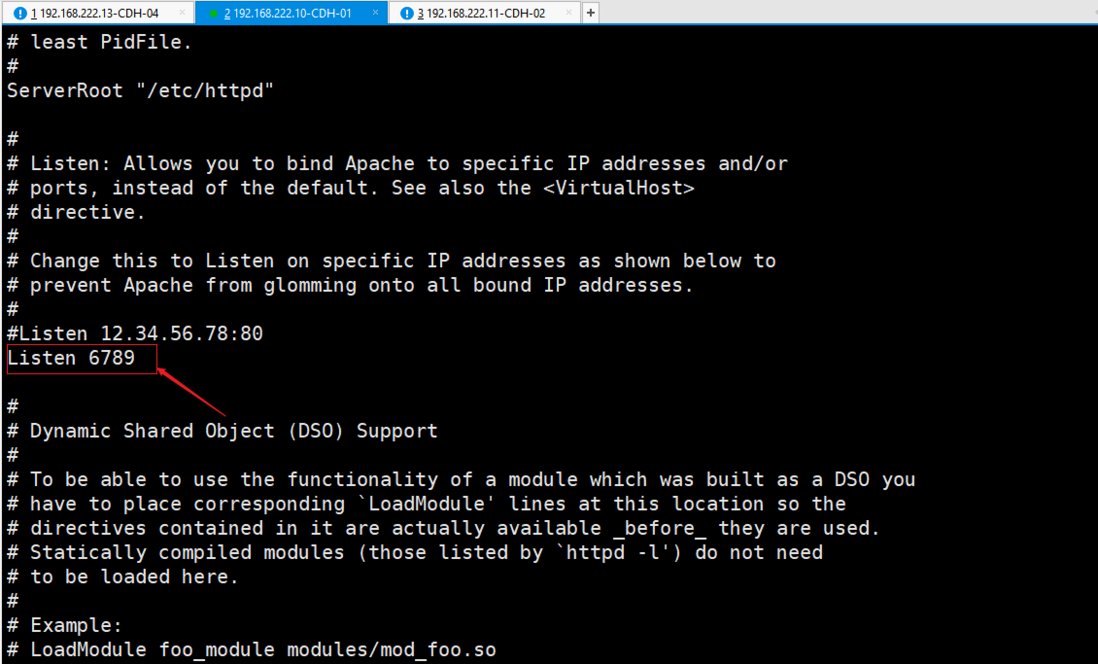
1.2 Modify the port number to: 6789 (optional operation, the default is 80, the default port is used here)
$ vi /etc/httpd/conf/httpd.confAdd/modify the port number as follows:
Listen 67891.3 Go to this directory and create a new directory:
cd /var/www/html/
mkdir cm6
mkdir cdh6
1.4 Copy the installation package of cdh and the package of cm to the created directory
1.4.1 Copy cm installation package and jdk to cm6
#拷贝cm安装包和jdk到cm6
cp cloudera-manager-* /var/www/html/cm6/
cp enterprise-debuginfo-6.3.1-1466458.el7.x86_64.rpm /var/www/html/cm6
cp oracle-j2sdk1.8-1.8.0+update181-1.x86_64.rpm /var/www/html/cm6
The files copied from the cm6 directory:
[root@centos01 cm6]# ls -l
总用量 1380408
-rw-r--r--. 1 root root   10483568 2月  27 14:11 cloudera-manager-agent-6.3.1-1466458.el7.x86_64.rpm
-rw-r--r--. 1 root root 1203832464 2月  27 14:12 cloudera-manager-daemons-6.3.1-1466458.el7.x86_64.rpm
-rw-r--r--. 1 root root      10996 2月  27 14:12 cloudera-manager-server-db-2-6.3.1-1466458.el7.x86_64.rpm
-rw-r--r--. 1 root root   14209868 2月  27 14:12 enterprise-debuginfo-6.3.1-1466458.el7.x86_64.rpm
-rw-r--r--. 1 root root  184988341 2月  27 14:12 oracle-j2sdk1.8-1.8.0+update181-1.x86_64.rpm
[root@centos01 cm6]#
1.4.2 Copy the cdh installation package and metadata files
# 拷贝cdh安装包和元数据文件
cp CDH-6.3.2-1.cdh6.3.2.p0.1605554-el7.parcel /var/www/html/cdh6/
cp manifest.json /var/www/html/cdh6/
Files copied to the cdh6 directory:
[root@centos01 cdh6]# ls -l
总用量 2033424
-rw-r--r--. 1 root root 2082186246 2月  27 14:08 CDH-6.3.2-1.cdh6.3.2.p0.1605554-el7.parcel
-rw-r--r--. 1 root root      33887 2月  27 14:08 manifest.json
1.5 Install the createrepo command, then enter the cm6 directory to create the yum source
[root@centos01 cdh6]# yum install -y createrepo  #下载createrepo
[root@centos01 cdh6]# cd /var/www/html/cm6  #命令进入到cm6安装包的httpd资源位置
[root@centos01 cdh6]# createrepo .  #创建yum源的描述meta
1.6 Configure yum source ( node)
cat >> /etc/yum.repos.d/cm.repo << EOF

[CM]
name=cm6
baseurl=http://centos01:6789/cm6/
gpgcheck=0
EOF
Then other nodes: centos02, centos04 nodes execute the above command;
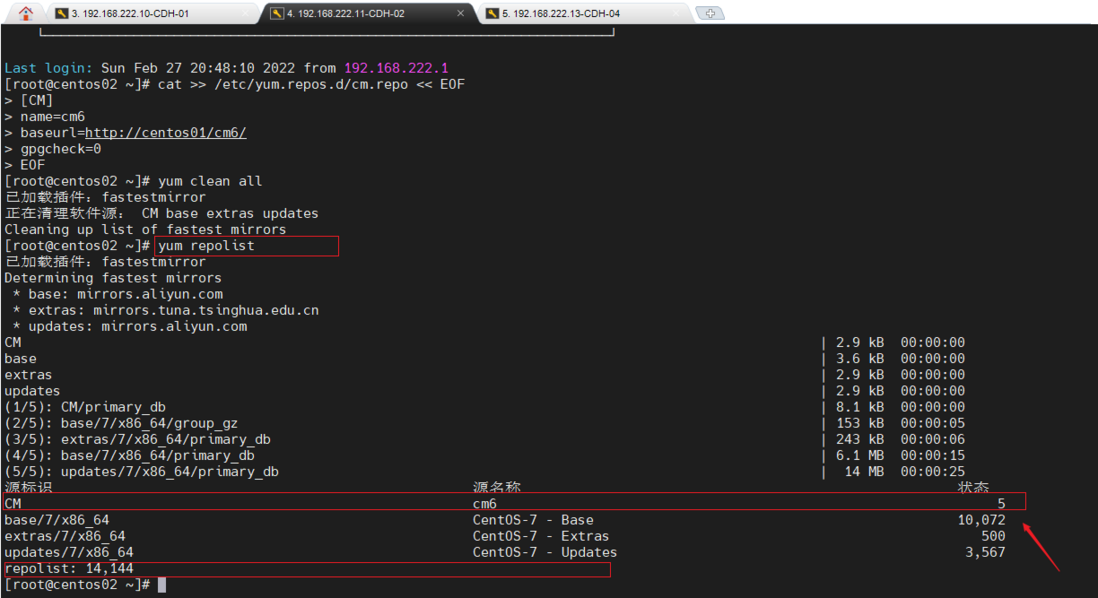
Check whether the yum configuration source takes effect
yum clean all
yum repolist
You can see that the cm source has been configured successfully.
2. Installation
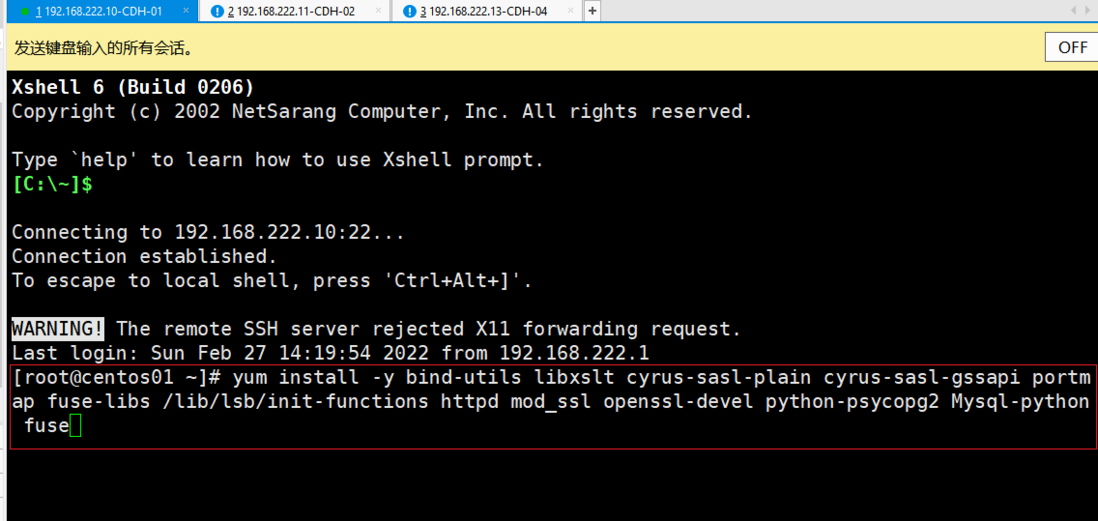
2.1 Install dependencies (all nodes)
yum install -y bind-utils libxslt cyrus-sasl-plain cyrus-sasl-gssapi portmap fuse-libs /lib/lsb/init-functions httpd mod_ssl openssl-devel python-psycopg2 Mysql-python fuse2.2 Install cloudera-manager and agent (centos01 node)
#安装JDK
yum install -y oracle-j2sdk1.8.x86_64
#安装cloudera-manager
yum install -y cloudera-manager-agent cloudera-manager-daemons cloudera-manager-server cloudera-manager-server-db-2 postgresq-server
I get this error when installing JDK:
Then go to the official website to re-download a package:
http://ro-bucharest-repo.bigstepcloud.com/cloudera-repos/cm6/redhat/7/x86_64/cm/6.2.0/RPMS/x86_64/
Put the newly downloaded oracle-j2sdk1.8.x86_64 file in the cm6 directory, and then recreate the yum source:
[root@centos01 cdh6]# cd /var/www/html/cm6  #命令进入到cm6安装包的httpd资源位置
[root@centos01 cdh6]# createrepo .  #创建yum源的描述meta
Then continue to install cloudera-manager:
#安装cloudera-manager
yum install -y cloudera-manager-agent cloudera-manager-daemons cloudera-manager-server cloudera-manager-server-db-2 postgresq-server
Another error is reported:
2.3 Install Mariadb (cdh01)
#安装
yum install -y mariadb-server
#启动和开机自启
systemctl start mariadb && systemctl enable mariadb
#配置Mariadb数据库
mysql_secure_installation #可以在遇[Y/n]输入y设置密码 [账号/密码:root/123456]
2.4 Modify the configuration file (all nodes)
Modify the Cloudera Agent configuration file /etc/cloudera-scm-agent/config.ini and configure server_host as the master node cdh01
#通过vi命令修改
vi /etc/cloudera-scm-agent/config.ini
server_host=centos01
# ------------- 第二种方法
#也可以通过sed命令修改(推荐)
sed -i "s/server_host=localhost/server_host=centos01/g" /etc/cloudera-scm-agent/config.ini
Configure JAVA_HOME (all nodes)
vi /etc/profile
#add for JAVA_HOME
export JAVA_HOME=/usr/java/jdk1.8.0_181-cloudera/
export PATH=PATH:PATH:PATH:JAVA_HOME/bin
3. Start CDH
3.1. Start Cloudera Manager (centos01)
#启动
service cloudera-scm-server start //systemctl start cloudera-scm-server
#设置开机自启???
chkconfig cloudera-scm-server on //systemctl enable cloudera-scm-server
3.2. Start Cloudera Agent ( all nodes )
#启动
service cloudera-scm-agent start //systemctl start cloudera-scm-agent
#开机自启
//systemctl enable cloudera-scm-agent
You can visit http://192.168.222.10:7180 to install component services
Username/Password: admin/admin
related articles:
|CDH6.3.2 offline installation (with Baidu network disk CDH installation package)
Shang Silicon Valley | Installation and use of CDH6.3.2 (1))
offline installation and deployment of CDH6.3.2 cluster
CDH6.1.0 offline install


**粗体** _斜体_ [链接](http://example.com) `代码` - 列表 > 引用。你还可以使用@来通知其他用户。