From the public account: Gopher refers to the north
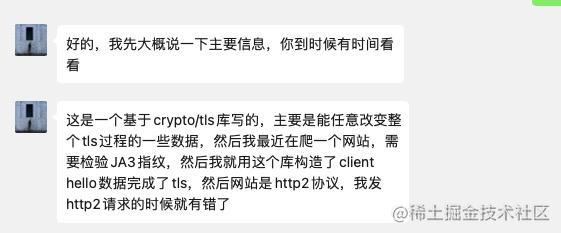
In this article, I will briefly review the https handshake process, and explain what JA3 fingerprints are and how to customize their own JA3 fingerprints based on readers' questions.
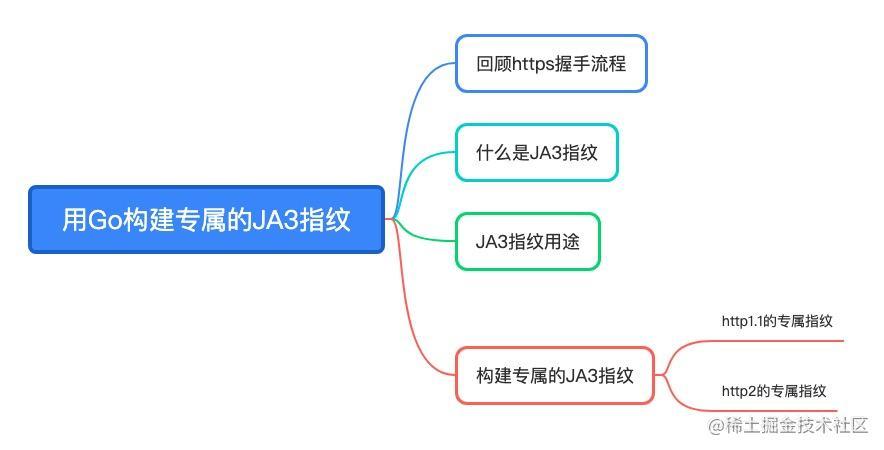
The outline of this article is as follows. Readers are invited to follow Lao Xu's ideas to gradually build their own JA3 fingerprints.
Review the HTTPS handshake process
Before we officially start to understand what JA3 fingerprints are, let's review the HTTPS handshake process, which will help understand the following.
I have coded more than 2000 lines of code to clarify the TLS handshake process . This article mainly analyzes the HTTPS one-way authentication and two-way authentication process (TLS1.3).
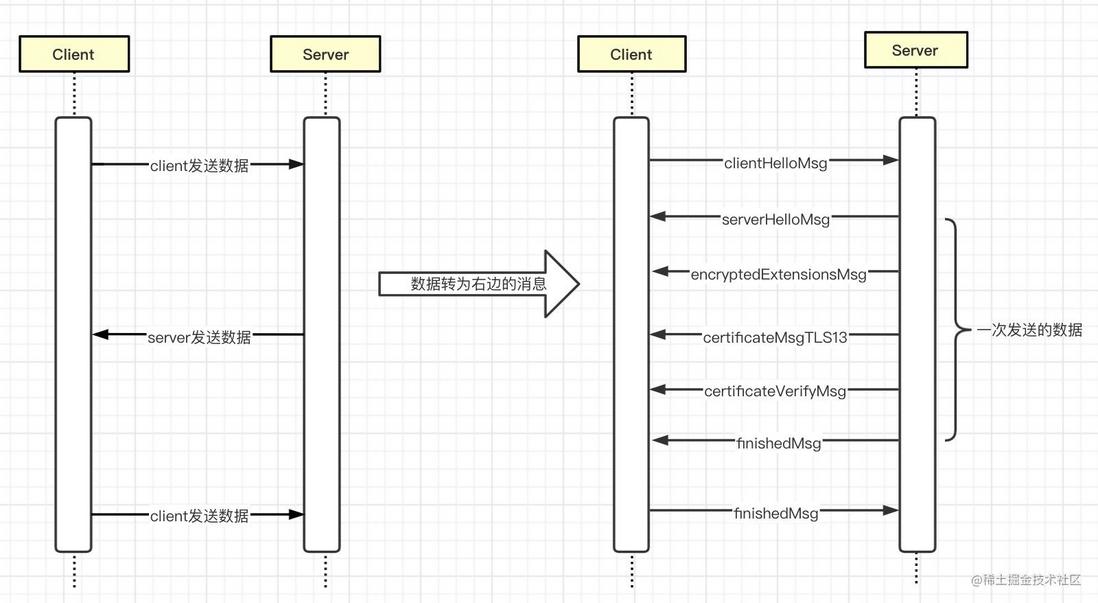
In one-way authentication , the client does not need a certificate, and only needs to verify that the server certificate is valid. The handshake process and the exchanged msg are as follows.
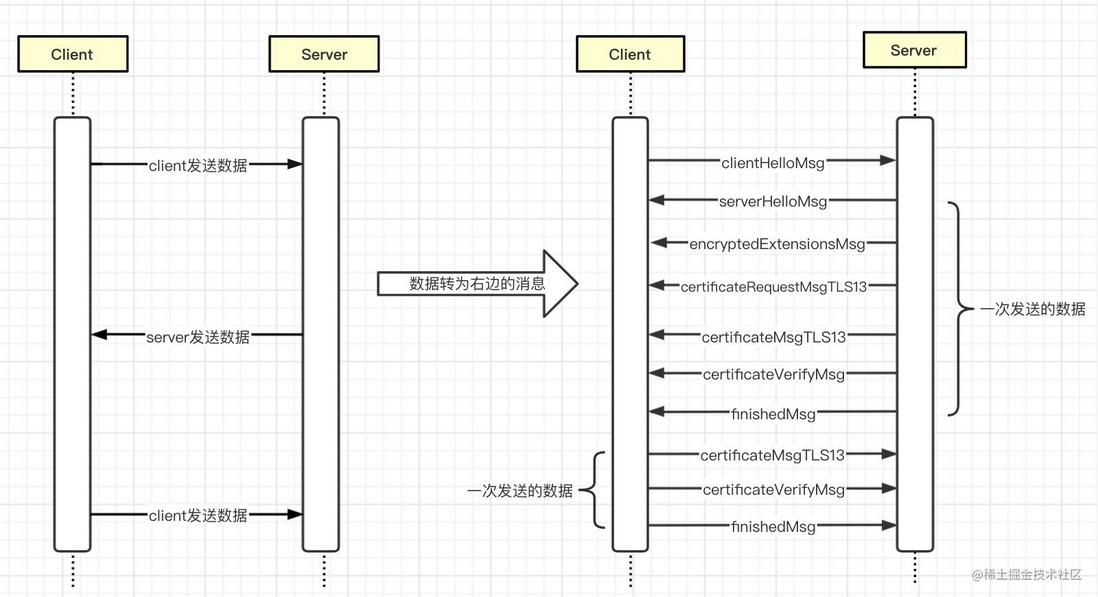
In two-way authentication , both the server and the client need to verify the validity of the other party's certificate. The handshake process and the exchanged msg are as follows.
Comparison of one-way authentication and two-way authentication:
- In one-way authentication and two-way authentication, the total data sent and received is only three times, and the data sent once contains one or more messages
-
clientHelloMsgandserverHelloMsgare not encrypted , and the messages sent after that are encrypted - Client and Server will each calculate the key twice, and the calculation timing is after reading each other's
HelloMsgandfinishedMsg - Compared with two-way authentication and one-way authentication, the server sends more
certificateRequestMsgTLS13messages - Compared with two-way authentication and one-way authentication, the client sends two more messages
certificateMsgTLS13andcertificateVerifyMsg
Whether it is one-way authentication or two-way authentication, the server's understanding of the client's basic information depends entirely on the client's initiative to inform the server, and the more critical information are 客户端支持的TLS版本 , 客户端支持的加密套件(cipherSuites) , 客户端支持的签名算法和客户端支持的密钥交换协议以及其对应的公钥 . These information are included in the clientHelloMsg , which is also the key information to generate the JA3 fingerprint, and clientHelloMsg and serverHelloMsg are not encrypted . Unencrypted means that the difficulty of modification is reduced, which also provides the possibility for us to customize our own exclusive JA3 fingerprint.
If you are interested in learning more details about the HTTPS handshake process, please read the following article:
Coded more than 2000 lines of code to clarify the TLS handshake process
Coded more than 2000 lines of code to clarify the TLS handshake process (continued)
What is JA3 Fingerprint
So much has been said before, so what exactly is a JA3 fingerprint. According to the article Open Sourcing JA3 , Lao Xu simply understands that JA3 is a method for online identification of TLS client fingerprints.
The method for collecting clientHelloMsg packet byte following the decimal value of the field: TLS Version , Accepted Ciphers , List of Extensions , Elliptic Curves and Elliptic Curve Formats . It then concatenates the values, using "," to separate the fields and "-" to separate the values in the fields. Finally, calculate the md5 hash of these strings, which is a 32-character fingerprint that is easy to use and share.
In order to further describe the source of these data, Lao Xu will John Althouse the packet capture map in the article combined with the clientHelloMsg structure in the Go source code to map the fields one by one.
Careful students may have discovered that according to the previous description, the JA3 fingerprint has a total of 5 data fields, but only 4 are mapped in the above figure. That's because there are many extension fields in TLS, and Lao Xu will not sort them out one by one. Although not listed one by one, Lao Xu has prepared a unit test, and students who are interested in in-depth research can use this unit test to debug and analyze.
https://github.com/Isites/go-coder/blob/master/http2/tls/handsh/msg_test.go
JA3 fingerprint usage
According to the previous description, the JA3 fingerprint is an md5 string. Please recall the use of md5 in the usual development.
- Determine whether the content is consistent
- as a unique identifier
Although md5 is not secure, the main reason why JA3 chooses md5 as the hash is for better backward compatibility
Clearly, JA3 fingerprints serve a similar purpose. As a simple example, the attacker builds an executable file, then the JA3 fingerprint of the file is likely to be unique. Therefore, we were able to identify some malware through JA3 fingerprinting.
At the end of this section, Lao Xu recommends a website that has many malicious JA3 fingerprint lists.
https://sslbl.abuse.ch/ja3-fingerprints/Build your own JA3 fingerprint
Exclusive fingerprint of http1.1
As mentioned above, clientHelloMsg and serverHelloMsg are not encrypted , which provides the possibility to customize your own JA3 fingerprint, and there is a library on github ( https://github.com/ refraction-networking/utls ) can be modified to some extent clientHelloMsg . Next, we will use this library to build our own JA3 fingerprint.
 // 关键import
import (
    xtls "github.com/refraction-networking/utls"
    "crypto/tls"
)

// 克隆一个Transport
tr := http.DefaultTransport.(*http.Transport).Clone()
// 自定义DialTLSContext函数,此函数会用于创建tcp连接和tls握手

tr.DialTLSContext = func(ctx context.Context, network, addr string) (net.Conn, error) {
    dialer := net.Dialer{}
    // 创建tcp连接
    con, err := dialer.DialContext(ctx, network, addr)
    if err != nil {
        return nil, err
    }
    // 根据地址获取host信息
    host, _, err := net.SplitHostPort(addr)
    if err != nil {
        return nil, err
    }
    // 构建tlsconf
    xtlsConf := &xtls.Config{
        ServerName:    host,
        Renegotiation: xtls.RenegotiateNever,
    }
    // 构建tls.UConn
    xtlsConn := xtls.UClient(con, xtlsConf, xtls.HelloCustom)
    clientHelloSpec := &xtls.ClientHelloSpec{
        // hellomsg中的最大最小tls版本
        TLSVersMax: tls.VersionTLS12,
        TLSVersMin: tls.VersionTLS10,
        // ja3指纹需要的CipherSuites
        CipherSuites: []uint16{
            tls.TLS_ECDHE_ECDSA_WITH_AES_256_GCM_SHA384,
            tls.TLS_ECDHE_ECDSA_WITH_AES_128_GCM_SHA256,
            // tls.TLS_ECDHE_ECDSA_WITH_AES_256_CBC_SHA384,
            tls.TLS_ECDHE_ECDSA_WITH_AES_128_CBC_SHA256,
            tls.TLS_ECDHE_ECDSA_WITH_AES_256_CBC_SHA,
            tls.TLS_ECDHE_ECDSA_WITH_AES_128_CBC_SHA,
            tls.TLS_ECDHE_ECDSA_WITH_CHACHA20_POLY1305,
            tls.TLS_ECDHE_RSA_WITH_AES_256_GCM_SHA384,
            tls.TLS_ECDHE_RSA_WITH_AES_128_GCM_SHA256,
            // tls.TLS_ECDHE_RSA_WITH_AES_256_CBC_SHA384,
            tls.TLS_ECDHE_RSA_WITH_AES_128_CBC_SHA256,
            tls.TLS_ECDHE_RSA_WITH_AES_256_CBC_SHA,
            tls.TLS_ECDHE_RSA_WITH_AES_128_CBC_SHA,
            tls.TLS_ECDHE_RSA_WITH_CHACHA20_POLY1305,
        },
        CompressionMethods: []byte{
            0,
        },
        // ja3指纹需要的Extensions
        Extensions: []xtls.TLSExtension{
            &xtls.RenegotiationInfoExtension{Renegotiation: xtls.RenegotiateOnceAsClient},
            &xtls.SNIExtension{ServerName: host},
            &xtls.UtlsExtendedMasterSecretExtension{},
            &xtls.SignatureAlgorithmsExtension{SupportedSignatureAlgorithms: []xtls.SignatureScheme{
                xtls.ECDSAWithP256AndSHA256,
                xtls.PSSWithSHA256,
                xtls.PKCS1WithSHA256,
                xtls.ECDSAWithP384AndSHA384,
                xtls.ECDSAWithSHA1,
                xtls.PSSWithSHA384,
                xtls.PSSWithSHA384,
                xtls.PKCS1WithSHA384,
                xtls.PSSWithSHA512,
                xtls.PKCS1WithSHA512,
                xtls.PKCS1WithSHA1}},
            &xtls.StatusRequestExtension{},
            &xtls.NPNExtension{},
            &xtls.SCTExtension{},
            &xtls.ALPNExtension{AlpnProtocols: []string{"h2", "http/1.1"}},
            // ja3指纹需要的Elliptic Curve Formats
            &xtls.SupportedPointsExtension{SupportedPoints: []byte{1}}, // uncompressed
            // ja3指纹需要的Elliptic Curves
            &xtls.SupportedCurvesExtension{
                Curves: []xtls.CurveID{
                    xtls.X25519,
                    xtls.CurveP256,
                    xtls.CurveP384,
                    xtls.CurveP521,
                },
            },
        },
    }
    // 定义hellomsg的加密套件等信息
    err = xtlsConn.ApplyPreset(clientHelloSpec)
    if err != nil {
        return nil, err
    }
    // TLS握手
    err = xtlsConn.Handshake()
    if err != nil {
        return nil, err
    }
    fmt.Println("当前请求使用协议:", xtlsConn.HandshakeState.ServerHello.AlpnProtocol)
    return xtlsConn, err
}
The above code can be summed up in three steps.
- Create a TCP connection
- Build
clientHelloMsgRequired Information - Complete the TLS handshake
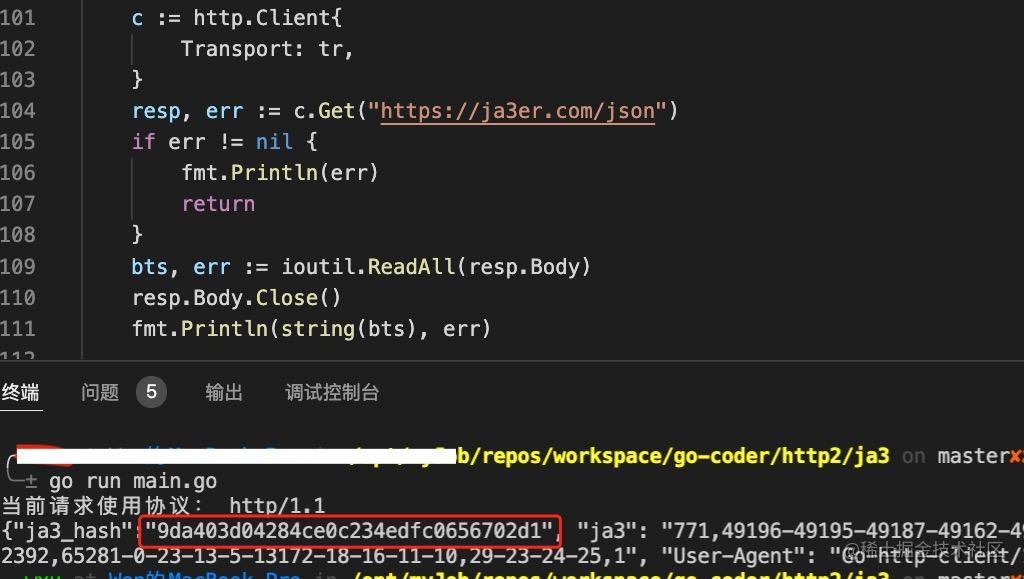
With the above code, we get our JA3 fingerprint by requesting https://ja3er.com/json .
 c := http.Client{
    Transport: tr,
}
resp, err := c.Get("https://ja3er.com/json")
if err != nil {
    fmt.Println(err)
    return
}
bts, err := ioutil.ReadAll(resp.Body)
resp.Body.Close()
fmt.Println(string(bts), err)
The final JA3 fingerprint obtained is as follows.
We have already got the first JA3 fingerprint, this time slightly changed the code to get the JA3 fingerprint of 专属 . For example, we add 2333 this value to the CipherSuites list, and the final result is as follows.
In the end, the JA3 fingerprint has changed again, and it can be called its own fingerprint. Needless to say, looking at the title should know that the problem is not over. It can also be seen from the result graph of the JA3 fingerprint obtained from the previous request that the currently used protocol is http1.1 , so Lao Xu found a link that supports http2 from a certain degree to continue the verification.
Students who have read the article Analysis of the HTTP2.0 Request Process (Part 1) initiated by Go should know that the http2 connection needs to be sent PRI * HTTP/2.0\r\n\r\nSM\r\n\r\n such a string. Obviously, after customizing the DialTLSContext function, the relevant process is missing. At this point, how do we build the exclusive fingerprint of http2?
Exclusive fingerprint of http2
After dialing through DialTLSContext , you can only get a connection that has completed the TLS handshake. At this time, it does not support http2's 数据帧 , 多路复用 and other features. Therefore, we need to build a connection that supports various features of http2 by ourselves.
Next, we use golang.org/x/net/http2 to complete the http2 request after the custom TLS handshake process.
 // 手动拨号,得到一个已经完成TLS握手后的连接
con, err := tr.DialTLSContext(context.Background(), "tcp", "dss0.bdstatic.com:443")
if err != nil {
    fmt.Println("DialTLSContext", err)
    return
}

// 构建一个http2的连接
tr2 := http2.Transport{}
// 这一步很关键,不可缺失
h2Con, err := tr2.NewClientConn(con)
if err != nil {
    fmt.Println("NewClientConn", err)
    return
}

req, _ := http.NewRequest("GET", "https://dss0.bdstatic.com/5aV1bjqh_Q23odCf/static/superman/img/topnav/newzhidao-da1cf444b0.png", nil)
// 向一个支持http2的链接发起请求并读取请求状态
resp2, err := h2Con.RoundTrip(req)
if err != nil {
    fmt.Println("RoundTrip", err)
    return
}
io.CopyN(io.Discard, resp2.Body, 2<<10)
resp2.Body.Close()
fmt.Println("响应code: ", resp2.StatusCode)
The results are as follows.
It can be seen that after customizing the JA3 fingerprint, http2 requests can also be read normally. At this point, the construction of the exclusive JA3 fingerprint in the request supporting http2 is completed (the information for generating the JA3 fingerprint is in clientHelloMsg , and this part is completed only to ensure that the request can be read normally from the start to the read response. ).
To add a few extra sentences, completing http2 requests manually NewClientConn has great limitations. For example, you need to manage the life cycle of the connection yourself, and you cannot automatically reconnect. Of course, these are all things to come. When there is a real need in this regard, developers may need to fork a copy of the net package from the go source code for their own maintenance.
write at the end
Lao Xu wrote this article not only to let you know about ja3, but also to hope that readers can deepen their understanding of the bottom layer of http through their own practice.
Finally, I sincerely hope that this article can be helpful to all readers.
Note:
At the time of writing this article, the go version used by the author is: go1.17.7
The complete example used in the article: https://github.com/Isites/go-coder/blob/master/http2/ja3/main.go



**粗体** _斜体_ [链接](http://example.com) `代码` - 列表 > 引用。你还可以使用@来通知其他用户。