Introduction
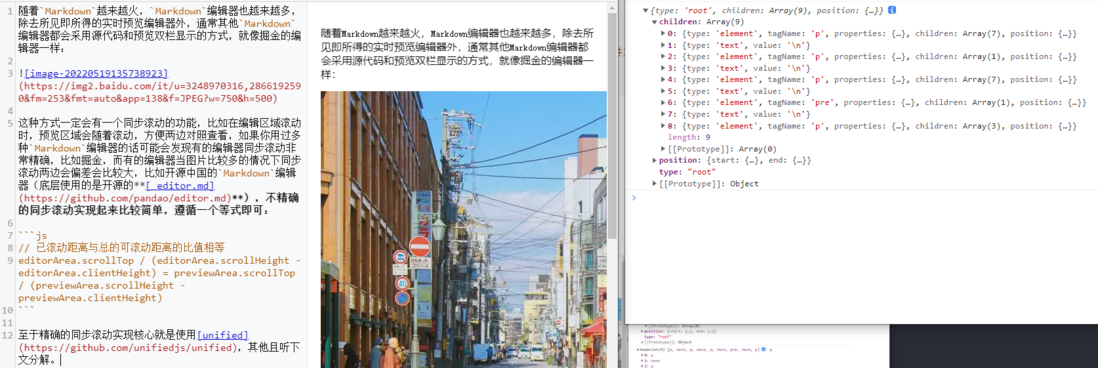
As Markdown becomes more and more popular, Markdown editors are also more and more, except the WYSIWYG real-time preview editor, usually other Markdown The editor will display the source code and preview in two columns, like this:
This method generally has a synchronous scrolling function. For example, when the editing area is scrolled, the preview area will scroll with it, and vice versa, which is convenient for viewing on both sides. If you have used multiple platforms Markdown If you are an editor, you may find that some platform editors have very accurate synchronous scrolling, such as Nuggets, segmentfault , CSDN , etc., and some platform editors when there are many pictures There will be large deviations on both sides of synchronous scrolling, such as Open Source China (the bottom layer uses the open source editor.md ), 51CTO , etc. In addition, there are a few platforms that do not even have the function of synchronous scrolling (goodbye).
Imprecise synchronous scrolling is relatively simple to implement, following an equation:
 // 已滚动距离与总的可滚动距离的比值相等
editorArea.scrollTop / (editorArea.scrollHeight - editorArea.clientHeight) = previewArea.scrollTop / (previewArea.scrollHeight - previewArea.clientHeight)
So how can we make synchronous scrolling more precise? We can refer to bytemd . The core of the implementation is to use unified to predict the details, and see the breakdown below.
Introduction to unified
unified is an interface for parsing, inspecting, converting, and serializing textual content by using a syntax tree, which can handle Markdown , HTML and natural language. It is a library, as an independent execution interface, responsible for the role of the executor, calling its ecologically related plug-ins to complete specific tasks. At the same time unified also represents an ecology. To complete the text processing tasks mentioned above, it needs to cooperate with various plug-ins in its ecology. As of now, there are more than 300 plug-ins in its ecology! Given that there are too many, it is easy to get lost in its huge ecology, which can be described as an ecology of persuasion.
unified There are four main ecosystems: remark , rehype , retext , redot , which have their own ecosystems, and also include some tools for processing syntax trees and other construction-related tools.
We should all be familiar with the execution process of unified , which is divided into three stages:
1. Parse
Parse the input into a syntax tree, mdast is responsible for defining the specification, remark and rehype and other processors otherwise create.
2. Transform
The syntax tree generated in the previous step will be passed to various plugins for modification, inspection, transformation, etc.
3. Stringify
This step will regenerate the text content from the processed syntax tree.
unified is unique in that it allows conversion between different formats in one processing flow, so it can meet the needs of our article, that is, convert the Markdown syntax into HTML Grammar, we will use the ecological remark (parse Markdown ), rehype (parse HTml ).
Specifically, it is to use the remark ecological remark-parse plugin to convert the input Markdown text into Markdown syntax tree, and then use the remark-rehype bridge plugin To convert the Markdown syntax tree into the HTML syntax tree, and finally use the rehype-stringify plugin to generate the --- HTML syntax tree to the string HTML .
Build the basic structure
This project is built using Vue3 . Editor We use CodeMirror , Markdown turn HTML We use the unified introduced in the previous section to install the relevant dependencies:
npm i codemirror unified remark-parse remark-rehype rehype-stringifyThen the basic structure and logic are very simple, the template part:
 <template>
  <div class="container">
    <div class="editorArea" ref="editorArea"></div>
    <div class="previewArea" ref="previewArea" v-html="htmlStr"></div>
  </div>
</template>
js Part:
 import { onMounted, ref } from "vue";
import CodeMirror from "codemirror";
import "codemirror/mode/markdown/markdown.js";
import "codemirror/lib/codemirror.css";
import { unified } from "unified";
import remarkParse from "remark-parse";
import remarkRehype from "remark-rehype";
import rehypeStringify from "rehype-stringify";

// CodeMirror编辑器实例
let editor = null;
// 编辑区域容器节点
const editorArea = ref(null);
// 预览区域容器节点
const previewArea = ref(null);
// markdown转换成的html字符串
const htmlStr = ref("");

// 编辑器文本发生变化后进行转换工作
const onChange = (instance) => {
  unified()
    .use(remarkParse) // 将markdown转换成语法树
    .use(remarkRehype) // 将markdown语法树转换成html语法树,转换之后就可以使用rehype相关的插件
    .use(rehypeStringify) // 将html语法树转换成html字符串
    .process(instance.doc.getValue())// 输入编辑器的文本内容
    .then(
      (file) => {
        // 将转换后得到的html插入到预览区节点内
        htmlStr.value = String(file);
      },
      (error) => {
        throw error;
      }
    );
};

onMounted(() => {
  // 创建编辑器
  editor = CodeMirror(editorArea.value, {
    mode: "markdown",
    lineNumbers: true,
    lineWrapping: true,
  });
  // 监听编辑器文本修改事件
  editor.on("change", onChange);
});
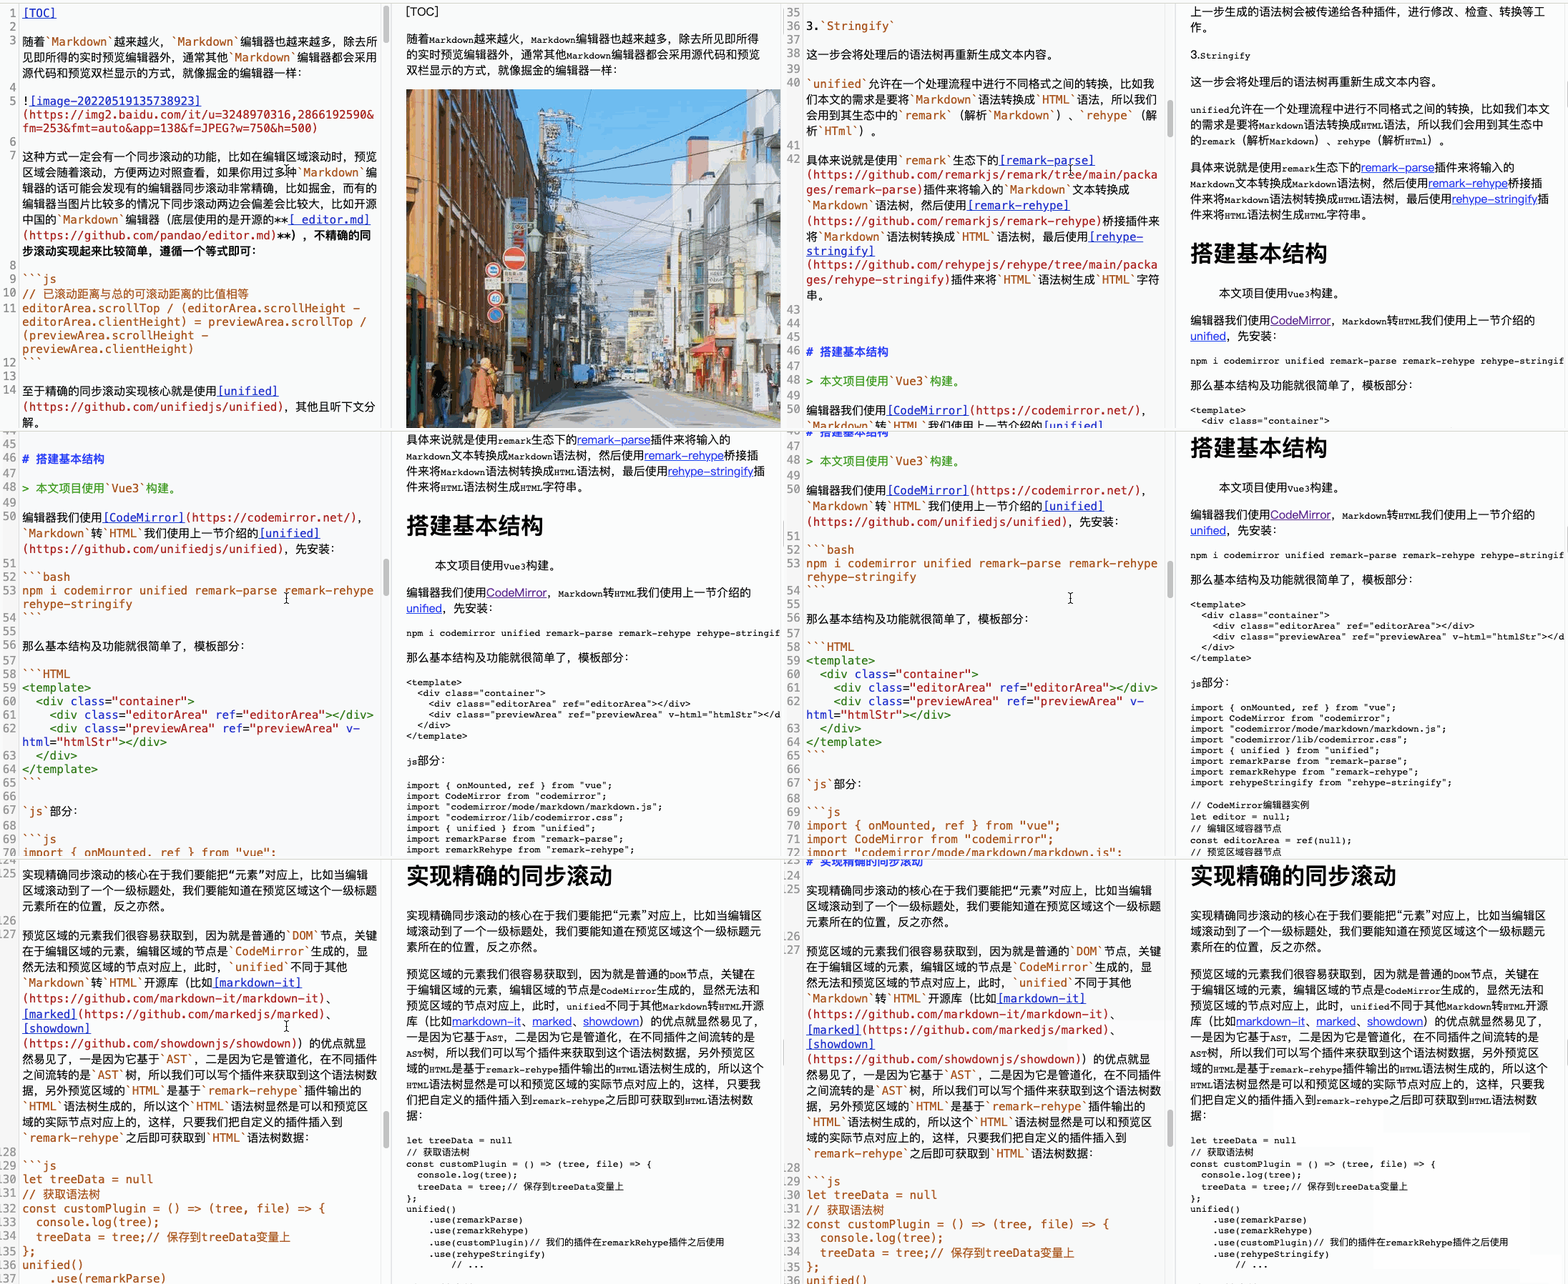
After listening to the editor text change, use unified to perform the conversion work, the effect is as follows:
Achieve precise synchronized scrolling
Basic realization principle
The core of achieving precise synchronous scrolling is that we need to be able to match the "nodes" on both sides of the editing area and the preview area. For example, when the editing area scrolls to a first-level title, we need to be able to know where the first-level title node in the preview area is located. location and vice versa.
We can easily get the nodes in the preview area, because they are ordinary DOM nodes. The key lies in the nodes in the editing area. The nodes in the editing area are generated by CodeMirror , which obviously cannot be generated with the preview area. At this time, unified different from other Markdown turn HTML open source library (such as markdown-it , marked , showdown ) One is because it is based on AST , and the other is because it is pipelined, and the flow between different plugins is AST tree, so we can write a plugin to get this语法树数据, HTML remark-rehype HTML语法树生成的, HTML语法树Obviously, it can correspond to the actual node in the preview area. In this way, as long as we insert the custom plug-in into remark-rehype , we can get the HTML syntax tree data:
 let treeData = null
// 自定义插件,获取HTML语法树
const customPlugin = () => (tree, file) => {
  console.log(tree);
  treeData = tree;// 保存到treeData变量上
};
unified()
    .use(remarkParse)
    .use(remarkRehype)
    .use(customPlugin)// 我们的插件在remarkRehype插件之后使用
    .use(rehypeStringify)
    // ...
Take a look at the output:
Next, we listen to the scroll event in the editing area, and print the syntax tree data and the generated preview area DOM node data in the event callback function:
 editor.on("scroll", onEditorScroll);

// 编辑区域的滚动事件
const onEditorScroll = () => {
  computedPosition();
};

// 计算位置信息
const computedPosition = () => {
  console.log(treeData, treeData.children.length);
  console.log(
    previewArea.value.childNodes,
    previewArea.value.childNodes.length
  );
};
print result:
Note that there is a one-to-one correspondence between the nodes of the syntax tree output by the console and the actual DOM nodes.
Of course, the correspondence is not enough, DOM node can get its height information through DOM related attributes, we also need to be able to get its height in the editor for a node of the syntax tree Height information, this can be achieved depends on two points, one is that the syntax tree provides the positioning information of a node:
The second is CodeMirror provides an interface to obtain the height of a certain row:
So we can get the height information of the node in the CodeMirror document through the starting line of a node, and test it:
 const computedPosition = () => {
  console.log('---------------')
  treeData.children.forEach((child, index) => {
    // 如果节点类型不为element则跳过
    if (child.type !== "element") {
      return;
    }
    let offsetTop = editor.heightAtLine(child.position.start.line, 'local');// 设为local返回的坐标是相对于编辑器本身的,其他还有两个可选项:window、page
    console.log(child.children[0].value, offsetTop);
  });
};
You can see that the offsetTop of the first node is 80 , why not 0 , there is actually a screenshot of the document CodeMirror . , the returned height is the distance from the bottom of this line to the top of the document, so to get the height of the top of a line is equivalent to getting the height of the bottom of the previous line, so reduce the number of lines 1 to:
let offsetTop = editor.heightAtLine(child.position.start.line - 1, 'local'); After both the editing area and the preview area can obtain the height of the node, we can do this next. When the scrolling is triggered in the editing area, first calculate the height information of all elements in the two areas, and then obtain the editing area. The current scrolling distance is used to find out which node is currently scrolled. Because the nodes on both sides are in one-to-one correspondence, the height of the corresponding node in the preview area can be found, and finally the preview area can be scrolled to this height:
 // 新增两个变量保存节点的位置信息
let editorElementList = [];
let previewElementList = [];

const computedPosition = () => {
  // 获取预览区域容器节点下的所有子节点
  let previewChildNodes = previewArea.value.childNodes;
  // 清空数组
  editorElementList = [];
  previewElementList = [];
  // 遍历所有子节点
  treeData.children.forEach((child, index) => {
    if (child.type !== "element") {
      return;
    }
    let offsetTop = editor.heightAtLine(child.position.start.line - 1, "local");
    // 保存两边节点的位置信息
    editorElementList.push(offsetTop);
    previewElementList.push(previewChildNodes[index].offsetTop); // 预览区域的容器节点previewArea需要设置定位
  });
};

const onEditorScroll = () => {
  computedPosition();
  // 获取编辑器滚动信息
  let editorScrollInfo = editor.getScrollInfo();
  // 找出当前滚动到的节点的索引
  let scrollElementIndex = null;
  for (let i = 0; i < editorElementList.length; i++) {
    if (editorScrollInfo.top < editorElementList[i]) {
      // 当前节点的offsetTop大于滚动的距离,相当于当前滚动到了前一个节点内
      scrollElementIndex = i - 1;
      break;
    }
  }
  if (scrollElementIndex >= 0) {
    // 设置预览区域的滚动距离为对应节点的offsetTop
    previewArea.value.scrollTop = previewElementList[scrollElementIndex];
  }
};
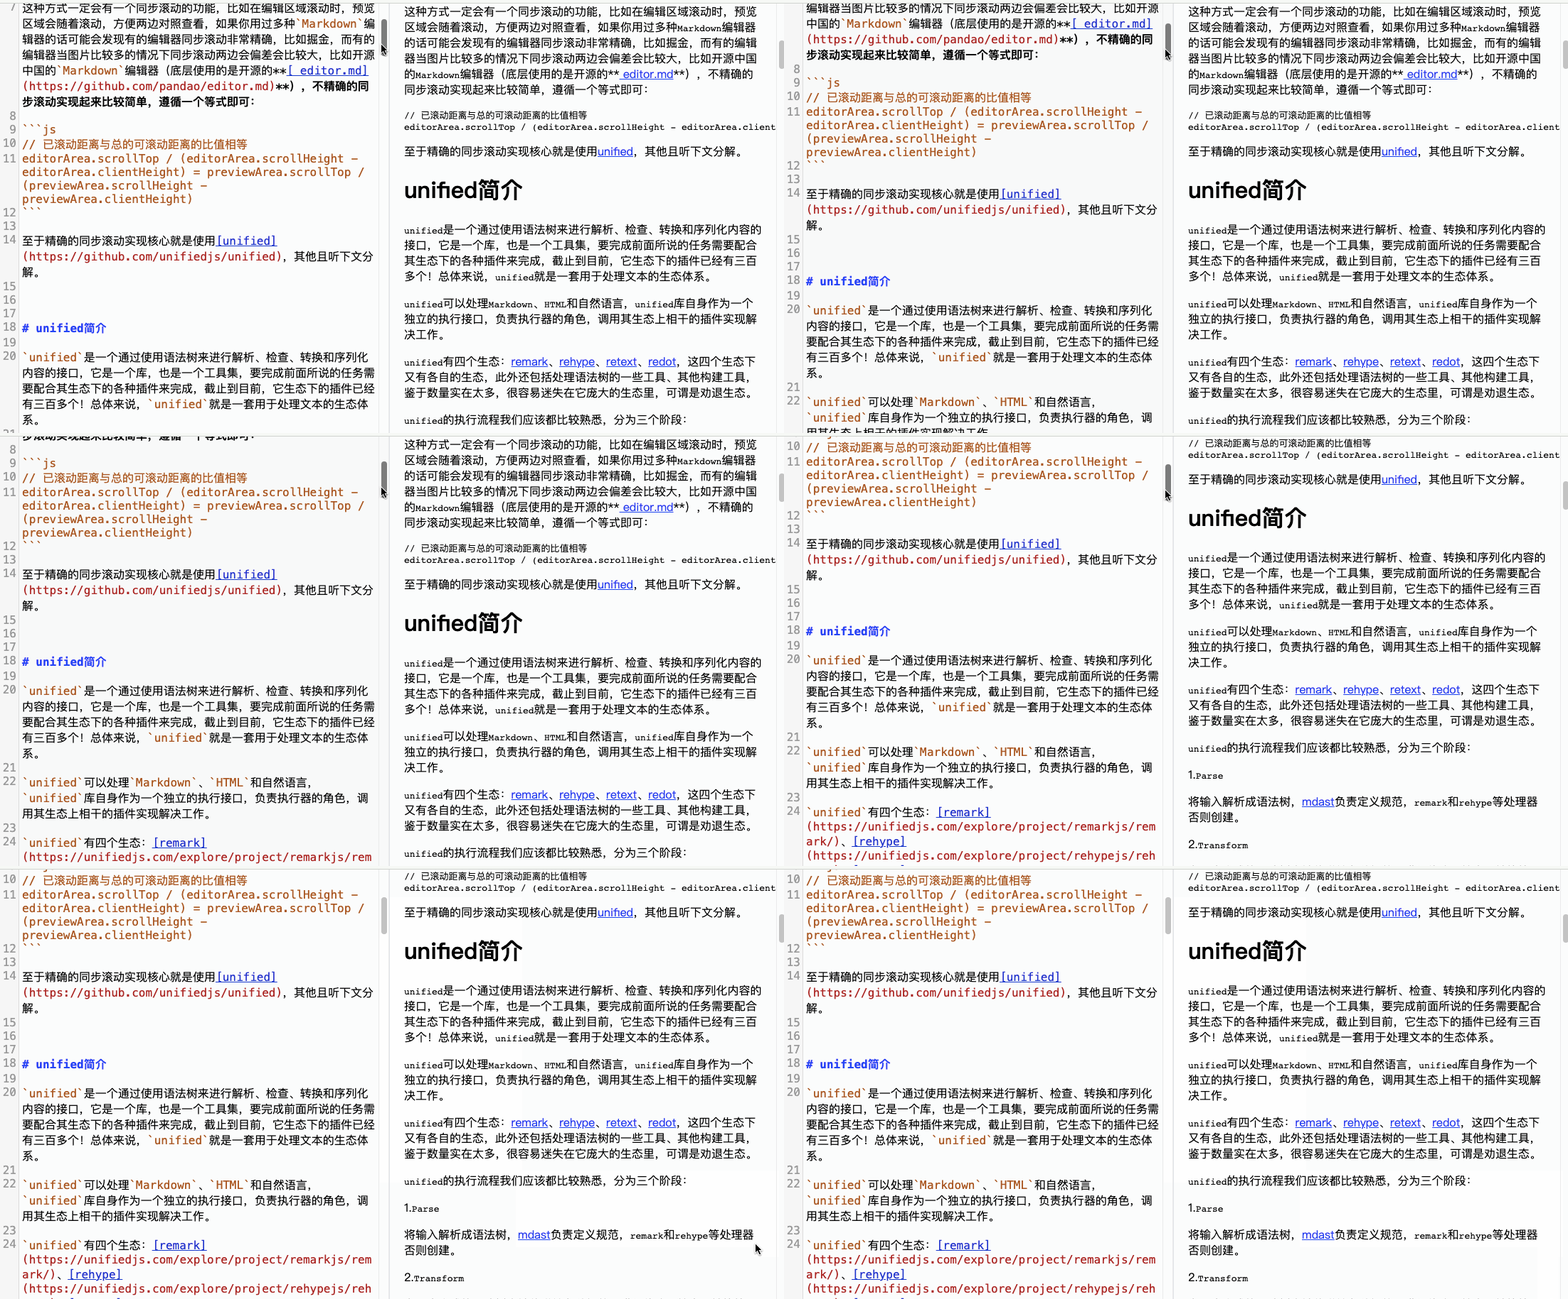
The effect is as follows:
Fix the problem that the scrolling in the node is out of sync
It can be seen that the scrolling across nodes is relatively accurate, but if the height of a node is relatively large, scrolling on the right side of the node will not scroll synchronously:
The reason is very simple. Our synchronous scrolling is currently only accurate to a certain node. As long as the scrolling does not exceed the node, the calculated scrollElementIndex is unchanged, and the scrolling on the right side will of course not change. .
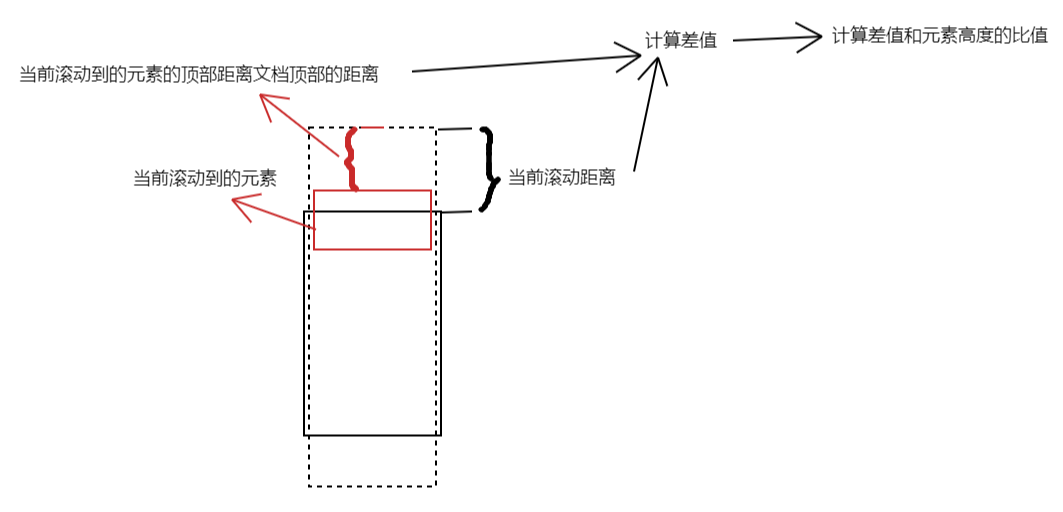
The solution to this problem is also very simple. Remember the principle of non-precise scrolling introduced at the beginning of the article? Here we can also calculate it like this: the current scrolling distance of the editing area is known, and the top of the currently scrolled node is far from the top of the document. The distance is also known, then their difference can be calculated, and then the height of the current node can be calculated using the offsetTop value of the next node minus the offsetTop value of the current node , then the ratio of this difference to the node height can also be calculated:
The same is true for the corresponding nodes in the preview area, their ratios should be equal, so the equation is as follows:
 (editorScrollInfo.top - editorElementList[scrollElementIndex]) /
      (editorElementList[scrollElementIndex + 1] -
        editorElementList[scrollElementIndex])
=
(previewArea.value.scrollTop - previewElementList[scrollElementIndex]) / (previewElementList[scrollElementIndex + 1] -
          previewElementList[scrollElementIndex])
Calculate the value of previewArea.value.scrollTop according to this equation, the final code:
 const onEditorScroll = () => {
  computedPosition();
  let editorScrollInfo = editor.getScrollInfo();
  let scrollElementIndex = null;
  for (let i = 0; i < editorElementList.length; i++) {
    if (editorScrollInfo.top < editorElementList[i]) {
      scrollElementIndex = i - 1;
      break;
    }
  }
  if (scrollElementIndex >= 0) {
    // 编辑区域滚动距离和当前滚动到的节点的offsetTop的差值与当前节点高度的比值
    let ratio =
      (editorScrollInfo.top - editorElementList[scrollElementIndex]) /
      (editorElementList[scrollElementIndex + 1] -
        editorElementList[scrollElementIndex]);
    // 根据比值相等计算出预览区域应该滚动到的位置
    previewArea.value.scrollTop =
      ratio *
        (previewElementList[scrollElementIndex + 1] -
          previewElementList[scrollElementIndex]) +
      previewElementList[scrollElementIndex];
  }
};
The effect is as follows:
Fixed an issue where both sides did not scroll to the bottom at the same time
Synchronized scrolling is basically accurate, but there is a small problem when the editing area has been scrolled to the end, but the preview area is not:
This is logical, but irrational, so when one side rolls to the end we let the other end as well:
 const onEditorScroll = () => {
  computedPosition();
  let editorScrollInfo = editor.getScrollInfo();
  let scrollElementIndex = null;
  // ...
  // 编辑区域已经滚动到底部,那么预览区域也直接滚动到底部
  if (
    editorScrollInfo.top >=
    editorScrollInfo.height - editorScrollInfo.clientHeight
  ) {
    previewArea.value.scrollTop =
      previewArea.value.scrollHeight - previewArea.value.clientHeight;
    return;
  }
  if (scrollElementIndex >= 0) {
      // ...
  }
}
The effect is as follows:
Improve the synchronous scrolling of the editing area when the preview area is scrolled
Finally, let's improve the logic of triggering scrolling in the preview area and following the scrolling in the editing area, and listening to the scrolling events in the preview area:
<div class="previewArea" ref="previewArea" v-html="htmlStr" @scroll="onPreviewScroll"></div> const onPreviewScroll = () => {
computedPosition();
let previewScrollTop = previewArea.value.scrollTop;
// 找出当前滚动到元素索引
let scrollElementIndex = null;
for (let i = 0; i < previewElementList.length; i++) {
if (previewScrollTop < previewElementList[i]) {
scrollElementIndex = i - 1;
break;
}
}
// 已经滚动到底部
if (
previewScrollTop >=
previewArea.value.scrollHeight - previewArea.value.clientHeight
) {
let editorScrollInfo = editor.getScrollInfo();
editor.scrollTo(0, editorScrollInfo.height - editorScrollInfo.clientHeight);
return;
}
if (scrollElementIndex >= 0) {
let ratio =
(previewScrollTop - previewElementList[scrollElementIndex]) /
(previewElementList[scrollElementIndex + 1] -
previewElementList[scrollElementIndex]);
let editorScrollTop =
ratio *
(editorElementList[scrollElementIndex + 1] -
editorElementList[scrollElementIndex]) +
editorElementList[scrollElementIndex];
editor.scrollTo(0, editorScrollTop);
}
};The logic is basically the same, and the effect is as follows:
The problem comes again. Our mouse has stopped scrolling, but the scrolling continues. The reason is very simple. Because both sides are bound with scrolling events, they trigger each other to follow the scrolling, resulting in an infinite loop. The solution is also very simple. We Set a variable to record which side we are currently triggering the scroll on, and the other side will not execute the callback logic:
 <div
     class="editorArea"
     ref="editorArea"
     @mouseenter="currentScrollArea = 'editor'"
     ></div>
<div
     class="previewArea"
     ref="previewArea"
     v-html="htmlStr"
     @scroll="onPreviewScroll"
     @mouseenter="currentScrollArea = 'preview'"
     ></div>
let currentScrollArea = ref("");
const onEditorScroll = () => {
if (currentScrollArea.value !== "editor") {
return;
}
// ...
}
// 预览区域的滚动事件
const onPreviewScroll = () => {
if (currentScrollArea.value !== "preview") {
return;
}
// ...
} Finally, let's add support for tables and code blocks, and add the theme style. Dangdang, a simple Markdown editor was born:
Summarize
本文CodeMirror 233bf5f240354e3d1281398f3d42cf27---和unified Markdown编辑器, bytemd ,具体实现上There are some differences, there may be other implementation methods, welcome to leave a message to discuss.
Online demo : https://wanglin2.github.io/markdown_editor_sync_scroll_demo/
Source code repository: https://github.com/wanglin2/markdown_editor_sync_scroll_demo






**粗体** _斜体_ [链接](http://example.com) `代码` - 列表 > 引用。你还可以使用@来通知其他用户。