tip:
I used my Tencent Cloud Lightweight Application Server to do this actual combat
(Operating System: CentOS 7.6 64bit)
(Host specifications: CPU: 4 cores Memory: 4GB) This configuration is a bit immobile from the front end -_-, 8G memory is recommended, I have repeatedly tested this problem many times. As soon as you run npm, it starts to occupy resources wildly, and then the operating system memory is not enough to directly kill the jenkins process. So if you also have 4g or 2g of memory, try not to have other redundant applications or containers running on the machine.
1. Ready
1.1. Jenkins
tip: If you have successfully started access to jenkins, you can skip 1.1 directly
a. getjenkins.war
Start:
nohup java -jar jenkins.war --httpPort=7999 >output 2>&1 &b. docker (not recommended, the big guy is free)
docker pull jenkins/jenkins docker run \
-u root \
--rm \
-d \
-p 7999:8080 \
-p 50000:50000 \
-v /jenkins-data:/var/jenkins_home \
-v /var/run/docker.sock:/var/run/docker.sock \
jenkinsci/blueoceanThe results of a and b are to start jenkins, which is also our goal. This article adopts the war package method, and also recommends the war package method. If docker is started, the jdk inside is 11, and the jdk of my machine is 8. At the same time, the project The jdk is also 8. If you change it to 11, God knows what will happen. After startup, visit it. In the above example, I mapped port 7999, and my Tencent Cloud firewall also opened the port 7999. The following is the access legend:
Paste the password according to the prompt. If it is started by the war package, just copy the path prompted on the page and enter the command to get the password.
cat /var/jenkins_home/secrets/initialAdminPasswordIf it is started by docker, the above -v mounts a path /jenkins-data The file in this is the file in jenkins_home in the container, so the path becomes
cat /jenkins-data/secrets/initialAdminPasswordThen, enter the obtained password, enter, and choose to install the recommended plugin
Next, wait for the machine to be installed, then create the first account, and then the default jenkinsURL is what it is (it can be changed anyway), it may prompt to restart, if not, ignore it. enter jenkins
Here, stop for a while. The red 1 in the upper right corner does not matter.
1.2. gitee (github and gitlab are similar, not much difference)
Install plugins: (System Management) Manage System -> (Plugin Management) Manage Plugins -> (Optional Plugins) Available, search for Gitee and Jersey2 API plugins in Filter, select them respectively, and then click install without restart.
Wait for the installation to complete.
After that, configure gitee
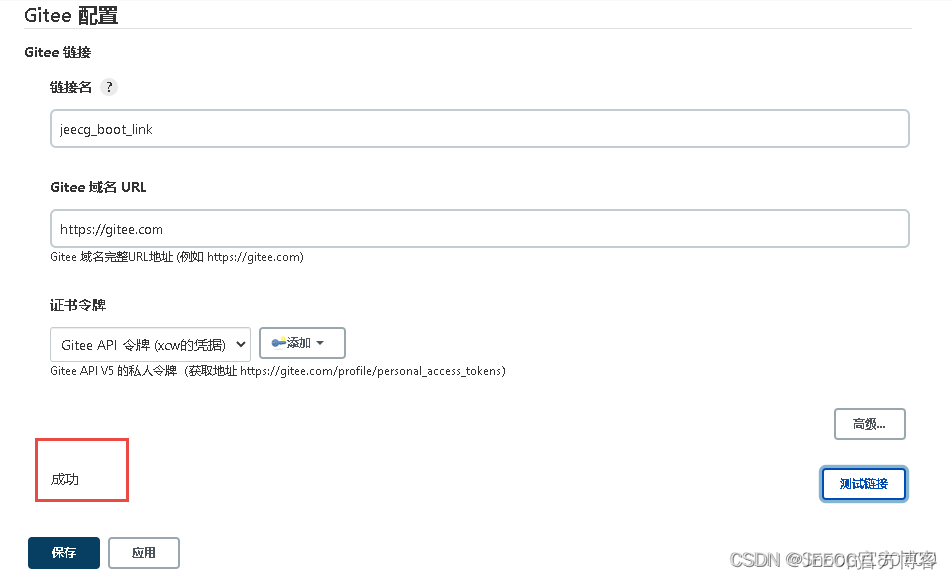
System management -> system configuration -> gitee configuration
Enter Gitee or whatever you want in the link name
Enter the full URL address of the code cloud in the Gitee domain name URL: https://gitee.com (the domain name of the code cloud privatization customer input deployment)
If the code cloud APIV5 private token has not been configured in the certificate token, click Add -> Jenkins
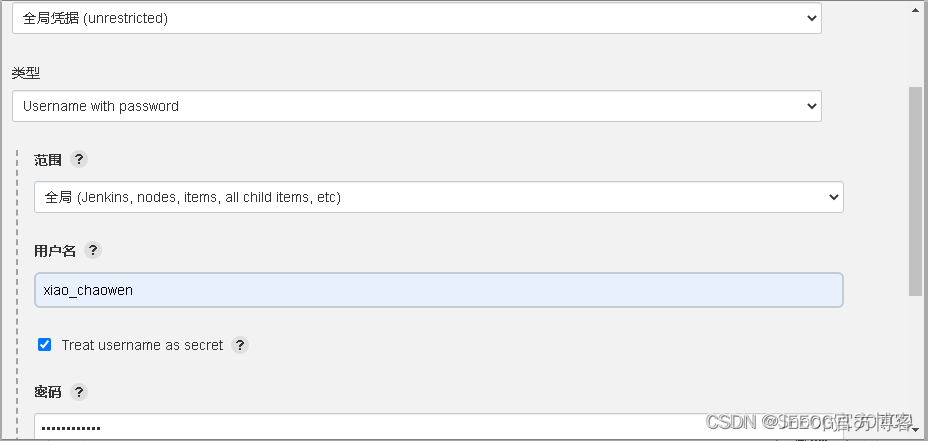
Domain select global credentials
Kind selects the Gitee API token
Scope Select the scope you need
Gitee API Token Enter your code cloud private token to get the address: https://gitee.com/profile/personal_access_tokens
This token is recommended to be saved on something like a cloud note, so that you can use it later
ID, Descripton, enter the ID and description you want. Then click Add, then come back and select the token you just added, click the test link, and it will appear successful.
1.3 maven
I installed maven on the host, so that mvn can be used directly in the shell command later
For maven, it is best to use the official recommendation of jeecg
yum -y install mavenFind the settings file
mvn -vYou can see the maven home and then there is a settings file in the conf directory of the maven home.
Then replace the settings.xml file, or change it directly (just the following part):
 <mirrors>
       <mirror>
            <id>nexus-aliyun</id>
            <mirrorOf>*,!jeecg,!jeecg-snapshots,!getui-nexus</mirrorOf>
            <name>Nexus aliyun</name>
            <url>http://maven.aliyun.com/nexus/content/groups/public</url>
        </mirror>
 </mirrors>
1.4 npm
npm is installed on the host machine. Because I started directly from the war package. So you can use npm directly in the following shell commands. If it is started by docker, there is no node in the container, and the jdk in the container is 11. It is not very convenient, so I suggested that the war package should be started directly.
 npm config set registry https://registry.npmmirror.com
npm config get registry
my version:
1.5 Modify the front-end Dockerfile and env file
jeecg-boot/ant-design-vue-jeecg/Dockerfile:
 FROM nginx
MAINTAINER jeecgos@163.com
VOLUME /tmp
ENV LANG en_US.UTF-8
RUN echo "server {  \
                      listen       8000; \
                      location ^~ /jeecg-boot { \
                      proxy_pass              http://127.0.0.1:8080/jeecg-boot/; \
                      proxy_set_header        Host jeecg-boot-system; \
                      proxy_set_header        X-Real-IP \$remote_addr; \
                      proxy_set_header        X-Forwarded-For \$proxy_add_x_forwarded_for; \
                  } \
                  #解决Router(mode: 'history')模式下,刷新路由地址不能找到页面的问题 \
                  location / { \
                     root   /var/www/html/; \
                      index  index.html index.htm; \
                      if (!-e \$request_filename) { \
                          rewrite ^(.*)\$ /index.html?s=\$1 last; \
                          break; \
                      } \
                  } \
                  access_log  /var/log/nginx/access.log ; \
              } " > /etc/nginx/conf.d/default.conf \
    &&  mkdir  -p  /var/www \
    &&  mkdir -p /var/www/html

ADD dist/ /var/www/html/
EXPOSE 8000
EXPOSE 443
jeecg-boot/ant-design-vue-jeecg/.env.production
 NODE_ENV=production
VUE_APP_API_BASE_URL=http://150.158.39.60:8080/jeecg-boot
VUE_APP_CAS_BASE_URL=http://localhost:8888/cas
VUE_APP_ONLINE_BASE_URL=http://fileview.jeecg.com/onlinePreview
2.Begin
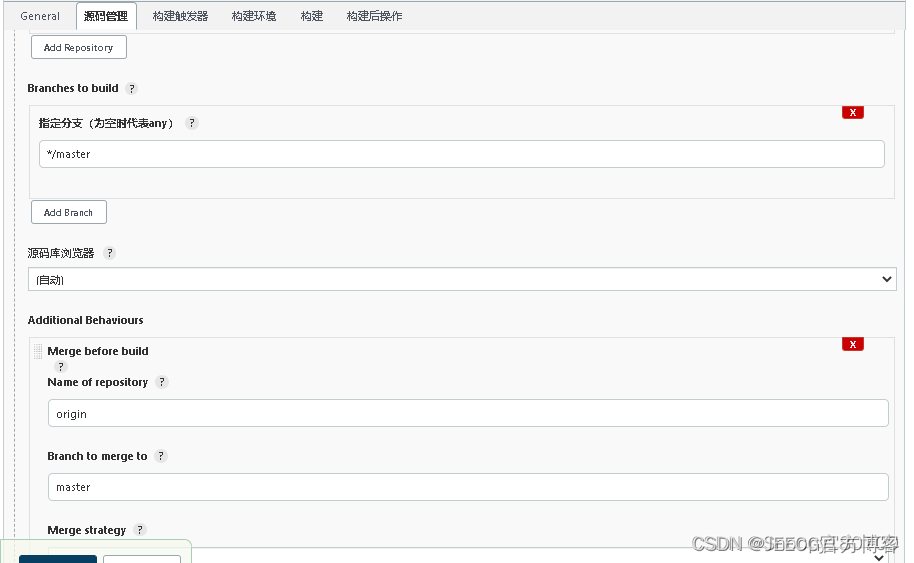
New task -> build a free style software project -> source code management -> click git
Enter the repository URL: https://gitee.com/xiao_chaowen/jeecg-boot.git (that is, the repository address)
Configure Credentials:
gitee username and password
Advanced point:
Branch Specifier options:
For single repository workflow input: origin/gitee Source Branch
For PR workflow input: pull / {giteeSourceBranch}
For PR workflow input: pull/giteeSourceBranch
For PR workflow input: pull/{giteePullRequestIid}/MERGE
Additional Behaviours options:
For a single-repo workflow, if you want the pushed branch to merge with the default branch (the released branch) before building, you can do the following:
Click the Add drop-down box
Select Merge before build
Set Name of repository to origin
Set Branch to merge to to ${ReleaseBranch} which is the default branch to be merged (release branch)
For the PR workflow, the code cloud server has pre-merged the original branch and the target branch of the PR, and you can build it directly. If the target branch is not the default branch (release branch), you can also apply the merge before the build.
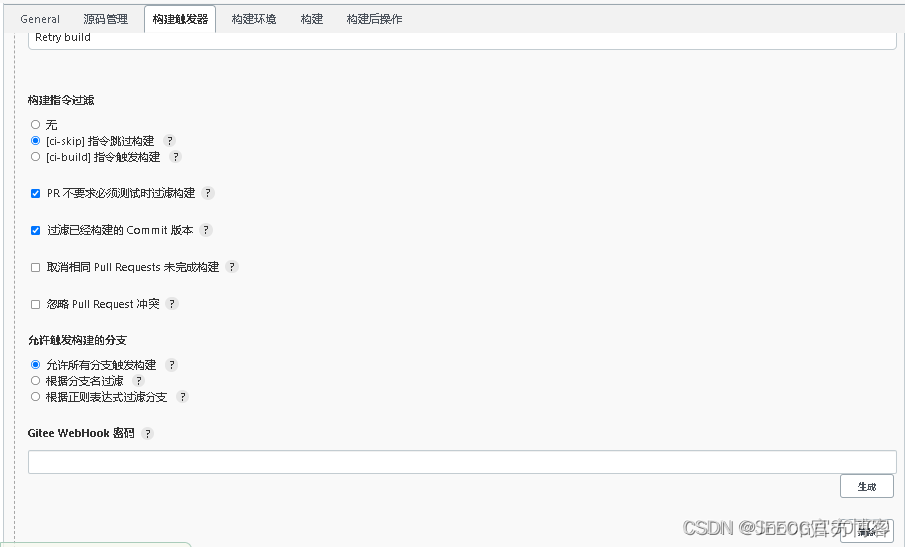
Then build the trigger:
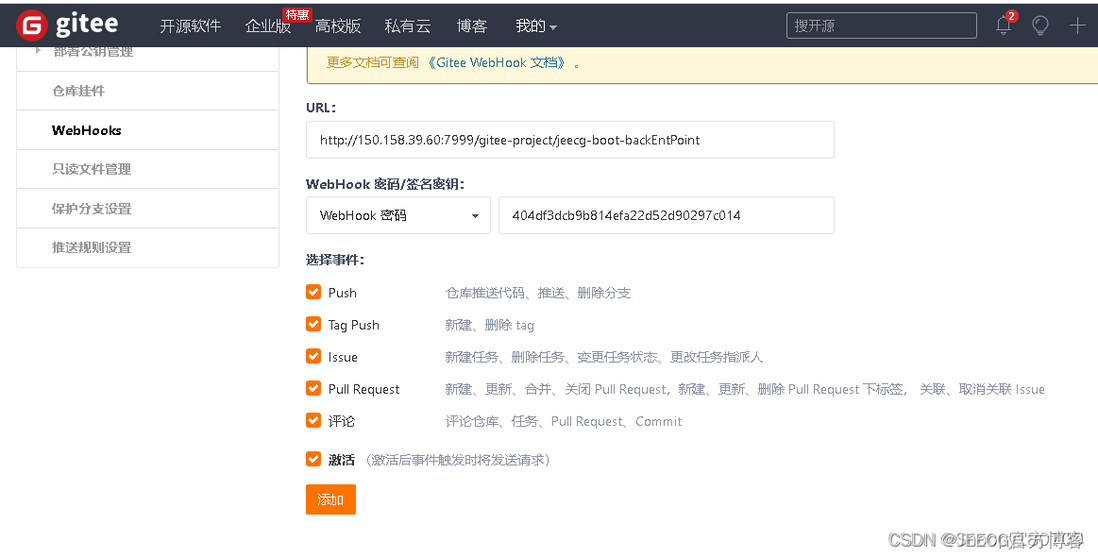
Click on gitee webhook to trigger build
Click to generate the gitee webhook password and record the URL to be filled in the gitee webhook in the above picture. Then go to gitee to add a webhook and fill it in.
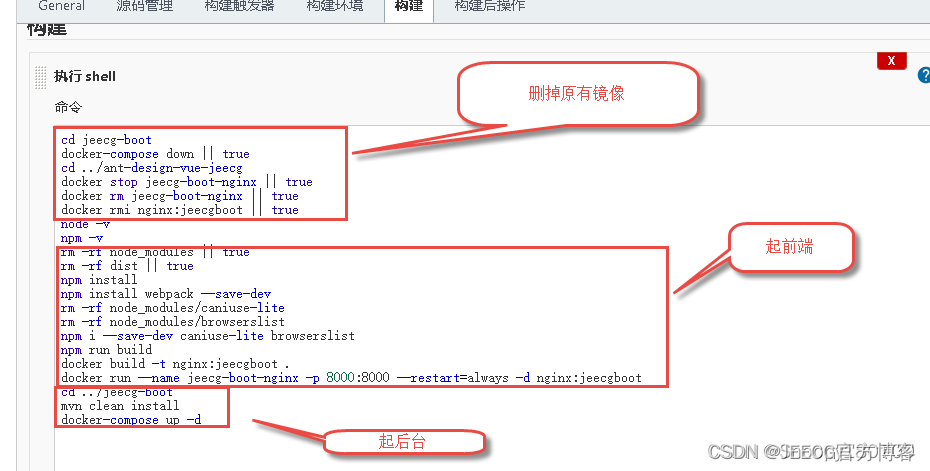
Then go back and configure the build, click Add Build Steps -> Execute Shell:
 cd jeecg-boot
docker-compose down || true
cd ../ant-design-vue-jeecg
docker stop jeecg-boot-nginx || true
docker rm jeecg-boot-nginx || true
docker rmi nginx:jeecgboot || true
node -v
npm -v
rm -rf node_modules || true
rm -rf dist || true
npm install
npm install webpack --save-dev
rm -rf node_modules/caniuse-lite
rm -rf node_modules/browserslist
npm i --save-dev caniuse-lite browserslist
npm run build
docker build -t nginx:jeecgboot .
docker run --name jeecg-boot-nginx -p 8000:8000 --restart=always -d nginx:jeecgboot
cd ../jeecg-boot
mvn clean install
docker-compose build
docker-compose up -d
This pile of commands is the mirror image of the background and the foreground, which can be changed according to your own situation.
Then the post-build action:
Save it when you're done. You can click test on the gitee webhook, and then go back to jenkins to view the console output
Then check the server, there will be four containers have been started, if the startup fails, look at the logs, there may be problems such as configuration.
Access 8000 now







**粗体** _斜体_ [链接](http://example.com) `代码` - 列表 > 引用。你还可以使用@来通知其他用户。