1. Hybrid development
App hybrid development means that some functions of an App are built with Native, and other functions are built with cross-end frameworks. The most common scenario is that Native is an engineering project, but business development is actually developed using a collapsed framework. At present, the more popular cross-end frameworks include H5, React Native, Flutter, and dynamic layout.
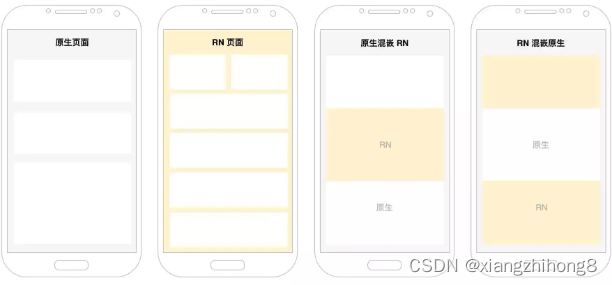
In the mixed development of Native and React Native, in the same App, the mixed development usually has the following forms:
So which companies are using React Native?
First of all, it is in some large apps, such as Meituan, Ctrip, JD.com, 58, etc. These large-scale apps are generally very complex, and the entire framework needs to include modularization, componentization, plug-in, and cross-end capabilities. Compared with pure React Native projects, the actual business development of large-scale apps also needs to consider how to introduce React Native into existing native projects as the extension capability of the native framework. For example, some businesses may have strong requirements for development efficiency, multi-end consistency, and dynamic update capabilities, which can be implemented using React Native.
In addition to large-scale apps, if you want to introduce React Native into an online project, you also need to use a hybrid development model. Because it is not so simple to transform from native to React Native, after all, development language, page management, and module management are completely different things, and some native pages, such as startup pages, home pages, etc., are still mostly chosen for performance reasons. It is implemented natively, and React Native is used for development of some businesses with low business requirements.
Of course, for some newly developed lightweight apps, pure React Native mode can be chosen. Because the newly developed App has no technical debt, it can enjoy the cross-end advantages of React Native from 0 to 1. So what are the advantages of using React Native mode?
- High development efficiency, a set of codes can run on Android and iOS;
- It is convenient to update and deploy, without relying on the application market release, and the iterative update speed is fast;
- It has the ability to dynamically update, especially for domestic apps. Taking Android as an example, it is limited by Google Play and cannot use Android App bundles, and the plug-in framework has stability problems, and React Native can solve this pain point.
Of course, there are also some disadvantages:
- Poor performance : H5 rendering link is long; React Native relies on JS bridge interaction (the old version, the latest architecture uses JSI); although the Flutter drawing process directly uses Skia, it still requires asynchronous interaction depending on the native ability;
- Poor compatibility : All versions of Android and iOS have various compatibility problems, especially Android is seriously fragmented;
- High cost of troubleshooting : Cross-end frameworks generally involve Native, FE, and Server, and a lot of bridging conversions are done in the middle, and the troubleshooting link is longer than pure Native;
- Limited dynamic capabilities : Compared with pure native plug-in, if the business of cross-end framework dynamic update involves the component update of the Native part, it needs to rely on the App release.
However, although cross-platform has its own shortcomings, many large apps will choose it. As for choosing H5 + React Native + dynamic layout, or H5 + Flutter, it needs to be based on business scenarios, package size, performance, running memory, The dynamic update capability is selected as a standard.
What about building a hybrid project from 0 to 1?
2. Environment Construction
Mixed development requires native environment support, so please make sure that native Android and iOS development environments have been configured locally.
2.1 Android Hybrid Development
2.1.1 Create Android project
First, use Android Studio to create a new App project, if you already have a local project, you can skip this step. After filling in the project name, package name, and project local path, click the "Finish" button. You can name this project "GeekTimeRNAndroid".
2.1.2 Add React Native dependencies
After creating the local project, we need to add dependencies to it. In fact, React Native officially provides documentation for integrating into existing native applications.
According to the official documentation, we need to "create an empty directory for the React Native project, then create a /android subdirectory in it, and copy your existing Android project into the /android subdirectory".
Of course, the official way is very good, it is biased towards the project management mode of React Native. In our actual development, especially in projects that have already been launched, the React Native function, like other business functions, is generally managed as a sub-module of the native project, so we choose a hybrid project management method for integration.
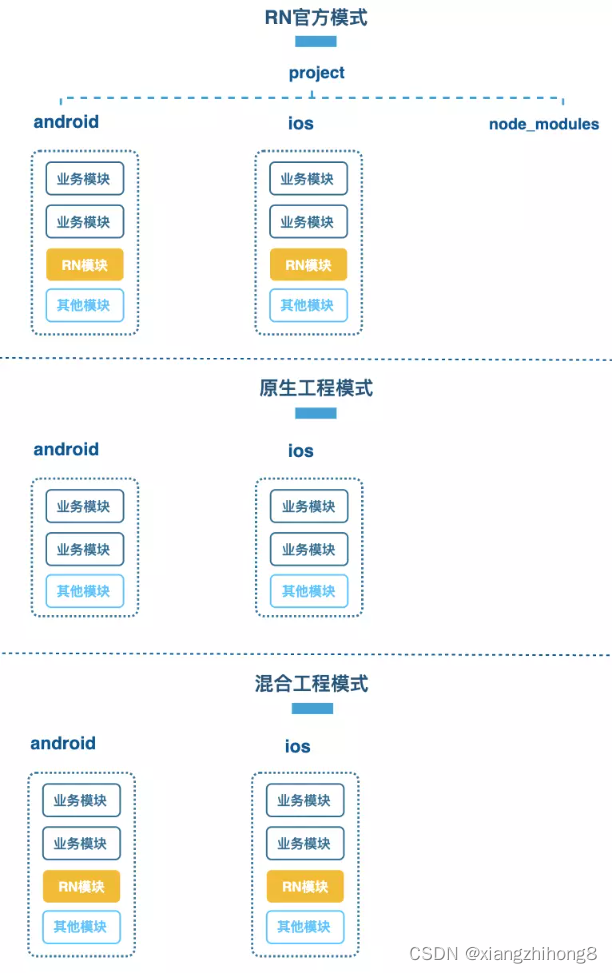
Here are several ways in which RN hybrid development exists:
It can be seen that compared with the official access mode, the engineering mode of the native hybrid RN has the following advantages:
- Without invading the existing project structure, React Native modules will be organized and managed as part of the existing project.
- It will not affect the code warehouse management, and there is no need to manage Android and iOS under the same code warehouse.
- The hybrid mode is convenient for us to reuse component functions. React Native modules can be independently formed into components and provided to other App platforms.
It should be noted that when using the above method to integrate the React Native module, you need to add the dependencies of react-native and JavaScript engine.
- react-native: The core framework of React Native;
- JavaScript engine: optional JSC, Hermes, used to execute JavaScript.
Next, we refer to the official documentation and add React Native dependencies, as follows.
 # 切换到刚刚新建好的工程目录
cd /Users/Mac/RN/RNAndroid

# 执行添加 react-native 命令,yarn 或 npm 都可以
yarn add react-native
After executing the yarn add react-native command, the latest version of the React Native package will be installed by default. After executing the above command successfully, we will find that there is a node_modules directory under the RNAndroid project, which contains not only the react-native framework, but also the compiled products of the JavaScript engine, including aar and pom dependency files. Next, we can refer to the official method, configure the node_modules directory as repository, and then introduce relevant dependencies into the project.
However, this method is not recommended. In fact, we only need the two products of react-native and JavaScript engine. After obtaining these two products, it is packaged in Android itself, and then released to the company's remote warehouse.
Then open the react-native framework compilation product in node_module, located in the …/RNAndroid/node_modules/react-native directory, as shown below.
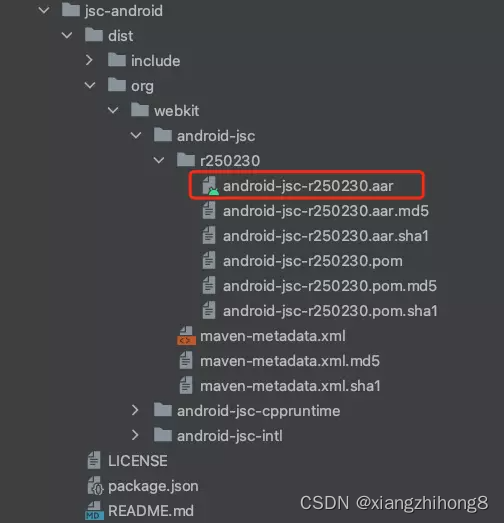
The JSC engine compilation product in node_module is located in the …/RNAndroid/node_modules/JavaScriptc-android directory.
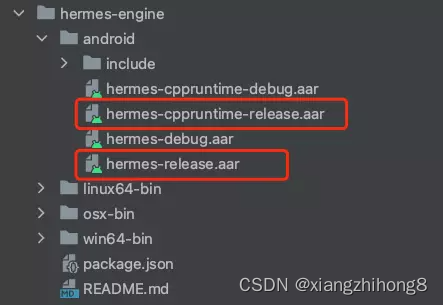
In addition, the new version of RN is also connected to the Hermes engine. The Hermes engine compilation product in node_module is located in the …/RNAndroid/node_modules/hermes-engine directory.
For the JSC engine and the Hermes engine, we need to pay attention to the following two common senses:
- In startup performance, Hermes is faster than JSC. Hermes adopts the AOT ahead-of-time compilation scheme, which supports bytecode files. Compared with JSC, Hermes does not need to compile JavaScript text into bytecode first, which saves the time of compiling bytecode and has better natural startup performance.
- In performance, JSC is faster than Herems. JSC uses the JIT just-in-time compilation scheme, which supports dynamic caching of hot code, so it runs faster in performance.
But on the whole, because the Hermes engine is specially customized for the mobile terminal, it is superior to JSC in terms of engine size, startup speed, running memory, and communication performance.
Next, we continue to add react native-related dependencies to the RNAndroid project, including:
- react-native.arr file;
- The third-party library that react-native.aar depends on;
- JavaScript engine aar file.
First, we add the react-native.arr file. We put the above copy of react-native.arr into the RNAndroid/libs directory, and then add dependencies.
 implementation fileTree(dir: 'libs',includes: ['*.jar','*.aar'])

implementation(name:'react-native-0.68.2', ext:'aar')
Next, we will add the dependency library in react-native-0.68.2.pom in the .../RNAndroid/node_modules/react-native/ directory according to the android gradle dependency. These dependencies are mainly react-native aar itself 3rd party libraries that are remotely dependent on. The added build.gradle is as follows:
 dependencies {
    implementation(name:'react-native-0.68.2', ext:'aar')

    implementation 'com.facebook.infer.annotation:infer-annotation:0.18.0'
    implementation 'javax.inject:javax.inject:1'
    implementation 'androidx.appcompat:appcompat:1.0.2'
    implementation 'com.facebook.fresco:imagepipeline-okhttp3:2.5.0'
    implementation 'com.facebook.fresco:fresco:2.5.0'
    implementation 'com.facebook.soloader:soloader:0.10.3'
    implementation 'com.google.code.findbugs:jsr305:3.0.2'
    implementation 'com.squareup.okhttp3:okhttp:4.9.2'
    implementation 'com.squareup.okhttp3:okhttp-urlconnection:4.9.2'
    implementation 'com.squareup.okio:okio:2.9.0'

    ... //省略其他依赖
}
Next, we go ahead and add the JavaScript engine aar package. Open …/RNAndroid/node_modules/hermes-engine in the hermes-cppruntime-release.aar & hermes-release.aar f8a6810ca48d8ac00d2ae10da525f6cd--- directory, then copy it to the libs directory, and add dependencies in build.gradle.
 dependencies {

    implementation(name:'android-jsc-r250230', ext:'aar')
    ... //省略其他依赖
}
2.1.3 Permission configuration
After adding dependencies, you need to configure permissions next, open the AndroidManifest.xml manifest file of the hybrid project, and then add network permissions and access the developer menu.
 <uses-permission android:name="android.permission.INTERNET" />

<activity android:name="com.facebook.react.devsupport.DevSettingsActivity" />
So far, the React Native environment configuration in the Android hybrid project has been completed. Next, let's take a look at how to configure the React Native environment in iOS.
2.2 iOS Hybrid Development
2.2.1 Create an iOS project
First, we need to follow the official documentation of React Native to create a corresponding version of the React Native project locally. Here we assume that the project needs version 0.68.2.
 # 首先安装 react-native-cli, 否则无法使用 react-native 命令
sudo npm install -g react-native-cli

react-native init projectName --version 0.68.2
After the creation is complete, we open the project, execute npm install in the project node_modules/react-native/template/ directory, and then enter the /ios/ directory to execute pod install, and then open the react native workspace project after completion.
Next, let's take a look at how to integrate React Native into an existing iOS project. First, you need to introduce the following three React Native source code into the iOS project, the three source code are Libraries, React, and React Common.
Then you use these three parts as React Native functional modules, directly refer to the official podspec (reference: https://github.com/facebook/react-native ), and choose a reasonable access scheme based on your own project.
2.2.2 Add iOS side library dependencies
Next, we need to modify the Podfile to reference other dependent third-party libraries, including DoubleConverison, glog, RCT_Folly, libevent, etc. The podspec configuration file directly uses the officially provided file.
 # Explicitly include Yoga if you are using RN >= 0.42.0
  pod "Yoga", :path => "../node_modules/react-native/ReactCommon/yoga"
  # Third party deps podspec link
  pod 'DoubleConversion', :podspec => '../node_modules/react-native/third-party-podspecs/DoubleConversion.podspec'
  pod 'glog', :podspec => '../node_modules/react-native/third-party-podspecs/glog.podspec'
  pod 'Folly', :podspec => '../node_modules/react-native/third-party-podspecs/Folly.podspec'
For details, please refer to the Podfile of the iOS project of the pure RN application. Then, we execute pod install to install the dependent plug-ins, build the project file xcworkspace, and open the project file for compilation.
It can be seen that, unlike the new React Native project, when accessing React Native in existing native Android and iOS projects, React Native is regarded as a sub-module and then introduced. However, in the environment configuration process, Android focuses on the framework aar that relies on React Native and the JavaScript engine aar, while iOS uses source code to integrate React Native-related dependency libraries.
3. Development of carrier pages
After adding dependencies, we also need to design a React Native carrier page. The role of the carrier page is to load and render the container for React Native, which is Activity/Fragment in Android and ViewController in iOS.
Taking Android as an example, first we create a new Activity, build ReactRootView, initialize ReactInstanceManager to load the local bundle file. For this part of the hungry code, we can quickly build a React Native carrier page according to the official documentation, or directly refer to the Android entry code of the pure RN project.
But in actual development, we use React Native cross-framework. In addition to its cross-platform advantages, we also pay special attention to its hot update capability. In addition, in order to debug and analyze bugs, it is necessary to have error handling and reporting capabilities, and in complex business, Native & JavaScript communication also needs to provide communication capabilities. Even, according to business requirements, some general built-in components, component registration capabilities, etc. need to be provided.
Therefore, a carrier page that can be used for commercial launch needs to provide the ability to initialize, load and render React Native pages, hot update, cache management, life cycle management, Native & JavaScript communication, error handling, error reporting, built-in basic components, component registration, etc. .
3.1 Overall Design
First, let's take a look at a carrier page that has been designed. The architecture diagram is as follows.
As you can see, a complete RN carrier page should contain the following parts:
- UI structure : In hybrid development, React Native mostly exists as a separate page, and the carrier page can contain a generic title bar and React Native container. Of course, the container view can also be directly exposed and added dynamically by the user;
- External capabilities : including life cycle management, native and JavaScript communication capabilities, built-in basic business components, component registration capabilities, exception callbacks, error reporting, etc., and the ability to provide hot updates and bundle loading;
- Hot update : Request the remote server to get the latest version of the corresponding bundle. If there is the latest version, download and execute the loading, if there is no latest version, use the cache to load (if there is no cache, download it first), which includes business strategies such as preloading and asynchronous update to improve the loading performance;
- Cache management : Usually, the bundle package will become larger and larger as the business volume increases. In response to this situation, our common strategy is to unpack and load on demand. The bundle package will be zip compressed and encrypted during the transmission process, and decompressed and verified after the download is successful. Each bundle file has a corresponding id, version number, and content hash;
- Bundle loading : JavaScript engine reads bundle files, common engines include JSC, Hermes;
- Operating environment : The entire React Native operating environment includes the RootView responsible for rendering, the framework's built-in core components, business custom components, the JavaScript engine that executes scripts, and the bridge/JSI that is responsible for the interaction between Native and JavaScript.
3.2 Initialize the carrier page
With the design of the carrier page, the next step is how to initialize the carrier page. The initialization mentioned here is mainly the initialization of the React Native framework itself. Next, we are still divided into Android and iOS for analysis.
3.2.1 Android carrier page initialization
In order to facilitate subsequent understanding, let's first look at the functions of several commonly used classes in React Native Android:
- ReactContext : Inherited from ContextWrapper, it is the context of React Native applications, managing CatalystInstance and three major threads (UIThread, NativeModulesThread, JSThread);
- ReactInstanceManager : The general management class, manages ReactPackage, ReactContext, ReactRootView, controls the life cycle, and can also set the JavaScript engine;
- ReactRootView : The native container rendered by React Native, inherited from FrameLayout;
- CatalystInstance : The general management class for Java layer, C++ layer, and JavaScript layer communication. It manages the Java layer, JavaScript layer Module mapping table and callback, and is a bridge for three-terminal communication. The implementation class is CatalystInstanceImpl, which supports injecting global variables into JavaScript, dynamically loading script files, and obtaining NativeModules & JSModules;
- JavaScriptModule : JS Module, responsible for the declaration of the mapping call format from JavaScript to Java, managed by CatalystInstance uniformly;
- NativeModule : Java Module, which is responsible for the declaration of the mapping call format from Java to JavaScript, and is managed uniformly by CatalystInstance;
- UIManager : Handle UI rendering, the JavaScript layer sends the request to create a View to the UIManagerModule of the Java layer through the C++ layer.
The core of React Native initialization is to build ReactInstanceManager through ReactInstanceManagerBuilder, and ReactInstanceManager manages ReactPackage, ReactContext, ReactRootView, control life cycle, etc. The official construction instructions for ReactInstanceManager are provided. Let's look at a piece of code (located in ReactNativeHost.class). Of course, the source code is written in a chained way:
 ReactInstanceManagerBuilder builder = ReactInstanceManager.builder();
// 设置 application 上下文
builder.setApplication((Application) context.getApplicationContext());

// 添加包,一个 package 由多个组件构成,上述代码中的 MainReactPackage 是 RN 内置的 package
builder.addPackage(new MainReactPackage());

// JS 异常回调处理实现,在这个实现中我们可以打印 JS 异常日志,上报错误
builder.setRedBoxHandler(mRedBoxHandler);

// native module 异常回调处理实现,在这个实现中我们可以打印 native module 异常日志,上报错误
builder.setNativeModuleCallExceptionHandler(mNativeModuleExceptionHandler);

// JS bundle 中主入口的文件名,demo 中 "index" 表示入口文件名为 index.js
builder.setJSMainModulePath("index");

// 是否开启 dev 模式
builder.setUseDeveloperSupport(true);

// 设置创建时机
builder.setInitialLifecycleState(LifecycleState.BEFORE_CREATE);

// 设置 JS 引擎,如果想使用 Hermes 引擎,可以这样设置,需要引入 Hermes 相关的 so 库
// builder.setJavaScriptExecutorFactory(new HermesExecutorFactory());

ReactInstanceManager reactInstanceManager = builder.build();
Then, we need to get the ReactContext, which will be used in the subsequent loading and rendering process. The code in ReactNativeFlipper.class is as follows.
 reactInstanceManager.addReactInstanceEventListener(new ReactInstanceManager.ReactInstanceEventListener() {
    @Override
    public void onReactContextInitialized(ReactContext reactContext) {
       mReactContext = reactContext;
    }
});
At this point, the initialization work on the Android side is complete, and then let's look at the initialization logic on the iOS side.
3.2.2 iOS carrier page initialization
In the iOS carrier page initialization process, we first need to create a Bridge. In React Native, the communication between JavaScript and the native framework is realized through Bridge, and calling the API provided by React Native is equivalent to calling the native API through Bridge. Therefore, the first step in initializing the carrier page is to create a Bridge, which is bound one-to-one with the carrier page.
RCTBridge *carrierBridge = [[RCTBridge alloc] initWithDelegate:self launchOptions:nil];Next, we need to create an RCTRootView to display the RCTRootView component of the React Native view. The UI components in the render() part of the JavaScript code will be rendered into the View. The creation method is as follows.
 RCTRootView *rctView = [[RCTRootView alloc] initWithBridge:bridge
moduleName:moduleName initialProperties:nil];
[self.view addSubview:rctView];
At this point, the initialization preparation process on the iOS side is complete, isn't it very simple?
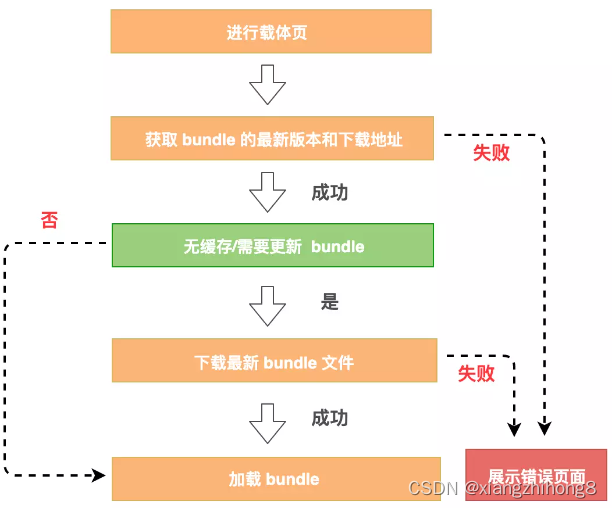
Next, we need to get the React Native code package, which is the JS Bundle resource. So how do we dynamically download JS Bundle resources? We can use the hot update strategy to dynamically download JS bundle resources. Each different JS bundle has its own identification id, and we can obtain the latest version number corresponding to the JS bundle resource and the latest resource download address from the server according to the id.
After obtaining the latest version number of the JS Bundle, if the user has browsed the current React Native page before and there is still a cache, then we can detect whether the cached version number is the same as the latest version number. If it is the same, you do not need to download it repeatedly; if it is not the same, then you need to download the latest resource package according to the latest resource download address, and cache it locally, as shown in the figure below.
With the above steps, we can create the carrier page and successfully download the JS bundle, so now we are ready to start executing the JavaScript code and rendering the React Native page.
3.2.3 Load JS bundle
Android loading bundle process
The Android side obtains the CatalystInstance object through ReactContext, and the CatalystInstance implementation class is CatalystInstanceImp. CatalystInstanceImpl has a non-public method, loadScriptFromFile(), through which we can dynamically load local bundle files. However, since loadScriptFromFile() is non-public, a reflective get call is required. code show as below:
 CatalystInstance catalystInstance = mReactContext.getCatalystInstance();
Method loadScripFromFileMethod = CatalystInstanceImpl.class.getDeclaredMethod("loadScriptFromFile", String.class, String.class, boolean.class);
loadScripFromFileMethod.setAccessible(true);
// fileName 和 sourceURL 传入本地缓存的 bundle 路径,loadSynchronously 为是否同步加载
loadScripFromFileMethod.invoke(catalystInstance, fileName, sourceURL, loadSynchronously);
Then, we call the startReactApplication() method of ReactRootView to start loading and rendering the React Native page. It should be noted here that the parameter moduleName in startReactApplication() must correspond to the first parameter of "AppRegistry.registerComponent()" in "index.js", as follows.
reactRootView.startReactApplication(reactInstanceManager, moduleName, launchOption);At this point, the dynamic loading of bundles on the Android side is finished. Let's continue to look at the process of loading bundles on iOS.
iOS loading bundle process
In the process of loading bundles in iOS, we need to initialize Bridge first, and then load JavaScript bundles. Next, let's take a look at the overall process of loading bundles in iOS in combination with the source code.
First of all, when initializing Bridge, in the process of setup, the proxy method of bridge (NSURL *)sourceURLForBridge : (RCTBridge *)bridge method will be called first to specify the path to obtain the JS bundle.
 -(NSURL *)sourceURLForBridge:(RCTBridge *)bridge{
    NSString *bundlePath = [self getCurrentBundlePath:bundleid];
    return bundlePath;
}
After determining the URL, the bridge starts calling the start() method, starts loading the JS bundle and calls the following methods:
 [self loadSource:^(NSError *error, RCTSource *source) {
    if (error) {
      [weakSelf handleError:error];
    }
    ...
 ]
Next, call the proxy method of bridge, where we can manually inject some business parameters:
 - (void)loadSourceForBridge:(RCTBridge *)bridge
                 onProgress:(RCTSourceLoadProgressBlock)onProgress
                 onComplete:(RCTSourceLoadBlock)loadCallback{
  [RCTJavaScriptLoader loadBundleAtURL:bridge.bundleURL onProgress:onProgress onComplete:^(NSError *error, RCTSource *source) {
      //手动注入一些业务参数
      NSString *string = ";this.__xxx___ = 'yyy';"
      NSData *stringData = [string dataUsingEncoding:NSUTF8StringEncoding];

      NSMutableData *newData = [NSMutableData dataWithData:stringData];
      [newData appendData:source.data];

      //生成新的 Source 去加载
      RCTSource * newSource = [RCTJavaScriptLoader getNewRCTSourceURL:source.url data:newData];
      loadCallback(error,newSource);
  }];
}
After that, the bridge is responsible for executing the JavaScript code and rendering the page.
4. Frequently Asked Questions and Modifications
4.1 Android Troubleshooting
In software development, as long as there are enough logs, it can help us locate problems fast enough. So for application development, especially this kind of cross-platform application development, the first thing we need to do is to add log output. Then, we can get JavaScript, native runtime errors through ReactInstanceManagerBuilder.
 ReactInstanceManagerBuilder builder = ReactInstanceManager.builder();
builder.setApplication((Application) context.getApplicationContext())
       .setRedBoxHandler(mExceptionHandler)
       .setNativeModuleCallExceptionHandler(mExceptionHandler);

private static class ExceptionHandler implements NativeModuleCallExceptionHandler, RedBoxHandler {

  @Override
  public void handleException(Exception e) {
    // 处理 Native 异常
  }

  @Override
  public void handleRedbox(String s, StackFrame[] stackFrames, ErrorType errorType) {
    // 处理 JS 异常
  }

  @Override
  public boolean isReportEnabled() {
    return false;
  }

  @Override
  public void reportRedbox(Context context, String s, StackFrame[] stackFrames, String s1, ReportCompletedListener reportCompletedListener) {
  }
}
Next, we intercept React Native's JavaMethodWrapper calls in AOP mode, and use AspectJ to instrument the ReactNative framework bytecode at compile time:
 @Aspect
public class NativeModuleMethodInvokeAspect extends BaseAspect<INativeModuleMethodInvokePointcut> {

    // 对 JavaMethodWrapper.invoke 方法调用进行插桩
    @Around("execution (* com.facebook.react.bridge.JavaMethodWrapper.invoke(..))")
    public Object invokeNativeModuleMethod(ProceedingJoinPoint joinPoint) throws Throwable {
        INativeModuleMethodInvokePointcut pointcut = getPointcut();
        if(pointcut == null){
            return joinPoint.proceed(joinPoint.getArgs());
        }
        return pointcut.pointcut(joinPoint);
    }
}
The following code is instrumentation for the call of the Native Module, and captures the exception of JavaScript calling the Native Module, as follows.
 public class ModuleMethodInvokePointcut implements INativeModuleMethodInvokePointcut {
    @Override
    public Object pointcut(ProceedingJoinPoint proceedingJoinPoint) {
        Object object;
        Object target = proceedingJoinPoint.getTarget();
        try {
            object = proceedingJoinPoint.proceed();
        } catch (Throwable throwable) {
            // 异常时,通过 target 反射获取对应的 module 名称和方法
            throwable.printStackTrace();
            return null;
        }
        return object;
    }
}
Then, we can view the React Native running log with the following two commands.
adb logcat | grep ReactFinally, if there is an abnormal log, it will be reported to the background, and the log information will include the system, model, operating environment, and business ID. With the information provided by the exception log, you can quickly troubleshoot React Native related bugs through offline and online means.
So next, we fix the bugs of the React Native framework? In the Android hybrid project, React Native is introduced in aar form. So it is recommended that you package it and publish aar management by yourself. However, the source code compilation method is complicated. You can instrument React Native aar by instrumenting at compile time to fix bugs.
Commonly used instrumentation methods include ASM, Javasist, and AspectJ. We can usually use AspectJ to match specific methods of specific classes for instrumentation and bug fixes. The reason for choosing AspectJ is that usually we only need to slice some exception methods of React Native, and do not need to modify the logic inside, which is enough to meet our needs to modify the problems of the React Native framework. Moreover, AspectJ is better than ASM and Javasist in terms of ease of use and readability.
4.2 iOS Troubleshooting
In the iOS hybrid project, if the React Native page has an exception during loading or running, we can use the following methods to intercept it uniformly.
typedef void (^RCTFatalHandler)(NSError *error);First of all, we need to transform the error parameter in the native RCTFatalHandler, so that the bridge information is brought into the error.
 - (void)error{
    //改造 error 中带有 bridge
    NSError *newError = [self getWBErrorBridge:error];
    RCTFatal(newError);
}

//error 信息里带上 Bridge
- (NSError *)getWBErrorBridge:(NSError *)error{
    NSMutableDictionary *errorDic = [NSMutableDictionary dictionaryWithDictionary:error.userInfo];
    [errorDic setObject:self->_parentBridge forKey:@"ErrorBridgeTag"];
    NSError *newErr = [[NSError alloc]initWithDomain:error.domain code:error.code userInfo:errorDic];
    return newErr;
}
After an exception occurs, we need to obtain the bridge from Error, find out the information of the carrier page where the exception occurred, and obtain the ID of the corresponding JS Bundle to determine which page has the exception.
 RCTSetFatalHandler(^(NSError *error) {
    dispatch_async(dispatch_get_main_queue(), ^{
        RNViewController *rnVC = nil;
        RCTBridge *bridge = (RCTBridge *)error.userInfo[@"ErrorBridgeTag"];
        if (bridge) {
           carrierVC = (RNViewController *)bridge.delegate;
        }
        NSString *descriptions = error.localizedDescription;
        NSLog(@"error --- %@ --- %@", rnVC.rnModel.bundleID, descriptions);
    }
}
After intercepting the exception, we can perform a series of operations on the page, such as displaying the error page, automatically repairing, and clearing the abnormal JS bundle cache.
V. Summary
This article mainly talks about the process of hybrid development of native and RN. Readers can quickly build a React Native hybrid project according to the official documentation. In addition, we also explain from the aspects of environment construction, carrier page design, debugging, packaging and publishing, troubleshooting and framework bug fixes.
In general, if it is a new project that needs to improve efficiency quickly and does not require complex architecture, you can choose the pure React Native mode at this time. If it is an online project to access React Native, the architecture is complex, or if React Native needs to be used as a basic capability for other businesses/Apps to use, the hybrid mode needs to be used.
Next, we introduced how to quickly troubleshoot and locate when encountering problems, which is a problem we often encounter in the actual development process. Because the link of React Native is relatively long, involving the client, front-end, and back-end, and the log output by the React Native framework is not enough, it is difficult to troubleshoot the problem. At this time, we can help us to quickly locate the problem by catching React Native running exceptions and adding enough logs to the React Native framework.





**粗体** _斜体_ [链接](http://example.com) `代码` - 列表 > 引用。你还可以使用@来通知其他用户。