Neuron is an industrial protocol gateway software that runs on various IoT edge gateway hardware. It supports one-stop access and MQTT protocol conversion for multiple different communication protocol devices and dozens of industrial protocols at the same time. It only occupies ultra-low resources. That is, it can be deployed in various edge hardware of X86, ARM and other architectures in the form of native or container. At the same time, users can realize online gateway configuration management through the Web-based management console.
In versions earlier than eKuiper 1.5.0, MQTT was required as a transit between Neuron and eKuiper. When the two work together, an additional MQTT broker needs to be deployed. At the same time, users need to handle the data format by themselves, including decoding and encoding when reading in and out.
The recently released version 1.5.0 of eKuiper has added Neuron source and sink, so that users can access the data collected in Neuron in eKuiper for calculation without configuration; they can also easily control devices from eKuiper through Neuron. The integration of the two products can significantly reduce the resource usage requirements of edge computing solutions and lower the usage threshold.
This article will take the scenario of industrial IoT data collection and cleaning as an example to introduce how to use eKuiper and Neuron for cloud-side collaboration data collection, data cleaning, and data anti-control.
Integration of Neuron and eKuiper
In Neuron 2.0, eKuiper support has been added to northbound applications. When Neuron starts the northbound eKuiper application, the two are connected through the inter-process communication method of the NNG protocol, thereby significantly reducing network communication consumption and improving performance.
The integration between eKuiper and Neuron is bidirectional, and its implementation mainly consists of two parts:
- A Neuron feed is provided to support subscribing data from Neuron.
- A Neuron sink is provided to support device control via Neuron.
In a typical IIoT edge data processing scenario, Neuron and eKuiper are deployed on the same edge machine. This is also the scenario currently supported by the integration of the two. If you need to communicate through the network, you can still cooperate through the previous MQTT method.
Preparation
Neuron and eKuiper are deployed on edge gateways or industrial PCs close to the device. The data collected by Neuron is processed by eKuiper and sent to the MQTT broker in the cloud for further processing by applications in the cloud. At the same time, eKuiper can receive cloud MQTT commands and control local devices through Neuron.
Before starting the hands-on operation, you need to prepare the following environment:
- MQTT server: You can use the public MQTT server provided by EMQ, or refer to the EMQX documentation to quickly deploy a local MQTT broker. Assuming that the MQTT broker address is
tcp://broker.emqx.io:1883, the following tutorial will take this address as an example. - In order to observe the running results conveniently, we need to install an MQTT client, such as MQTT X.
Rapid deployment
Both Neuron and eKuiper support binary installation packages as well as Docker containerized deployment scenarios. This article will take the Docker solution as an example, and use the docker compose method to complete the rapid deployment of the two components at the edge with one click.
Copy the docker-compose.yml file to the deployed machine. Its content is as follows, including Neuron, eKuiper and eKuiper's management interface eKuiper manager (optional). Among them, eKuiper and Neuron share a volume named nng-ipc for communication between them.
 version: '3.4'

services:
  manager:
    image: emqx/ekuiper-manager:1.5
    container_name: ekuiper-manager
    ports:
      - "9082:9082"
  ekuiper:
    image: lfedge/ekuiper:1.5-slim
    ports:
      - "9081:9081"
      - "127.0.0.1:20498:20498"
    container_name: manager-ekuiper
    hostname: manager-ekuiper
    environment:
      MQTT_SOURCE__DEFAULT__SERVER: "tcp://broker.emqx.io:1883"
      KUIPER__BASIC__CONSOLELOG: "true"
      KUIPER__BASIC__IGNORECASE: "false"
    volumes:
      - nng-ipc:/tmp
  neuron:
    image: neugates/neuron:2.0.1
    ports:
      - "127.0.0.1:7001:7001"
      - "127.0.0.1:7000:7000"
    container_name: manager-neuron
    hostname: manager-neuron
    volumes:
      - nng-ipc:/tmp

volumes:
  nng-ipc:
In the directory where the file is located, run:
# docker compose up -dAfter all the containers are started, please use the docker ps command to make sure that all the containers are started normally.
 CONTAINER ID   IMAGE                        COMMAND                  CREATED        STATUS          PORTS                                                NAMES
3d61c1b166e5   neugates/neuron:2.0.1        "/usr/bin/entrypoint…"   18 hours ago   Up 11 seconds   127.0.0.1:7000-7001->7000-7001/tcp                   manager-neuron
62a74d0be2ea   lfedge/ekuiper:1.5-slim    "/usr/bin/docker-ent…"   18 hours ago   Up 11 seconds   0.0.0.0:9081->9081/tcp, 127.0.0.1:20498->20498/tcp   manager-ekuiper
7deffb470c1a   emqx/ekuiper-manager:1.5   "/usr/bin/docker-ent…"   18 hours ago   Up 11 seconds   0.0.0.0:9082->9082/tcp                               ekuiper-manager
Configure Neuron and eKuiper
After Neuron is started, we need to configure Neuron's southbound device and northbound eKuiper application channel, and then start the simulator for simulated data collection.
For southbound device and simulator configuration, please refer to Neuron Quick Tutorial to complete the 3. Southbound configuration section to run and use. The northbound configuration part in this tutorial is the MQTT application, and eKuiper is required for this tutorial as the northbound application.
Neuron Northbound eKuiper Application Configuration
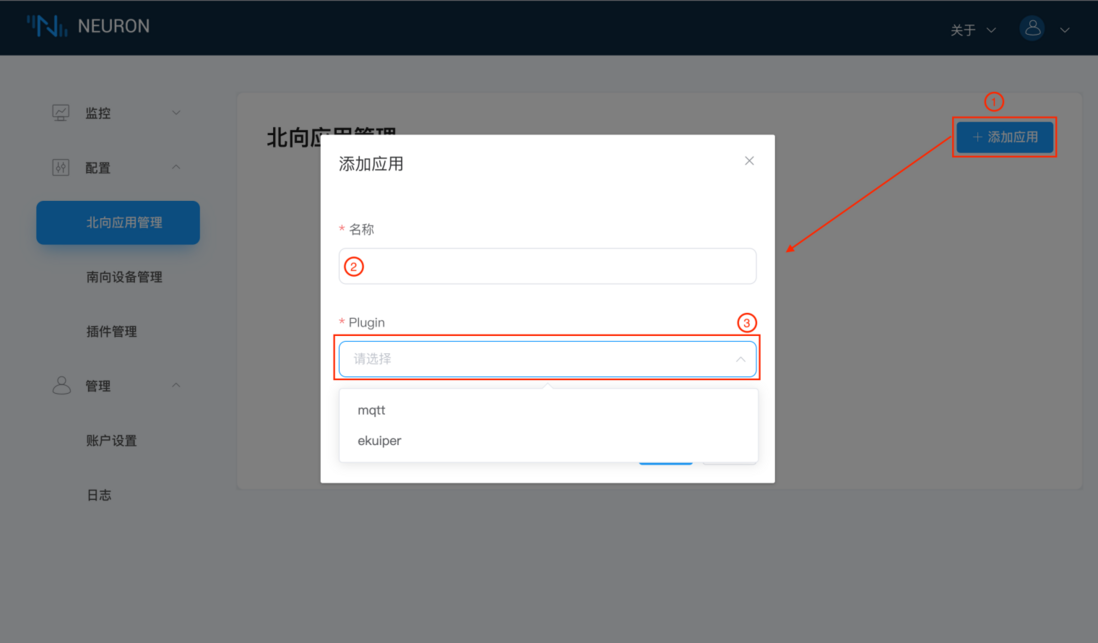
Select northbound application management in the configuration menu to enter the northbound application management interface. No applications have been added at this time, and applications need to be added manually. In this example, we will create an eKuiper application.
The first step is to add a northbound application:
- Click the Add Configuration button in the upper right corner;
- Fill in the application name, for example, ekuiper-1;
- The drop-down box displays the available northbound applications in this software version, this time we select the ekuiper plug-in, as shown in the following figure.
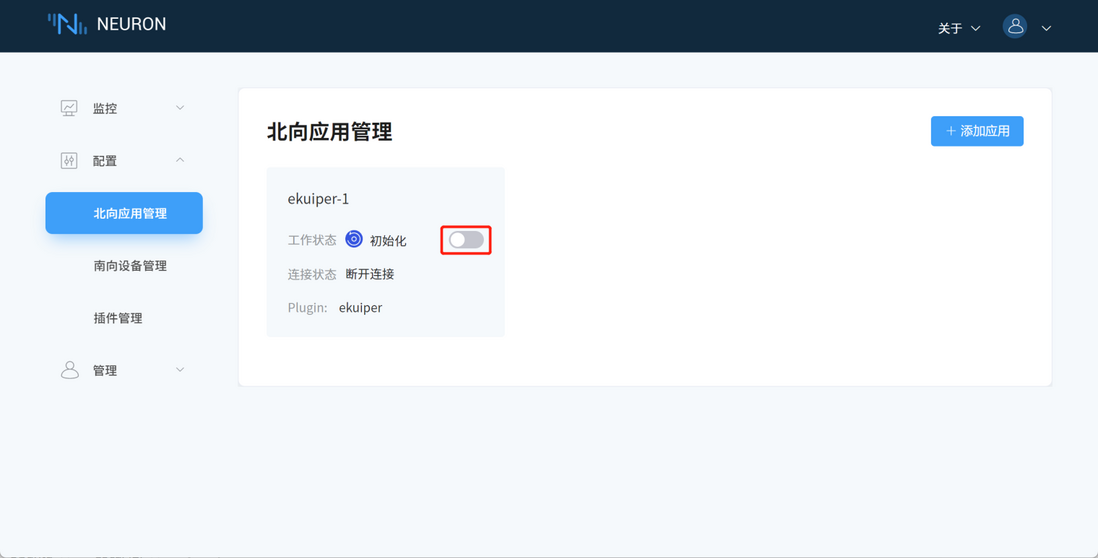
- After the application is created successfully, a card of the just-created application will appear on the northbound application management interface. At this time, the working state of the application is initialized, and the connection state is in the disconnected state, as shown in the following figure.
The second step is to subscribe to the Group:
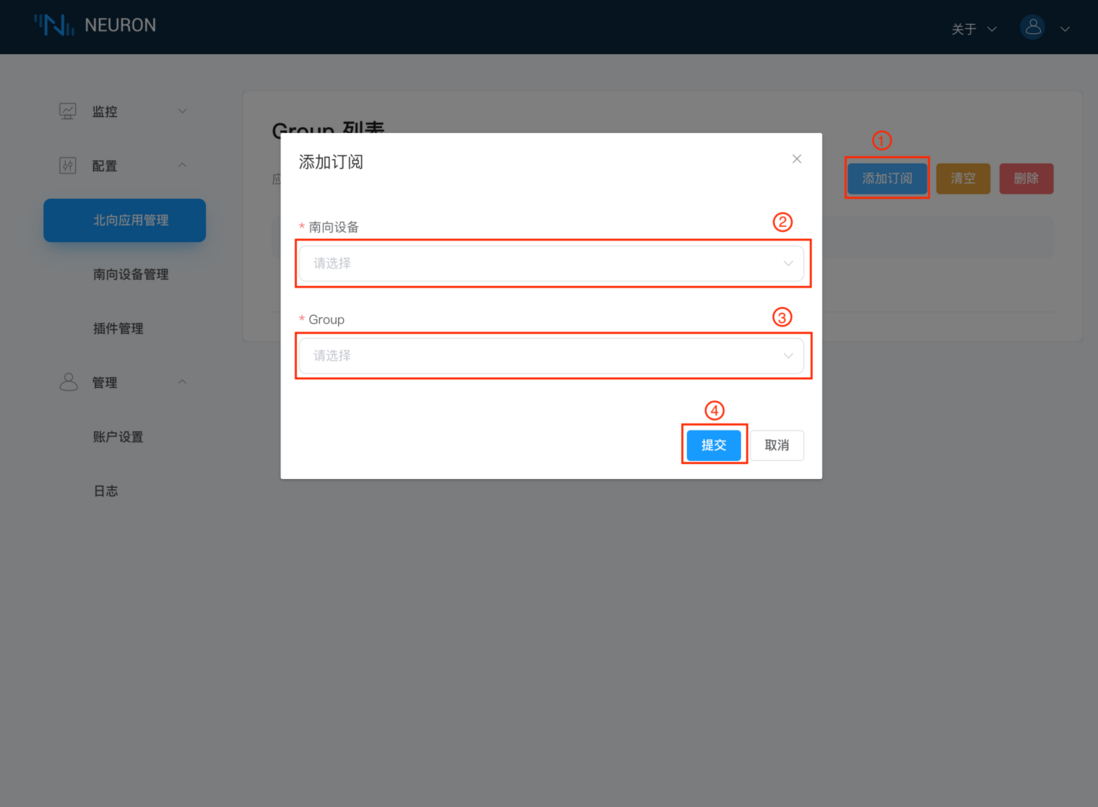
Click any blank space in the first step application card ekuiper-1 to enter the subscription group interface, as shown in the following figure.
- Click the Add Subscription button in the upper right corner to add a subscription;
- Select the southbound device from the drop-down box, here we select the modbus-plus-tcp-1 device built above;
- Select the Group to be subscribed from the drop-down box, here we select the group-1 built above;
- Click Submit to complete the subscription.
- Click northbound application management, and click the working status switch in the application card to make the application enter the running state.
So far, Neuron has configured data collection and sent the collected data to the northbound eKuiper channel.
eKuiper manager configuration
eKuiper manager is a web management interface that manages multiple eKuiper instances. Therefore, we need to set the eKuiper instance managed by the manager. For detailed settings, please refer to the use of eKuiper management console .
eKuiper can be managed using REST API, command line and management console. In the following tutorials, we mainly use the REST API for management, including flow and rule creation.
Create flow
Create a stream named neuronStream using the following command. where the type attribute is set to neuron, indicating that the stream will be connected to neuron. All data collected in neuron will be sent over, so multiple rules in eKuiper will process the same data, so the stream attribute shared is set to true.
 curl -X POST --location http://127.0.0.1:9081/streams \
    -H 'Content-Type: application/json' \
    -d '{"sql":"CREATE STREAM neuronStream() WITH (TYPE=\"neuron\",FORMAT=\"json\",SHARED=\"true\");"}'
Collection rules
After the Neuron flow is established, we can create any number of rules in eKuiper to perform various calculations and processing on the collected data. This article takes two collection rules as an example to implement the scene of edge collection to the cloud. For more data processing capabilities of eKuiper, please refer to the extended reading section.
Clean data to cloud
Suppose the real meaning of the two tags set in Neuron is:
- tag1: The temperature data represented by decimal, the actual temperature should be divided by 10
- tag2: Integer humidity data.
This rule scales the acquired Neuron data to the correct precision and renames it to a meaningful name. The result is sent to the MQTT dynamic topic ${nodeName}/${groupName} in the cloud. The REST command to create the rule is as follows. Among them, the rule name is ruleNAll, the collected values are calculated in the SQL of the rule, and metadata such as node_name and group_name are selected. In the action, the result of the rule is sent to the MQTT broker in the cloud, and the topic is a dynamic name. According to the previous configuration, the node_name we collected is modbus-plus-tcp-1, and the group_name is group-1. Therefore, in MQTT X, subscribing to the modbus-plus-tcp-1/group-1 topic can get the calculation result.
 curl -X POST --location http://127.0.0.1:9081/rules \
    -H 'Content-Type: application/json' \
    -d '{
  "id": "ruleNAll",
  "sql": "SELECT node_name, group_name, values->tag1/10 as temperature, values->tag2 as humidity FROM neuronStream",
  "actions": [{
    "mqtt": {
      "server": "tcp://cloud.host:1883",
      "topic": "{{.node_name}}/{{.group_name}}",
      "sendSingle": true
    }
  }]
}'
Open MQTT X, connect to the cloud broker, subscribe to the topic modbus-plus-tcp-1/group-1 , and you can get the following results. Since the acquisition frequency is once every 100ms, the data received here is also of a similar frequency.
Modify the data in the Modbus TCP simulator to get the changed output.
Collect change data to the cloud
When the collection frequency is high and the data change frequency is low, users usually collect a large amount of redundant and repeated data, and uploading all the data to the cloud will occupy a large amount of bandwidth. eKuiper provides the deduplication function at the application layer, and can create rules to collect change data. Modify the above rules, add filter conditions, and send data only when any of the collected tag data changes. The new rules become:
 curl -X POST --location http://127.0.0.1:9081/rules \
    -H 'Content-Type: application/json' \
    -d '{
  "id": "ruleChange",
  "sql": "SELECT node_name, group_name, values->tag1/10 as temperature, values->tag2 as humidity FROM neuronStream WHERE HAD_CHANGED(true, values->tag1, values->tag2)",
  "actions": [{
    "mqtt": {
      "server": "tcp://cloud.host:1883",
      "topic": "changed/{{.node_name}}/{{.group_name}}",
      "sendSingle": true
    }
  }]
}'
Open MQTT X, connect to the cloud broker, subscribe to the changed/modbus-plus-tcp-1/group-1 topic, and the frequency of receiving data is greatly reduced. Modify the data in the Modbus TCP simulator to receive new data.
Control the device via Neuron
Thanks to the Neuron sink component, eKuiper can control the device through Neuron after data processing. In the following rules, eKuiper receives MQTT commands and dynamically counter-controls Neuron.
Suppose there is an application scenario where the user controls the device deployed at the edge by sending a control command to a topic of the MQTT server in the cloud, such as setting the desired temperature of the target device. First, we need to create an MQTT stream in eKuiper to receive commands sent from other applications to the command MQTT topic.
 curl -X POST --location "http://127.0.0.1:9081/streams" \
    -H 'Content-Type: application/json' \
    -d '{"sql":"CREATE STREAM mqttCommand() WITH (TYPE=\"mqtt\",SHARED=\"TRUE\",DATASOURCE=\"command\");"}'
Next, we create a rule to read data from this MQTT stream and write data through Neuron according to the rule. As before, suppose tag1 is the decimal reading of the temperature sensor. This rule reads the temperature value in the MQTT payload and multiplies it by 10 as the value of tag1; uses the nodeName and groupName fields in the payload as the dynamic node and group names written to Neuron.
 curl -X POST --location http://127.0.0.1:9081/rules \
    -H 'Content-Type: application/json' \
    -d '{
  "id": "ruleCommand",
  "sql": "SELECT temperature * 10 as tag1, nodeName, groupName from mqttCommand",
  "actions": [{
    "log": {},
    "neuron": {
      "nodeName": "{{.nodeName}}",
      "groupName": "{{.groupName}}",
      "tags": [
        "tag1"
      ]
    }
  }]
}'
After the rule runs, open MQTT X and write a JSON string in the following format to the command topic. Note that you should make sure that the node and group are created in Neuron. In this tutorial's configuration, only modbus-plus-tcp-1 and group-1 are created.
 {
  "nodeName": "modbus-plus-tcp-1",
  "temperature": 24,
  "groupName": "group-1"
}
Open Neuron's data monitoring, it can be seen that the tag1 data has changed to 240, indicating that the anti-control is successful.
At the same time, the two rules created above should capture new values.
Copyright statement: This article is original by EMQ, please indicate the source when reprinting.
Original link: https://www.emqx.com/zh/blog/industrial-iot-data-collection-cleaning-and-control


**粗体** _斜体_ [链接](http://example.com) `代码` - 列表 > 引用。你还可以使用@来通知其他用户。