Purpose of writing
It is not often used, and you may forget the basic usage and keep it for yourself.
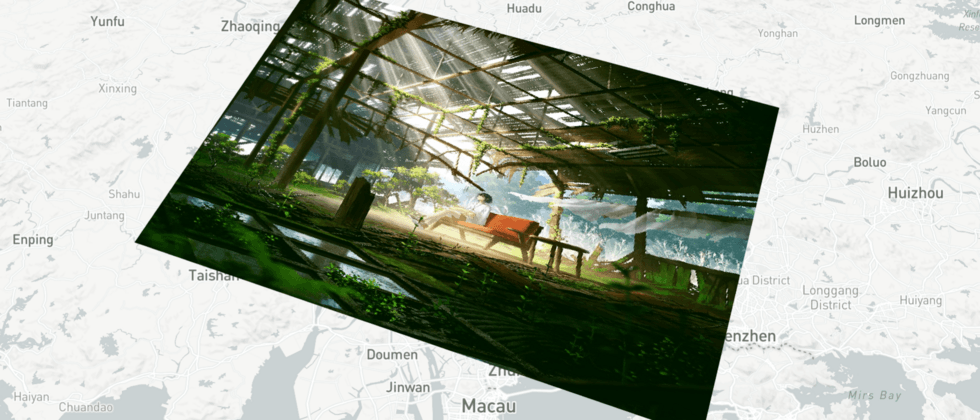
texture
Effect
be careful
- The two triangles that make up the rectangle need to be converted to the scene world coordinates in WebGL using the
mapboxgl.MercatorCoordinate.fromLngLatmethod. Pay attention to how the triangle order is set in the case. -
renderThe function is the calling function of each frame of drawing, and the program, texture, and vertexBuffer must be set once for each frame to trigger the draw, and pay special attention to the address of the matrix uniform, and it is also necessary to obtain the latest update for each frame. the (gl.getUniformLocation(this.program, 'u_matrix')) - The length and width of the texture should be a power of 2
source code
Please use your own access token, the code is not explained, and the basic comments are complete.
Part of the page (omitted, please complete it yourself):
 <link href="https://api.mapbox.com/mapbox-gl-js/v2.9.1/mapbox-gl.css" rel="stylesheet">
<script src="https://api.mapbox.com/mapbox-gl-js/v2.9.1/mapbox-gl.js"></script>
<style>
#map {
  width: 90vw;
  height: 90vh;
}
</style>
<div id="map"></div>

<script>
  // js 部分,见下
</script>
js part:
 mapboxgl.accessToken = '你的令牌'

const map = new mapboxgl.Map({
  container: 'map',
  zoom: 7,
  center: [112.5, 22.5],
  style: 'mapbox://styles/mapbox/light-v10',
  // 开启 WebGL 的 msaa(抗锯齿)
  antialias: true
})

const vertexSource = /* glsl */`
uniform mat4 u_matrix;
attribute vec3 a_pos;
attribute vec2 a_uv;
varying vec2 v_uv;
void main() {
  v_uv = a_uv;
  gl_Position = u_matrix * vec4(a_pos, 1.0);
}`

const fragmentSource = /* glsl */`
precision mediump float;
varying vec2 v_uv;
uniform sampler2D u_sampler;
void main() {
    gl_FragColor = texture2D(u_sampler, v_uv);
}`

// create a custom style layer to implement the WebGL content
const customLayer = {
  id: 'highlight',
  type: 'custom',

  // 当图层添加时调用的函数
  // https://docs.mapbox.com/mapbox-gl-js/api/#styleimageinterface#onadd
  onAdd: function (map, /** @type {WebGLRenderingContext} */gl) {

    // 创建、编译顶点着色器
    const vertexShader = gl.createShader(gl.VERTEX_SHADER)
    gl.shaderSource(vertexShader, vertexSource)
    gl.compileShader(vertexShader)

    // 创建、编译片元着色器
    const fragmentShader = gl.createShader(gl.FRAGMENT_SHADER)
    gl.shaderSource(fragmentShader, fragmentSource)
    gl.compileShader(fragmentShader)

    // 创建着色器程序,链接片元和顶点着色器
    this.program = gl.createProgram()
    gl.attachShader(this.program, vertexShader)
    gl.attachShader(this.program, fragmentShader)
    gl.linkProgram(this.program)

    // 把 vertexAttributes 和 uniform 在着色器中的位置保存下来
    this.aPos = gl.getAttribLocation(this.program, 'a_pos')
    this.aUv = gl.getAttribLocation(this.program, 'a_uv')
    this.uSamplerLoc = gl.getUniformLocation(this.program, 'u_sampler')

    // 四个点用于定义一个矩形
    const p1 = mapboxgl.MercatorCoordinate.fromLngLat({
      lng: 112.5494384765625,
      lat: 22.268764039073968
    }, 10)
    const p2 = mapboxgl.MercatorCoordinate.fromLngLat({
      lng: 114.0216064453125,
      lat: 22.268764039073968
    }, 10)
    const p3 = mapboxgl.MercatorCoordinate.fromLngLat({
      lng: 114.0216064453125,
      lat: 23.28171917560002
    }, 10)
    const p4 = mapboxgl.MercatorCoordinate.fromLngLat({
      lng: 112.5494384765625,
      lat: 23.28171917560002
    }, 10)

    // 加载贴图并创建纹理,在加载完毕的回调函数中上载贴图数据
    const img = new Image()
    img.src = './img.png'
    this.texture = gl.createTexture()
    img.onload = () => {
      // bind 和 storei 操作必须等纹理解码完成
      gl.bindTexture(gl.TEXTURE_2D, this.texture)
      gl.pixelStorei(gl.UNPACK_FLIP_Y_WEBGL, true)

      // 上载数据
      gl.texImage2D(gl.TEXTURE_2D, 0, gl.RGBA, gl.RGBA, gl.UNSIGNED_BYTE, img)
    }

    // 创建 VBO
    this.buffer = gl.createBuffer()
    gl.bindBuffer(gl.ARRAY_BUFFER, this.buffer)
    gl.bufferData(
      gl.ARRAY_BUFFER,
      new Float32Array([
        // position, uv
        p1.x, p1.y, p1.z, 0, 0,
        p2.x, p2.y, p2.z, 1, 0,
        p3.x, p3.y, p3.z, 1, 1,

        p1.x, p1.y, p1.z, 0, 0,
        p3.x, p3.y, p3.z, 1, 1,
        p4.x, p4.y, p4.z, 0, 1,
      ]),
      gl.STATIC_DRAW
    )
  },

  // 每帧运行
  // https://docs.mapbox.com/mapbox-gl-js/api/#map.event:render
  render: function (/** @type {WebGLRenderingContext} */gl, matrix) {
    // 每帧都要指定用哪个着色器程序
    gl.useProgram(this.program)
    // 每帧都要传递 uniform
    gl.uniformMatrix4fv(
      gl.getUniformLocation(this.program, 'u_matrix'),
      false,
      matrix
    )
    // 每帧都要绑定纹理参数
    gl.bindTexture(gl.TEXTURE_2D, this.texture)
    gl.texParameteri(gl.TEXTURE_2D, gl.TEXTURE_WRAP_S, gl.CLAMP_TO_EDGE)
    gl.texParameteri(gl.TEXTURE_2D, gl.TEXTURE_WRAP_T, gl.CLAMP_TO_EDGE)
    gl.texParameteri(gl.TEXTURE_2D, gl.TEXTURE_MAG_FILTER, gl.NEAREST)
    gl.texParameteri(gl.TEXTURE_2D, gl.TEXTURE_MIN_FILTER, gl.NEAREST)

    // 每帧都要绑定 VBO,并启用 vertexAttributes、设置 vertexAttributes 的参数
    gl.bindBuffer(gl.ARRAY_BUFFER, this.buffer)
    gl.enableVertexAttribArray(this.aPos)
    gl.enableVertexAttribArray(this.aUv)
    gl.vertexAttribPointer(this.aPos, 3, gl.FLOAT, false, 20, 0)
    gl.vertexAttribPointer(this.aUv, 2, gl.FLOAT, false, 20, 12)

    // 如果你用不着透明度,可以不执行这两行
    // gl.enable(gl.BLEND)
    // gl.blendFunc(gl.SRC_ALPHA, gl.ONE_MINUS_SRC_ALPHA)

    // 触发绘制
    gl.drawArrays(gl.TRIANGLES, 0, 6)
  }
}

map.on('load', () => {
  map.addLayer(customLayer)
})
Points for improvement
After the above example is added to the map, the picture is still not requested and decoded, and the callback function has not been executed. If you don't move the map, such as clicking or moving the viewing angle, it will not be updated. It may be black A black frame - the texture is not ready, only a black frame can be drawn.
The improvement method is also very simple. You can asynchronously request to complete the picture and decode it outside the custom layer ( Image supports the decode method that returns Promise), and then create and add the customLayer object. to the map.


**粗体** _斜体_ [链接](http://example.com) `代码` - 列表 > 引用。你还可以使用@来通知其他用户。