
Tanabata is coming! It's time to surprise someone important again.
This year, in addition to integrating your thoughts into flowers and gifts, as a programmer, as a programmer, you can use your own code skills to rub a technically-sounding "Qianxi Festival" surprise. I think this is no less than the classic romance of handwritten letters in the slow-moving era.
So, how to create a romantic Tanabata surprise with self-identity attributes?
There are many ways to play. Today, I will introduce to you a technical and romantic practice method that is not wrong. Firework particle animation, creating a sky-filled firework for each other in the virtual space, the romance of parallel time and space, how cool.
In addition to being romantic, the firework particle animation effect has a variety of practical application scenarios, for example, in game applications, the page presentation after the player wins, and the creation of in-game atmosphere for specific holidays such as the Spring Festival.
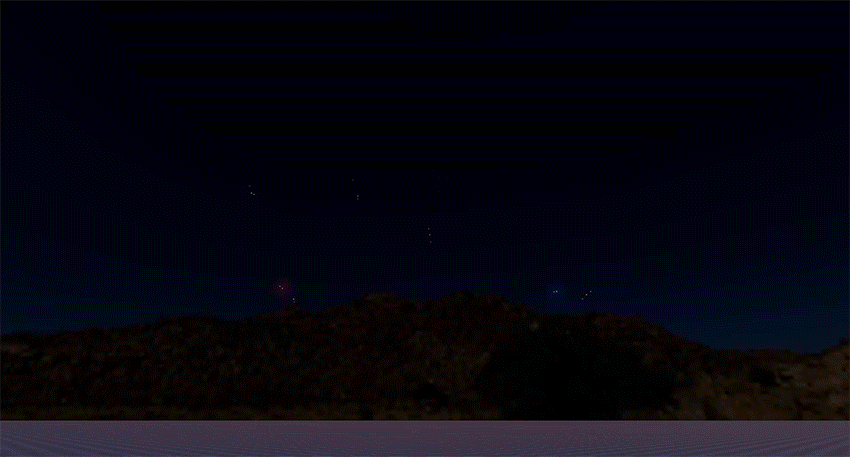
See an example :
From particle animation to more exciting
Firework particle animation is a visual effect realized by HMS Core 3D Engine . With the help of 3D Engine, it can also open more exciting possibilities of virtual horizons. 3D Engine provides developers with a high-performance, high-quality, and highly scalable real-time 3D engine, as well as convenient and efficient visual development tools to help developers create high-quality 3D applications.
If you are game development or interested in game development, then you can play more than romance with 3D Engine.
1. High-definition rendering and visual effects, highly restore realistic light and shadow effects;
2. Multi-threaded PBR rendering to achieve high-performance real-time 3D rendering effects;
3. CPU/GPU particle rendering to simulate visual effects such as explosions, flames, rain and snow;
4. Easily create 3D characters and smooth animations, support real-time skeletal animation, facial expression animation, full-body IK, animation redirection, and fusion of multiple animation state machines;
5. Provide automatic navigation grid generation, multi-target path planning, NPC intelligent pathfinding and intelligent obstacle avoidance functions;
6. 3D Studio provides convenient development tools and supports core functions such as scene editing, material editing, animation editing, terrain editing, and script editing.
In short, with the 3D Engine in hand, the high-quality 3D game scene is easy to have, if you are not convinced, try it!
Practical Guide - Realizing Particle Animation Firework Effect with 3D Engine
Create a level
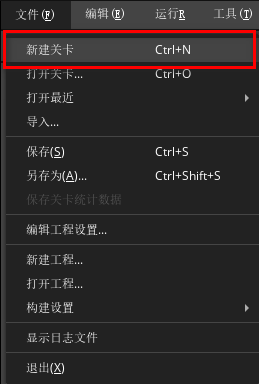
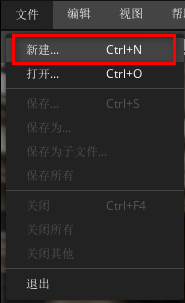
1. You need to create a new level: In the menu bar of the engine home page, select "File > New Level".
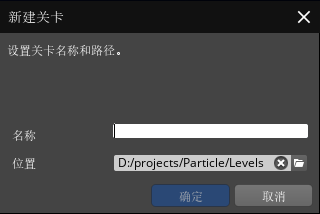
2. Enter the Level name, such as "Fireworks", and click "Confirm" to create it successfully. After completion, you will enter the Level interface of Xuantian Engine.
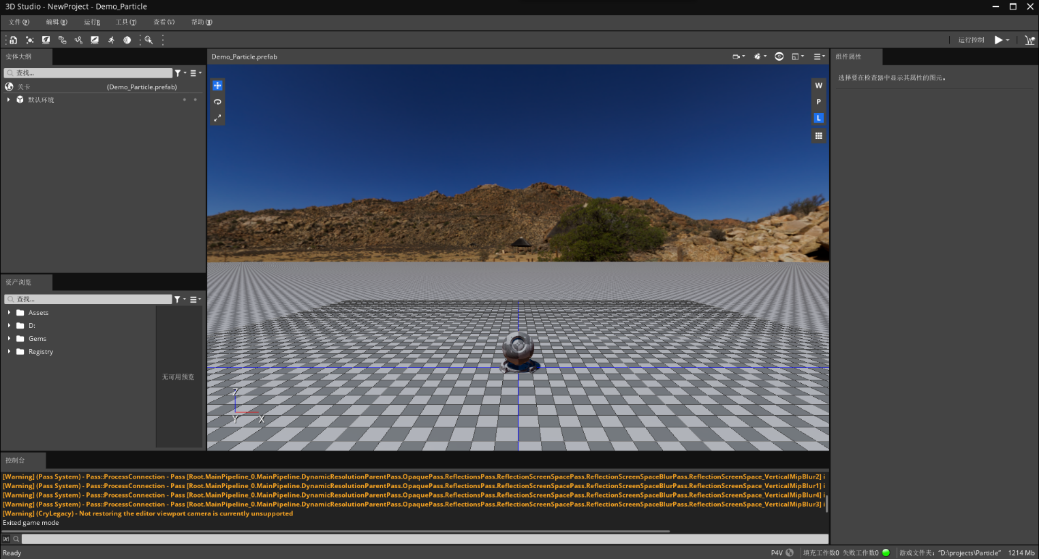
Environment construction
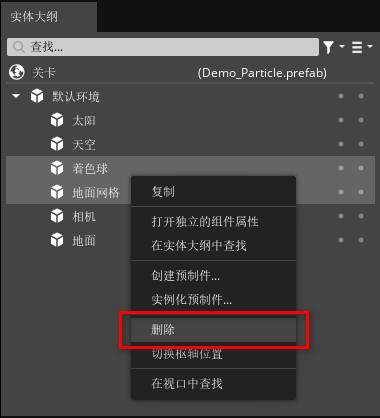
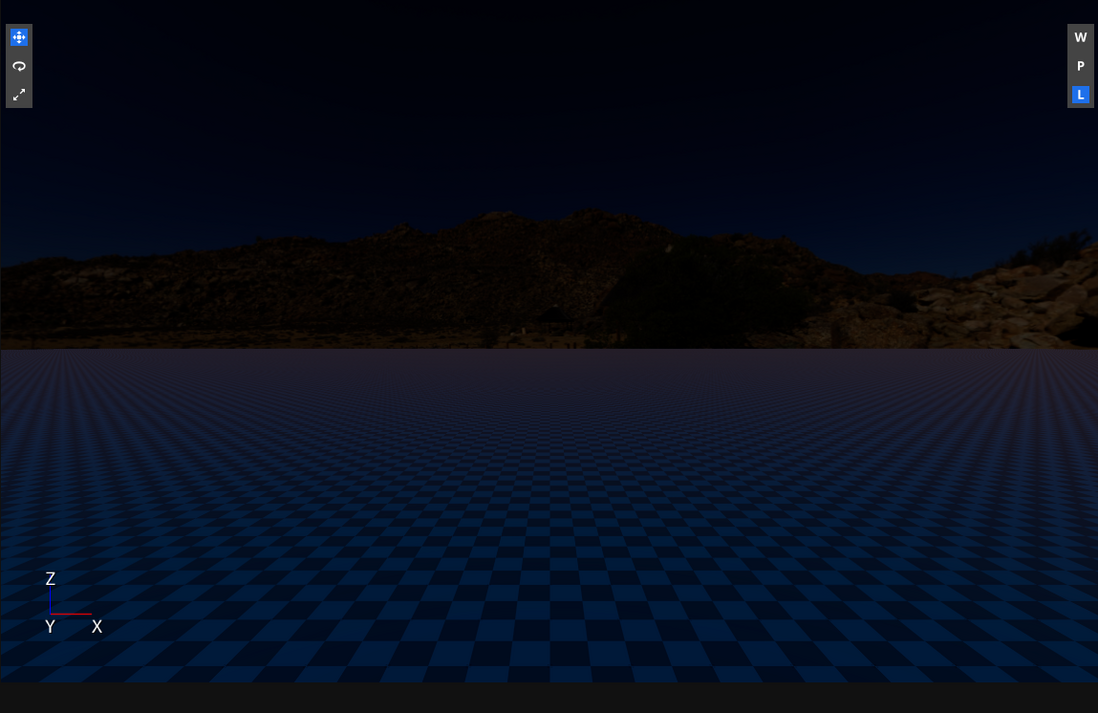
1. Before the fireworks effect in the scene, we need to adjust the environment in the level appropriately. First, remove the entities that we do not use: find the shader ball and the ground mesh entity in the default environment in the "Entity Outline" window of the engine home page, and right-click delete.
2. We need to simulate a darker environment: select the sky in the default environment group of the "Entity Outline" window, find the high dynamic range skybox component in the "Component Properties" window on the right side of the engine home page, and adjust the exposure property to -3.2.

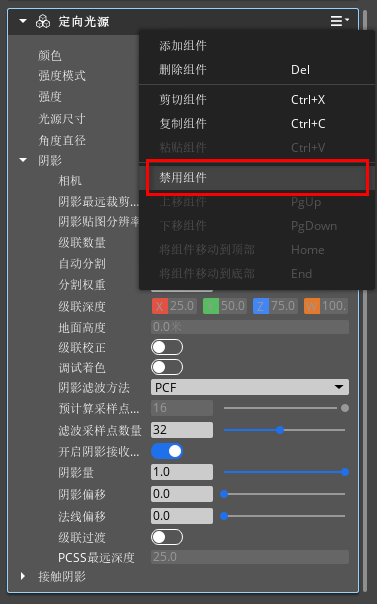
3. Select the sun in the default environment group of the "Entity Outline" window, find the directional light source component in the "Component Properties" window on the right side of the engine home page, right-click the component, and click "Disable Component".
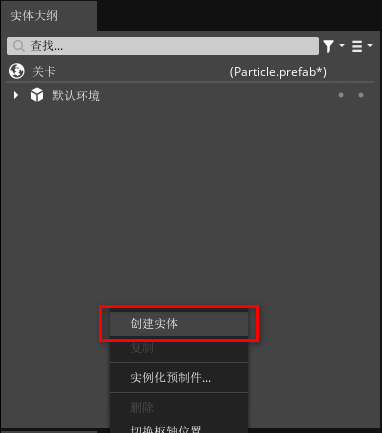
4. Right-click in the Entity Outline window and select Create Entity.
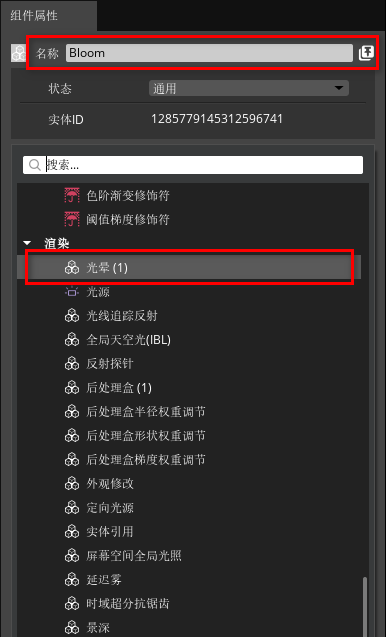
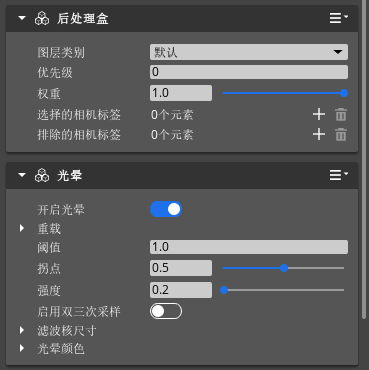
5. Select the newly created entity in the "Entity Outline" window, rename it to "Bloom" in the component properties, and add a "halo" component and a "post-processing box" component to enhance the light effect of the firework particles.
6. Set the parameters of the halo component as shown below.
After completing the above steps you will get the following effect
Material editing
1. Next, we need to create some light effect materials for the firework particles. First, click "Tools > Material Editor" in the global menu bar of the engine home page to open the material editor.

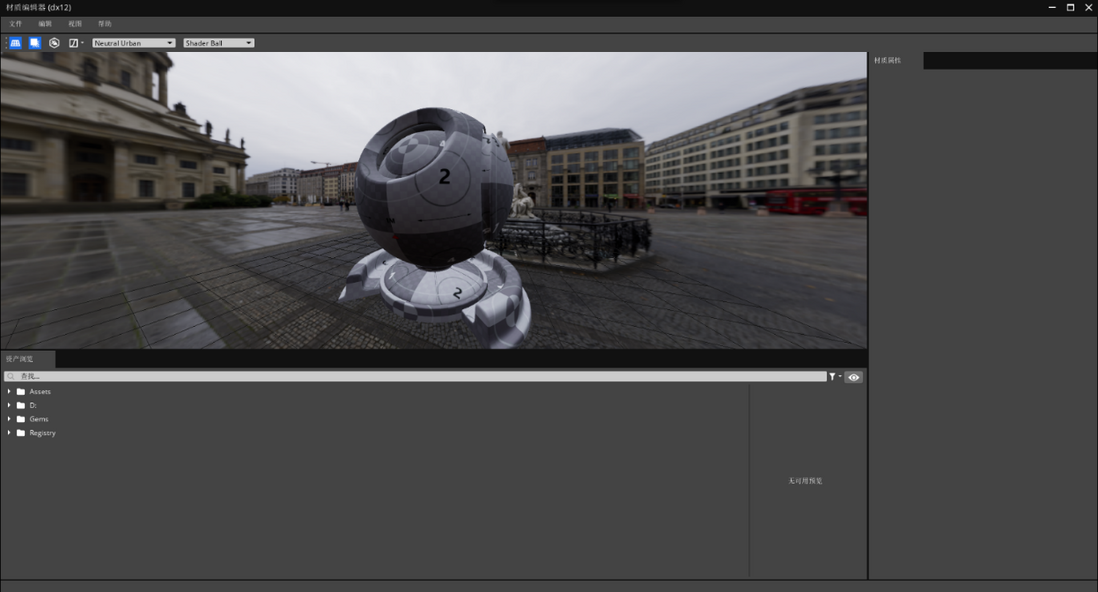
2. Click "File > New" in the menu bar of the material editor to create a new material file.
3. In the pop-up window, select the material type as "ParticleMesh", and create a new "Material" folder in the Assets folder in the project directory, keep the material in this folder, and rename it to "Particle".
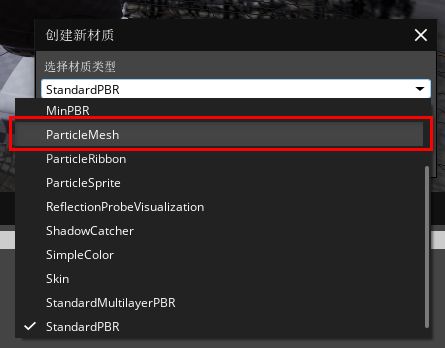
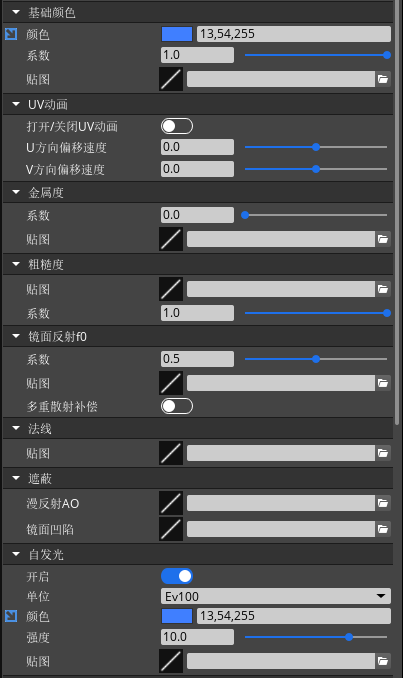
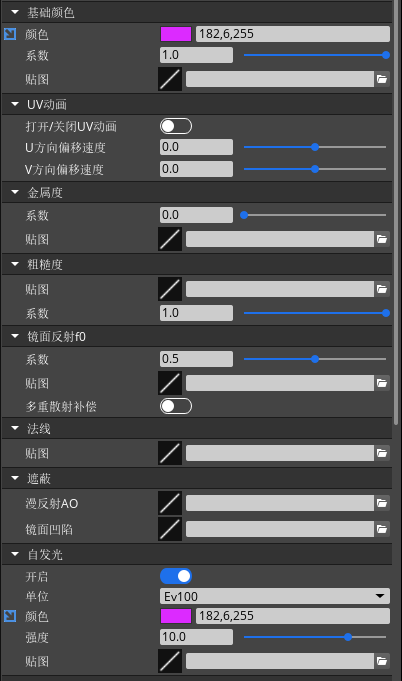
4. The "Material Properties" window of the material editor displays the current material type and input parameter configuration. You can modify the corresponding parameter settings here. The parameter settings are as shown in the figure below.
·Basic color: Use the color in the basic color, you can directly enter the RGB value in the input field, or you can click the color square to open the "Select Color" window to adjust the color.
·Self-illumination: To use the self-illumination property, you need to turn on the "On" switch first. Colors are used in a similar way to the underlying color properties, with the intensity determining the intensity of the self-illumination.

5. In order to enrich our particle light effect, we need to repeat steps 2~4 to recreate two light effect materials of different colors and name them "Particle_02" and "Particle_03". The parameter settings are as shown below.
Particle Editing
1. Go back to the engine home page, click "Tools > Particle Editor" in the global menu bar to open the particle editor.

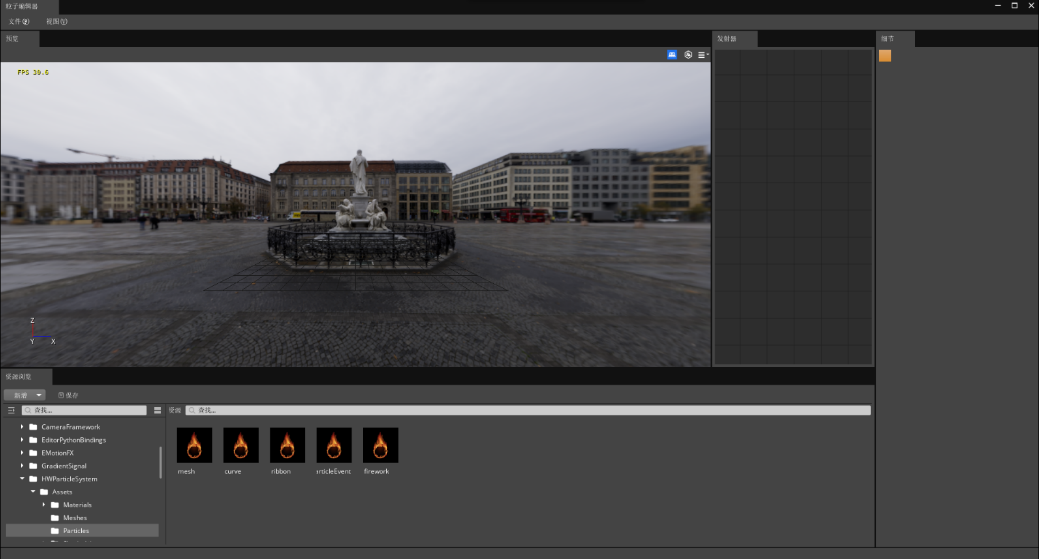
2. Find the "Assets" folder in the project directory in the "Assets" window of the particle editor, click to select it, right-click in the browse template and click "New Folder", name it "Particle".
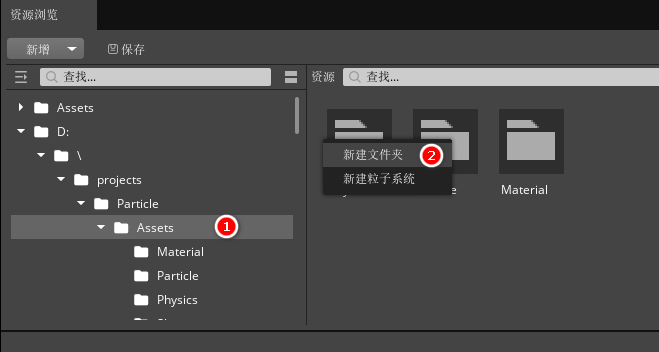
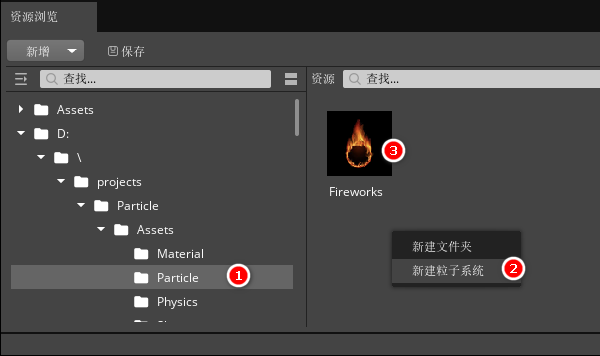
3. Right-click in the "Particle" folder we created in step 2 and click "New Particle System", name it "Fireworks.particle".
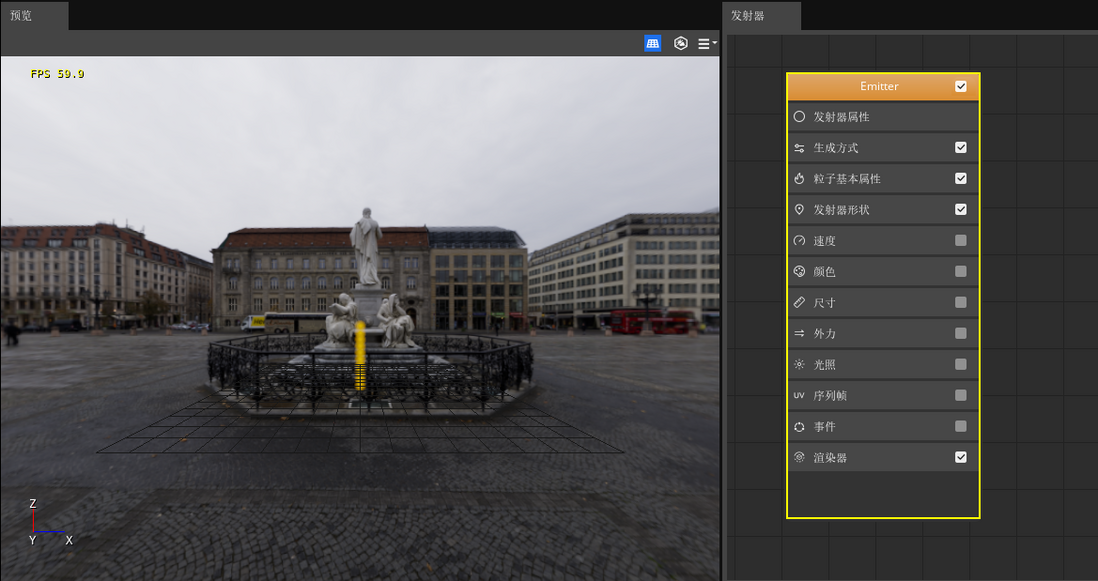
4. Double-click the particle created in the browse panel to enter the editing, and a default effect will be displayed in the "Emitter" window: the sprite particle uses a yellow material and emits upward at a speed of 10 particles per second, and the life cycle of the particle is 1 second.
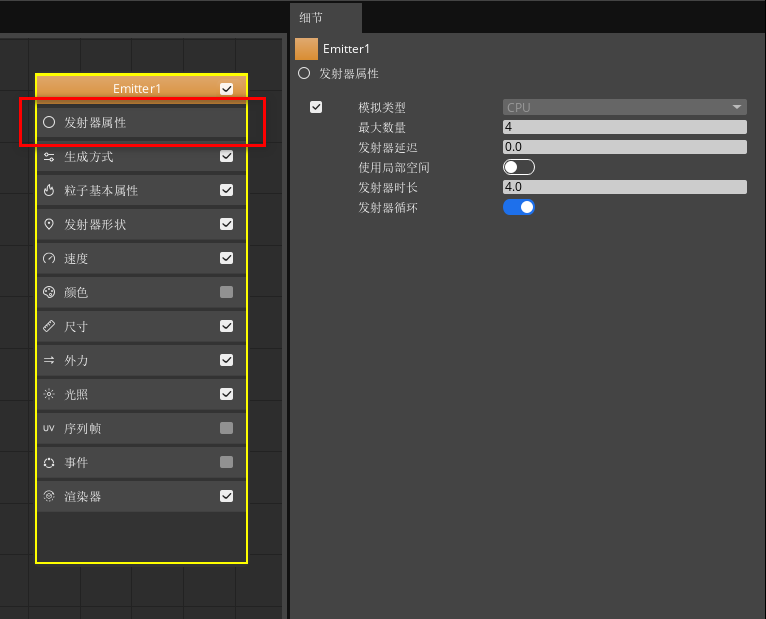
5. We need to create an upward emitting particle part and a bursting particle part to compose the firework effect that emits and blooms, let's edit an upward emitting particle emitter first.
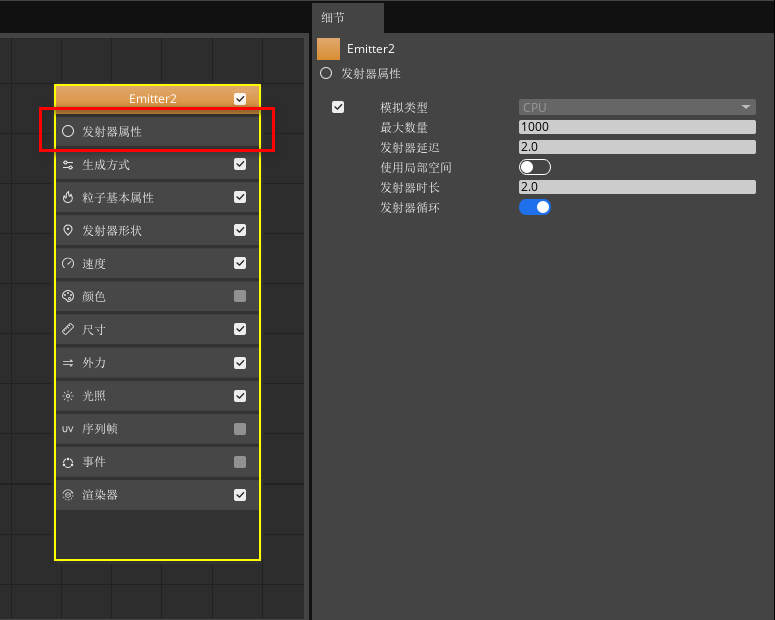
After clicking the "Emitter Attribute" attribute category in the emitter node, you can view the attribute module under this attribute category in the "Details" panel, and set the maximum number of particles emitted and the emitter duration according to the following figure.
Click the "Generation Method" attribute category in the emitter node, check the "Burst List" generation method, and add an element to the burst list to set the number of particles to 4.

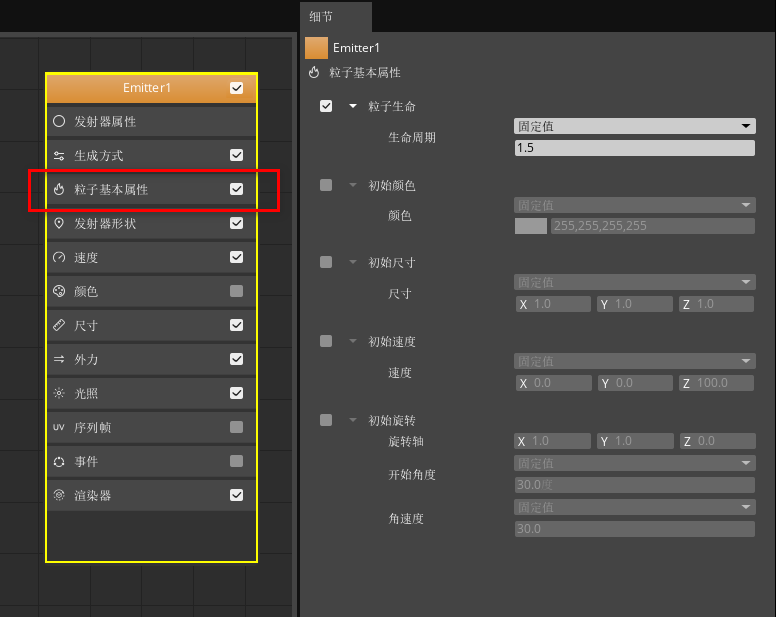
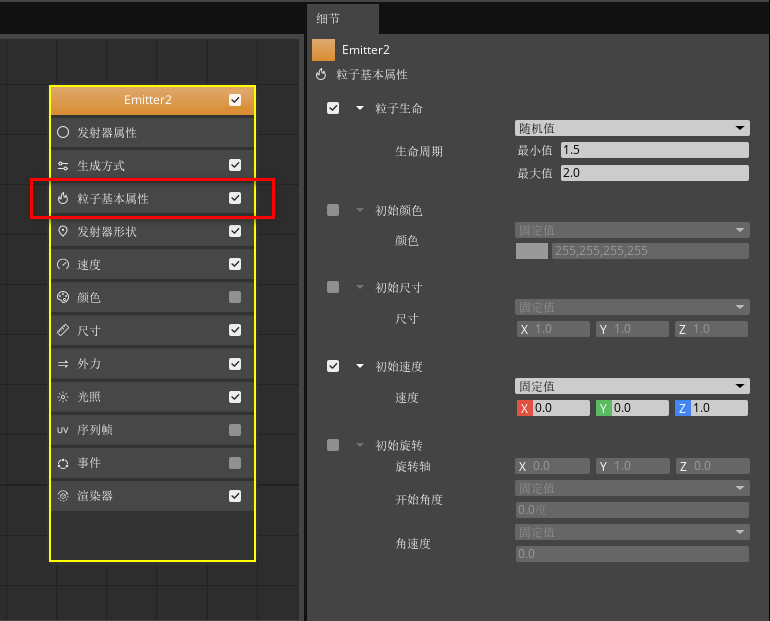
Click the "Particle Basic Properties" property category in the emitter node, and set the lifetime of the particle to 1.5.
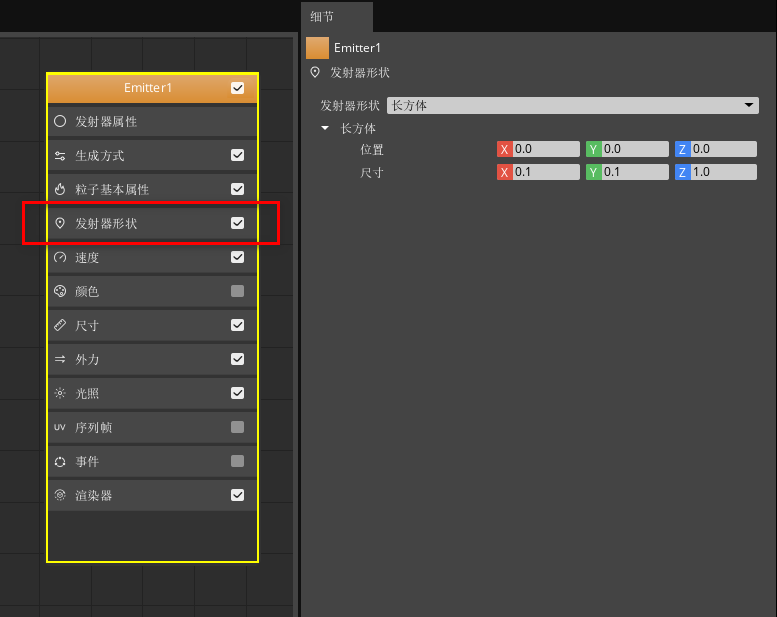
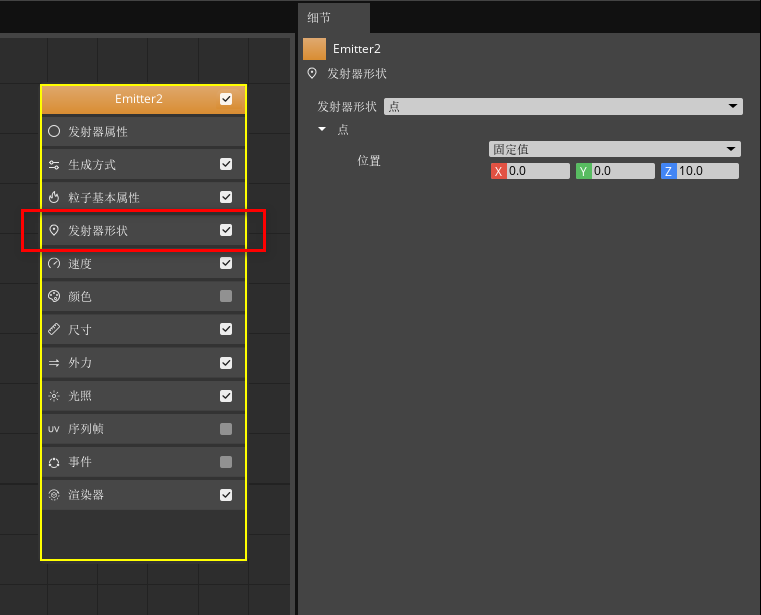
Click the "Emitter Shape" attribute category in the emitter node, select a rectangle in the emitter shape, and set the size according to the following figure.
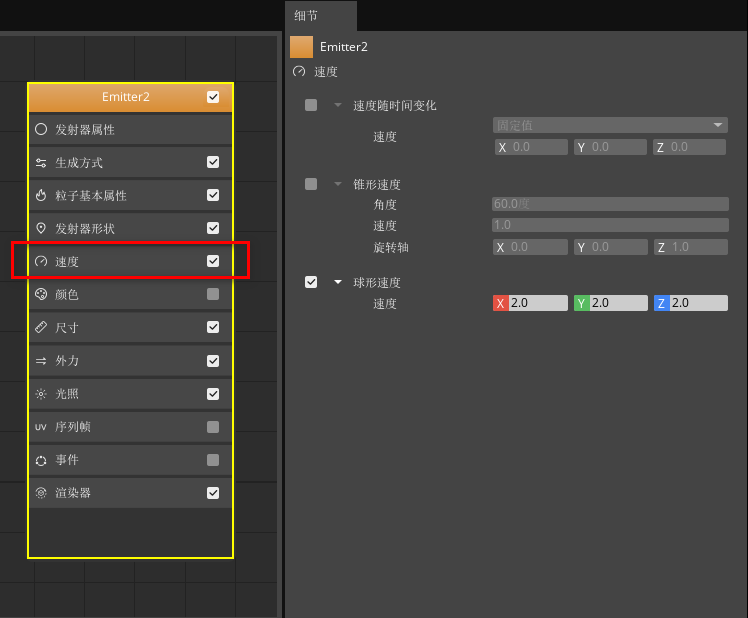
Click the "Speed" property category in the emitter node and set the Z-axis speed to 7.0.

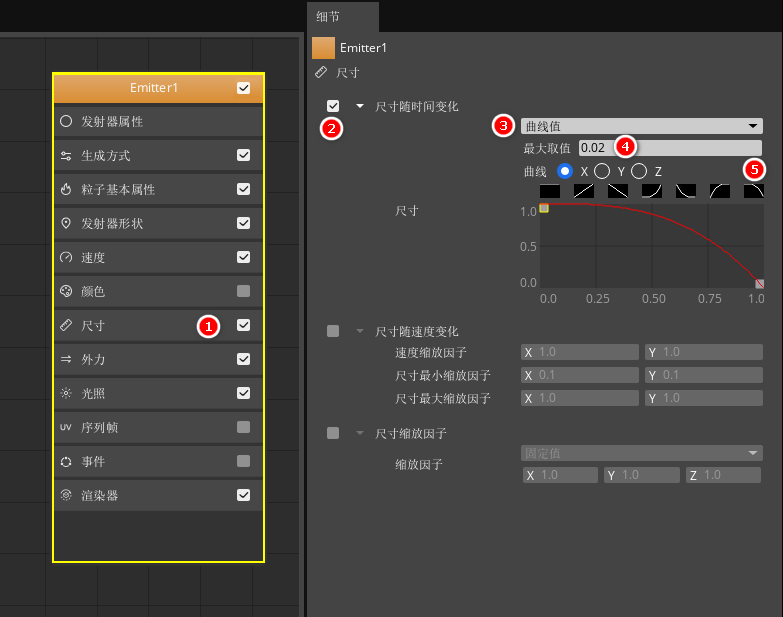
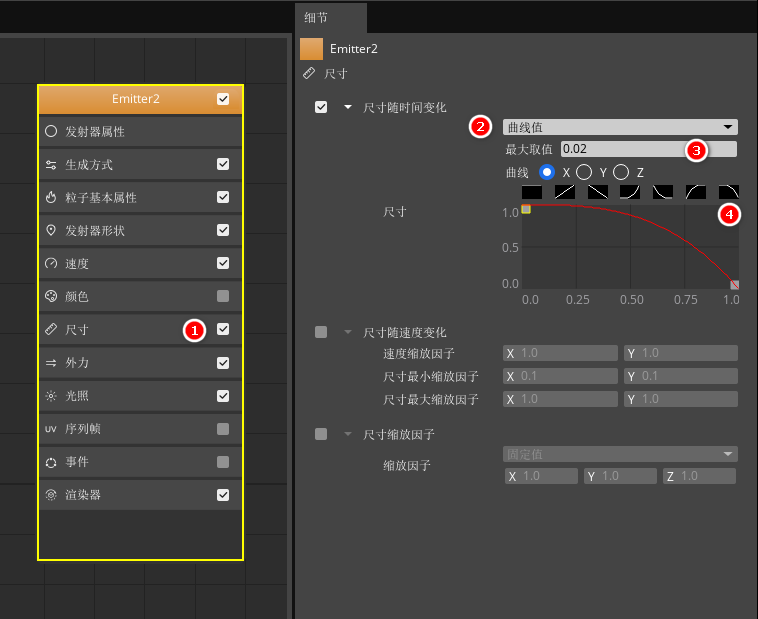
Click the "Size" attribute category in the emitter node, check "Size over time", select the type as Curve Value, and set the maximum value and curve of X, Y, Z according to the following figure.
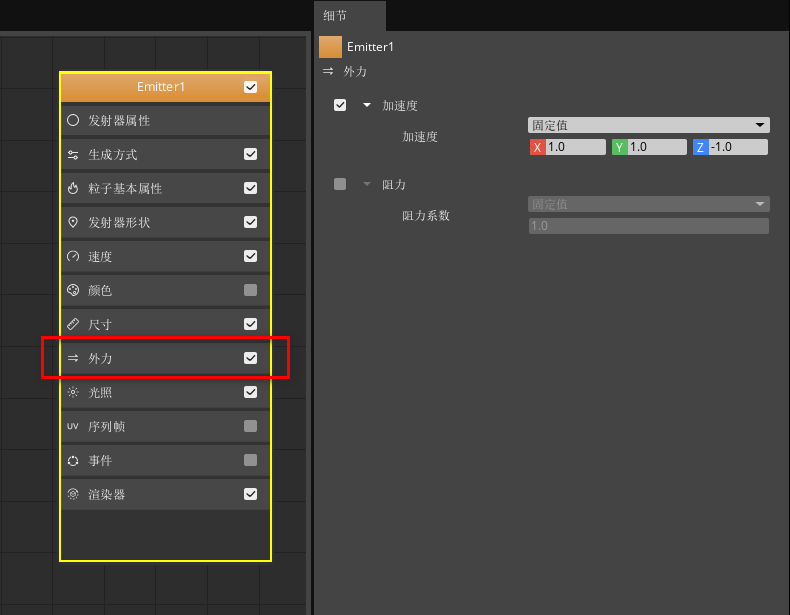
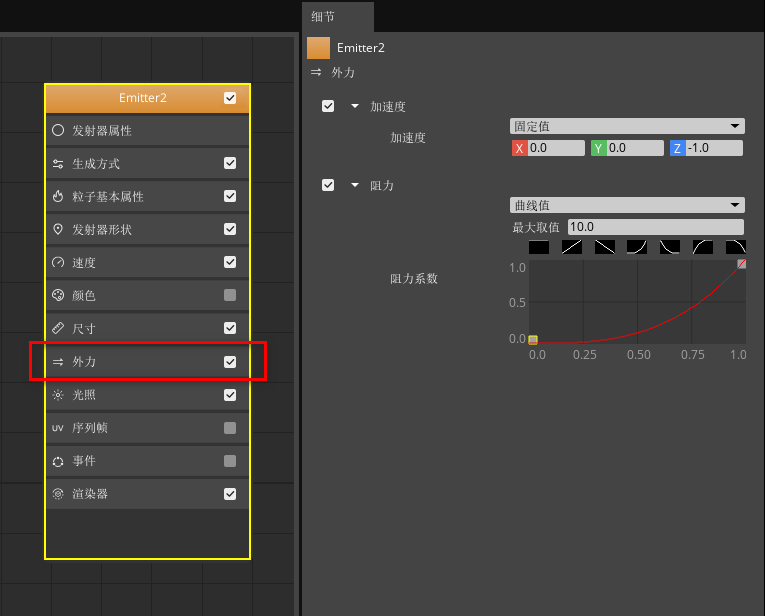
Click the "External Force" attribute category in the transmitter node, check the acceleration, and set it as shown below.
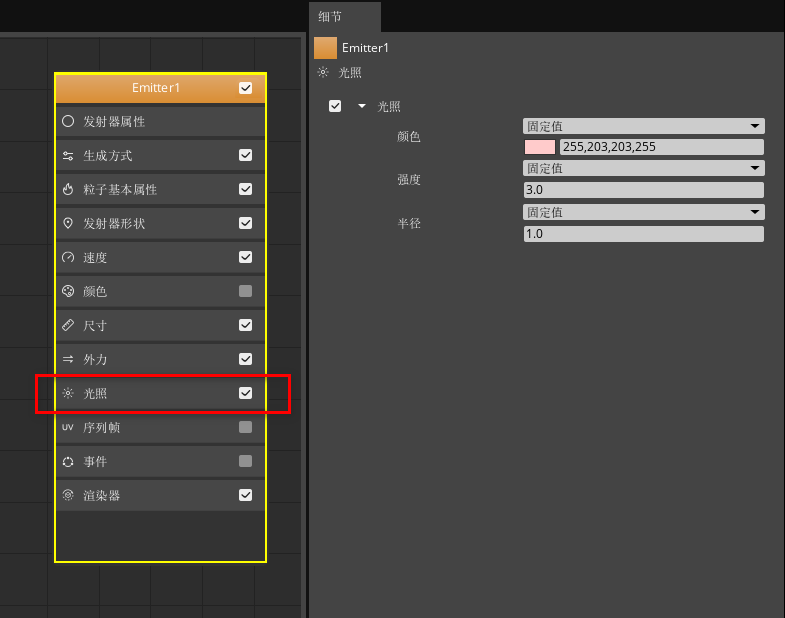
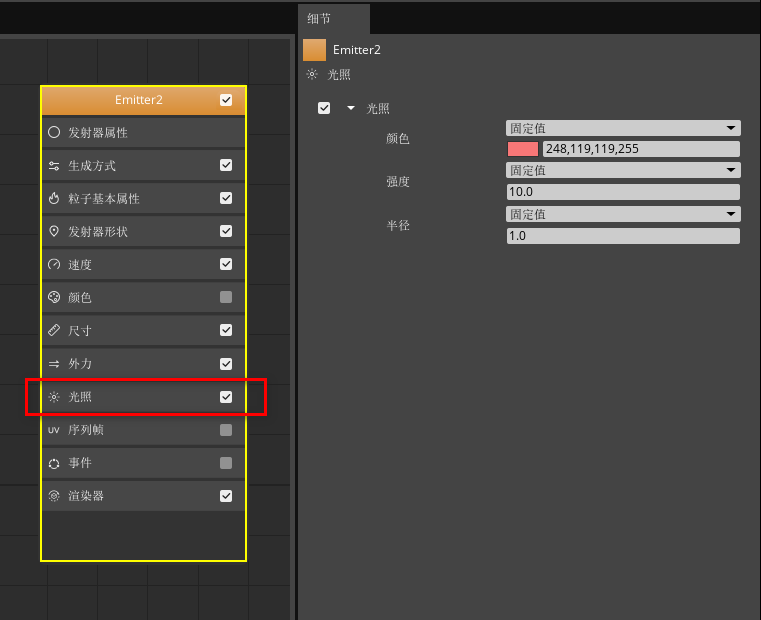
Click the "Lighting" attribute category in the emitter node, check the lighting, and set the parameters according to the following figure.
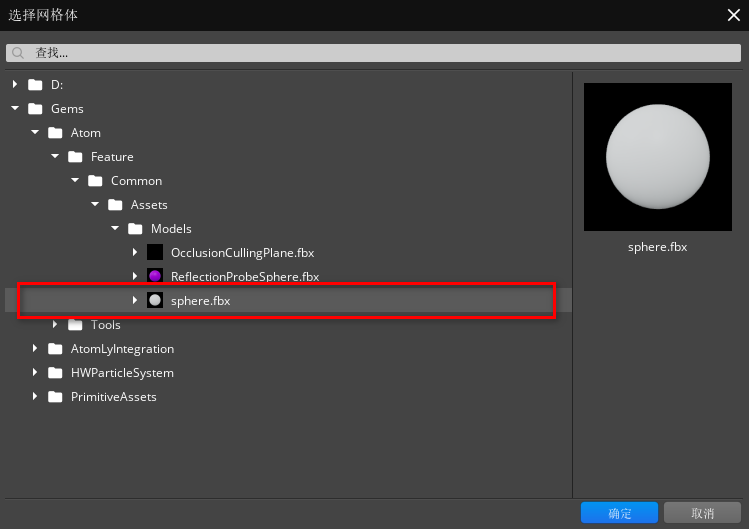
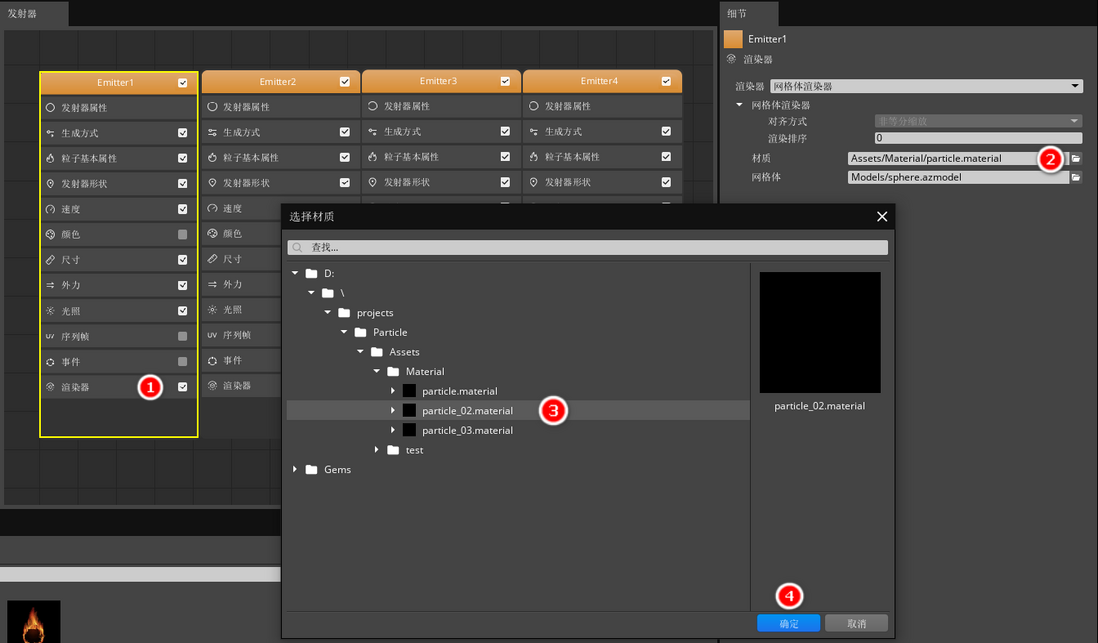
Click the "Renderer" attribute category in the emitter node, select the renderer as "Mesh Renderer", and find the material we saved in the material editing chapter in the "Assets > Material > Particle.material" directory to assign .
Specify "sphere.fbx" in the mesh.
6. At this point, we have completed an upward emitting particle emitter, and then we need to edit the burst firework particles.
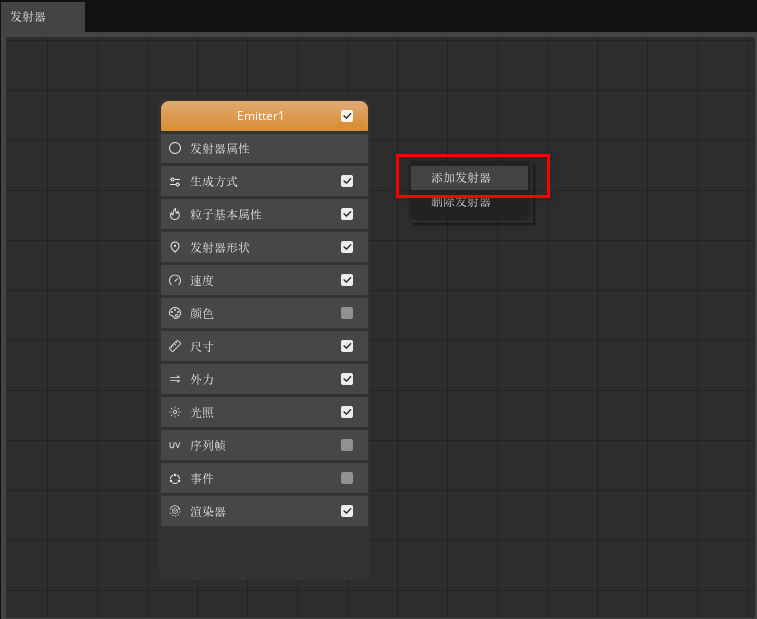
First, we right-click in the "Launcher" window and click "Add Launcher" to add a new launcher.
After clicking the "Emitter Properties" property category in the emitter node, set the emitter property parameters as shown below.
After clicking the "Generation Method" attribute category in the emitter node, set the generation method parameters according to the following figure.

After clicking the "Particle Basic Attributes" attribute classification in the emitter node, set the particle basic attribute parameters according to the following figure.
After clicking the "Emitter Shape" attribute classification in the emitter node, set the emitter shape parameters according to the following figure.
After clicking the "Speed" attribute category in the emitter node, set the speed parameters according to the following figure.
After clicking the "size" attribute category in the emitter node, set the size parameters according to the following figure.
After clicking the "External Force" attribute category in the emitter node, set the external force parameters according to the following figure.
After clicking the "Lighting" attribute category in the emitter node, set the lighting parameters according to the following figure.
After clicking the "Renderer" attribute category in the emitter node, set the renderer parameters according to the following figure.

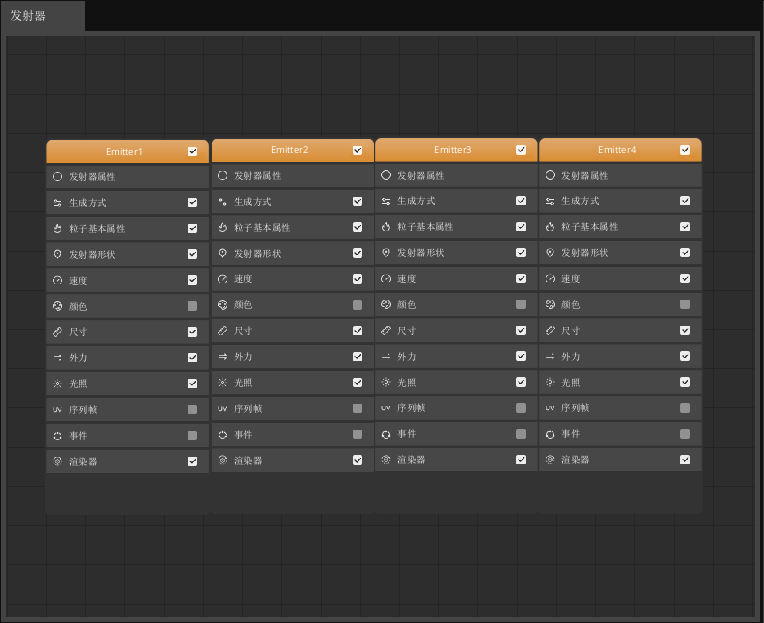
7. Repeat step 6 to create two new emitters to enrich the particle effect of the fireworks. It should be noted that you can set different "speed > spherical speed" parameters and "particle basic properties > particle life > life cycle" parameters in the newly created two emitters to enrich the firework effect, of course, you can also according to your Understand parameter values for setting other properties.
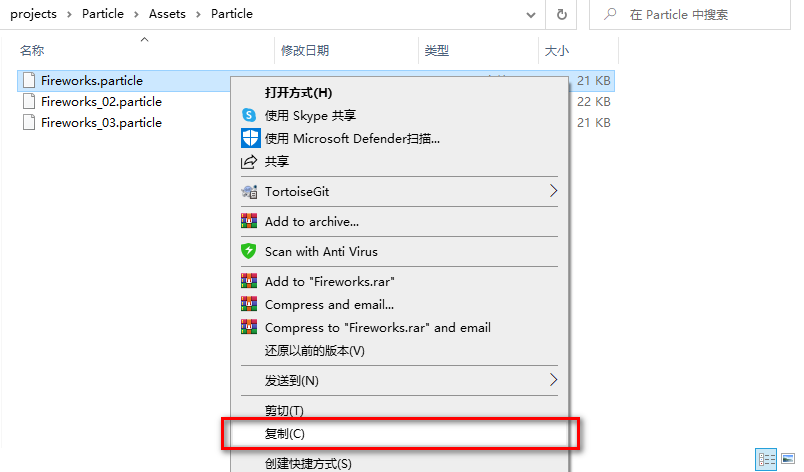
8. At this point, we have completed the setting of a firework particle. In order to achieve a richer effect, we can copy the particle file to get two new particle effects with the same attribute parameters, which we will name "Fireworks_02" " and "Fireworks_03".
9. Open the "Fireworks_02" particle file in the particle editor, click the "Renderer" attribute category in the four emitter nodes respectively, and assign the material to the material file of other colors that we saved in the "Material Editing" chapter" Particle_02" to enrich our firework effect and save our edits. Similarly, we can assign a new material file "Particle_03" in the "Fireworks_03" particle file.
place particles
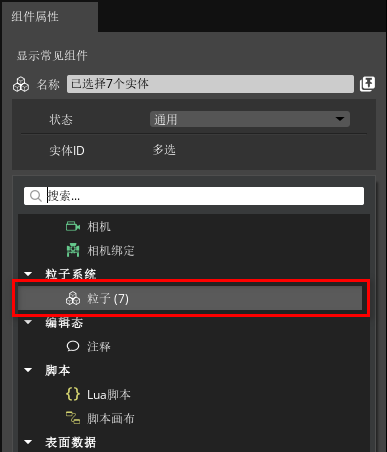
1. Go back to the engine home page, right-click and click "Create Entity" in the "Entity Outline" window, create 7 blank entities, and rename them in the "Component Properties" window, as shown in the figure below.

2. After multi-selecting the newly created 7 entities in the "Entity Outline" window, add "Particle Components" to them in the "Component Properties" window.
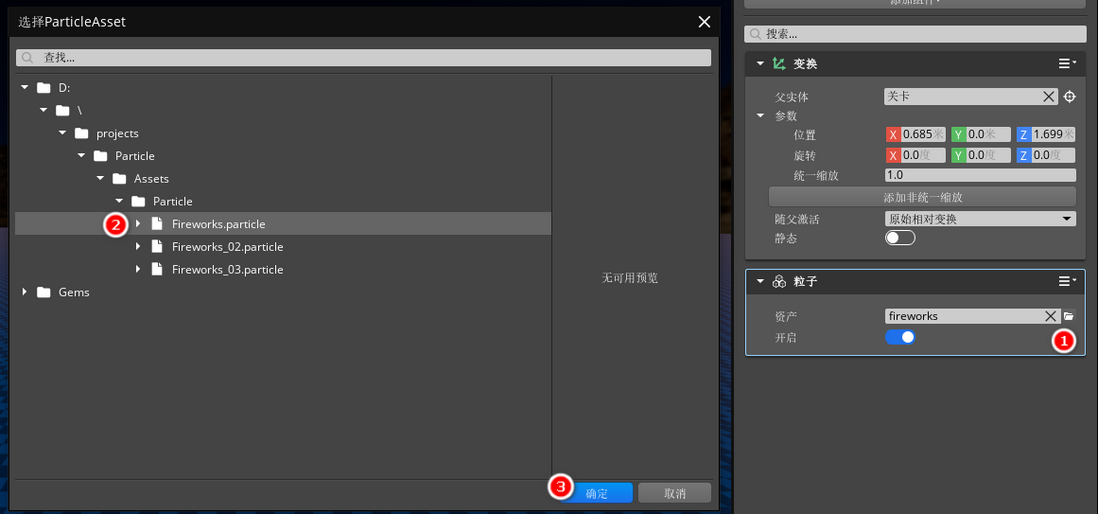
3. In the "Particle" component, specify the particle file we saved, and open the "Open" button, where we can randomly assign "Fireworks", "Fireworks_02" and "Fireworks_03" particle files for each entity.
5. Use the viewport controls to randomly place the position and rotation of the 7 entities, which will determine the angle and position of the fireworks launch.
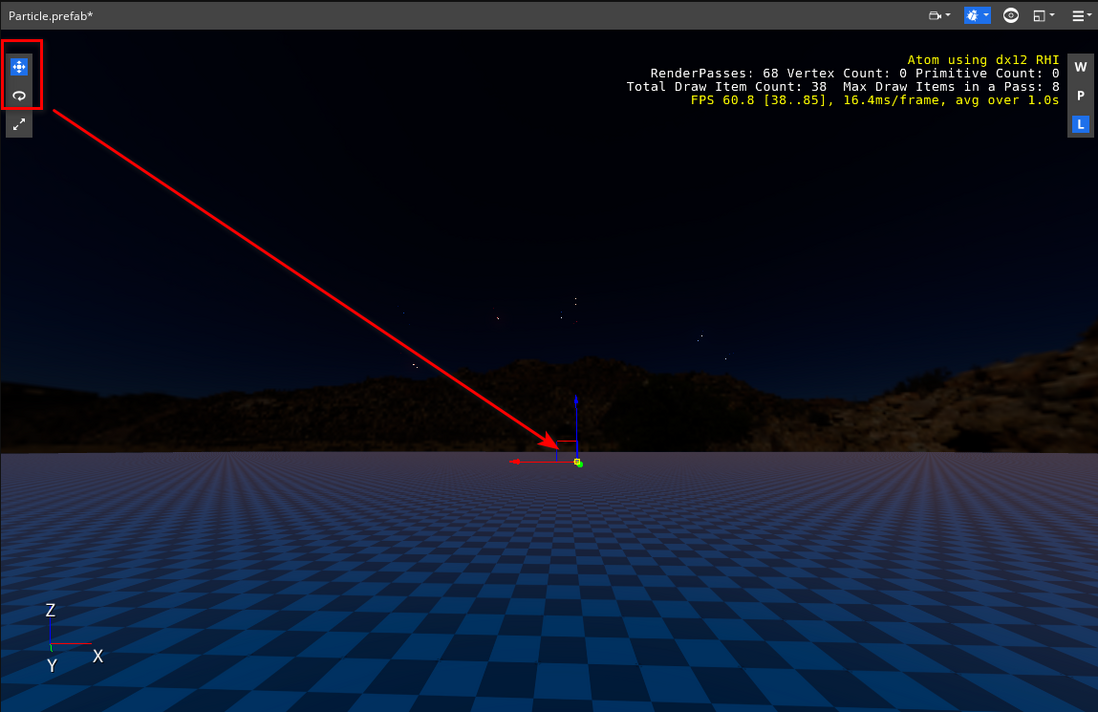
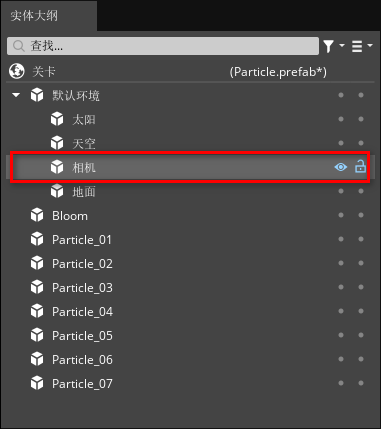
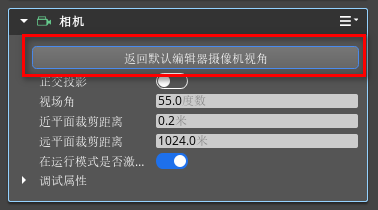
6. Finally, we also need to adjust the angle and position of the camera. We select the "Camera" entity in the default environment of the "Entity Outline" window.
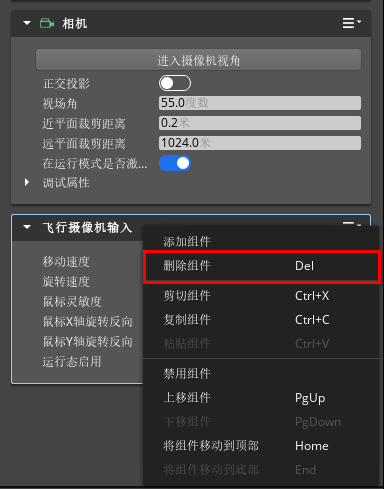
7. Find the "Flying Camera Input" component in the "Component Properties" window, right-click the component, and delete it.
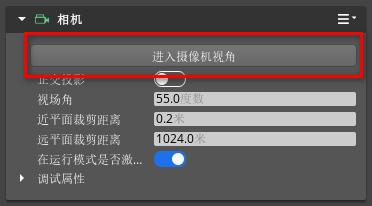
8. In the camera component, click to enter the camera perspective, your viewport will present the camera perspective, and you can use the mouse and keyboard to move the perspective in the viewport.
9. After selecting the best viewing position, click "Return to the default editor camera angle".
final effect
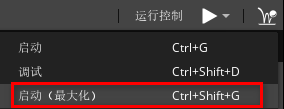
After completing the above steps, click the drop-down menu of the Play button, select "Play (Maximized)" to run in full screen, and you can run the scene.
Learn more details>>
Visit the official website of 3D Engine Developer Alliance
Visit the official website of Huawei Developer Alliance
Get development guidance documents
Huawei Mobile Services Open Source Warehouse Address: GitHub , Gitee
Follow us to know the latest technical information of HMS Core for the first time~


**粗体** _斜体_ [链接](http://example.com) `代码` - 列表 > 引用。你还可以使用@来通知其他用户。