This article records and imitates the details of an el-link component, so as to help you better understand the specific working details of the corresponding component of Ele.me ui. This article is another article in the elementui source code learning and imitation series. I will continue to update and imitate other components when I am free. The source code is on github, you can pull it down, npm start to run, and comments are helpful for better understanding. The github warehouse address is as follows: https://github.com/shuirongshuifu/elementSrcCodeStudy
component thinking
In short, el-link组件 just wraps the a tag with some styling. Therefore link组件 In addition to having the function of the a tag, it also needs to have some style effects that can be used. Therefore, when we imitate this component label, we mainly review it 传参的变量和样式的搭配 , so as to achieve the effect we need
component requirements
- Add different types of link styles to
link组件, such as normal style, success style, warning style, dangerous style link style - Add underline to
link组件when the mouse is hovering. Pseudo-element collocationborder-bottomis used in the package component. - To control by passing parameters
link组件when there is an underline and when there is no underline - In addition, you also need to consider that the component will be disabled. When disabled, you cannot click or jump, and change the style effect.
- At the same time,
link组件some operations when jumping links - It should also be considered that
link组件needs to be used with small icons (in this example, the Ele.me icon is used as an example)
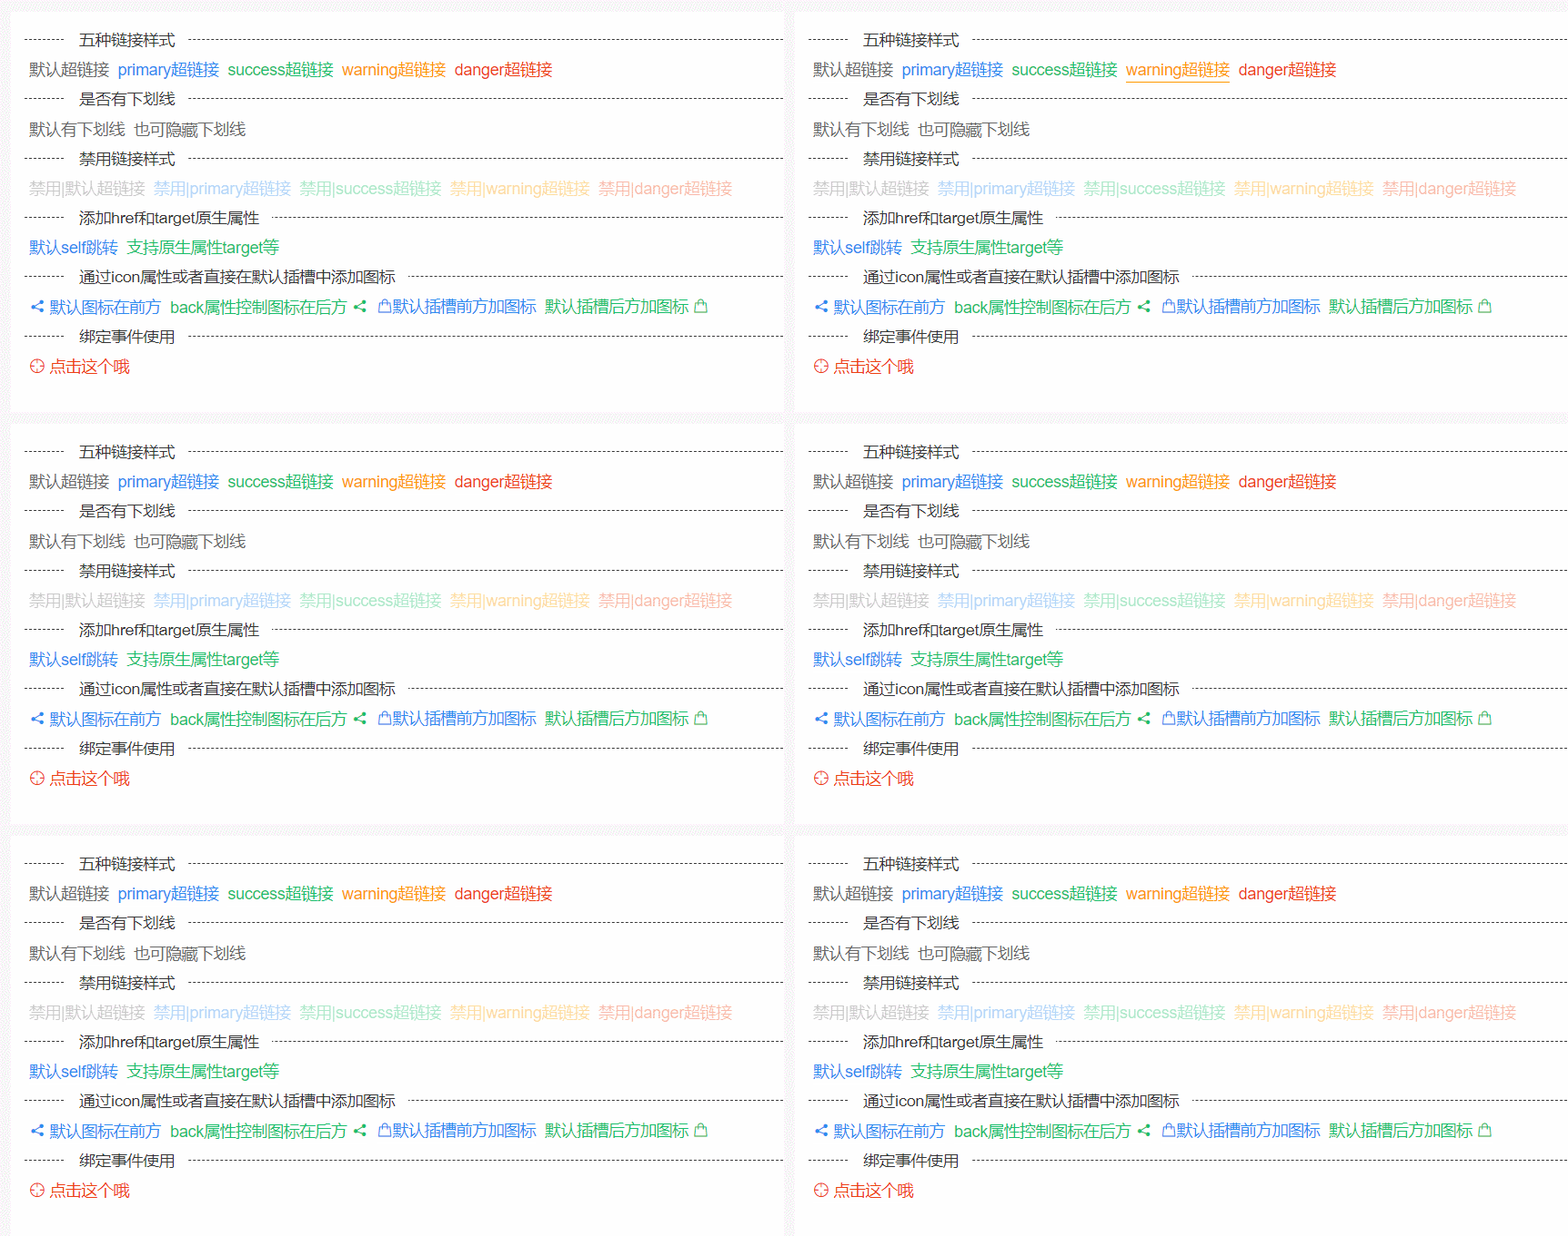
Rendering of components
Component Implementation Analysis
Add link style to link组件
Here we use 动态class的数组用法 to control, the following simple example:
 // html
<a
  :class="[
    'myLink',
    type
]"
>

// js
props:{
    type: String, // 标签颜色的类型
}

// css
.primary { color: #2d8cf0; }
.success { color: #19be6b; }
.warning { color: #f90; }
.danger { color: #ed4014; }
由上, type success ,那么a标签就会加上一个success的类名,这样If you do, you will find the class name in the corresponding css, so as to present the corresponding color effect (of course, the value of type must be corresponding in the css below)
Add underline to link组件 when the mouse is hovering
In fact, it is similar to this, suspending underline, suspending overline, and suspending special background control. It can be roughly summarized as in the main dom旁边加上一个小东西 , you can consider using pseudo elements
About what is a pseudo-element, I won't go into details here
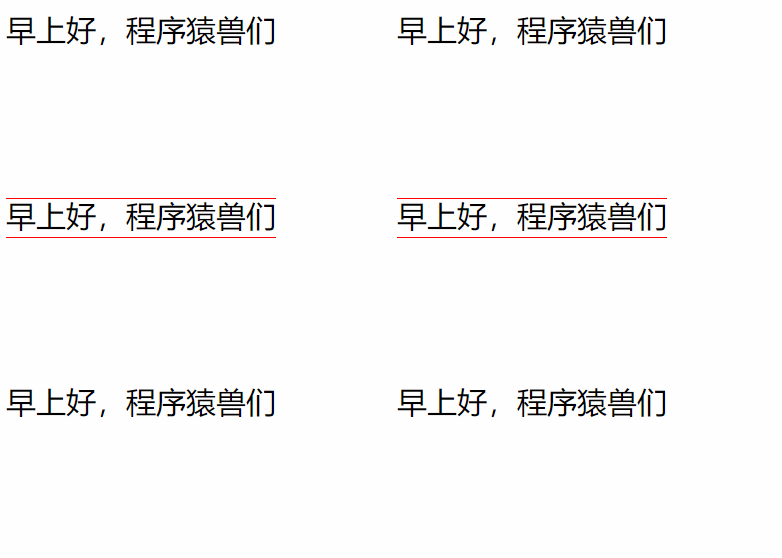
Let's look at the rendering of the mouse hovering overline and underline below. This rendering is achieved by using 伪元素搭配定位以及border
Code:
 // css
span {
     font-size: 24px;
     position: relative;
}
span:hover::before {
    content: "";
    position: absolute;
    left: 0;
    right: 0;
    height: 0;
    /* 定位控制 */
    top: 2px;
    border-top: 1px solid red;
}
span:hover::after {
    content: "";
    position: absolute;
    left: 0;
    right: 0;
    height: 0;
    /* 定位控制 */
    bottom: -2px;
    border-bottom: 1px solid red;
}

// html
<span>早上好,程序猿兽们</span>
Control whether to add an underline by passing a parameter (ie: whether to add the underscore class name)
Here we still use 动态class的数组用法 and write 四元表达式 in the array. The simplified code is as follows:
 <a
    :class="[
      'myLink',
       hideUnderline ? '' : disabled ? '' : 'underline'
    ]"
  >
To the effect: when you do not hide the underline and do not disable this link component, only add the underline class name to generate the underline
Use the v-bind="$attrs" a label for other parameters not declared in props
 <a
    :href="disabled ? null : href"
    v-bind="$attrs"
  >
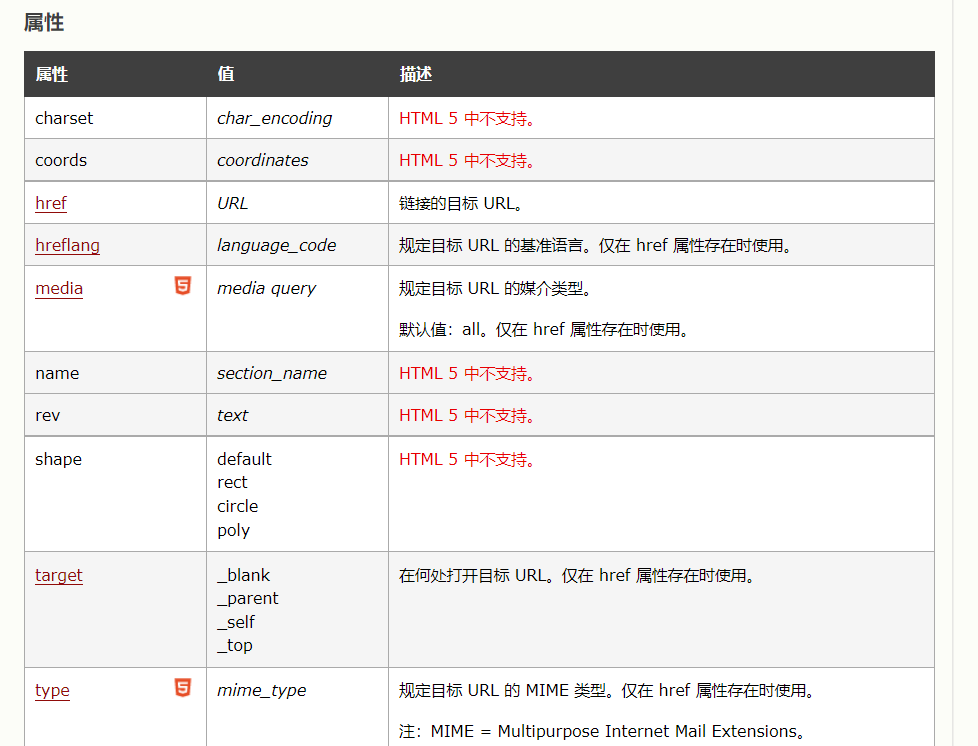
We know that there are many native attributes in the a tag, as shown below:
There are so many a tag attributes, we can not be in the package component, if every attribute is declared in props , it is a bit troublesome. So this time $attr came into being. Regarding the usage of $attr and $listener , we won't go into details here. Just remember that $attr is the bottom line of parameter attributes. For details, please refer to the article written by the author before: https://segmentfault.com/a/1190000040317732
The component requirements will not be repeated due to space reasons. For details, see the comments in the code (after all, this component is actually quite simple), and then the code will be added.
code
For demonstration, just copy and paste directly, combined with comments for better understanding. Note my-divider component is a previously packaged component.
The components packaged by the author and the components packaged by the official may be slightly different in some details, which is one more 解法思路 it ^o^
use code
 <template>
  <div class="box">
    <my-divider lineType="dashed" content-position="left"
      >五种链接样式</my-divider
    >
    <my-link>默认超链接</my-link>
    <my-link type="primary">primary超链接</my-link>
    <my-link type="success">success超链接</my-link>
    <my-link type="warning">warning超链接</my-link>
    <my-link type="danger">danger超链接</my-link>
    <my-divider lineType="dashed" content-position="left"
      >是否有下划线</my-divider
    >
    <my-link>默认有下划线</my-link>
    <my-link hideUnderline>也可隐藏下划线</my-link>
    <my-divider lineType="dashed" content-position="left"
      >禁用链接样式</my-divider
    >
    <my-link disabled>禁用|默认超链接</my-link>
    <my-link type="primary" disabled>禁用|primary超链接</my-link>
    <my-link type="success" disabled>禁用|success超链接</my-link>
    <my-link type="warning" disabled>禁用|warning超链接</my-link>
    <my-link type="danger" disabled>禁用|danger超链接</my-link>
    <my-divider lineType="dashed" content-position="left"
      >添加href和target原生属性</my-divider
    >
    <my-link type="primary" href="https://www.baidu.com/">默认self跳转</my-link>
    <my-link type="success" target="_blank" href="https://cn.bing.com/"
      >支持原生属性target等</my-link
    >
    <my-divider lineType="dashed" content-position="left"
      >通过icon属性或者直接在默认插槽中添加图标</my-divider
    >
    <my-link type="primary" icon="el-icon-share">默认图标在前方</my-link>
    <my-link type="success" icon="el-icon-share" back
      >back属性控制图标在后方</my-link
    >
    <my-link type="primary"
      ><i class="el-icon-goods"></i>默认插槽前方加图标</my-link
    >
    <my-link type="success"
      >默认插槽后方加图标 <i class="el-icon-goods"></i
    ></my-link>
    <my-divider lineType="dashed" content-position="left"
      >绑定事件使用</my-divider
    >
    <my-link @click="clickThis" type="danger" icon="el-icon-aim"
      >点击这个哦</my-link
    >
  </div>
</template>

<script>
export default {
  methods: {
    clickThis() {
      console.log("注意:当myLink禁用或有href属性时,点击事件失效");
    },
  },
};
</script>
package component code
 <template>
  <!--
       hideUnderline ? '' : disabled ? '' : 'underline',
       先看hideUnderline是否为true,为true则要隐藏下划线,即不加underline类名
       再看disabled是否为true,为true则禁用,禁用也要隐藏下划线,即也不加underline类名
       若既不隐藏下划线又不禁用链接,则加上underline类名用于显示下划线
   -->
  <a
    :href="disabled ? null : href"
    :class="[
      'myLink',
      hideUnderline ? '' : disabled ? '' : 'underline',
      type,
      disabled ? 'toDisabled' : '',
    ]"
    v-bind="$attrs"
    @click="handleClick"
  >
    <!--
       这里加上v-bind="$attrs"是为了传递更多的属性,做一个参数兜底的功能效果。因为a标签还有其他很多属性,如:
       target、download、type等。props中未声明的参数,会被$attr兜底交给a标签使用。故加了v-bind="$attrs"以后,
       在外层my-link标签上,我们便可正常使用除props中声明的属性了,如使用target原生属性:<my-link target="_blank" href="xxx"/>
    -->
    <!-- 内容区 -->
    <span class="aContent" :class="{ spaceC: icon, back: back }">
      <i :class="icon" v-if="icon"></i>
      <span><slot></slot></span>
    </span>
  </a>
</template>

<script>
export default {
  name: "myLink",
  props: {
    href: String, // a标签的href属性,用于跳转
    disabled: Boolean, // 是否禁用超链接
    type: String, // 标签颜色的类型
    // 是否隐藏下划线
    hideUnderline: {
      type: Boolean,
      default: false, // 默认不隐藏下划线,默认展示下划线
    },
    icon: String, // 使用饿了么UI的小图标
    back: Boolean, // 设置图标在内容后方
  },
  methods: {
    handleClick(event) {
      // 禁用状态下不允许传递事件
      if (this.disabled) {
        return;
      }
      // 有链接了也不允许传递事件
      if (this.href) {
        return;
      }
      // 没有禁用没有链接,便可正常传递事件
      this.$emit("click", event);
    },
  },
};
</script>

<style lang="less" scoped>
// 默认样式
.myLink {
  display: inline-block;
  cursor: pointer;
  font-size: 14px;
  font-weight: 500;
  color: #666; // 默认颜色,当然也可以使用type类型的配色
  text-decoration: none; // 去除a标签默认的下划线(不使用自带的下划线效果)
  position: relative; // 定位搭配伪元素实现悬浮下划线效果
  margin: 4px;
  .aContent {
    display: flex;
    align-items: center;
  }
  // 当传的有图标的时候,把第一个元素加上一个右边距,产生间距
  .spaceC > :first-child {
    margin-right: 4px;
  }
  // 控制弹性盒方向,控制图标在后方位置(默认前方位置)
  .back {
    flex-direction: row-reverse;
  }
  // 注意这里要覆盖上方spaceC的样式
  .back > :first-child {
    margin: 0 0 0 4px;
  }
}
// 通过变量控制是否有这个underline类名,从而控制是否有下划线
.underline:hover::after {
  // 这样的话,元素在哪,下划线就在哪里
  content: "";
  position: absolute;
  left: 0;
  right: 0;
  height: 0;
  bottom: -2px;
  // 注意,这里不设置颜色,就会跟随参考定位的元素的颜色了
  border-bottom: 1px solid;
}
// 下方的配色是抄iview的
.primary {
  color: #2d8cf0;
}
.success {
  color: #19be6b;
}
.warning {
  color: #f90;
}
.danger {
  color: #ed4014;
}
// 通过透明度模拟禁用的颜色样式效果,要不然要写两份颜色会稍微麻烦一些
.toDisabled {
  opacity: 0.36;
  cursor: not-allowed;
}
</style>


**粗体** _斜体_ [链接](http://example.com) `代码` - 列表 > 引用。你还可以使用@来通知其他用户。