Welcome to the fifth phase of the front-end small class . Today we will talk about how to terminate the ongoing Fetch and Promise . This article will introduce the two key knowledge points AbortController and AbortSignal in detail. Students who are more interested in hands-on practice can also watch the corresponding video version .
In the usual development process, it is estimated that you will not often encounter the need to actively cancel a Fetch request, so some students may not know this knowledge very well. It doesn't matter, after reading this article you will be able to master all the skills on how to terminate a Fetch request or a Promise . Then let's get started~
This article takes more time and energy than I expected, so the article is relatively long. If you don't have time to browse it now, you can save it first and read it later. If you think this article is good, you can also help to like it, forward it and support it.
Terminate Fetch requests using AbortController
Before fetch , we used the XMLHttpRequest constructor to create a xhr object, and then passed this xhr object sends and receives requests.
 const xhr = new XMLHttpRequest();
xhr.addEventListener('load', function (e) {
  console.log(this.responseText);
});
xhr.open('GET', 'https://jsonplaceholder.typicode.com/todos/1');
xhr.send();
There is also a abort method on this xhr to perform the requested termination operation. But it should be noted that the execution process of this abort is relatively vague. We don't know when abort can not make or terminate the corresponding network request, or if there is a race condition between calling the abort method and getting the requested resource what happened. We can practice it with simple code:
 // ... 省略掉上面的代码
setTimeout(() => {
  xhr.abort();
}, 10);
By adding a delay, and then canceling the corresponding request; you can see in the console that sometimes the request has obtained the result, but the corresponding result has not been printed; sometimes the request has not obtained the corresponding result, but check the corresponding The status of the network is successful. So there are a lot of uncertainties here, which are vague with our feeling.
When fetch came out, everyone was talking about how to correctly and clearly cancel a fetch request. The earliest discussion can be seen here Aborting a fetch #27 , which was already 7 years ago (2015), and it can be seen that the discussion at that time was still quite intense. If you are interested, you can take a look at the features that everyone was mainly concerned about at that time.
Finally, the new specification came out, and through AbortController and AbortSignal we can terminate a fetch request conveniently, quickly and clearly. It should be noted that this specification is a DOM -level specification, not a JavaScript language-level specification. Most browser environments and newer versions of Node.js now support this feature. Regarding the compatibility of AbortController , you can refer to here AbortController#browser_compatibility
Basically, the code examples in the following articles can be directly copied and pasted to the console to run, so interested students can directly open the browser console to run after reading the corresponding part, and then see the corresponding results. Deepen your memory of relevant knowledge points.
Terminate a single request in progress
Let's first show you how to implement this function through a piece of code
 const ac = new AbortController();
const { signal } = ac;

const resourceUrl = 'https://jsonplaceholder.typicode.com/todos/1';
fetch(resourceUrl, { signal })
  .then(response => response.json())
  .then(json => console.log(json))
  .catch(err => {
    // 不同浏览器的返回结果不同
    console.log(err);
  });

// 可以立即终止请求,或者设置一个定时器
// ac.abort();
setTimeout(() => {
  ac.abort();
}, 10);
If you are interested, you can copy and paste the above code into the browser console to run it. The running result of the above code is as follows:
You can see that the console output is: DOMException: The user aborted a request.
The corresponding Network shows a request in a canceled state. This means that the request we just sent was terminated and cancelled.
It is important for our application to be able to actively cancel related requests in some specific cases, which can reduce the traffic usage of our users and the memory usage of our application.
A deep dive into AbortController
Next, let's explain the above code. The first line creates an instance of the type AbortController through AbortController ac , this instance has a abort method and one AbortSignal signal instance. Then we use the fetch method to request a resource path, and pass it to the fetch option and pass the ac the signal object into it. fetch method will print the resource to the console if the resource is obtained. If there is a problem with the network, it will catch the exception and then print the exception to the console. Finally, through a setTimeout delay, call the ac abort method of ---9f5b6f5aa53a5198da195f081a8e786f---to terminate the fetch ec17043dde702c8f5fba65fee622666f---method.
The fetch options option of ---2b898843eab30ab118570768a01cf715--- allows us to pass a signal fetch ; A fetch request fails immediately if it changes from an unterminated state to a terminated state, and the fetch request is still in progress. The corresponding status of Promise will become Rejected .
How to change the status of signal ? We can change the state of ---b37e701101f1d9055589a6ff8de2d366--- by calling the ac abort method of signal . Once we call ac.abort() then the state associated with it signal will immediately change from the starting state (non-terminating state) to the ending state.
We just used the signal object simply above, this object is an instance of the AbortSignal class, for AbortSignal we will do an in-depth explanation below, here we only need Knowing that signal can be passed as a signal object to the fetch method, which can be used to terminate the continuation of fetch .
In addition, the results printed in different browsers may be slightly different, which is related to the internal implementation of different browsers. For example, the result in Firefox is as follows:
The result in Safari is as follows:
Of course if we didn't terminate the fetch request, the console print would be:
In addition, if you need some simulated data interfaces, you can try JSONPlaceholder , which is very convenient to use.
Cancel multiple fetch requests in batches
It's worth noting that our signal object can be passed to multiple requests at the same time, and multiple requests can be cancelled at the same time if needed; let's see how to do this. The code looks like this:
 const ac = new AbortController();
const { signal } = ac;

const resourcePrefix = 'https://jsonplaceholder.typicode.com/todos/';
function todoRequest (id, { signal } = {}) {
  return fetch(`${resourcePrefix}${id}`, { signal })
    .then(response => response.json())
    .then(json => console.log(json))
    .catch(e => console.log(e));
}

todoRequest(1, { signal });
todoRequest(2, { signal });
todoRequest(3, { signal });

// 同时终止多个请求
ac.abort();
After running the code, you can see the following results in the console:
If we need to terminate multiple requests at the same time, it is very simple and convenient to use the above method.
If we want to customize the reason for terminating the request, we can directly pass the reason we want in the abort method. This parameter can be any value of type JavaScript . The passed reason for termination is received by signal and placed in its reason attribute. This we will talk about below.
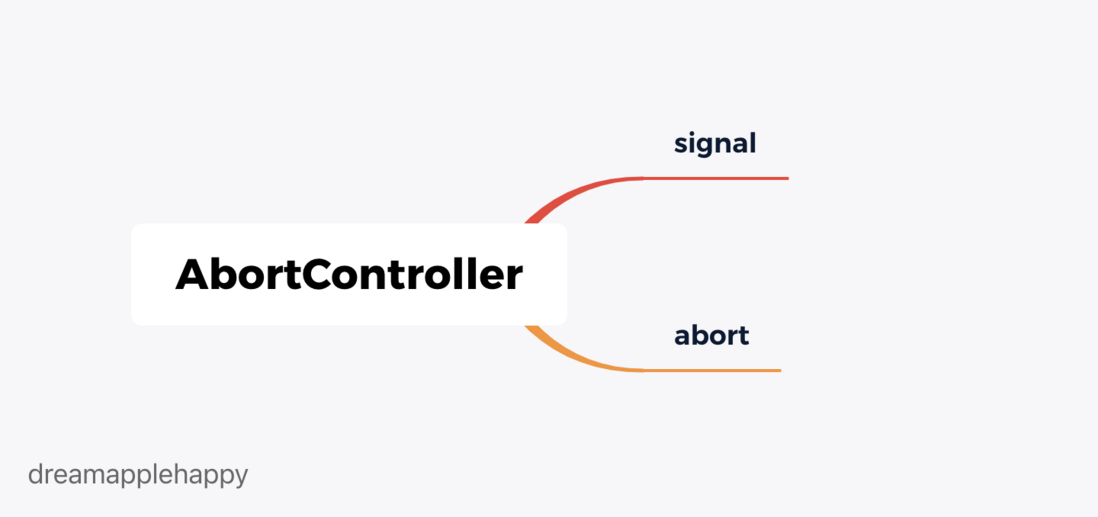
AbortController Related properties and methods
Details about AbortSignal
Properties and Methods of AbortSignal
AbortSignal interface inherits from EventTarget , so EventTarget corresponding properties and methods, AbortSignal are inherited. Of course, there are also some unique methods and properties of their own, which we will explain one by one below. It should be noted that some attributes of AbortSignal have compatibility problems. For the specific compatibility, you can refer to AbortSignal#browser_compatibility here.
Static methods abort and timeout
These two methods are static methods on the AbortSignal class that create AbortSignal instances. where abort is used to create a signal object that has been terminated. Let's look at the following example:
 // ... 省略 todoRequest 函数的定义
// Safari 暂时不支持, Firefox 和 Chrome 支持
// abort 可以传递终止的原因
const abortedAS = AbortSignal.abort();
// 再发送之前信号终止,请求不会被发送
todoRequest(1, { signal: abortedAS });
console.warn(abortedAS);
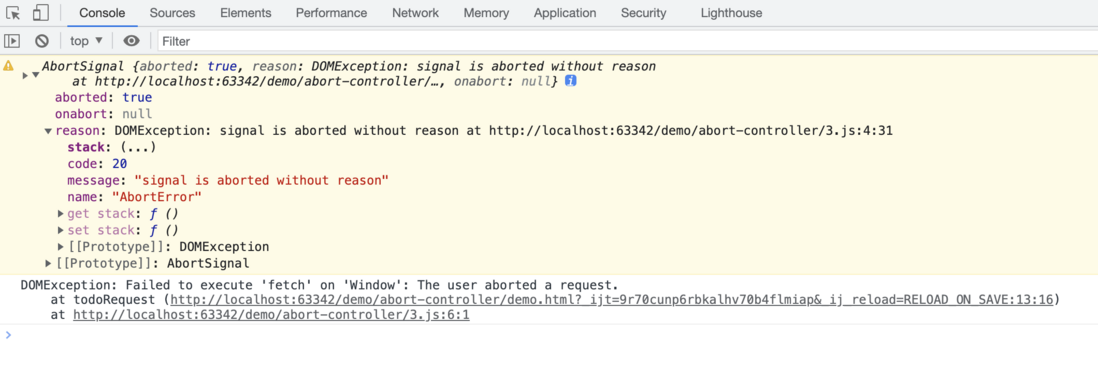
Running the code, the console output is as follows:
The corresponding request is not even sent
We can also pass the reason for termination to the abort method, such as an object:
 // ...
const abortedAS = AbortSignal.abort({
  type: 'USER_ABORT_ACTION',
  msg: '用户终止了操作'
});
// ...
Then the output result is as shown in the following figure:
The signal reason attribute of ---75c07ff97ba8c3ea2668e553c83dcacf--- becomes our custom value.
Similarly, when you see timeout it should be easy to think of creating a signal object that will be terminated after a few milliseconds . code show as below:
 // ... 省略部分代码
const timeoutAS = AbortSignal.timeout(10);
todoRequest(1, { signal: timeoutAS }).then(() => {
  console.warn(timeoutAS);
});
console.log(timeoutAS);
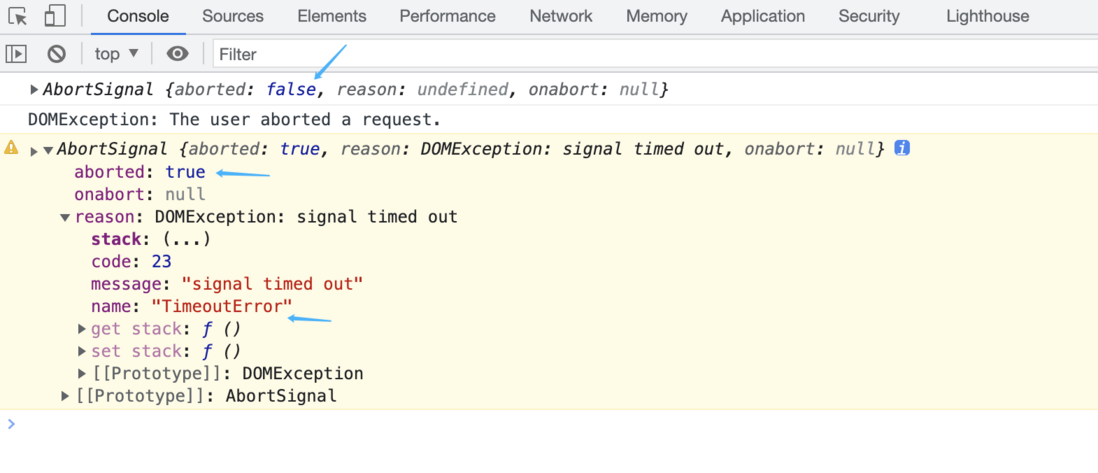
The result of running the code is as follows:
You can see that we print timeoutAS twice, the first time is printed immediately, and the second time is printed after the request is terminated. It can be seen that the state of timeoutAS is still not terminated when the first print is made. When the request is terminated, the result of the second print indicates that timeoutAS has been terminated at this time, and the value of the reason attribute indicates that the request was terminated due to a timeout. .
Properties aborted and reason
AbortSignal instance has two attributes; one is aborted indicates whether the current signal object state is a terminated state, false is the start state, indicating that the signal has not been Terminated, true indicates that the signal object has been terminated.
reason property can be any value of type JavaScript , if we call the abort method without passing the reason for the termination signal, then the default will be used reason. There are two default reasons, one is to terminate the signal object through the abort method, and no reason for the termination is passed, then the default value of reason is: DOMException: signal is aborted without reason ; If the signal object is terminated by the timeout method, then the default reason at this time is: DOMException: signal timed out . If we actively pass the reason for termination, then the corresponding value reason is the value we passed in.
Instance method throwIfAborted
You can guess what this method does by name, that is, when calling throwIfAborted , if the state of the object signal is terminated at this time, then a Abnormal, the abnormal value is the reason value corresponding to signal . See the following code example:
 const signal = AbortSignal.abort();
signal.throwIfAborted();

// try {
//   signal.throwIfAborted();
// } catch (e) {
//   console.log(e);
// }
The output in the console after running is as follows:
It can be seen that an exception is thrown directly. At this time, we can capture it by try ... catch ... , and then perform corresponding logical processing. This method is also very helpful, we will talk about it later. This method is useful when we implement a custom cancelable Promise .
event listener abort
For the signal object, it can also listen for the abort event, and then we can do some additional operations when the signal is terminated. Here is a simple example of an event listener:
 const ac = new AbortController();
const { signal } = ac;

// 添加事件监听
signal.addEventListener('abort', function (e) {
  console.log('signal is aborted');
  console.warn(e);
});

setTimeout(() => {
  ac.abort();
}, 100);
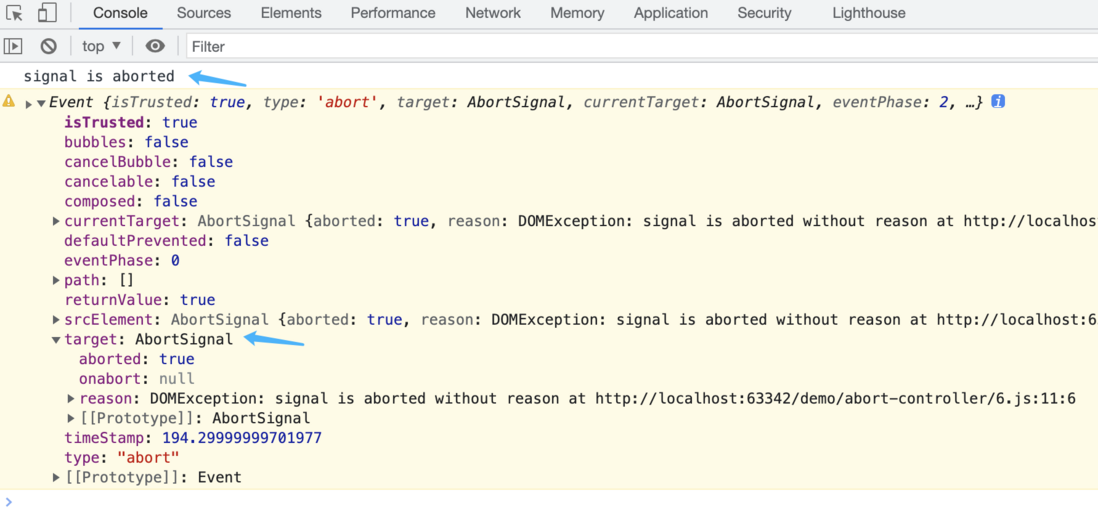
The output in the console after running is as follows:
It can be seen that when signal is terminated, the event listener function we added earlier starts to run. Among them e represents the received event object, and then the event object target and currentTarget represents the corresponding signal object.
Implement a Promise that can be actively cancelled
When we are familiar with AbortController and AbortSignal , we can easily construct our custom cancelable Promise . The following is a relatively simple version, you can take a look:
 /**
 * 自定义的可以主动取消的 Promise
 */

function myCoolPromise ({ signal }) {
  return new Promise((resolve, reject) => {
    // 如果刚开始 signal 存在并且是终止的状态可以直接抛出异常
    signal?.throwIfAborted();

    // 异步的操作,这里使用 setTimeout 模拟
    setTimeout(() => {
      Math.random() > 0.5 ? resolve('ok') : reject(new Error('not good'));
    }, 1000);

    // 添加 abort 事件监听,一旦 signal 状态改变就将 Promise 的状态改变为 rejected
    signal?.addEventListener('abort', () => reject(signal?.reason));
  });
}

/**
 * 使用自定义可取消的 Promise
 */

const ac = new AbortController();
const { signal } = ac;

myCoolPromise({ signal }).then((res) => console.log(res), err => console.warn(err));
setTimeout(() => {
  ac.abort();
}, 100); // 可以更改时间看不同的结果
This time the code is a little more, but I believe it is easy for everyone to know what the above code means.
First, we customized the myCoolPromise function, and then the function receives an signal object; then immediately returns a newly constructed Promise , this Promise Internally we added some extra processing to Promise . First, we judge whether signal exists, and if so, call its throwIfAborted method. Because it is possible that the status of signal is already terminated at this time, it is necessary to immediately change the status of --- Promise to the status of rejected .
If the state of signal has not changed at this time, then we can add an event listener to this signal , once the state of signal changes, we need to go immediately Change the status of Promise .
When the time of our below setTimeout is set to 100 milliseconds, the above Promise is always rejected, so you will see the console print as follows:
If we modify this time to 2000 milliseconds , the result of the console output may be ok or a not good exception capture.
Some students may say that when they see this, it seems that there is no need for signal to realize active cancellation Promise , I can use an ordinary EventTarget combination CustomEvent A similar effect can also be achieved. Of course, we can also do this, but in general our asynchronous operations include network requests. If the network request uses the fetch method, then the AbortSignal type must be used. Example signal to transmit the signal; because fetch the method will determine whether the ongoing request needs to be terminated according to the status of signal .
Related properties and methods of AbortSignal :
Examples of use in other scenarios in development
A convenient way to cancel event listeners
Under normal circumstances, if we add an event listener to a DOM element in the document, then when the element is destroyed or removed, the corresponding event listener function needs to be removed accordingly, otherwise memory will easily appear leak problem . So in general, we will add and remove related event listener functions in the following way.
 <button class="event">事件监听按钮</button>
<button class="cancel">点击后取消事件监听</button>
const evtBtn = document.querySelector('.event');
const cancelBtn = document.querySelector('.cancel');
const evtHandler = (e) => {
console.log(e);
};
evtBtn.addEventListener('click', evtHandler);
// 点击 cancelBtn 移除 evtBtn 按钮的 click 事件监听
cancelBtn.addEventListener('click', function () {
evtBtn.removeEventListener('click', evtHandler);
}); This method is the most common method, but this method requires us to keep a reference to the corresponding event listener function, such as the above evtHandler . Once we lose this reference, there is no way to cancel this event listener later.
In addition, some application scenarios require you to add many event handlers to an element. When canceling, you need to cancel one by one, which is very inconvenient. At this time, our AbortSignal can come in handy, we can use AbortSignal to cancel the event listener function of many events at the same time. It's like we cancel many fetch requests at the same time. code show as below:
 // ... HTML 部分参考上面的内容

const evtBtn = document.querySelector('.event');
const cancelBtn = document.querySelector('.cancel');

const evtHandler = (e) => console.log(e);
const mdHandler = (e) => console.log(e);
const muHandler = (e) => console.log(e);

const ac = new AbortController();
const { signal } = ac;

evtBtn.addEventListener('click', evtHandler, { signal });
evtBtn.addEventListener('mousedown', mdHandler, { signal });
evtBtn.addEventListener('mouseup', muHandler, { signal });

// 点击 cancelBtn 移除 evtBtn 按钮的 click 事件监听
cancelBtn.addEventListener('click', function () {
  ac.abort();
});
This way of handling is not very convenient, and it is very clear.
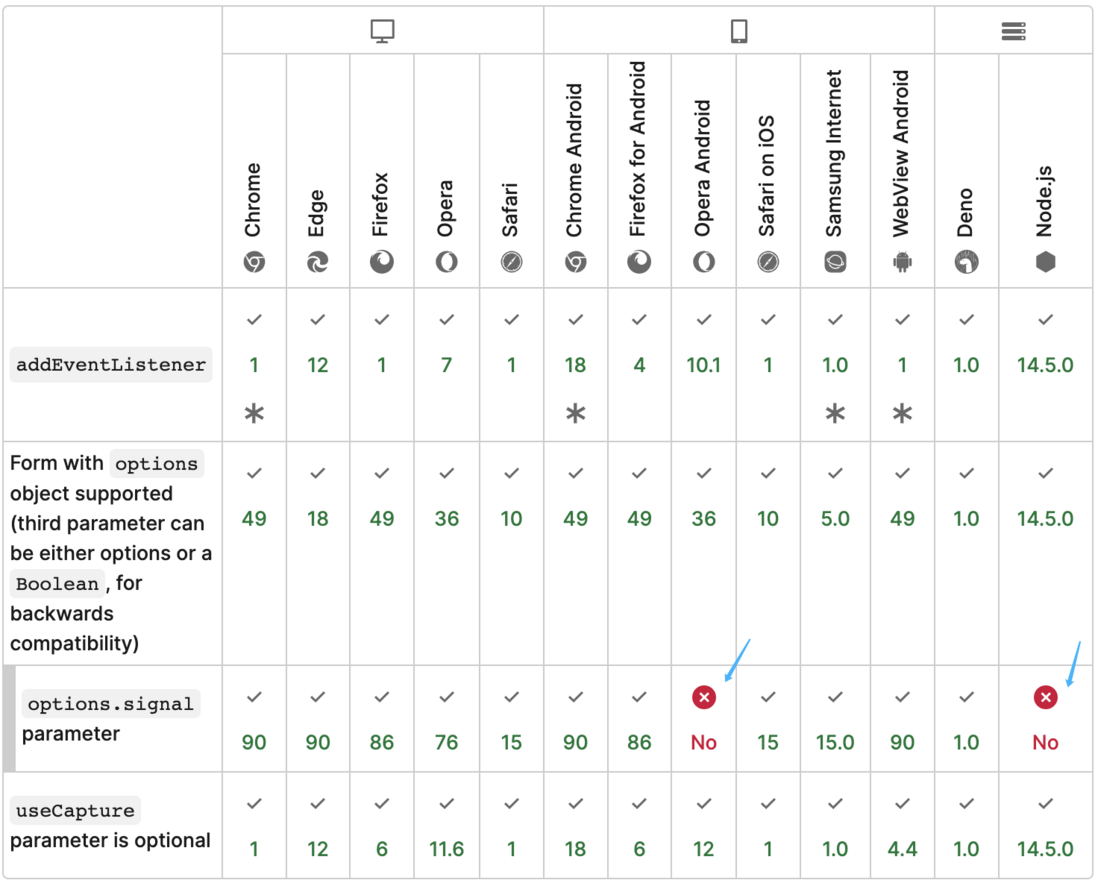
addEventListener(type, listener, options); The third parameter of addEventListener 119d45ade271d7f00fc35422ee383468--- can be a options object, which allows us to pass a signal object as a signal object for event cancellation. Like above we used the signal object to cancel the fetch request.
From the above compatibility point of view, the compatibility of this property is still possible; currently only Opera Android and Node.js are not supported for the time being. If you want to use this new property, you need to do something for these two platforms and operating environments. Compatibility is fine.
A method worth learning to deal with complex business logic
We sometimes encounter some more complex processing operations in development. For example, you need to obtain data through several interfaces, then assemble the data; and then asynchronously draw and render the data to the page. If the user actively cancels this operation or because of a timeout, we have to actively cancel these operations. For this scenario, using AbortController with AbortSignal also has a good effect. Here is a simple example:
 // 多个串行或者并行的网络请求
const requestUserData = (signal) => {
  // TODO
};
// 异步的绘制渲染操作 里面包含了 Promise 的处理
const drawAndRenderImg = (signal) => {
  // TODO
};
// 获取服务端数据并且进行数据的绘制和渲染
function fetchServerDataAndDrawImg ({ signal }) {
  signal?.throwIfAborted();
  // 多个网络请求
  requestUserData(signal);
  // 组装数据,开始绘制和渲染
  drawAndRenderImg(signal);
  // ... 一些其他的操作
}

const ac = new AbortController();
const { signal } = ac;

try {
  fetchServerDataAndDrawImg({ signal });
} catch (e) {
  console.warn(e);
}

// 用户主动取消或者超时取消
setTimeout(() => {
  ac.abort();
}, 2000);
The above is a simplified example to represent such a complex operation; we can see that if the user cancels the operation actively or because of a timeout; our code logic above can easily handle this situation. There are also no possible memory leaks due to less processing of some operations.
Once we want to start the operation again, we just need to call fetchServerDataAndDrawImg again and pass a new signal object. After doing this, the logic of restarting and canceling is very clear. If you have similar operations in your own projects, you can try this method.
Usage in Node.js
We can not only use AbortController and AbortSignal in the browser environment, but also in the Node.js environment. Node.js中的fs.readFile , fs.writeFile , http.request , https.request timers The new version supports Fetch API can use signal to cancel the operation. Let's take a simple example about the operation of reading a file:
 const fs = require('fs');

const ac = new AbortController();
const { signal } = ac;

fs.readFile('data.json', { signal, encoding: 'utf8' }, (err, data) => {
  if (err) {
    console.error(err);
    return;
  }
  console.log(data);
});

ac.abort();
Running the code can see the output of the terminal as follows:
Students who often use Node.js for business development can try to use this new feature, which should be very helpful for development.
feedback and suggestions
This article is over here. I don’t know how many students have insisted on reading this article; I hope that the students who have finished reading can master the knowledge explained in this article. If this article helped you, or opened up a new world for you; please like and forward it.
If you have any suggestions and comments on this article, you are welcome to leave a comment below the article, we will discuss it together and make progress together.
Wonderful recommendation in the past
- Detailed Guide to Integrity Verification of Web Page Subresources
Hands-on writing a simple compiler: Using Swift's tail closure syntax in JavaScript
Related URLs for reference
- MDN - AbortController
- DOM Living Standard - Interface AbortController
- How to Cancel Promise with AbortController
- Using AbortController as an Alternative for Removing Event Listeners
- The complete guide to AbortController in Node.js
- AbortController is your friend
- Fetch: Abort
- Abortable fetch
- EventTarget.addEventListener()
- MDN - fetch()








**粗体** _斜体_ [链接](http://example.com) `代码` - 列表 > 引用。你还可以使用@来通知其他用户。