Official website: https://kubernetes.io/
Documentation: https://kubernetes.io/en-us/docs/home/
Basic environment deployment
Preliminary preparation (all nodes)
1. Modify the host name and configure hosts
Deploy 1master and 2node nodes first, followed by a master node
 # 在192.168.0.113执行
hostnamectl set-hostname  k8s-master-168-0-113
# 在192.168.0.114执行
hostnamectl set-hostname k8s-node1-168-0-114
# 在192.168.0.115执行
hostnamectl set-hostname k8s-node2-168-0-115
configure hosts
 cat >> /etc/hosts<<EOF
192.168.0.113 k8s-master-168-0-113
192.168.0.114 k8s-node1-168-0-114
192.168.0.115 k8s-node2-168-0-115
EOF
2. Configure ssh mutual trust
 # 直接一直回车就行
ssh-keygen

ssh-copy-id -i ~/.ssh/id_rsa.pub root@k8s-master-168-0-113
ssh-copy-id -i ~/.ssh/id_rsa.pub root@k8s-node1-168-0-114
ssh-copy-id -i ~/.ssh/id_rsa.pub root@k8s-node2-168-0-115
3. Time synchronization
 yum install chrony -y
systemctl start chronyd
systemctl enable chronyd
chronyc sources
4. Turn off the firewall
 systemctl stop firewalld
systemctl disable firewalld
5. Close swap
 # 临时关闭;关闭swap主要是为了性能考虑
swapoff -a
# 可以通过这个命令查看swap是否关闭了
free
# 永久关闭
sed -ri 's/.*swap.*/#&/' /etc/fstab
6. Disable SELinux
 # 临时关闭
setenforce 0
# 永久禁用
sed -i 's/^SELINUX=enforcing$/SELINUX=disabled/' /etc/selinux/config
7. Allow iptables to inspect bridged traffic (optional, all nodes)
 若要显式加载此模块,请运行 sudo modprobe br_netfilter,通过运行 lsmod | grep br_netfilter 来验证 br_netfilter 模块是否已加载,

sudo modprobe br_netfilter
lsmod | grep br_netfilter
In order for the iptables of the Linux node to see bridged traffic correctly, make sure that net.bridge.bridge-nf-call-iptables is set to 1 in the sysctl configuration. E.g:
 cat <<EOF | sudo tee /etc/modules-load.d/k8s.conf
overlay
br_netfilter
EOF

sudo modprobe overlay
sudo modprobe br_netfilter

# 设置所需的 sysctl 参数,参数在重新启动后保持不变
cat <<EOF | sudo tee /etc/sysctl.d/k8s.conf
net.bridge.bridge-nf-call-iptables  = 1
net.bridge.bridge-nf-call-ip6tables = 1
net.ipv4.ip_forward                 = 1
EOF

# 应用 sysctl 参数而不重新启动
sudo sysctl --system
Install container docker (all nodes)
Tip: Kubernetes versions prior to v1.24 included direct integration with Docker Engine, using a component called dockershim. This particular direct integration is no longer part of Kubernetes (this removal was announced as part of the v1.20 release). You can read Checking if Dockershim deprecation affects you to understand how this removal might affect you. To learn how to migrate with dockershim, see Migrating from dockershim.
 # 配置yum源
cd /etc/yum.repos.d ; mkdir bak; mv CentOS-Linux-* bak/
# centos7
wget -O /etc/yum.repos.d/CentOS-Base.repo http://mirrors.aliyun.com/repo/Centos-7.repo
# centos8
wget -O /etc/yum.repos.d/CentOS-Base.repo http://mirrors.aliyun.com/repo/Centos-8.repo

# 安装yum-config-manager配置工具
yum -y install yum-utils
# 设置yum源
yum-config-manager --add-repo http://mirrors.aliyun.com/docker-ce/linux/centos/docker-ce.repo
# 安装docker-ce版本
yum install -y docker-ce
# 启动
systemctl start docker
# 开机自启
systemctl enable docker
# 查看版本号
docker --version
# 查看版本具体信息
docker version

# Docker镜像源设置
# 修改文件 /etc/docker/daemon.json,没有这个文件就创建
# 添加以下内容后,重启docker服务:
cat >/etc/docker/daemon.json<<EOF
{
   "registry-mirrors": ["http://hub-mirror.c.163.com"]
}
EOF
# 加载
systemctl reload docker

# 查看
systemctl status docker containerd
[ Tips ] What dockerd actually calls is the api interface of containerd, which is an intermediate communication component between dockerd and runC. So when the docker service is started, the containerd service will also be started.
Configure k8s yum source (all nodes)
 cat > /etc/yum.repos.d/kubernetes.repo << EOF
[k8s]
name=k8s
enabled=1
gpgcheck=0
baseurl=https://mirrors.aliyun.com/kubernetes/yum/repos/kubernetes-el7-x86_64/
EOF
Set the sandbox\_image image source to Alibaba Cloud google\_containers image source (all nodes)
 # 导出默认配置,config.toml这个文件默认是不存在的
containerd config default > /etc/containerd/config.toml
grep sandbox_image  /etc/containerd/config.toml
sed -i "s#k8s.gcr.io/pause#registry.aliyuncs.com/google_containers/pause#g"       /etc/containerd/config.toml
grep sandbox_image  /etc/containerd/config.toml
Configure containerd cgroup driver systemd (all nodes)
kubernets deprecated docker.shim since v 1.24.0, instead using containerd as the container runtime endpoint. Therefore, it is necessary to install containerd (installed on the basis of docker), and containerd is automatically installed when docker is installed above. The docker here is just as a client. The container engine is still containerd.
 sed -i 's#SystemdCgroup = false#SystemdCgroup = true#g' /etc/containerd/config.toml
# 应用所有更改后,重新启动containerd
systemctl restart containerd
Start installing kubeadm, kubelet and kubectl (master node)
 # 不指定版本就是最新版本,当前最新版就是1.24.1
yum install -y kubelet-1.24.1  kubeadm-1.24.1  kubectl-1.24.1 --disableexcludes=kubernetes
# disableexcludes=kubernetes:禁掉除了这个kubernetes之外的别的仓库
# 设置为开机自启并现在立刻启动服务 --now:立刻启动服务
systemctl enable --now kubelet

# 查看状态,这里需要等待一段时间再查看服务状态,启动会有点慢
systemctl status kubelet
Check the log and find that there is an error, the error is as follows:
kubelet.service: Main process exited, code=exited, status=1/FAILURE kubelet.service: Failed with result 'exit-code'. [ Explanation ] After reinstalling (or installing for the first time) k8s, kubelet will continue to restart after kubeadm init or kubeadm join. This is a normal phenomenon... The problem will be solved automatically after init or join is executed. The official website has the following Description, that is, ignore kubelet.service at this time.
View version
 kubectl version

yum info kubeadm
Initialize the cluster (master node) with kubeadm
It is best to download the mirror in advance, so that the installation is fast
 docker pull registry.aliyuncs.com/google_containers/kube-apiserver:v1.24.1
docker pull registry.aliyuncs.com/google_containers/kube-controller-manager:v1.24.1
docker pull registry.aliyuncs.com/google_containers/kube-scheduler:v1.24.1
docker pull registry.aliyuncs.com/google_containers/kube-proxy:v1.24.1
docker pull registry.aliyuncs.com/google_containers/pause:3.7
docker pull registry.aliyuncs.com/google_containers/etcd:3.5.3-0
docker pull registry.aliyuncs.com/google_containers/coredns:v1.8.6
Cluster initialization
 kubeadm init \
  --apiserver-advertise-address=192.168.0.113 \
  --image-repository registry.aliyuncs.com/google_containers \
  --control-plane-endpoint=cluster-endpoint \
  --kubernetes-version v1.24.1 \
  --service-cidr=10.1.0.0/16 \
  --pod-network-cidr=10.244.0.0/16 \
  --v=5
# –image-repository string:    这个用于指定从什么位置来拉取镜像(1.13版本才有的),默认值是k8s.gcr.io,我们将其指定为国内镜像地址:registry.aliyuncs.com/google_containers
# –kubernetes-version string:  指定kubenets版本号,默认值是stable-1,会导致从https://dl.k8s.io/release/stable-1.txt下载最新的版本号,我们可以将其指定为固定版本(v1.22.1)来跳过网络请求。
# –apiserver-advertise-address  指明用 Master 的哪个 interface 与 Cluster 的其他节点通信。如果 Master 有多个 interface,建议明确指定,如果不指定,kubeadm 会自动选择有默认网关的 interface。这里的ip为master节点ip,记得更换。
# –pod-network-cidr             指定 Pod 网络的范围。Kubernetes 支持多种网络方案,而且不同网络方案对  –pod-network-cidr有自己的要求,这里设置为10.244.0.0/16 是因为我们将使用 flannel 网络方案,必须设置成这个 CIDR。
# --control-plane-endpoint     cluster-endpoint 是映射到该 IP 的自定义 DNS 名称,这里配置hosts映射:192.168.0.113   cluster-endpoint。 这将允许你将 --control-plane-endpoint=cluster-endpoint 传递给 kubeadm init,并将相同的 DNS 名称传递给 kubeadm join。 稍后你可以修改 cluster-endpoint 以指向高可用性方案中的负载均衡器的地址。
[ Tips ] kubeadm does not support converting a single control plane cluster without the --control-plane-endpoint parameter to a high-availability cluster.
reset and reinitialize
 kubeadm reset
rm -fr ~/.kube/  /etc/kubernetes/* var/lib/etcd/*
kubeadm init \
  --apiserver-advertise-address=192.168.0.113  \
  --image-repository registry.aliyuncs.com/google_containers \
  --control-plane-endpoint=cluster-endpoint \
  --kubernetes-version v1.24.1 \
  --service-cidr=10.1.0.0/16 \
  --pod-network-cidr=10.244.0.0/16 \
  --v=5
# –image-repository string:    这个用于指定从什么位置来拉取镜像(1.13版本才有的),默认值是k8s.gcr.io,我们将其指定为国内镜像地址:registry.aliyuncs.com/google_containers
# –kubernetes-version string:  指定kubenets版本号,默认值是stable-1,会导致从https://dl.k8s.io/release/stable-1.txt下载最新的版本号,我们可以将其指定为固定版本(v1.22.1)来跳过网络请求。
# –apiserver-advertise-address  指明用 Master 的哪个 interface 与 Cluster 的其他节点通信。如果 Master 有多个 interface,建议明确指定,如果不指定,kubeadm 会自动选择有默认网关的 interface。这里的ip为master节点ip,记得更换。
# –pod-network-cidr             指定 Pod 网络的范围。Kubernetes 支持多种网络方案,而且不同网络方案对  –pod-network-cidr有自己的要求,这里设置为10.244.0.0/16 是因为我们将使用 flannel 网络方案,必须设置成这个 CIDR。
# --control-plane-endpoint     cluster-endpoint 是映射到该 IP 的自定义 DNS 名称,这里配置hosts映射:192.168.0.113   cluster-endpoint。 这将允许你将 --control-plane-endpoint=cluster-endpoint 传递给 kubeadm init,并将相同的 DNS 名称传递给 kubeadm join。 稍后你可以修改 cluster-endpoint 以指向高可用性方案中的负载均衡器的地址。
Configure environment variables
 mkdir -p $HOME/.kube
sudo cp -i /etc/kubernetes/admin.conf $HOME/.kube/config
sudo chown $(id -u):$(id -g) $HOME/.kube/config

# 临时生效(退出当前窗口重连环境变量失效)
export KUBECONFIG=/etc/kubernetes/admin.conf
# 永久生效(推荐)
echo "export KUBECONFIG=/etc/kubernetes/admin.conf" >> ~/.bash_profile
source  ~/.bash_profile
It is found that there is still a problem with the node, check the log /var/log/messages
"Container runtime network not ready" networkReady="NetworkReady=false reason:NetworkPluginNotReady message:Network plugin returns error: cni plugin not initialized" The next step is to install the Pod network plugin
Install Pod Network Plugin (CNI: Container Network Interface) (master)
You must deploy a Container Network Interface (CNI) based on the Pod Networking plugin so that your Pods can communicate with each other.
 # 最好提前下载镜像(所有节点)
docker pull quay.io/coreos/flannel:v0.14.0
kubectl apply -f https://raw.githubusercontent.com/coreos/flannel/master/Documentation/kube-flannel.yml
If the above installation fails, install offline after downloading
Check the node node again, it is normal
The node node joins the k8s cluster
Install kubelet first
 yum install -y kubelet kubeadm kubectl --disableexcludes=kubernetes
# 设置为开机自启并现在立刻启动服务 --now:立刻启动服务
systemctl enable --now kubelet
systemctl status kubelet
If you don't have a token, you can get it by running the following command on the control plane node:
kubeadm token listBy default, tokens expire after 24 hours. If you want to join a node to the cluster after the current token expires, you can create a new token by running the following command on the control plane node:
 kubeadm token create
# 再查看
kubeadm token list
If you don't have the value for –discovery-token-ca-cert-hash , you can get it by executing the following chain of commands on the control plane node:
openssl x509 -pubkey -in /etc/kubernetes/pki/ca.crt | openssl rsa -pubin -outform der 2>/dev/null | openssl dgst -sha256 -hex | sed 's/^.* //' If the command to join the cluster is not recorded when executing kubeadm init , you can recreate it with the following command (recommended). Generally, instead of the above method of obtaining token and ca-cert-hash separately, execute the following command in one go:
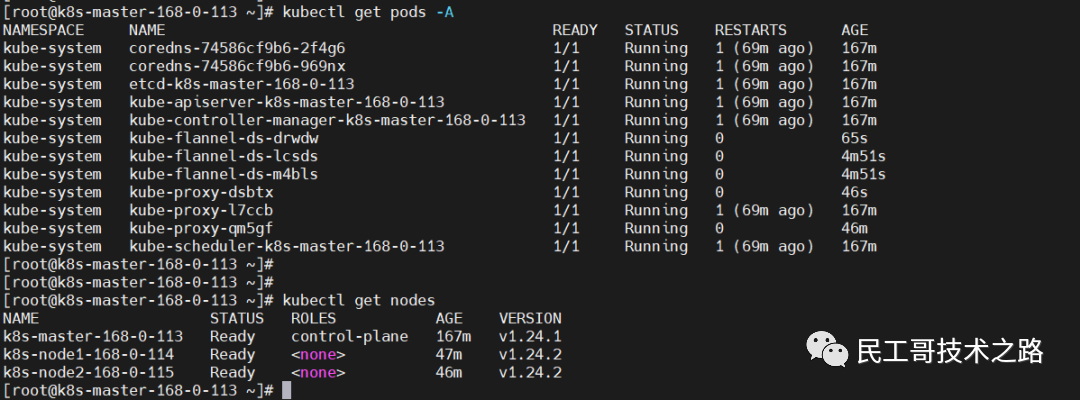
kubeadm token create --print-join-commandIt takes a while to check the node status here, because kube-proxy and flannel need to be installed.
 kubectl get pods -A
kubectl get nodes
Configure IPVS
[Problem] The ClusterIP (or ServiceName) cannot be pinged in the cluster
1. Load ip_vs related kernel modules
 modprobe -- ip_vs
modprobe -- ip_vs_sh
modprobe -- ip_vs_rr
modprobe -- ip_vs_wrr
All nodes verify that ipvs is enabled:
lsmod |grep ip_vs2. Install the ipvsadm tool
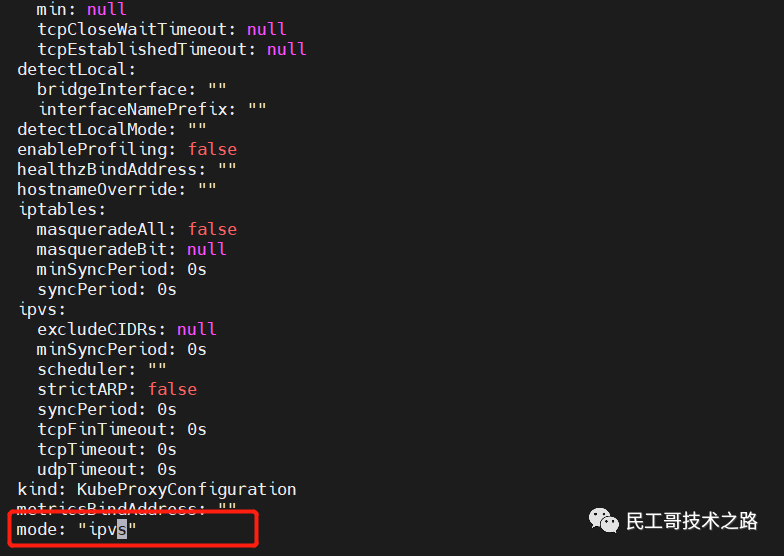
yum install ipset ipvsadm -y3. Edit the kube-proxy configuration file and change the mode to ipvs
kubectl edit configmap -n kube-system kube-proxy 4. Restart kube-proxy
 # 先查看
kubectl get pod -n kube-system | grep kube-proxy
# 再delete让它自拉起
kubectl get pod -n kube-system | grep kube-proxy |awk '{system("kubectl delete pod "$1" -n kube-system")}'
# 再查看
kubectl get pod -n kube-system | grep kube-proxy
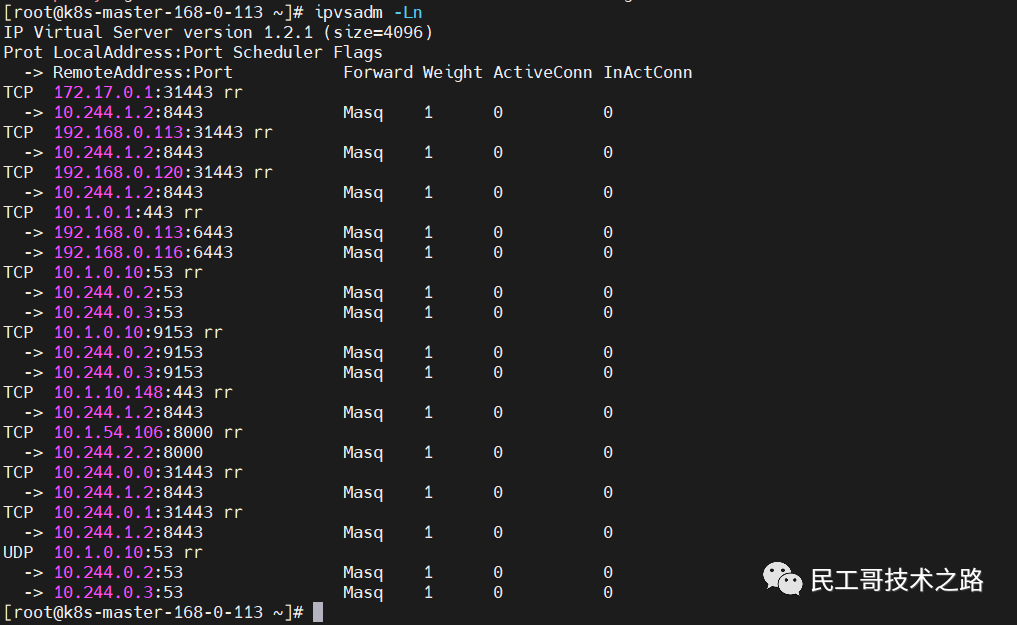
5. View ipvs forwarding rules
ipvsadm -Ln Cluster high availability configuration
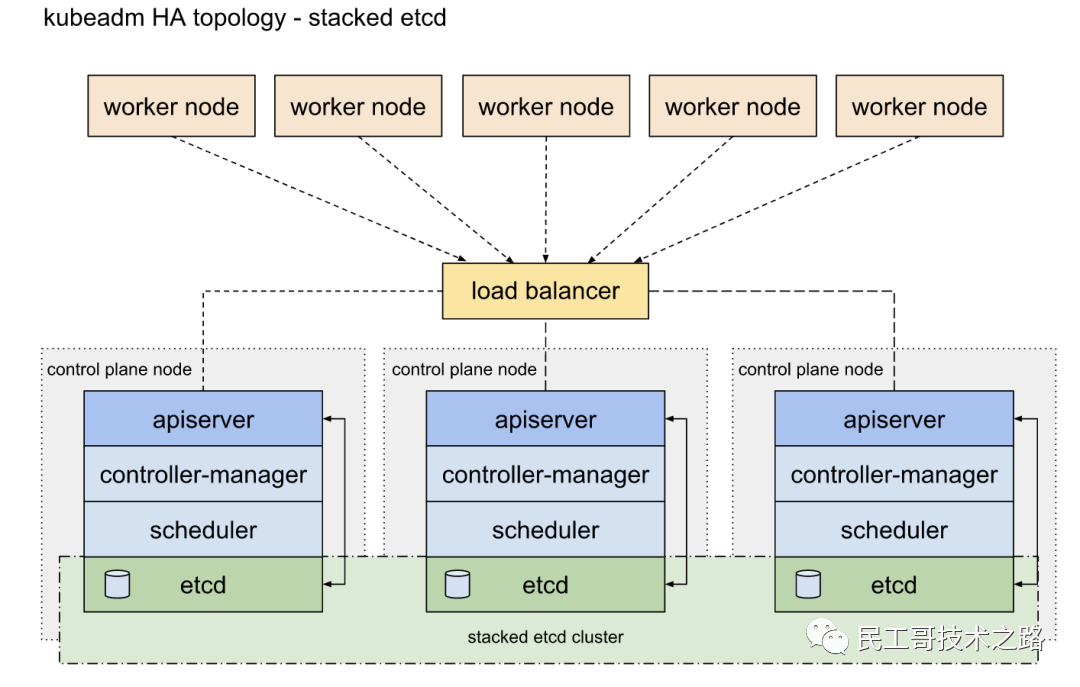
Configure high availability (HA) Kubernetes cluster implementation 两种方案 :
- Using stacked control plane nodes, where etcd nodes coexist with control plane nodes (used in this chapter), the architecture diagram is as follows:
- Using an external etcd node, where etcd runs on a different node than the control plane, the architecture diagram is as follows:
Here a new machine is added as another master node: 192.168.0.116 The configuration is the same as the above master node. Just don't need the last step of initialization.
1. Modify the host name and configure hosts
All nodes are uniformly configured as follows:
 # 在192.168.0.113执行
hostnamectl set-hostname  k8s-master-168-0-113
# 在192.168.0.114执行
hostnamectl set-hostname k8s-node1-168-0-114
# 在192.168.0.115执行
hostnamectl set-hostname k8s-node2-168-0-115
# 在192.168.0.116执行
hostnamectl set-hostname k8s-master2-168-0-116
configure hosts
 cat >> /etc/hosts<<EOF
192.168.0.113 k8s-master-168-0-113 cluster-endpoint
192.168.0.114 k8s-node1-168-0-114
192.168.0.115 k8s-node2-168-0-115
192.168.0.116 k8s-master2-168-0-116
EOF
2. Configure ssh mutual trust
 # 直接一直回车就行
ssh-keygen

ssh-copy-id -i ~/.ssh/id_rsa.pub root@k8s-master-168-0-113
ssh-copy-id -i ~/.ssh/id_rsa.pub root@k8s-node1-168-0-114
ssh-copy-id -i ~/.ssh/id_rsa.pub root@k8s-node2-168-0-115
ssh-copy-id -i ~/.ssh/id_rsa.pub root@k8s-master2-168-0-116
3. Time synchronization
 yum install chrony -y
systemctl start chronyd
systemctl enable chronyd
chronyc sources
4. Turn off the firewall
 systemctl stop firewalld
systemctl disable firewalld
5. Close swap
 # 临时关闭;关闭swap主要是为了性能考虑
swapoff -a
# 可以通过这个命令查看swap是否关闭了
free
# 永久关闭
sed -ri 's/.*swap.*/#&/' /etc/fstab
6. Disable SELinux
 # 临时关闭
setenforce 0
# 永久禁用
sed -i 's/^SELINUX=enforcing$/SELINUX=disabled/' /etc/selinux/config
7. Allow iptables to inspect bridged traffic (optional, all nodes)
To explicitly load this module, run sudo modprobe br_netfilter , verify that the br_netfilter module is loaded by running lsmod | grep br_netfilter ,
 sudo modprobe br_netfilter
lsmod | grep br_netfilter
In order for the iptables of the Linux node to correctly view the bridged traffic, please confirm that net.bridge.bridge-nf-call-iptables in the sysctl configuration is set to 1 . E.g:
 cat <<EOF | sudo tee /etc/modules-load.d/k8s.conf
overlay
br_netfilter
EOF

sudo modprobe overlay
sudo modprobe br_netfilter

# 设置所需的 sysctl 参数,参数在重新启动后保持不变
cat <<EOF | sudo tee /etc/sysctl.d/k8s.conf
net.bridge.bridge-nf-call-iptables  = 1
net.bridge.bridge-nf-call-ip6tables = 1
net.ipv4.ip_forward                 = 1
EOF

# 应用 sysctl 参数而不重新启动
sudo sysctl --system
8. Install the container docker (all nodes)
Tip: Kubernetes versions prior to v1.24 included direct integration with Docker Engine, using a component called dockershim. This particular direct integration is no longer part of Kubernetes (this removal was announced as part of the v1.20 release). You can read Checking if Dockershim deprecation affects you to understand how this removal might affect you. To learn how to migrate with dockershim, see Migrating from dockershim.
 # 配置yum源
cd /etc/yum.repos.d ; mkdir bak; mv CentOS-Linux-* bak/
# centos7
wget -O /etc/yum.repos.d/CentOS-Base.repo http://mirrors.aliyun.com/repo/Centos-7.repo
# centos8
wget -O /etc/yum.repos.d/CentOS-Base.repo http://mirrors.aliyun.com/repo/Centos-8.repo

# 安装yum-config-manager配置工具
yum -y install yum-utils
# 设置yum源
yum-config-manager --add-repo http://mirrors.aliyun.com/docker-ce/linux/centos/docker-ce.repo
# 安装docker-ce版本
yum install -y docker-ce
# 启动
systemctl start docker
# 开机自启
systemctl enable docker
# 查看版本号
docker --version
# 查看版本具体信息
docker version

# Docker镜像源设置
# 修改文件 /etc/docker/daemon.json,没有这个文件就创建
# 添加以下内容后,重启docker服务:
cat >/etc/docker/daemon.json<<EOF
{
   "registry-mirrors": ["http://hub-mirror.c.163.com"]
}
EOF
# 加载
systemctl reload docker

# 查看
systemctl status docker containerd
[ Tips ] What dockerd actually calls is the api interface of containerd, which is an intermediate communication component between dockerd and runC. So when the docker service is started, the containerd service will also be started.
9. Configure the k8s yum source (all nodes)
 cat > /etc/yum.repos.d/kubernetes.repo << EOF
[k8s]
name=k8s
enabled=1
gpgcheck=0
baseurl=https://mirrors.aliyun.com/kubernetes/yum/repos/kubernetes-el7-x86_64/
EOF
10. Set the sandbox_image image source to Alibaba Cloud google_containers image source (all nodes)
 # 导出默认配置,config.toml这个文件默认是不存在的
containerd config default > /etc/containerd/config.toml
grep sandbox_image  /etc/containerd/config.toml
sed -i "s#k8s.gcr.io/pause#registry.aliyuncs.com/google_containers/pause#g"       /etc/containerd/config.toml
grep sandbox_image  /etc/containerd/config.toml
11. Configure the containerd cgroup driver systemd
kubernets deprecated docker.shim since v 1.24.0, instead using containerd as the container runtime endpoint. Therefore, it is necessary to install containerd (installed on the basis of docker), and containerd is automatically installed when docker is installed above. The docker here is just as a client. The container engine is still containerd.
 sed -i 's#SystemdCgroup = false#SystemdCgroup = true#g' /etc/containerd/config.toml
# 应用所有更改后,重新启动containerd
systemctl restart containerd
11、开始安装 kubeadm,kubelet 和 kubectl(master 节点)
# 不指定版本就是最新版本,当前最新版就是1.24.1
yum install -y kubelet-1.24.1  kubeadm-1.24.1  kubectl-1.24.1 --disableexcludes=kubernetes
# disableexcludes=kubernetes:禁掉除了这个kubernetes之外的别的仓库
# 设置为开机自启并现在立刻启动服务 --now:立刻启动服务
systemctl enable --now kubelet

# 查看状态,这里需要等待一段时间再查看服务状态,启动会有点慢
systemctl status kubelet

# 查看版本

kubectl version
yum info kubeadm
12. Join the k8s cluster
 # 证如果过期了,可以使用下面命令生成新证书上传,这里会打印出certificate key,后面会用到
kubeadm init phase upload-certs --upload-certs
# 你还可以在 【init】期间指定自定义的 --certificate-key,以后可以由 join 使用。 要生成这样的密钥,可以使用以下命令(这里不执行,就用上面那个自命令就可以了):
kubeadm certs certificate-key

kubeadm token create --print-join-command

kubeadm join cluster-endpoint:6443 --token wswrfw.fc81au4yvy6ovmhh --discovery-token-ca-cert-hash sha256:43a3924c25104d4393462105639f6a02b8ce284728775ef9f9c30eed8e0abc0f --control-plane --certificate-key 8d2709697403b74e35d05a420bd2c19fd8c11914eb45f2ff22937b245bed5b68

# --control-plane 标志通知 kubeadm join 创建一个新的控制平面。加入master必须加这个标记
# --certificate-key ... 将导致从集群中的 kubeadm-certs Secret 下载控制平面证书并使用给定的密钥进行解密。这里的值就是上面这个命令(kubeadm init phase upload-certs --upload-certs)打印出的key。
Execute the following commands according to the prompts:
 mkdir -p $HOME/.kube
sudo cp -i /etc/kubernetes/admin.conf $HOME/.kube/config
sudo chown $(id -u):$(id -g) $HOME/.kube/config
Check
 kubectl get nodes
kubectl get pods -A -owide
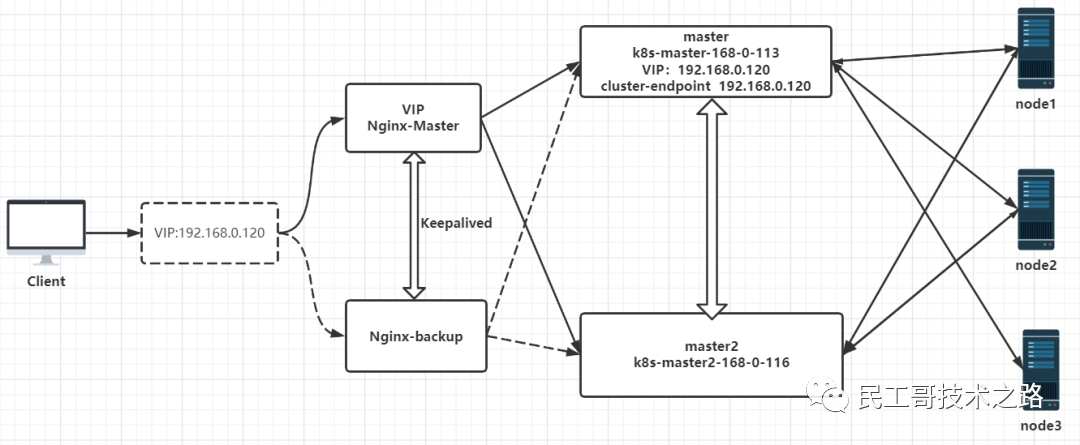
Although there are already two masters, there is still only one external entry, so a load balancer is required. If one master hangs, it will automatically switch to another master node.
Deploy Nginx+Keepalived High Availability Load Balancer
1. Install Nginx and Keepalived
 # 在两个master节点上执行
yum install nginx keepalived -y
2. Nginx configuration
Configured on two master nodes
 cat > /etc/nginx/nginx.conf << "EOF"
user nginx;
worker_processes auto;
error_log /var/log/nginx/error.log;
pid /run/nginx.pid;
include /usr/share/nginx/modules/*.conf;
events {
    worker_connections 1024;
}
# 四层负载均衡,为两台Master apiserver组件提供负载均衡
stream {
    log_format  main  '$remote_addr $upstream_addr - [$time_local] $status $upstream_bytes_sent';
    access_log  /var/log/nginx/k8s-access.log  main;
    upstream k8s-apiserver {
    # Master APISERVER IP:PORT
       server 192.168.0.113:6443;
    # Master2 APISERVER IP:PORT
       server 192.168.0.116:6443;
    }
    server {
       listen 16443;
       proxy_pass k8s-apiserver;
    }
}

http {
    log_format  main  '$remote_addr - $remote_user [$time_local] "$request" '
                      '$status $body_bytes_sent "$http_referer" '
                      '"$http_user_agent" "$http_x_forwarded_for"';
    access_log  /var/log/nginx/access.log  main;
    sendfile            on;
    tcp_nopush          on;
    tcp_nodelay         on;
    keepalive_timeout   65;
    types_hash_max_size 2048;
    include             /etc/nginx/mime.types;
    default_type        application/octet-stream;
    server {
        listen       80 default_server;
        server_name  _;

        location / {
        }
    }
}
EOF
[ Reminder ] If you only ensure high availability and do not configure k8s-apiserver load balancing, you can not install nginx, but it is better to configure k8s-apiserver load balancing.
3. Keepalived configuration (master)
 cat > /etc/keepalived/keepalived.conf << EOF
global_defs {
   notification_email {
     acassen@firewall.loc
     failover@firewall.loc
     sysadmin@firewall.loc
   }
   notification_email_from fage@qq.com
   smtp_server 127.0.0.1
   smtp_connect_timeout 30
   router_id NGINX_MASTER
}
vrrp_script check_nginx {
    script "/etc/keepalived/check_nginx.sh"
}
vrrp_instance VI_1 {
    state MASTER
    interface ens33
    virtual_router_id 51 # VRRP 路由 ID实例,每个实例是唯一的
    priority 100    # 优先级,备服务器设置 90
    advert_int 1    # 指定VRRP 心跳包通告间隔时间,默认1秒
    authentication {
        auth_type PASS
        auth_pass 1111
    }
    # 虚拟IP
    virtual_ipaddress {
        192.168.0.120/24
    }
    track_script {
        check_nginx
    }
}
EOF
vrrp_script: Specify the script to check the working status of nginx (determine whether to fail over according to the status of nginx) virtual_ipaddress: Virtual IP (VIP)
Check nginx status script:
 cat > /etc/keepalived/check_nginx.sh  << "EOF"
#!/bin/bash
count=$(ps -ef |grep nginx |egrep -cv "grep|$$")

if [ "$count" -eq 0 ];then
    exit 1
else
    exit 0
fi
EOF
chmod +x /etc/keepalived/check_nginx.sh4. Keepalived configuration (backup)
 cat > /etc/keepalived/keepalived.conf << EOF
global_defs {
   notification_email {
     acassen@firewall.loc
     failover@firewall.loc
     sysadmin@firewall.loc
   }
   notification_email_from fage@qq.com
   smtp_server 127.0.0.1
   smtp_connect_timeout 30
   router_id NGINX_BACKUP
}
vrrp_script check_nginx {
    script "/etc/keepalived/check_nginx.sh"
}
vrrp_instance VI_1 {
    state BACKUP
    interface ens33
    virtual_router_id 51 # VRRP 路由 ID实例,每个实例是唯一的
    priority 90
    advert_int 1
    authentication {
        auth_type PASS
        auth_pass 1111
    }
    virtual_ipaddress {
        192.168.0.120/24
    }
    track_script {
        check_nginx
    }
}
EOF
Check nginx status script:
 cat > /etc/keepalived/check_nginx.sh  << "EOF"
#!/bin/bash
count=$(ps -ef |grep nginx |egrep -cv "grep|$$")

if [ "$count" -eq 0 ];then
    exit 1
else
    exit 0
fi
EOF
chmod +x /etc/keepalived/check_nginx.sh5. Start and set the boot to start
 systemctl daemon-reload
systemctl restart nginx && systemctl enable nginx && systemctl status nginx
systemctl restart keepalived && systemctl enable keepalived && systemctl status keepalived
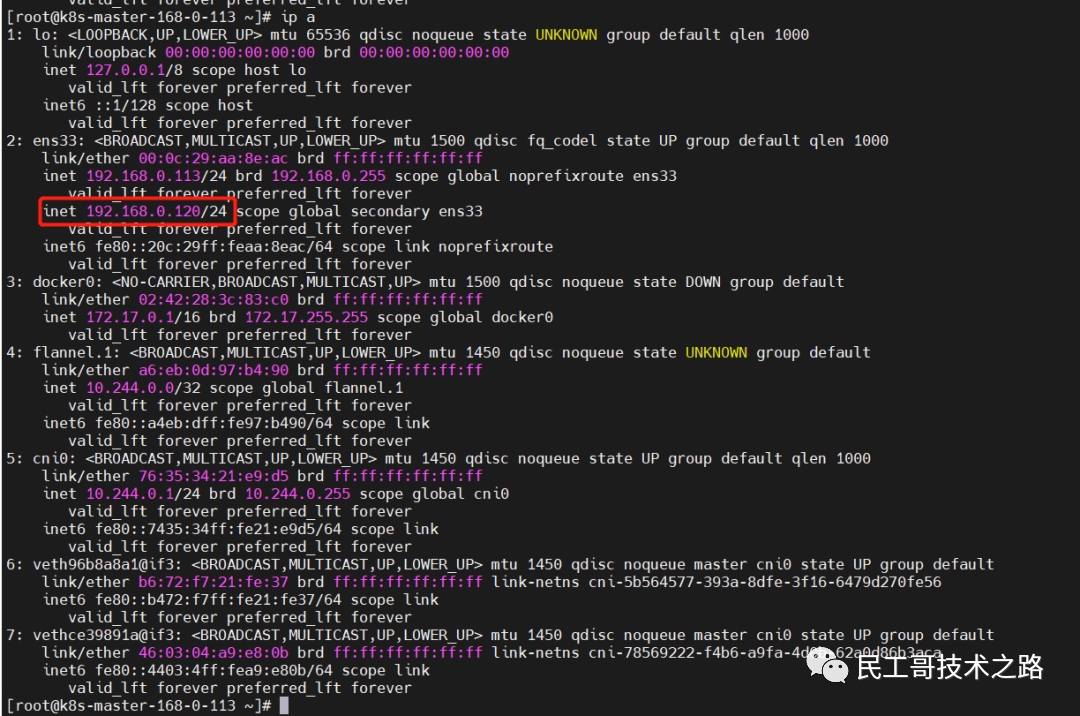
View VIP
ip a 6. Modify hosts (all nodes)
Modify the ip executed before cluster-endpoint to execute the current VIP
 192.168.0.113 k8s-master-168-0-113
192.168.0.114 k8s-node1-168-0-114
192.168.0.115 k8s-node2-168-0-115
192.168.0.116 k8s-master2-168-0-116
192.168.0.120 cluster-endpoint
7. Test verification
View version (load balancing test verification)
curl -k https://cluster-endpoint:16443/version High availability test verification, shut down the k8s-master-168-0-113 node
 shutdown -h now
curl -k https://cluster-endpoint:16443/version
kubectl get nodes -A
kubectl get pods -A
[ Tips ] There is a risk of coupling failure in stacking clusters. If a node fails, both etcd members and control plane instances are lost, and redundancy is affected. You can reduce this risk by adding more control plane nodes.
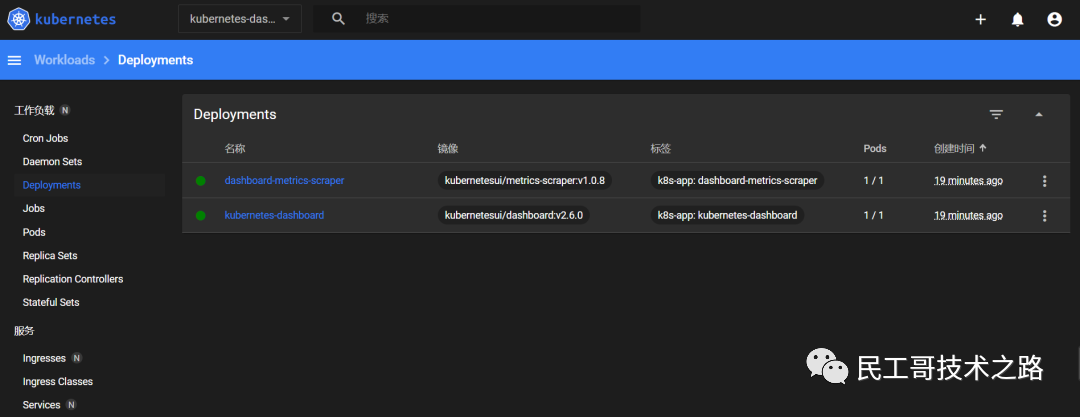
k8s management platform dashboard environment deployment
dashboard deployment
GitHub address: https://github.com/kubernetes/dashboard
 kubectl apply -f https://raw.githubusercontent.com/kubernetes/dashboard/v2.6.0/aio/deploy/recommended.yaml
kubectl get pods -n kubernetes-dashboard
But this can only be accessed internally, so to access externally, either deploy ingress or set the service NodePort type. Here, select the service exposed port.
wget https://raw.githubusercontent.com/kubernetes/dashboard/v2.6.0/aio/deploy/recommended.yamlThe modified content is as follows:
 # Copyright 2017 The Kubernetes Authors.
#
# Licensed under the Apache License, Version 2.0 (the "License");
# you may not use this file except in compliance with the License.
# You may obtain a copy of the License at
#
#     http://www.apache.org/licenses/LICENSE-2.0
#
# Unless required by applicable law or agreed to in writing, software
# distributed under the License is distributed on an "AS IS" BASIS,
# WITHOUT WARRANTIES OR CONDITIONS OF ANY KIND, either express or implied.
# See the License for the specific language governing permissions and
# limitations under the License.

apiVersion: v1
kind: Namespace
metadata:
  name: kubernetes-dashboard

---

apiVersion: v1
kind: ServiceAccount
metadata:
  labels:
    k8s-app: kubernetes-dashboard
  name: kubernetes-dashboard
  namespace: kubernetes-dashboard

---

kind: Service
apiVersion: v1
metadata:
  labels:
    k8s-app: kubernetes-dashboard
  name: kubernetes-dashboard
  namespace: kubernetes-dashboard
spec:
  type: NodePort
  ports:
    - port: 443
      targetPort: 8443
      nodePort: 31443
  selector:
    k8s-app: kubernetes-dashboard

---

apiVersion: v1
kind: Secret
metadata:
  labels:
    k8s-app: kubernetes-dashboard
  name: kubernetes-dashboard-certs
  namespace: kubernetes-dashboard
type: Opaque

---

apiVersion: v1
kind: Secret
metadata:
  labels:
    k8s-app: kubernetes-dashboard
  name: kubernetes-dashboard-csrf
  namespace: kubernetes-dashboard
type: Opaque
data:
  csrf: ""

---

apiVersion: v1
kind: Secret
metadata:
  labels:
    k8s-app: kubernetes-dashboard
  name: kubernetes-dashboard-key-holder
  namespace: kubernetes-dashboard
type: Opaque

---

kind: ConfigMap
apiVersion: v1
metadata:
  labels:
    k8s-app: kubernetes-dashboard
  name: kubernetes-dashboard-settings
  namespace: kubernetes-dashboard

---

kind: Role
apiVersion: rbac.authorization.k8s.io/v1
metadata:
  labels:
    k8s-app: kubernetes-dashboard
  name: kubernetes-dashboard
  namespace: kubernetes-dashboard
rules:
  # Allow Dashboard to get, update and delete Dashboard exclusive secrets.
  - apiGroups: [""]
    resources: ["secrets"]
    resourceNames: ["kubernetes-dashboard-key-holder", "kubernetes-dashboard-certs", "kubernetes-dashboard-csrf"]
    verbs: ["get", "update", "delete"]
    # Allow Dashboard to get and update 'kubernetes-dashboard-settings' config map.
  - apiGroups: [""]
    resources: ["configmaps"]
    resourceNames: ["kubernetes-dashboard-settings"]
    verbs: ["get", "update"]
    # Allow Dashboard to get metrics.
  - apiGroups: [""]
    resources: ["services"]
    resourceNames: ["heapster", "dashboard-metrics-scraper"]
    verbs: ["proxy"]
  - apiGroups: [""]
    resources: ["services/proxy"]
    resourceNames: ["heapster", "http:heapster:", "https:heapster:", "dashboard-metrics-scraper", "http:dashboard-metrics-scraper"]
    verbs: ["get"]

---

kind: ClusterRole
apiVersion: rbac.authorization.k8s.io/v1
metadata:
  labels:
    k8s-app: kubernetes-dashboard
  name: kubernetes-dashboard
rules:
  # Allow Metrics Scraper to get metrics from the Metrics server
  - apiGroups: ["metrics.k8s.io"]
    resources: ["pods", "nodes"]
    verbs: ["get", "list", "watch"]

---

apiVersion: rbac.authorization.k8s.io/v1
kind: RoleBinding
metadata:
  labels:
    k8s-app: kubernetes-dashboard
  name: kubernetes-dashboard
  namespace: kubernetes-dashboard
roleRef:
  apiGroup: rbac.authorization.k8s.io
  kind: Role
  name: kubernetes-dashboard
subjects:
  - kind: ServiceAccount
    name: kubernetes-dashboard
    namespace: kubernetes-dashboard

---

apiVersion: rbac.authorization.k8s.io/v1
kind: ClusterRoleBinding
metadata:
  name: kubernetes-dashboard
roleRef:
  apiGroup: rbac.authorization.k8s.io
  kind: ClusterRole
  name: kubernetes-dashboard
subjects:
  - kind: ServiceAccount
    name: kubernetes-dashboard
    namespace: kubernetes-dashboard

---

kind: Deployment
apiVersion: apps/v1
metadata:
  labels:
    k8s-app: kubernetes-dashboard
  name: kubernetes-dashboard
  namespace: kubernetes-dashboard
spec:
  replicas: 1
  revisionHistoryLimit: 10
  selector:
    matchLabels:
      k8s-app: kubernetes-dashboard
  template:
    metadata:
      labels:
        k8s-app: kubernetes-dashboard
    spec:
      securityContext:
        seccompProfile:
          type: RuntimeDefault
      containers:
        - name: kubernetes-dashboard
          image: kubernetesui/dashboard:v2.6.0
          imagePullPolicy: Always
          ports:
            - containerPort: 8443
              protocol: TCP
          args:
            - --auto-generate-certificates
            - --namespace=kubernetes-dashboard
            # Uncomment the following line to manually specify Kubernetes API server Host
            # If not specified, Dashboard will attempt to auto discover the API server and connect
            # to it. Uncomment only if the default does not work.
            # - --apiserver-host=http://my-address:port
          volumeMounts:
            - name: kubernetes-dashboard-certs
              mountPath: /certs
              # Create on-disk volume to store exec logs
            - mountPath: /tmp
              name: tmp-volume
          livenessProbe:
            httpGet:
              scheme: HTTPS
              path: /
              port: 8443
            initialDelaySeconds: 30
            timeoutSeconds: 30
          securityContext:
            allowPrivilegeEscalation: false
            readOnlyRootFilesystem: true
            runAsUser: 1001
            runAsGroup: 2001
      volumes:
        - name: kubernetes-dashboard-certs
          secret:
            secretName: kubernetes-dashboard-certs
        - name: tmp-volume
          emptyDir: {}
      serviceAccountName: kubernetes-dashboard
      nodeSelector:
        "kubernetes.io/os": linux
      # Comment the following tolerations if Dashboard must not be deployed on master
      tolerations:
        - key: node-role.kubernetes.io/master
          effect: NoSchedule

---

kind: Service
apiVersion: v1
metadata:
  labels:
    k8s-app: dashboard-metrics-scraper
  name: dashboard-metrics-scraper
  namespace: kubernetes-dashboard
spec:
  ports:
    - port: 8000
      targetPort: 8000
  selector:
    k8s-app: dashboard-metrics-scraper

---

kind: Deployment
apiVersion: apps/v1
metadata:
  labels:
    k8s-app: dashboard-metrics-scraper
  name: dashboard-metrics-scraper
  namespace: kubernetes-dashboard
spec:
  replicas: 1
  revisionHistoryLimit: 10
  selector:
    matchLabels:
      k8s-app: dashboard-metrics-scraper
  template:
    metadata:
      labels:
        k8s-app: dashboard-metrics-scraper
    spec:
      securityContext:
        seccompProfile:
          type: RuntimeDefault
      containers:
        - name: dashboard-metrics-scraper
          image: kubernetesui/metrics-scraper:v1.0.8
          ports:
            - containerPort: 8000
              protocol: TCP
          livenessProbe:
            httpGet:
              scheme: HTTP
              path: /
              port: 8000
            initialDelaySeconds: 30
            timeoutSeconds: 30
          volumeMounts:
          - mountPath: /tmp
            name: tmp-volume
          securityContext:
            allowPrivilegeEscalation: false
            readOnlyRootFilesystem: true
            runAsUser: 1001
            runAsGroup: 2001
      serviceAccountName: kubernetes-dashboard
      nodeSelector:
        "kubernetes.io/os": linux
      # Comment the following tolerations if Dashboard must not be deployed on master
      tolerations:
        - key: node-role.kubernetes.io/master
          effect: NoSchedule
      volumes:
        - name: tmp-volume
          emptyDir: {}
redeploy
 kubectl delete -f recommended.yaml
kubectl apply -f recommended.yaml
kubectl get svc,pods -n kubernetes-dashboard
Create a login user
 cat >ServiceAccount.yaml<<EOFapiVersion: v1kind: ServiceAccountmetadata:cat >ServiceAccount.yaml<<EOF
apiVersion: v1
kind: ServiceAccount
metadata:
  name: admin-user
  namespace: kubernetes-dashboard
---
apiVersion: rbac.authorization.k8s.io/v1
kind: ClusterRoleBinding
metadata:
  name: admin-user
roleRef:
  apiGroup: rbac.authorization.k8s.io
  kind: ClusterRole
  name: cluster-admin
subjects:
- kind: ServiceAccount
  name: admin-user
  namespace: kubernetes-dashboard
EOF
kubectl apply -f ServiceAccount.yaml
Create and get login token
kubectl -n kubernetes-dashboard create token admin-userConfigure hosts to log in to dashboard web
192.168.0.120 cluster-endpoint
Login: https://cluster-endpoint:31443 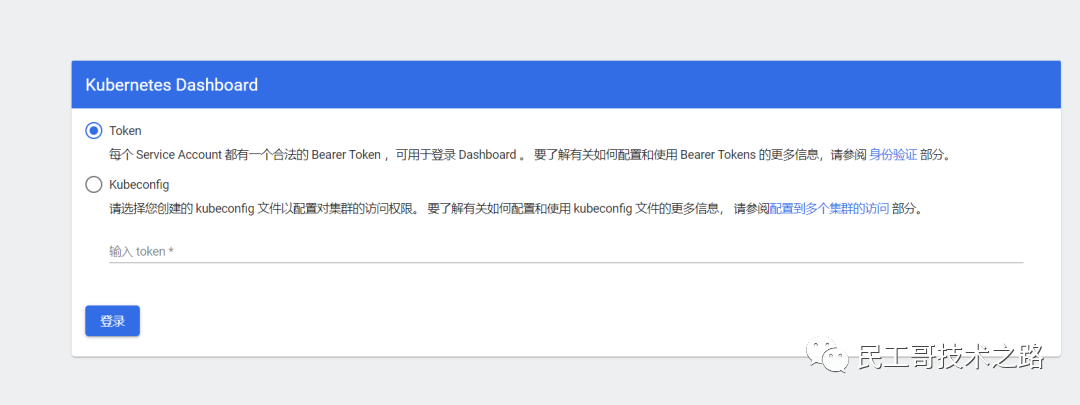
k8s mirror warehouse harbor environment deployment
GitHub address: https://github.com/helm/helm/releases
This is installed using helm, so you have to install helm first
install helm
 mkdir -p /opt/k8s/helm && cd /opt/k8s/helm
wget https://get.helm.sh/helm-v3.9.0-rc.1-linux-amd64.tar.gz
tar -xf helm-v3.9.0-rc.1-linux-amd64.tar.gz
ln -s /opt/k8s/helm/linux-amd64/helm /usr/bin/helm
helm version
helm help
configure hosts
192.168.0.120 myharbor.comCreate stl certificate
 mkdir /opt/k8s/helm/stl && cd /opt/k8s/helm/stl
# 生成 CA 证书私钥
openssl genrsa -out ca.key 4096
# 生成 CA 证书
openssl req -x509 -new -nodes -sha512 -days 3650 \
 -subj "/C=CN/ST=Guangdong/L=Shenzhen/O=harbor/OU=harbor/CN=myharbor.com" \
 -key ca.key \
 -out ca.crt
# 创建域名证书,生成私钥
openssl genrsa -out myharbor.com.key 4096
# 生成证书签名请求 CSR
openssl req -sha512 -new \
    -subj "/C=CN/ST=Guangdong/L=Shenzhen/O=harbor/OU=harbor/CN=myharbor.com" \
    -key myharbor.com.key \
    -out myharbor.com.csr
# 生成 x509 v3 扩展
cat > v3.ext <<-EOF
authorityKeyIdentifier=keyid,issuer
basicConstraints=CA:FALSE
keyUsage = digitalSignature, nonRepudiation, keyEncipherment, dataEncipherment
extendedKeyUsage = serverAuth
subjectAltName = @alt_names

[alt_names]
DNS.1=myharbor.com
DNS.2=*.myharbor.com
DNS.3=hostname
EOF
#创建 Harbor 访问证书
openssl x509 -req -sha512 -days 3650 \
    -extfile v3.ext \
    -CA ca.crt -CAkey ca.key -CAcreateserial \
    -in myharbor.com.csr \
    -out myharbor.com.crt
install ingress
- ingress official website: https://kubernetes.github.io/ingress-nginx/
- ingress warehouse address: https://github.com/kubernetes/ingress-nginx
- Deployment documentation: https://kubernetes.github.io/ingress-nginx/deploy/
1. Deploy through helm
 helm upgrade --install ingress-nginx ingress-nginx \
  --repo https://kubernetes.github.io/ingress-nginx \
  --namespace ingress-nginx --create-namespace
2. Install through YAML file (this chapter uses this method to install ingress)
kubectl apply -f https://raw.githubusercontent.com/kubernetes/ingress-nginx/controller-v1.2.0/deploy/static/provider/cloud/deploy.yamlIf the download mirror fails, you can modify the mirror address in the following ways and then install
 # 可以先把镜像下载,再安装
docker pull registry.cn-hangzhou.aliyuncs.com/google_containers/nginx-ingress-controller:v1.2.0
docker pull registry.cn-hangzhou.aliyuncs.com/google_containers/kube-webhook-certgen:v1.1.1

wget https://raw.githubusercontent.com/kubernetes/ingress-nginx/controller-v1.2.0/deploy/static/provider/cloud/deploy.yaml
# 修改镜像地址
sed -i 's@k8s.gcr.io/ingress-nginx/controller:v1.2.0\(.*\)@registry.cn-hangzhou.aliyuncs.com/google_containers/nginx-ingress-controller:v1.2.0@' deploy.yaml
sed -i 's@k8s.gcr.io/ingress-nginx/kube-webhook-certgen:v1.1.1\(.*\)$@registry.cn-hangzhou.aliyuncs.com/google_containers/kube-webhook-certgen:v1.1.1@' deploy.yaml

###还需要修改两地方
#1、kind: 类型修改成DaemonSet,replicas: 注销掉,因为DaemonSet模式会每个节点运行一个pod
#2、在添加一条:hostnetwork:true
#3、把LoadBalancer修改成NodePort
#4、在--validating-webhook-key下面添加- --watch-ingress-without-class=true
#5、设置master节点可调度
kubectl taint nodes k8s-master-168-0-113 node-role.kubernetes.io/control-plane:NoSchedule-
kubectl taint nodes k8s-master2-168-0-116 node-role.kubernetes.io/control-plane:NoSchedule-

kubectl apply -f deploy.yaml
install nfs
1. Install nfs on all nodes
yum -y install nfs-utils rpcbind2. Create a shared directory on the master node and authorize it
 mkdir /opt/nfsdata
# 授权共享目录
chmod 666 /opt/nfsdata
3. Configure the exports file
 cat > /etc/exports<<EOF
/opt/nfsdata *(rw,no_root_squash,no_all_squash,sync)
EOF
# 配置生效
exportfs -r
exportfs 命令
Common options
 -a 全部挂载或者全部卸载
-r 重新挂载
-u 卸载某一个目录
-v 显示共享目录 以下操作在服务端上
4. Start rpc and nfs (the client only needs to start the rpc service) (note the order)
 systemctl start rpcbind
systemctl start nfs-server
systemctl enable rpcbind
systemctl enable nfs-server
Check
 showmount -e
# VIP
showmount -e 192.168.0.120

-e #显示 NFS 服务器的共享列表
-a #显示本机挂载的文件资源的情况 NFS 资源的情况
-v #显示版本号
5. Client
 # 安装
yum -y install  nfs-utils rpcbind
# 启动rpc服务
systemctl start rpcbind
systemctl enable rpcbind
# 创建挂载目录
mkdir /mnt/nfsdata
# 挂载
echo "192.168.0.120:/opt/nfsdata /mnt/nfsdata     nfs    defaults  0 1">> /etc/fstab
mount -a
6, rsync data synchronization
[1] rsync installation
 # 两端都得安装
yum -y install rsync
[2] Configuration, add in /etc/rsyncd.conf
 cat >/etc/rsyncd.conf<<EOF
uid = root
gid = root
#禁锢在源目录
use chroot = yes
#监听地址
address = 192.168.0.113
#监听地址tcp/udp 873,可通过cat /etc/services | grep rsync查看
port 873
#日志文件位置
log file = /var/log/rsyncd.log
#存放进程 ID 的文件位置
pid file = /var/run/rsyncd.pid
#允许访问的客户机地址
hosts allow = 192.168.0.0/16
#共享模块名称
[nfsdata]
#源目录的实际路径
path = /opt/nfsdata
comment = Document Root of www.kgc.com
#指定客户端是否可以上传文件,默认对所有模块为 true
read only = yes
#同步时不再压缩的文件类型
dont compress = *.gz *.bz2 *.tgz *.zip *.rar *.z
#授权账户,多个账号以空格分隔,不加则为匿名,不依赖系统账号
auth users = backuper
#存放账户信息的数据文件
secrets file = /etc/rsyncd_users.db
EOF
configure rsyncd\_users.db
 cat >/etc/rsyncd_users.db<<EOF
backuper:123456
EOF
#官方要求,最好只是赋权600!
chmod 600 /etc/rsyncd_users.db
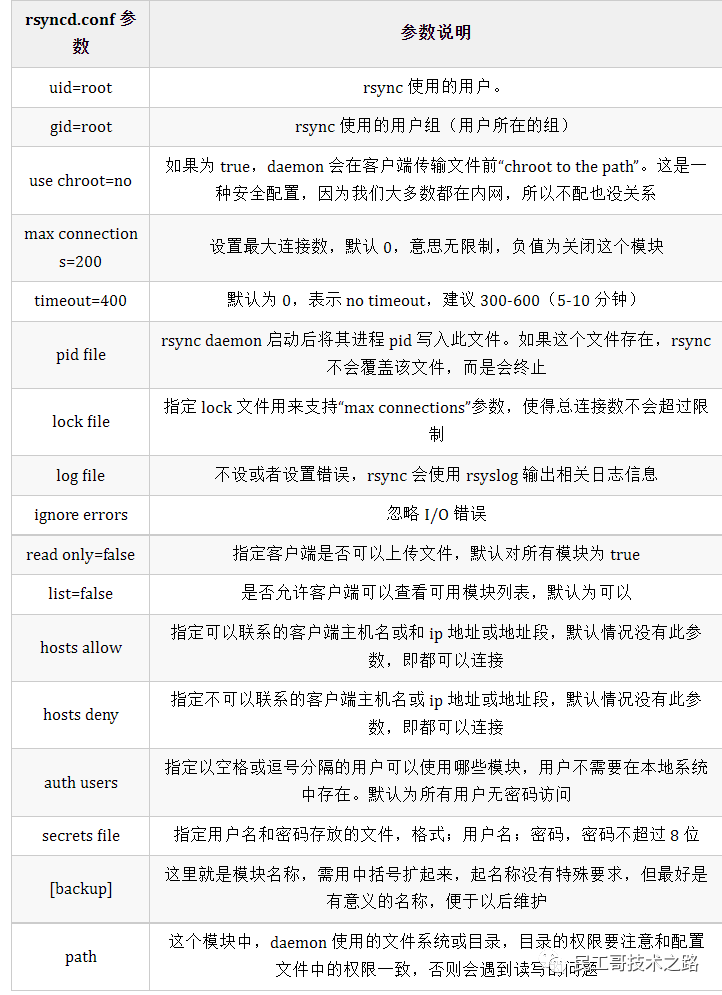
[3] Detailed explanation of common parameters of rsyncd.conf
[4] Detailed explanation of common command parameters of rsync
 rsync --help

rsync [选项]  原始位置   目标位置

常用选项    说明
-r    递归模式,包含目录及子目录中的所有文件
-l    对于符号链接文件仍然复制为符号链接文件
-v    显示同步过程的详细信息
-z    在传输文件时进行压缩goD
-p    保留文件的权限标记
-a    归档模式,递归并保留对象属性,等同于-rlpt
-t    保留文件的时间标记
-g    保留文件的属组标记(仅超级用户使用)
-o    保留文件的属主标记(仅超级用户使用)
-H    保留硬链接文件
-A    保留ACL属性信息
-D    保留设备文件及其他特殊文件
--delete  删除目标位置有而原始位置没有的文件
--checksum  根据对象的校验和来决定是否跳过文件
[5] Start the service (data source machine)
 #rsync监听端口:873
#rsync运行模式:C/S
rsync --daemon --config=/etc/rsyncd.conf
netstat -tnlp|grep :873
【6】Execute command to synchronize data
 # 在目的机器上执行
# rsync -avz 用户名@源主机地址/源目录 目的目录
rsync -avz root@192.168.0.113:/opt/nfsdata/* /opt/nfsdata/
【7】crontab 定时同步
# 配置crontab, 每五分钟同步一次,这种方式不好
*/5 * * * * rsync -avz root@192.168.0.113:/opt/nfsdata/* /opt/nfsdata/
[Reminder] The crontab timing synchronization data is not very good. You can use rsync+inotify for real-time data synchronization. This is a bit long, so I won't talk about it first. If there is time, a separate article will be published later.
Create nfs provisioner and persistent storage SC
[Warm reminder] This is a bit different from my previous article, and the previous method does not apply to the new version.
GitHub address: https://github.com/kubernetes-sigs/nfs-subdir-external-provisioner
helm deploy nfs-subdir-external-provisioner
1. Add helm repository
helm repo add nfs-subdir-external-provisioner https://kubernetes-sigs.github.io/nfs-subdir-external-provisioner/2. helm install nfs provisioner
[Reminder] The default image is inaccessible. Here, the image searched by dockerhub willdockerhub/nfs-subdir-external-provisioner:v4.0.2, and StorageClass has no namespace, all of which can be used in all namespaces .
 helm install nfs-subdir-external-provisioner nfs-subdir-external-provisioner/nfs-subdir-external-provisioner \
  --namespace=nfs-provisioner \
  --create-namespace \
  --set image.repository=willdockerhub/nfs-subdir-external-provisioner \
  --set image.tag=v4.0.2 \
  --set replicaCount=2 \
  --set storageClass.name=nfs-client \
  --set storageClass.defaultClass=true \
  --set nfs.server=192.168.0.120 \
  --set nfs.path=/opt/nfsdata
[Tips] The above nfs.server is set to VIP, which can achieve high availability.
3. View
kubectl get pods,deploy,sc -n nfs-provisionerDeploy Harbor (Https method)
1. Create Namespace
kubectl create ns harbor2. Create a certificate key
 kubectl create secret tls myharbor.com --key myharbor.com.key --cert myharbor.com.crt -n harbor
kubectl get secret myharbor.com -n harbor
3. Add Chart library
helm repo add harbor https://helm.goharbor.io4. Install harbor through helm
 helm install myharbor --namespace harbor harbor/harbor \
  --set expose.ingress.hosts.core=myharbor.com \
  --set expose.ingress.hosts.notary=notary.myharbor.com \
  --set-string expose.ingress.annotations.'nginx\.org/client-max-body-size'="1024m" \
  --set expose.tls.secretName=myharbor.com \
  --set persistence.persistentVolumeClaim.registry.storageClass=nfs-client \
  --set persistence.persistentVolumeClaim.jobservice.storageClass=nfs-client \
  --set persistence.persistentVolumeClaim.database.storageClass=nfs-client \
  --set persistence.persistentVolumeClaim.redis.storageClass=nfs-client \
  --set persistence.persistentVolumeClaim.trivy.storageClass=nfs-client \
  --set persistence.persistentVolumeClaim.chartmuseum.storageClass=nfs-client \
  --set persistence.enabled=true \
  --set externalURL=https://myharbor.com \
  --set harborAdminPassword=Harbor12345
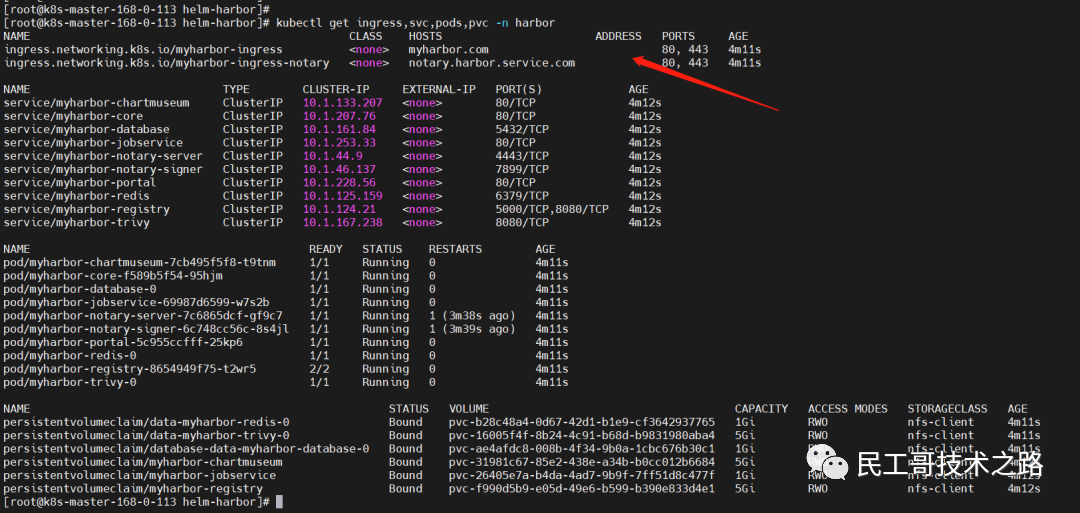
Wait a while here to check the resource status
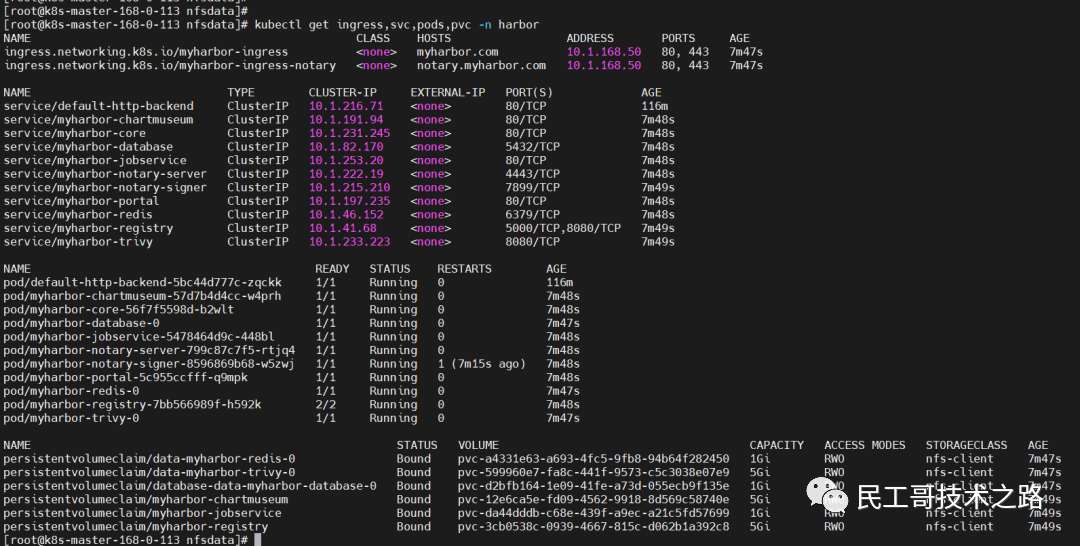
kubectl get ingress,svc,pods,pvc -n harbor 5. Ingress does not have ADDRESS problem solving
[Analysis], found "error: endpoints "default-http-backend" not found"
 cat << EOF > default-http-backend.yaml
---

apiVersion: apps/v1
kind: Deployment
metadata:
  name: default-http-backend
  labels:
    app: default-http-backend
  namespace: harbor
spec:
  replicas: 1
  selector:
    matchLabels:
      app: default-http-backend
  template:
    metadata:
      labels:
        app: default-http-backend
    spec:
      terminationGracePeriodSeconds: 60
      containers:
      - name: default-http-backend
        # Any image is permissible as long as:
        # 1. It serves a 404 page at /
        # 2. It serves 200 on a /healthz endpoint
        image: registry.cn-hangzhou.aliyuncs.com/google_containers/defaultbackend:1.4
#        image: gcr.io/google_containers/defaultbackend:1.4
        livenessProbe:
          httpGet:
            path: /healthz
            port: 8080
            scheme: HTTP
          initialDelaySeconds: 30
          timeoutSeconds: 5
        ports:
        - containerPort: 8080
        resources:
          limits:
            cpu: 10m
            memory: 20Mi
          requests:
            cpu: 10m
            memory: 20Mi
---

apiVersion: v1
kind: Service
metadata:
  name: default-http-backend
  namespace: harbor
  labels:
    app: default-http-backend
spec:
  ports:
  - port: 80
    targetPort: 8080
  selector:
    app: default-http-backend
EOF
kubectl apply -f default-http-backend.yaml
6. Uninstall and redeploy
 # 卸载
helm uninstall myharbor -n harbor
kubectl get pvc -n harbor| awk 'NR!=1{print $1}' | xargs kubectl delete pvc -n harbor

# 部署
helm install myharbor --namespace harbor harbor/harbor \
  --set expose.ingress.hosts.core=myharbor.com \
  --set expose.ingress.hosts.notary=notary.myharbor.com \
  --set-string expose.ingress.annotations.'nginx\.org/client-max-body-size'="1024m" \
  --set expose.tls.secretName=myharbor.com \
  --set persistence.persistentVolumeClaim.registry.storageClass=nfs-client \
  --set persistence.persistentVolumeClaim.jobservice.storageClass=nfs-client \
  --set persistence.persistentVolumeClaim.database.storageClass=nfs-client \
  --set persistence.persistentVolumeClaim.redis.storageClass=nfs-client \
  --set persistence.persistentVolumeClaim.trivy.storageClass=nfs-client \
  --set persistence.persistentVolumeClaim.chartmuseum.storageClass=nfs-client \
  --set persistence.enabled=true \
  --set externalURL=https://myharbor.com \
  --set harborAdminPassword=Harbor12345
5. Visit harbor
Account/Password: admin/Harbor12345
6. Common operations of harbor
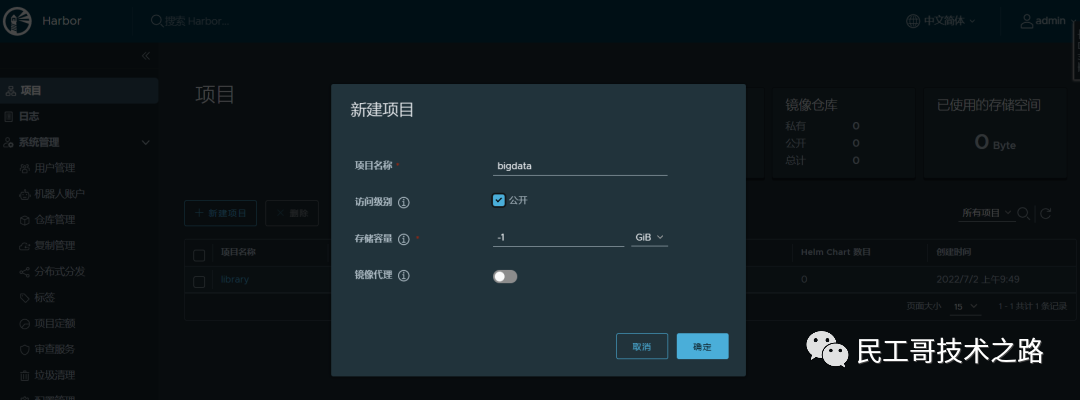
[1] Create project bigdata
[2] Configure the private warehouse and add the following content to the file /etc/docker/daemon.json:
"insecure-registries":["https://myharbor.com"]restart docker
systemctl restart docker【3】Log in harbor on the server
docker login https://myharbor.com #account/password: admin/Harbor12345
[4] Tag and upload the image to harbor
 docker tag rancher/pause:3.6 myharbor.com/bigdata/pause:3.6
docker push myharbor.com/bigdata/pause:3.6
7. Modify the containerd configuration
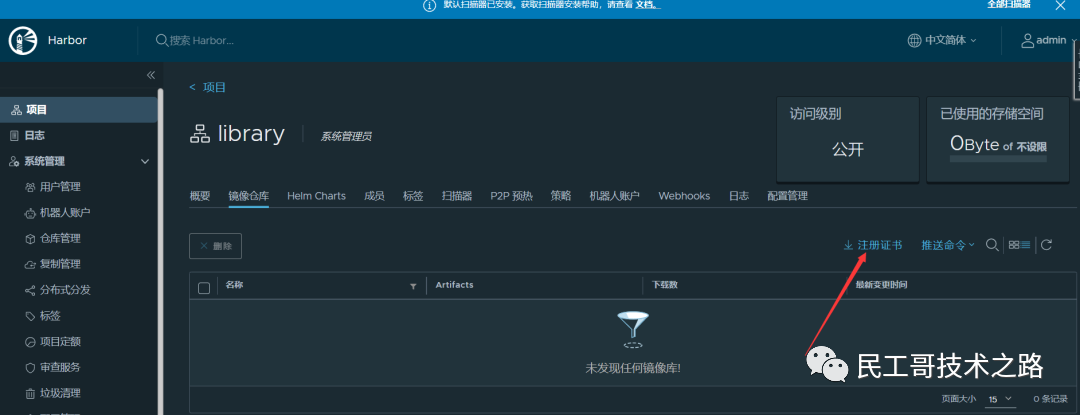
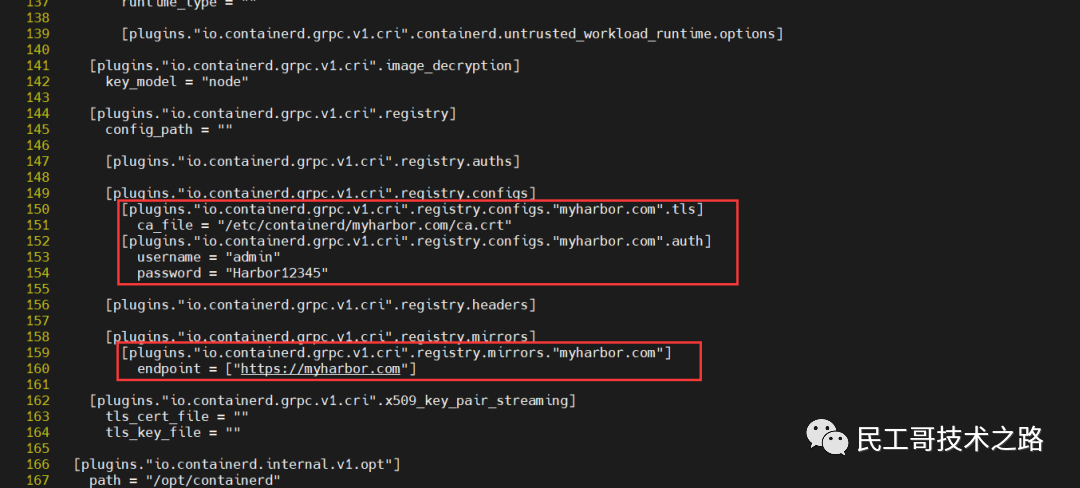
When using docker-engine before, you only need to modify /etc/docker/daemon.json, but the new version of k8s already uses containerd, so you need to do relevant configuration here, otherwise containerd will fail. The certificate (ca.crt) can be downloaded on the page:
Create a domain name directory
 mkdir /etc/containerd/myharbor.com
cp ca.crt /etc/containerd/myharbor.com/
Configuration file: /etc/containerd/config.toml
 [plugins."io.containerd.grpc.v1.cri".registry]
      config_path = ""

      [plugins."io.containerd.grpc.v1.cri".registry.auths]

      [plugins."io.containerd.grpc.v1.cri".registry.configs]
        [plugins."io.containerd.grpc.v1.cri".registry.configs."myharbor.com".tls]
          ca_file = "/etc/containerd/myharbor.com/ca.crt"
        [plugins."io.containerd.grpc.v1.cri".registry.configs."myharbor.com".auth]
          username = "admin"
          password = "Harbor12345"

      [plugins."io.containerd.grpc.v1.cri".registry.headers]

      [plugins."io.containerd.grpc.v1.cri".registry.mirrors]
        [plugins."io.containerd.grpc.v1.cri".registry.mirrors."myharbor.com"]
          endpoint = ["https://myharbor.com"]
restart containerd
 #重新加载配置
systemctl daemon-reload
#重启
containerdsystemctl restart containerd
Simple to use
 # 把docker换成crictl 就行,命令都差不多
crictl pull myharbor.com/bigdata/mysql:5.7.38
Execute crictl to report the following error solution
WARN[0000] image connect using default endpoints: [unix:///var/run/dockershim.sock unix:///run/containerd/containerd.sock unix:///run/crio/crio.sock unix:///var/run/cri-dockerd.sock]. As the default settings are now deprecated, you should set the endpoint instead.ERRO[0000] unable to determine image API version: rpc error: code = Unavailable desc = connection error: desc = "transport: Error while dialing dial unix /var/run/dockershim.sock: connect: no such file or directory"This error is an error reported by docker, which is not used here, so this error does not affect the use, but it is better to solve it. The solution is as follows:
 cat <<EOF> /etc/crictl.yaml
runtime-endpoint: unix:///run/containerd/containerd.sock
image-endpoint: unix:///run/containerd/containerd.sock
timeout: 10
debug: false
EOF
Pull the image again
crictl pull myharbor.com/bigdata/mysql:5.7.38 The latest version of Kubernetes (k8s) and the most complete version of the basic environment deployment + master high-availability implementation detailed steps are here. If you have any questions, please leave a message to me~
Link: cnblogs.com/liugp/p/16345473.html












**粗体** _斜体_ [链接](http://example.com) `代码` - 列表 > 引用。你还可以使用@来通知其他用户。