background
As a front-end engineer, I think everyone must be familiar with 静态文件服务器 . What the so-called static file server does is to transmit our 前端静态文件 (.js/.css/.html) to the browser, and then the browser renders our page. Our commonly used webpack-dev-server is a static file server for local development, and in general online environment, we will use nginx because it is more stable and efficient. Now that static file servers are ubiquitous, how are they implemented? This article will take you to implement a 高效的静态文件服务器 .
Features
Our static server includes the following two functions:
- When the content requested by the user is
文件夹, display the current文件夹的结构信息 - When the content requested by the user is
文件, return文件的内容
Let's take a look at the actual effect. The static file directory on the server is like this:
 static
└── index.html
Visit localhost:8080 to get the information of 根目录 :
There is only one index.html file in the root directory. We can click the index.html file to get the specific content of this file:
Code
According to the above requirement description, we first use 流程图 to design how our logic is implemented:
In fact, the implementation idea of the static file server is still very simple: 先判断资源存不存在 , if it does not exist, it will report an error directly. If the resource exists, 根据资源的类型返回对应的结果给客户端 is fine.
Basic code implementation
After reading the above 流程图 , I believe that everyone's ideas are basically clear, and then let's take a look at the specific code implementation:
 const http = require('http')
const url = require('url')
const fs = require('fs')
const path = require('path')
const process = require('process')

// 获取服务端的工作目录,也就是代码运行的目录
const ROOT_DIR = process.cwd()

const server = http.createServer(async (req, resp) => {
  const parsedUrl = url.parse(req.url)
  // 删除开头的'/'来获取资源的相对路径,e.g: `/static`变为`static`
  const parsedPathname = parsedUrl.pathname.slice(1)
  // 获取资源在服务端的绝对路径
  const pathname = path.resolve(ROOT_DIR, parsedPathname)

  try {
    // 读取资源的信息, fs.Stats对象
    const stat = await fs.promises.stat(pathname)

    if (stat.isFile()) {
      // 如果请求的资源是文件就交给sendFile函数处理
      sendFile(resp, pathname)
    } else {
      // 如果请求的资源是文件夹就交给sendDirectory函数处理
      sendDirectory(resp, pathname)
    }
  } catch (error) {
    // 访问的资源不存在
    if (error.code === 'ENOENT') {
      resp.statusCode = 404
      resp.end('file/directory does not exist')
    } else {
      resp.statusCode = 500
      resp.end('something wrong with the server')
    }
  }
})

server.listen(8080, () => {
  console.log('server is up and running')
})
In the above code, I use the http module to create a server instance, which defines the handler function that handles all HTTP requests. handler function implementation is relatively simple, readers can understand it according to the above code comments, here I want to explain why I use fs.promises.stat to get the meta information of the resource ( fs.Stats class, including the type of resource and change time, etc.) without using fs.stat and fs.statSync which can achieve the same function:
-
fs.promises.stat vs fs.stat:fs.promises.stat是promise-style的,asyncawait逻辑,代码很clean. Andfs.statiscallback-style, the asynchronous logic written by this API may eventually become意大利面条, which is difficult to maintain later. -
fs.promises.stat vs fs.statSync:fs.promises.statThe information to read the file is a异步操作, which will not block the execution of the main thread. Andfs.statSyncis synchronous, which means that when this API is executed,JSthe main thread will be stuck, and other resource requests cannot be processed. Here I also suggest that when you need进行文件系统的读写on the server, you must优先使用异步APIand避免使用同步式的API.
Next, let's take sendFile at the specific sendDirectory of these two functions:
 const sendFile = async (resp, pathname) => {
  // 使用promise-style的readFile API异步读取文件的数据,然后返回给客户端
  const data = await fs.promises.readFile(pathname)
  resp.end(data)
}

const sendDirectory = async (resp, pathname) => {
  // 使用promise-style的readdir API异步读取文件夹的目录信息,然后返回给客户端
  const fileList = await fs.promises.readdir(pathname, { withFileTypes: true })
  // 这里保存一下子资源相对于根目录的相对路径,用于后面客户端继续访问子资源
  const relativePath = path.relative(ROOT_DIR, pathname)

  // 构造返回的html结构体
  let content = '<ul>'
  fileList.forEach(file => {
    content += `
    <li>
      <a href=${
        relativePath
      }/${file.name}>${file.name}${file.isDirectory() ? '/' : ''}
      </a>
    </li>`
  })

  content += '</ul>'
  // 返回当前的目录结构给客户端
  resp.end(`<h1>Content of ${relativePath || 'root directory'}:</h1>${content}`)
}
sendDirectory Get the directory information under it through fs.promises.readdir , and then return an html structure to the client in the form of 列表 . It is worth mentioning here that since the client needs to further access the sub-resource according to the returned sub-resource information, we need to record the sub-resource 相对于根目录的相对路径 . sendFile The implementation of the function is simpler than sendDirectory , it only needs to read the content of the file and return it to the client.
After the above code is written, we have actually achieved the requirements mentioned above, but this server is 生产不可用的 , because it has many potential problems that have not been solved, then let us see how to solve them problem to optimize our server-side code.
Large file optimization
Let's first take a look at what happens when the client requests a large file under the current implementation. static文件夹下准备一个大文件test.txt ,这个文件里面有1000万行Hello World! ,文件的大小124M :
Then we start the server and check the Node's 内存占用情况 after the server is started:
You can see that the Node service only occupies the memory of 8.5M , let's visit it in the browser test.txt :
The browser is frantically outputting Hello World! . At this time, take another look at the memory usage of Node:
The memory usage suddenly increased from 8.5M to 132.9M , and the increased resources were almost the size of the file 124M , what is the reason for this? Let's take a look at the implementation of the sendFile file:
 const sendFile = async (resp, pathname) => {
  // readFile会读取文件的数据然后存在data变量里面
  const data = await fs.promises.readFile(pathname)
  resp.end(data)
}
In the above code, in fact, we will read the content of the file once and save it in the data variable, which means that we will save the text information of 124M in 内存里面 ! Just imagine, if there are multiple users accessing large resources at the same time, our program will definitely be OOM (Out of Memory) due to memory explosion. So how to solve this problem? In fact, the stream module provided by node can solve our problem very well.
Stream
Let's take a look at the official introduction of stream :
A stream is an abstract interface for working withstreaming datain Node.js.
There are many stream objects provided by Node.js. For instance, a request to an HTTP server andprocess.stdoutare both stream instances.Streams can be readable, writable, or both. All streams are instances ofEventEmitter
In short, stream is for us 流式处理 data, so what is 流式处理 ? In the simplest terms: not 一下子处理完数据 but 一点一点地处理 they. Using stream , the data we want to process will be loaded bit by bit into a fixed-size area of memory ( buffer ) for consumption by other consumers. Since the size of the saved data buffer is generally fixed, the new data will be loaded when the old data is processed, so it can avoid memory crash. Without further ado, let's use stream to reconstruct the above sendFile function:
 const sendFile = async (resp, pathname) => {
  // 为需要读取的文件创建一个可读流readableStream
  const fileStream = fs.createReadStream(pathname)
  fileStream.pipe(resp)
}
In the above code, we create a 可读流 (ReadableStream) for the file to be read, and then connect this stream to the resp object ( pipe ) At the same time, the data of the file will be continuously sent to the client. Seeing this, you may ask, why the resp object can be connected with fileStream ?原因就是resp 可写流 (WritableStream),而可读流的pipe函数接收的就是可写流 。 After optimization, let's ask again test.txt large file, and the browser also outputs a crazy output, but the memory usage of the Node service at this time is as follows:
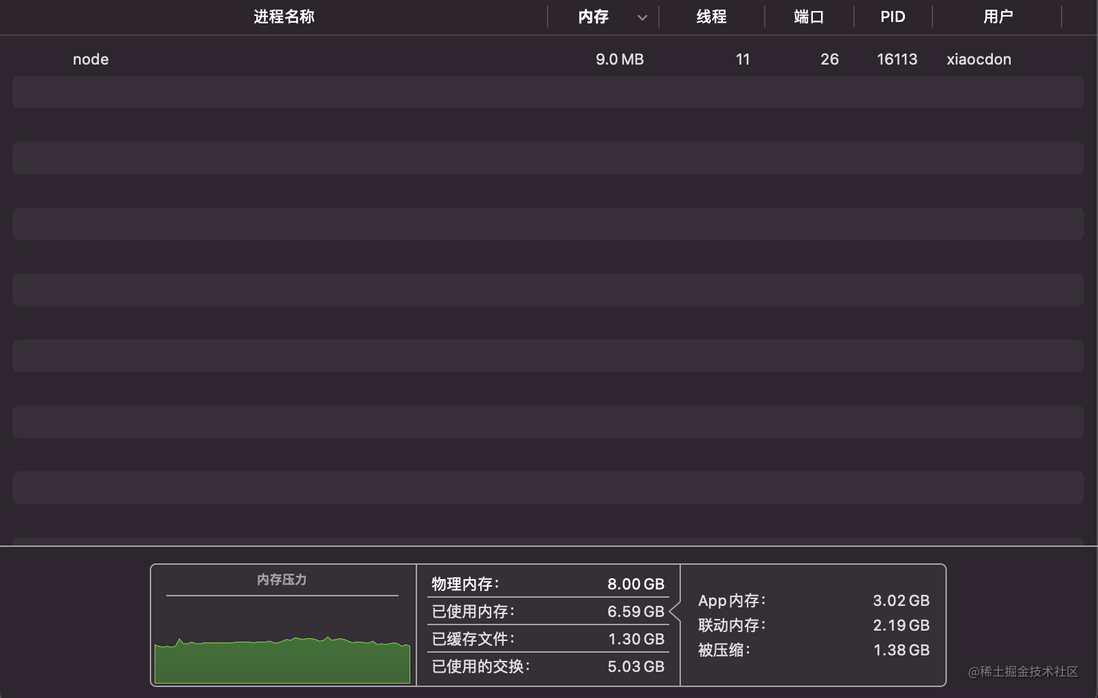
The memory of Node is basically stable at 9.0M , which is only more than when the service was started 0.5M ! It can be seen from this that we have achieved good results by optimizing stream . Due to the limitation of the article space, there is no detailed introduction on how to use the API of stream . Students who need to know can check the official documents by themselves.
Reduce file transfer bandwidth
Using stream does reduce the server's 内存占用问题 , but it does 没有减少服务端和客户端传输的数据大小 . In other words, if our file size is 2M we will actually transmit this 2M data to the client. If the client is a mobile phone or other mobile device, such a large bandwidth consumption is definitely not desirable. At this time, we need to decompress the transmitted data 压缩 and then decompress it on the client side, so that the amount of transmitted data can be greatly reduced. There are many algorithms for server-side data compression, here I use a more commonly used gzip algorithm, let's see how to change sendFile to support data compression:
 // 引入zlib包
const zlib = require('zlib')

const sendFile = async (resp, pathname) => {
  // 通过header告诉客户端:服务端使用的是gzip压缩算法
  resp.setHeader('Content-Encoding', 'gzip')
  // 创建一个可读流
  const fileStream = fs.createReadStream(pathname)
  // 文件流首先通过zip处理再发送给resp对象
  fileStream.pipe(zlib.createGzip()).pipe(resp)
}
In the above code, I use Node's native zlib module to create a 转换流 (Transform Stream), which is 既可读又可写的 (Readable and Writable Stream) ), so it looks like a 转换器 that processes the input data and outputs it to a downstream writable stream. We request the index.html file to see the optimized effect:
In the above figure, the request size of the first line is the request size without gzip compression, which is probably 2.6kB , and after gzip compressed, the transmitted data suddenly becomes 373B , the optimization effect is very significant!
Use browser cache
数据压缩 Although it solves the problem of the bandwidth of the data transmission between the server and the client, it does not solve the problem 重复数据传输的问题 . We know that in general, the static files of the server are rarely changed. On the premise that the server resources have not changed, the same client accesses the same resource multiple times, 服务端会传输一样的数据 , and in this case The next more efficient way is: the server tells the client that the resource has not changed, and you can use the cache directly. There are many ways of browser caching, there are 协商缓存 and 强缓存 . About the difference between these two kinds of caches, I think there are many articles on the Internet that have made it very clear, and I will not say more here. This article mainly wants to talk about 强缓存 Etag How the mechanism is implemented.
What is Etag
In fact, Etag (Entity-Tag) can be understood as the content of the file 指纹 , if the content of the file changes, the fingerprint is 大概率 will change. Note here that I used high probability instead of absolute, this is because HTTP1.1 does not stipulate in the agreement etag What is the specific generation algorithm, which is completely determined by the developers themselves . Usually, for a file, etag is generated by 文件的长度 + 更改时间 , which means that the browser cannot read the latest file content. However, this is not the focus of this article. Interested students can refer to other information on the Internet.
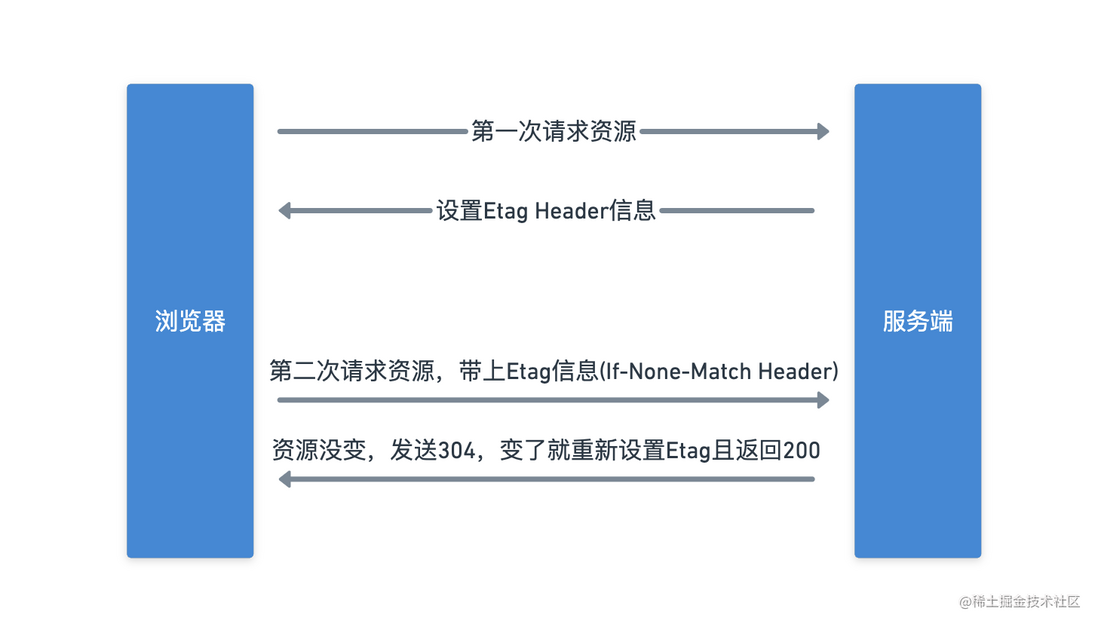
Then let's illustrate the 协商缓存 process based on etag :
The specific process is as follows:
- When the browser requests the server's resources for the first time, the server will set the
etaginformation of the current resource in the Response, for exampleEtag: 5d-1834e3b6ea2 - When the browser requests the server resource for the second time, it will bring the latest
etaginformation5d-1834e3b6ea2in theIf-None-Matchfield of the request header. The server receives the request and parses theIf-None-Matchfield and compares it with the latest serveretag, if it is the same, it will return304to the browser Indicates that the resource is not updated. If the resource has changed, the latestetagis set to the header and the latest resource is returned to the browser.
Then let's take a look at how the sendFile function supports etag :
 // 这个函数会根据文件的fs.Stats信息计算出etag
const calculateEtag = (stat) => {
  // 文件的大小
  const fileLength = stat.size
  // 文件的最后更改时间
  const fileLastModifiedTime = stat.mtime.getTime()
  // 数字都用16进制表示
  return `${fileLength.toString(16)}-${fileLastModifiedTime.toString(16)}`
}

const sendFile = async (req, resp, stat, pathname) => {
  // 文件的最新etag
  const latestEtag = calculateEtag(stat)
  // 客户端的etag
  const clientEtag = req.headers['if-none-match']

  // 客户端可以使用缓存
  if (latestEtag == clientEtag) {
    resp.statusCode = 304
    resp.end()
    return
  }

  resp.statusCode = 200
  resp.setHeader('etag', latestEtag)
  resp.setHeader('Content-Encoding', 'gzip')

  const fileStream = fs.createReadStream(pathname)
  fileStream.pipe(zlib.createGzip()).pipe(resp)
 }
In the above code, I added a function that calculates etag calculateEtag , this function will calculate the latest file etag according to the size of the file and the last change time. information. Then I also modified the function signature of sendFile d88ad5fdf796c3c940185f6c2982cc48--- and received two req (HTTP request body) and stat (file information, fs.Stats class) new parameter. sendFile will first judge whether the client's etag and the server's etag are the same, if they are the same, return 304 to the client The latest content of the file and the latest etag information is set in the header. Similarly, we visit index.html file again to verify the optimization effect:
In the above figure, you can see that the browser does not cache the resource when the resource is requested for the first time. The server returns the latest content of the file and the 200 status code. The actual bandwidth of this request is 396B , the first In the second request, due to 浏览器有缓存并且服务端资源没有更新 , the server returns the 304 status code without returning the actual file content. The actual file bandwidth at this time is 113B ! It can be seen that the optimization effect is obvious. We slightly change the content of index.html to verify whether the client will pull the latest data:
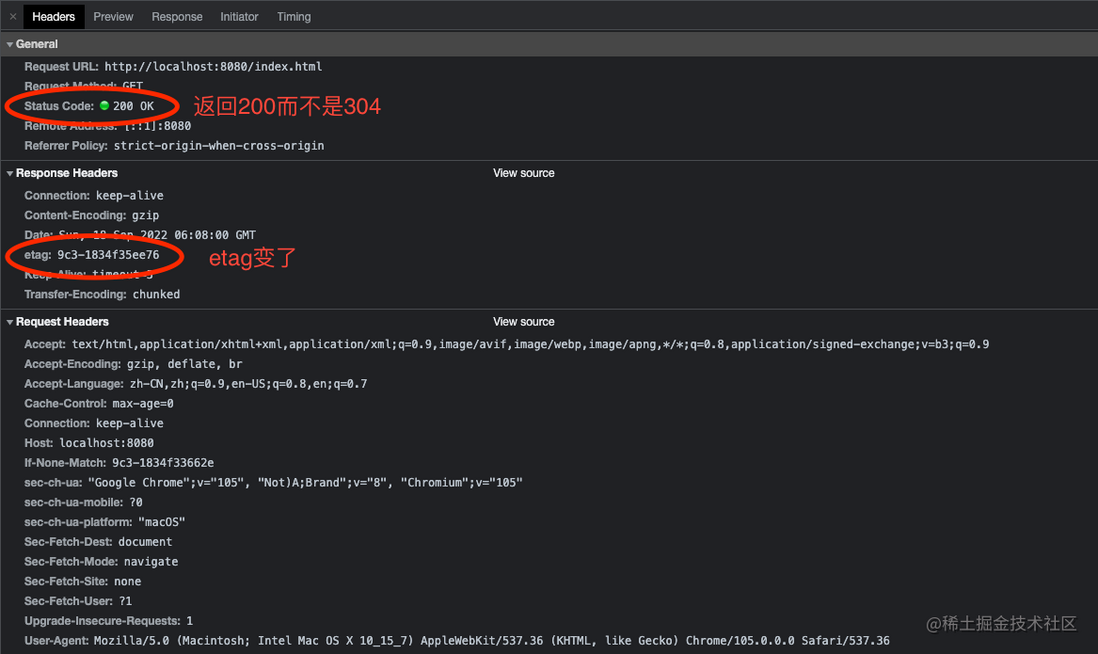
As can be seen from the above figure, when index.html is updated, the old etag is invalid, and the browser can obtain the latest data. Let's finally look at the details of these three requests. The following is the first request, the server returns etag information to the browser:
Next is the second request, when the client requests server resources, it will bring etag information:
The third request, etag fails, get new data:
It is worth mentioning that here we only implement browser caching through etag , which is incomplete, and the actual static server may add --- based on Expires/Cache-Control 强缓存 and Last-Modified/Last-Modified-Since 协商缓存 to optimize.
Summarize
In this article, I first implemented the simplest and usable one 静态文件服务器 , then optimized our code by solving three problems encountered in actual use, and finally completed one 简单高效的静态文件服务器 .
As mentioned above, due to space limitations, our implementation still missed a lot of things, such as MIME type settings, support for more compression algorithms such as deflate and support for more There are many caching methods such as Last-Modified/Last-Modified-Since and so on. In fact, these contents can be easily implemented after mastering the above methods, so it is left to everyone to implement them when they need to be really used.
Personal technology trends
Creation is not easy. If you learn something from this article, please give me a like or follow. Your support is the biggest motivation for me to continue to create!
At the same time, welcome the onions who pay attention to the attack on the public account to learn and grow together


**粗体** _斜体_ [链接](http://example.com) `代码` - 列表 > 引用。你还可以使用@来通知其他用户。