This article was shared by the front-end technical team of Mogujie. The original title "Electron from Zero to One" has been revised and changed.
1 Introduction
In the last article "Quick Understanding of the New Generation of Cross-Platform Desktop Technology - Electron", we already have a basic understanding of the Electron cross-end framework.
This article will take you to get started with Electron framework to develop cross-platform desktop, including a quick start example, cross-process communication principles, packaging and distribution, and some typical technical pitfalls. Hope to inspire you.
study Exchange:
- Introductory article on mobile IM development: "One entry is enough for beginners: developing mobile IM from scratch"
- Open source IM framework source code: https://github.com/JackJiang2011/MobileIMSDK (click here for alternate address)
(This article has been published simultaneously at: http://www.52im.net/thread-4039-1-1.html )
2. Series of articles
This article is the second in a series of articles. The general catalogue of this series is as follows:
"IM Cross-Platform Technology Learning (1): Quickly Understand the New Generation of Cross-Platform Desktop Technology - Electron"
"IM cross-platform technology learning (2): Electron first experience (quick start, cross-process communication, packaging, stepping on pits, etc.)" (* this article)
"IM cross-platform technology learning (3): vivo's Electron detailed technology stack selection, stepping on the pit summary, etc." (to be released later.. )
"IM Cross-Platform Technology Learning (4): Mogujie's Technical Practice of Electron-based IM Client Development" (to be released later.. )
"IM Cross-Platform Technology Learning (5): Summary of Rongyun's Electron-based IM Cross-Platform SDK Transformation Practice" (to be released later..)
"IM Cross-Platform Technology Learning (6): NetEase Yunxin's Electron-based IM Message Full Text Retrieval Technology Practice" (to be released later.. )
3. Introduction to Electron
Electron is a framework that empowers front-end cross-platform development, allowing developers to build cross-platform desktop applications using front-end technologies such as JavaScript, HTML, and CSS.
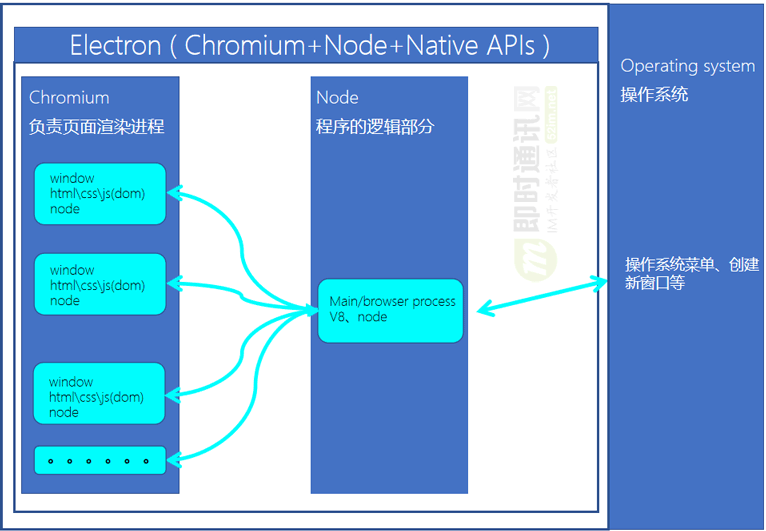
Electron combines Chromium (all Chrome-like browsers are based on this open source project) and Node.js into the same runtime environment (see the figure below), and packages it for Mac, Windows and Linux systems application, and developers only need to focus on the development of front-end code.
▲ The above picture is quoted from "Quick Understanding of the New Generation of Cross-Platform Desktop Technology - Electron"
The functions of Chromium, Node.js, and Native API are:
1) Chromium: Provides powerful UI capabilities for Electron, and can use a powerful Web ecosystem to develop interfaces without considering the compatibility of traditional browsers;
2) Node.js: It enables Electron to have the underlying operation capabilities (such as file reading and writing, and even integration of C++, etc.), and can use a large number of open source npm packages to complete development requirements.
3) Native API: Native API enables Electron to have native capabilities across platforms and desktops (for example, it has a unified native interface, windows, trays, and message notifications).
Electron is the ingenious combination of these three, which makes it very efficient for us to develop cross-platform applications.
It is essentially a chromium (chrome open source version) browser. The latest things will be tested in chromium, so electron can experience the latest api, which is also one of the benefits.
The basic introduction of Electron, etc., will not be repeated here. If you don't know it yet, you can read the first part of this article first.
4. Quick start
4.1 Data preparation
Electron officially provides a project called electron-quick-start, which can be cloned and used as a template. This article uses create-react-app to learn step by step.
Other important Electron development resources:
1) Electron official website: https://electronjs.org ;
2) Electron Github: https://github.com/electron ;
3) Electron Development Manual: https://www.electronjs.org/zh/docs/latest/ .
4.2 Create a react project
 # 安装 create-react-app 命令,如果已将安装请忽略

npm install -g create-react-app

# 创建 electron-react 项目

create-react-app electron-react

# 启动项目

cd electron-react && npm start
4.3 Configuring Electron Environment
1) Create a new index.html in the public folder and write something casually:
 ...

<div>hello world</div>

...
2) Next, create the electron main thread file (public/main.js), which is recommended to be written under the public path:
 const{app, BrowserWindow} = require('electron')

// 创建全局变量并在下面引用,避免被GC

let win

function createWindow () {

    // 创建浏览器窗口并设置宽高

    win = newBrowserWindow({ width: 800, height: 600 })

    // 加载页面

    win.loadFile('./index.html')

    // 打开开发者工具

    win.webContents.openDevTools()

    // 添加window关闭触发事件

    win.on('closed', () => {

        win = null// 取消引用

    })

}

// 初始化后 调用函数

app.on('ready', createWindow)

// 当全部窗口关闭时退出。

app.on('window-all-closed', () => {

   // 在 macOS 上,除非用户用 Cmd + Q 确定地退出,

   // 否则绝大部分应用及其菜单栏会保持激活。

   if(process.platform !== 'darwin') {

        app.quit()

   }

})

app.on('activate', () => {

// 在macOS上,当单击dock图标并且没有其他窗口打开时,

// 通常在应用程序中重新创建一个窗口。

    if(win === null) {

      createWindow()

    }

})
3) Then modify the path corresponding to the main field in package.json, and add the start command:
 {

    ...

    "main": "main.js",

    "scripts": "electron ."

}
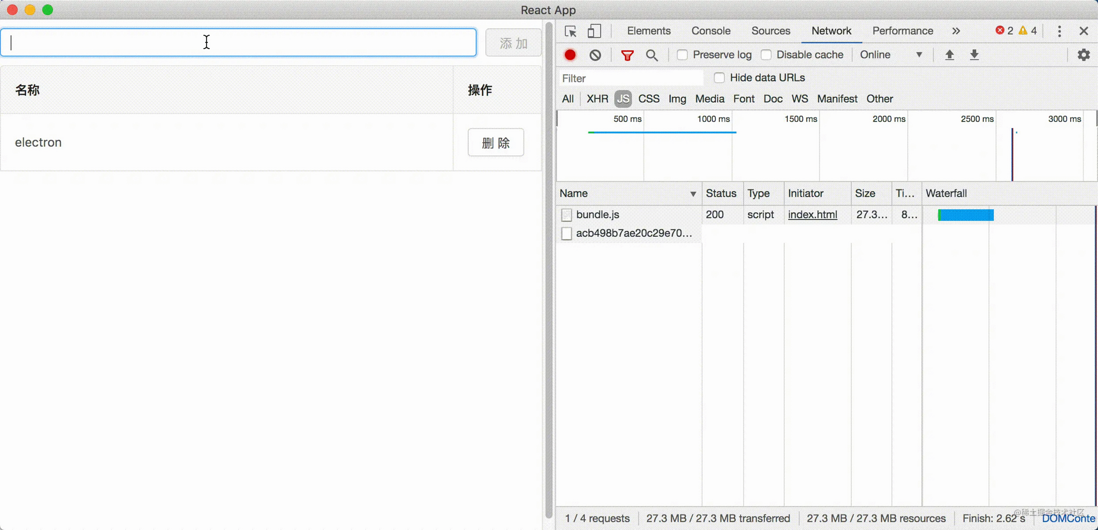
4) Execute npm start, and the following running interface will pop up:
The above is a simple page I wrote, and you can also write about what you are interested in.
As demonstrated above, a simple Electron cross-platform desktop application has been developed, so easy!
5. Detailed explanation of the process
5.1 Basic knowledge
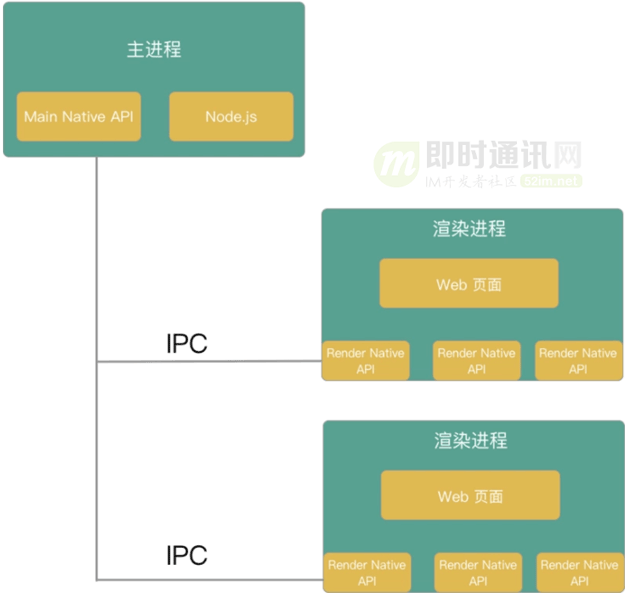
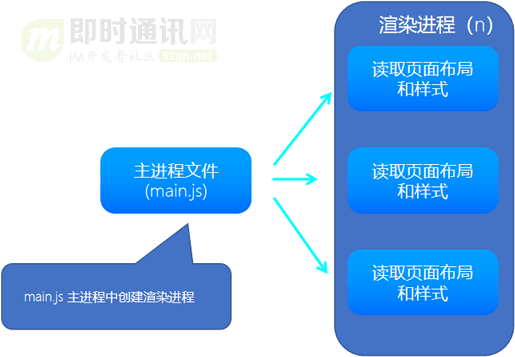
The Electron architecture is similar to the Chromium architecture, with one main process and multiple rendering processes (as shown in the figure below).
But there are also differences:
1) Native API is exposed in each process, providing Native capabilities;
2) Node.js is introduced, so the capabilities of Node can be used;
3) But the rendering process needs to be configured using node.
It can be simply understood as: Electron puts the shell of the Node.js environment on the web project, so that we can call the rich API of Node.js. This way we can use JavaScript to write desktop applications, extending a lot of things we can't do on the web.
The following picture, the technical principle is easier to understand:
5.2 Main features of the main process
The process in which Electron runs the main script of package.json is called the main process (there is only one main process). The explanation of the specific code will be expanded in the next section, and will not be elaborated in this section.
The specific responsibilities of the Electron main process:
1) The main process is connected to the operating system and the rendering process, which can be regarded as a bridge between the page and the computer;
2) Interprocess communication, window management
3) Global general services;
4) Some things that can only or are suitable to be done in the main process (such as browser download, global shortcut key processing, tray, session);
5) Maintain some necessary global state.
5.3 The main features of the rendering process The rendering process is the front-end environment we are familiar with, but the carrier has changed, from browser to window.
Note: For security reasons, the rendering process cannot directly access local resources, so it needs to be done in the main process.
The main features of the Electron rendering process:
1) Electron uses Chromium to display web pages, so Chromium's multi-process architecture is also used;
2) Each web page runs in its own rendering process (each rendering process is independent of each other and only cares about their own web pages);
3) Use the BrowserWindow class to start a rendering process and run the instance in the process. When a BrowserWindow instance is destroyed, the corresponding rendering process will also be terminated;
4) Native resources cannot be called in the rendering process, but the rendering process also includes the Node.js environment, so Node.js can be introduced.
5.4 The relationship between the main process and the rendering process The relationship between the main process and the rendering process is mainly as follows:
1) The main process uses the BrowserWindow instance to create a web page;
2) Each BrowserWindow instance runs a web page in its own rendering process (when a BrowserWindow instance is destroyed, the corresponding rendering process will also be terminated);
3) The main process manages all pages and their corresponding rendering processes;
4) Since it is very dangerous to manage native GUI resources in web pages and it is easy to cause resource leakage, it is not allowed to call GUI-related APIs on web pages (if you want to use GUI operations in web pages, the corresponding rendering process must be Communicate with the main process and request the main process to perform related GUI operations).
The specific relationship is shown in the following figure:
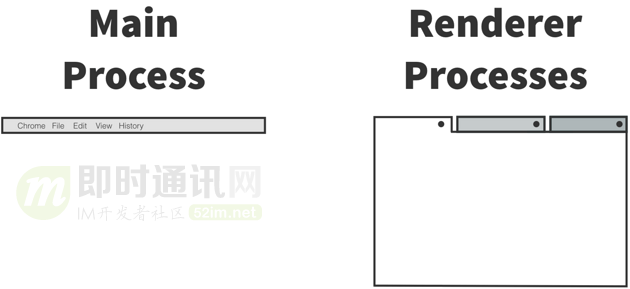
Think of them like this:
That is, each tab (tab) and its page of Chrome (or other browsers) is like a separate rendering process in Electron. Chrome still exists even when all tabs are closed. This is like Electron's main process, which can open new windows or close the application. Like the picture below.
6. Understand the process from a code perspective
6.1 Main process and rendering process Let's take a look at the basic directory structure of the electron project:
 app

└─public

    └─index.html---------------入口文件

├─main.js----------------------程序启动入口,主进程

├─ipc--------------------------进程间模块

├─appNetwork-------------------应用通信模块

└─src--------------------------窗口管理,渲染进程

    ├─components---------------通用组件模块

    ├─store--------------------数据共享模块

    ├─statics------------------静态资源模块

    └─pages----------------------窗口业务模块

      ├─窗口A----------------窗口

      └─窗口B----------------窗口
As shown above: the process of the file corresponding to the main field in package.json is the main process. Electron integrates Chromium to display the window interface, and the content seen in the window is rendered using HTML.
Chromium itself is a multi-process architecture for rendering pages (by default, Chromium's default strategy is to open a new process for each tab to ensure that each page is independent and does not affect each other, avoiding the crash of one page and causing all pages cannot be used), so Electron will also use Chromium's multi-process architecture when displaying the window. In Electron, this multi-process rendering architecture is also called the render process.
6.2 Inter-process communication In Electron, GUI-related modules (such as dialog, menu, etc.) are only available in the main process, not in the rendering process.
In order to use them in the rendering process, you need to use the ipc module to send messages to the main process. Here are several methods of inter-process communication.
1) ipcMain & ipcRenderer:
Asynchronous communication from the main process to the renderer process, it is also possible to send messages from the main process to the renderer process (see documentation).
When sending a message, the event name is channel. When replying to a synchronous message, you need to set event.returnValue.
To send asynchronous messages back to the sender, you can use event.reply(...) , this helper method will automatically handle messages from the renderer process, whereas event.sender.send(...) this method will always send messages to main process.
Here is an example of sending and processing messages between the renderer and the main process:
 // 在主进程中

const { ipcMain } = require('electron')

ipcMain.on('asynchronous-message', (event, arg) => {

    console.log(arg); // 输出 'ping'

    event.reply('asynchronous-reply', 'pong');

})

ipcMain.on('synchronous-message', (event, arg) => {

    console.log(arg) // 输出 ‘ping’

    event.returnValue = 'pong'

})

// 在渲染进程(网页)中

const { ipcRenderer } = require('electron')

console.log(ipcRenderer.sendSync('synchronous-message', 'ping')) // 输出 'pong'

ipcRenderer.on('asynchronous-reply', (event, arg) => {

    console.log(arg); // 输出 'pong'

})

ipcRenderer.send('asynchronous-message', 'ping')
2) remote module:
remote provides an easy way for the renderer process to communicate with the main process. You can call methods on the main process object without explicitly sending interprocess messages.
For example: create a browser window from a renderer process
 const { BrowserWindow } = require('electron').remote

let win = newBrowserWindow({ width: 800, height: 600 })

win.loadUrl('https://www.mogu.com')
Note: Conversely, if you need to access the rendering process from the main process, you can use webContents.executeJavascript.
3) webContents:
That is, send an asynchronous message to the rendering process through the channel, and you can send any parameters. Internally, the parameters are serialized to JSON, so the function and prototype chain of the parameter object is not sent.
In addition to the above methods, localStorage, sessionStorage, etc. can also be used.
7. Package release
After the development is completed, the application needs to be packaged into an executable file. The pit in this link is still the most stepped on by learning electron.
The current mainstream packaging tools are electron-packager and electron-builder
7.1 electron-packager
1) Install dependencies:
npm i electron-packager --save-dev2) Packaging:
electron-packager --platform= --arch= [optional flags...]You can also run npm run electron-packager directly to package.
7.2 electron-builder
Official explanation:
A complete solution to package and build a ready for distribution Electron, Proton Native or Muon app for macOS, Windows and Linux with “auto update” support out of the box.Simply put: electron-builder has richer functions than electron-packager, supports more platforms, and also supports automatic updates. In addition to these points, the package produced by electron-builder is more lightweight, and can package the setup installer without exposing the source code.
In addition, it feels a little less pitted than electron-packager.
1) Install dependencies:
npm i electron-builder --save-dev2) Packaging (define the build field in the project's package.json file):
 {

    "build": {

        "appId": "com.xxx.app",

        "extends": null,

        "files": [

            "build/**/*"

        ],

        "mac": {

            "icon": "icons/icon.icns"

        },

        "win": {

            "target": "nsis",

            "icon": "icons/icon.png"

        }

    }

}
This is the most basic configuration. Of course, other problems may be encountered during the packaging process and the configuration needs to be modified. Usually, it is not enough to write only one build folder for the files configuration. Other paths should be added according to the project structure and packaging situation.
add scripts command
 {

    "scripts": {

        "pack": "electron-builder"

    }

}
Run npm run pack to pack.
After the package is completed, there is an executable file in the dist directory. If no error is reported after opening, the package is successful.
8. Summary of stepping on the pit
Most of the pits I have encountered are pits encountered in packaging. Here are a few typical pits.
8.1 Use electron-packager to package errors
Generated checksum for"electron-v6.0.2-darwin-x64.zip"did not match expected checksum。Solution: Just upgrade the node version to 8.x or above.
8.2 Open the packaged executable file and report an error
This problem may occur for several reasons.
1) The local path may be directly accessed in the project, and the browser does not allow access for security reasons.
2) The build configuration problem in package.json, if main.js is in a deep path, you need to add the path of main.js separately below:
 "build": {

    ...

+   "public/main.js"

    ...

}
3) The path in the webpack configuration uses __dirname directly, you can use the getAppPath method of the remote module to get the path:
 const remote = require('remote')

const app = remote.require('app')

console.log(app.getAppPath());
Reference: https://github.com/electron/electron/issues/5107
8.3 dependencies & devDependencies
When packaging Electron, be sure to distinguish which are the dependencies of the production environment and which are dependencies of the development environment to avoid such errors:
8.4 About slow packaging (npm & cnpm)
All kinds of node_modules installed by cnpm. In this way, all packages are installed flat. There are a lot of files when node_modules is expanded, which makes the packaging process very slow.
But if it's time to use npm to install node_modules, all the packages are in a tree structure and the hierarchy gets deeper. But the packaging speed will be much faster (for details, please refer to: Electronic packaging is not good for 2 hours?).
9. Advantages and disadvantages of Electron
At the end of the article, based on practical experience, summarize the advantages and disadvantages of Electron.
The advantages of Electron are obvious:
1) It is easy to get started: HTML, CSS, JS, Node, npm package, UI framework, convenient and efficient, can easily achieve a good-looking UI;
2) Multi-terminal operation: desktop-level applications that can quickly build "cross-platform" (Windows, MacOs, Linux);
3) Short development time: Compared with other cross-platform solutions (such as QT, GTK+, etc.), it is more stable and has fewer bugs. After all, as long as the browser shell is running (of course, pits are indispensable);
4) Compatibility issues: no longer compatible with multiple browsers (only for Google, but compatible with mac and Linux).
Electron's shortcomings are also obvious:
1) The installation package is large in size: the installation package is slightly larger (packaged with Chromium), and contains at least the size of a browser. Each app installed is equivalent to installing a chrome;
2) The running performance is slightly worse: the performance is not as good as the native application, the Mac system is smoother, and the Window system loses frames;
3) Large memory footprint: card, slow startup, and a new process is opened, and the starting price is the memory overhead of a NodeJS;
4) Web page loading is slightly slower: loadURL takes a long time to load a remote page with a blank screen (for optimization, VSCode skeleton screen can be used).
10. References
[1] Electron official developer manual
[2] Electron first experience (quick start, cross-process communication, packaging, stepping on pits, etc.)
[3] The basic introduction to Electron is simple and clear, and you can understand everything after reading it
[4] Practice of full-text retrieval technology of chat messages in NetEase Yunxin Web-side IM
(This article has been published simultaneously at: http://www.52im.net/thread-4039-1-1.html )




**粗体** _斜体_ [链接](http://example.com) `代码` - 列表 > 引用。你还可以使用@来通知其他用户。