
Author: Yu Shengda, big data development engineer, cloud native enthusiast, KubeSphere community user.
foreword
Redis is a cache middleware that is often used in the development process. In the production environment, in order to consider stability and high availability , it is generally deployed in cluster mode.
Conventional deployment on virtual machines is cumbersome to configure and requires manual restart of nodes, while using K8s for Redis cluster deployment has the following advantages:
- Easy installation : use the image or
yamlconfiguration file to install in one piece - Automatic scheduling : After the container hangs, it will automatically schedule restart and resource allocation
- Easy to shrink and expand
缩容扩容to say, one-key expansion - Stable and efficient :
K8sScheduling on the entire cluster, as long as the entire cluster does not hang, it will always be scheduled to a suitable node to restart the container service
Install Redis Cluster
I have created a new project space of ---b3877584ff78c4dad0c71e24639d4dde test-project to do Redis the placement of all installation resources in the cluster, and later on DNS will use the project space name, which will be marked In this part, you need to pay attention to using your own project space name.
Installing a cluster is roughly divided into the following steps:
- config
redis.confdictionary; - CREATE
redisservice; - container group configuration;
- storage settings;
- advanced settings.
Now start with the first step.
1.1 Configure the redis.conf dictionary
Create a configuration dictionary in the project space 配置 → 配置字典 → 创建 .

The name is called redis-conf and then the next step is to add key-value pair data.

key value is redis.conf , value value is:
 cluster-enabled yes
cluster-config-file nodes.conf
cluster-node-timeout 5000
cluster-require-full-coverage no
cluster-migration-barrier 1
appendonly yes
Create a Redis service
In the project space 应用负载 → 服务 → 创建 to create the Redis service.

Select 有状态服务 , the services that require data storage are basically stateful services.

The name in the basic settings is called redis-cluster and then the highlight, the next step is 容器组配置 .
Container group configuration
The core of this step is to configure the Redis container. The number of clusters is the conventional three masters and three slaves, and the number of replicas of the container is 6.

Adjust the number of container group replicas to 6 and click Add Container.

Mirror selection docker hub medium redis 6.2.3 version, and choose to use the default port, CPU and memory can be selectively reserved, if not, it is to schedule public resources .

If you select 使用默认端口 , the following port settings will be used as shown in the above figure 6379 , and the configuration startup command.
Configuration as above:
- Command:
redis-server - Parameters:
/etc/redis/redis.conf
The parameter points to the content of the previous dictionary configuration, but you need to configure the dictionary in the next step 存储设置 to use it.

There is nothing to configure other content, select the checkmark to complete the container configuration.
The update strategy is the recommended one 滚动更新 , nothing else needs to be modified, click Next to configure 存储设置 .

Store settings
There are two operations in this step
-
添加持久卷声明模板 -
挂载配置字典

Add persistent volume claim template
PVC name prefix : redis-pvc
Capacity : 10G
Mount path :
- Permissions : read and write
Address : /data
The main thing is to select the mount path. After configuration, click the checkmark to complete the configuration.

Mount configuration dictionary
This step is to mount the dictionary we configured earlier redis-conf , which is also the parameter content of our redis start command.

Select the configuration dictionary for redis .

The mount permission is: 只读 , the address is: /etc/redis ; it corresponds to the configuration of the above command parameters.

Select a specific key redis.conf the same name later redis.conf , and click the checkmark to return to the storage setting after completion.

After the configuration is complete, enter the above picture, click Next to enter the final advanced settings.

高级设置 There are some additional configurations, you can choose to adjust the configuration according to your own scene, and click 创建 to create a Redis cluster container after the adjustment is complete.
Initialize the Redis cluster
After creating the Redis service , click the service name of ---33a3b55e5b125f42be798ff6dc8115cf redis to enter redis service details, as shown in the following figure:

The 6 container groups of redis have been started successfully, and the next step is to initialize the cluster; because the service we configured redis is 有状态服务 (Headless) , so the access mode can pass through the internal DNS, the access format is: (container name).(container DNS).svc.cluster.local .

According to the example in the above figure, for example, the access address to access the cluster 1 node is redis-cluster-v1-1 add DNS address redis-cluster.test-project add svc.cluster.local complete address is as follows:
redis-cluster-v1-1.redis-cluster.test-project.svc.cluster.localIn the terminal of other nodes other than the first node of the redis cluster, access through this address to verify whether they communicate with each other, and enter the terminal of the 3 nodes, as shown in the following figure:

Enter the terminal and execute the command:
redis-cli -h redis-cluster-v1-1.redis-cluster.test-project.svc.clusterredis.local If you can jump to the node of v1-1 as shown in the figure below, it means that the two nodes communicate with each other.

Execute the command: cluster info Check the cluster status of the node.

主要看上图的这两个参数, nodes 1 1个, cluster_size没有master node, so it is not yet a cluster structure, info The detailed explanation of the attribute is listed here:
-
cluster_state: The ok status indicates that the cluster can accept query requests normally. The fail state means that at least one hash slot is not bound (indicating that there is a hash slot that is not bound to any node), or in an error state (the node can provide services but is marked with FAIL), or the node Unable to reach the majority of master nodes. -
cluster_slots_assigned: The number of hash slots allocated to cluster nodes (not the number that is not bound). All 16384 hash slots allocated to cluster nodes is a necessary condition for the cluster to function properly. -
cluster_slots_ok: The hash slot status is not the number of FAIL and PFAIL. -
cluster_slots_pfail: The hash slot state is the number of PFAILs. As long as the hash slot state is not upgraded to the FAIL state, these hash slots can still be processed normally. The PFAIL state means that we cannot currently interact with the node, but this state is only a temporary error state. -
cluster_slots_fail: The hash slot status is the number of FAILs. If the value is not 0, then cluster nodes will not be able to serve queries unless cluster-require-full-coverage is set to no. -
cluster_known_nodes: The number of nodes in the cluster, including nodes that are in the handshake state and have not yet become full members of the cluster. -
cluster_size: The number of master nodes that contain at least one hash slot and can provide services. -
cluster_current_epoch: The value of the cluster-local Current Epoch variable. This value is useful during node failover, it is always incremented and unique. -
cluster_my_epoch: The Config Epoch value of the node currently in use. This is the version value associated with this node. -
cluster_stats_messages_sent: The number of messages sent over the node-to-node binary bus. -
cluster_stats_messages_received: The number of messages received over the node-to-node binary bus.
IP address to initialize the cluster
First try to initialize the cluster in the way of ip + port K8s , but start the service in ip will change, so the final result still needs to be DNS way to initialize the cluster.
If you want to change to DNS address initialization after executing this step, you need to do it again. If you don't want trouble, you can skip it directly.
Record redis all of the cluster ip+port , the initialization command is as follows:

redis-cli --cluster create 10.233.70.30:6379 10.233.70.32:6379 10.233.90.41:6379 10.233.90.43:6379 10.233.96.47:6379 10.233.96.50:6379 --cluster-replicas 1 Enter redis any node of the cluster 终端 execute the above command.
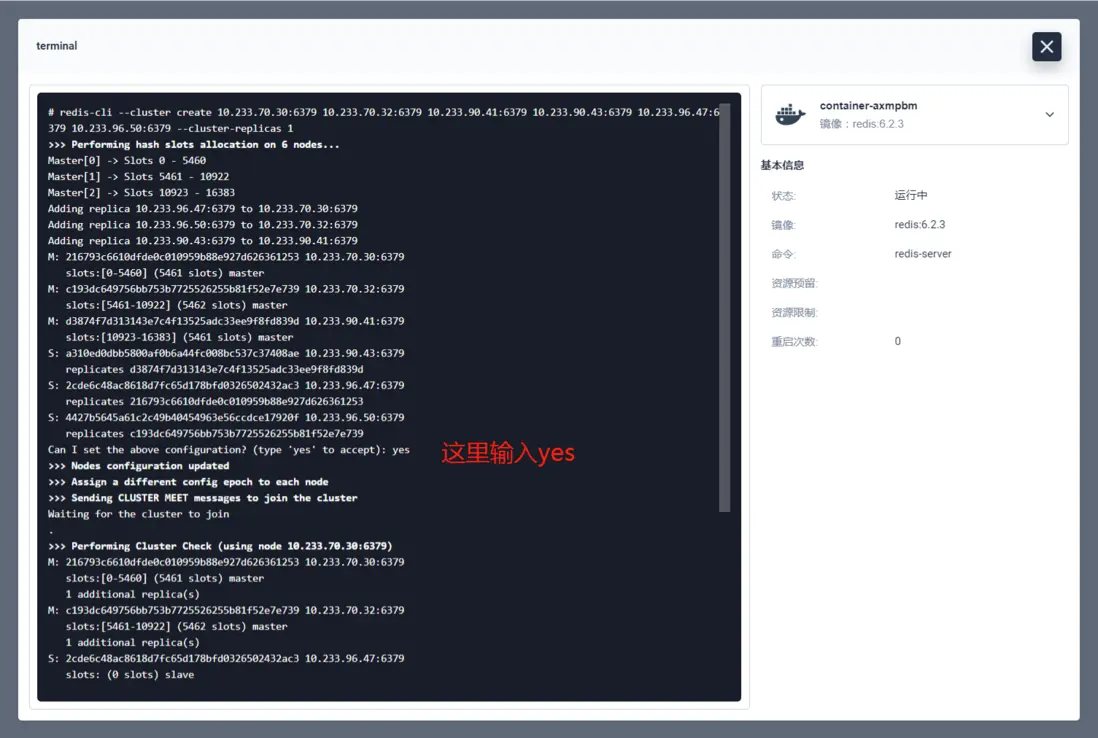

As shown in the figure above, the cluster initialization is completed, and then enter the command redis-cli to enter the command terminal, and then execute cluster info to view the cluster information.

Now our cluster node 6 , master node also has three, the cluster is established, the following operation selects master node to operate.

When verifying the cluster node, if you encounter the error in the above figure (error) MOVED 2589 10.233.70.30:6379 because redis-cli does not turn on the cluster mode, change the command to redis-cli -c and switch to cluster mode.
Initialize with internal DNS
ip地址的K8s redis后ip , K8s It is not appropriate to use the ip method to initialize the cluster in the cluster, but if you use the internal DNS to initialize the cluster directly as above, an error will occur, because redis for the domain name The support is not very good, so you can use Redis-tribe at this time.
Create Redis-tribe service
To create a custom service, select 编辑 YAML .

Parameters namespace just write the project name:

Specifically YAML content is as follows:
 apiVersion: apps/v1
kind: Deployment
metadata:
  namespace: test-project
  labels:
    app: redis-cluster-tools
  name: redis-cluster-tools
spec:
  replicas: 1
  selector:
    matchLabels:
      app: redis-cluster-tools
  template:
    metadata:
      labels:
        app: redis-cluster-tools
      name: pos-redis
    spec:
     containers:
     - name: pos-redis
       image: sunnywang/redis-tools-ubuntu:v0.5.1
       imagePullPolicy: IfNotPresent
       args:
       - /bin/bash
       - -c
       - sleep 3600
After creation, find redis-cluster-tools in the container group.

Initialize the cluster
Click the container name to enter the container details and then enter the terminal.

First execute the following command to initialize the master node, at this time the previous internal DNS domain name is useful.
redis-trib.py create `dig +short redis-cluster-v1-0.redis-cluster.test-project.svc.cluster.local`:6379 `dig +short redis-cluster-v1-1.redis-cluster.test-project.svc.cluster.local`:6379 `dig +short redis-cluster-v1-2.redis-cluster.test-project.svc.cluster.local`:6379The execution result is as follows:

Next, bind the corresponding replica node to each master node, three in total:
0 nodes -> 3 nodes
redis-trib.py replicate --master-addr `dig +short redis-cluster-v1-0.redis-cluster.test-project.svc.cluster.local`:6379 --slave-addr `dig +short redis-cluster-v1-3.redis-cluster.test-project.svc.cluster.local`:63791 node -> 4 nodes
redis-trib.py replicate --master-addr `dig +short redis-cluster-v1-1.redis-cluster.test-project.svc.cluster.local`:6379 --slave-addr `dig +short redis-cluster-v1-4.redis-cluster.test-project.svc.cluster.local`:63792 nodes -> 5 nodes
redis-trib.py replicate --master-addr `dig +short redis-cluster-v1-2.redis-cluster.test-project.svc.cluster.local`:6379 --slave-addr `dig +short redis-cluster-v1-5.redis-cluster.test-project.svc.cluster.local`:6379The execution result is as follows:

verify
Simply enter the terminal of a cluster node, or execute the cluster info command to view the cluster information.

Use the basic command to verify, verify that the cluster mode redis-cli needs to add -c .

Verify that cluster mode can be used normally.
This article is published by OpenWrite , a multi-post blog platform!


**粗体** _斜体_ [链接](http://example.com) `代码` - 列表 > 引用。你还可以使用@来通知其他用户。