[TOC]
本文为翻译文章,原文地址在这里。
Material Design是由Google提出的关于如何构建一个Android应用的完整的指导方案,该方案不仅仅可以被用于Android应用的设计,同样可以被用于Web端的设计。目前在Web端上已经出现了大量践行Material Design的开源的组件库。在开发个APP的过程种,Android提供了多个辅助库来帮助开发者实践这些设计指南。其中最重要的几个库就是:
com.android.support:appcompat-v7:23.1.0
com.android.support:design :23.1.0
总而言之,如果使用Android Studio来开发应用的话,这两个库会被自动作为依赖引入项目中。在开发应用时,一个重要的方面就是应用的颜色模式的选择,而Material Design的原则中也阐述了如何来选择颜色。
Material Design: Colors
创建应用的第一步即是选择合适的颜色方案。在这种目标下可以利用这个站点 website 来根据Material Design来选取合适的颜色。在经过选择之后我们可以下载colors.xml:
<resources>
    <color name="primary">#3F51B5</color>
    <color name="primary_dark">#303F9F</color>
    <color name="primary_light">#C5CAE9</color>
    <color name="accent">#03A9F4</color>
    <color name="primary_text">#212121</color>
    <color name="secondary_text">#727272</color>
    <color name="icons">#FFFFFF</color>
    <color name="divider">#B6B6B6</color>
</resources>
在选择了合适的颜色之后就要创建自定义的主题,一般来说应用需要支持尽可能多的不同的设备,而不仅仅是Lollipop或者之后的版本。基于这个原因,我们需要在values目录下创建两个文件夹:
style
style-v21
第一个文件夹下面的样式设计会被低于Lollipop版本的手机使用,第二个文件夹下面的样式设计会被高于Lollipop版本的手机使用,在第一个目录下,style.xml文件应该被定义如下:
<resources>
    <style name="AppTheme" parent="Theme.AppCompat.Light.NoActionBar">    <!-- Customize your theme here. -->
        <item name="colorPrimary">@color/primary</item>
        <item name="colorPrimaryDark">@color/primary_dark</item>
        <item name="colorAccent">@color/accent</item>
    </style>
    <style name="MyAppTheme" parent="@style/AppTheme" />
</resources>
而在第二个文件夹下面只需要添加如下的配置:
<resources>
   <style name="MyAppTheme" parent="AppTheme">
     <item name="android:windowContentTransitions">true</item>
     <item name="android:windowAllowEnterTransitionOverlap">true</item>
     <item name="android:windowAllowReturnTransitionOverlap">true</item>
     <item name="android:windowSharedElementEnterTransition">@android:transition/move</item>
     <item name="android:windowSharedElementExitTransition">@android:transition/move</item>
  </style>
</resources>
最后,在Manifest.xml文件中,应该将application的主题修正为:
<application
     android:theme="@style/MyAppTheme" >
     ...
</application>
Android Toolbar
在开发一个Android应用中另一个比较重要的组件就是Toolbar,它的作用很类似于早年的Android中的Action Bar,它主要担负着如下几个功能:
导航按钮
应用标题与副标题
活动菜单
图标
根据Material Design的设计原则,Toolbar会包含之前选择的几个主要的颜色,可以将其加入到Android应用中:
<RelativeLayout xmlns:android="http://schemas.android.com/apk/res/android"
    xmlns:tools="http://schemas.android.com/tools" android:layout_width="match_parent"
    android:layout_height="match_parent"
    tools:context=".MainActivity"
    android:id="@+id/layout">
   <include layout="@layout/toolbar" />
</RelativeLayout>
其中Toolbar的布局如下:
<android.support.v7.widget.Toolbar xmlns:android="http://schemas.android.com/apk/res/android"
    xmlns:local="http://schemas.android.com/apk/res-auto"
    android:id="@+id/toolbar"
    android:layout_width="match_parent"
    android:layout_height="?attr/actionBarSize"
    android:background="@color/primary"
    local:theme="@style/ThemeOverlay.AppCompat.Dark.ActionBar"
    local:popupTheme="@style/ThemeOverlay.AppCompat.Light" />
注意到在第五行中是利用?attr/actionBarSize设置了Toolbar的高度。同时在Activity种需要利用代码设置Toolbar:
@Override
protected void onCreate(Bundle savedInstanceState) {
   super.onCreate(savedInstanceState);
   setContentView(R.layout.activity_main);
   setToolBar();
}
...
private void setToolBar() {
    Toolbar tb = (Toolbar) findViewById(R.id.toolbar);
    setSupportActionBar(tb);
    ActionBar ab = getSupportActionBar();
    ab.setHomeAsUpIndicator(R.drawable.ic_menu_white_24dp);
    ab.setDisplayHomeAsUpEnabled(true);
}
添加活动菜单
一旦Toolbar配置完毕之后,就需要为该菜单添加活动选项与出现在Toolbar上的菜单栏目。首先需要在res/menu目录下添加一个main_menu.xml:
<?xml version="1.0" encoding="utf-8"?>

<menu xmlns:android="http://schemas.android.com/apk/res/android"
    xmlns:app="http://schemas.android.com/apk/res-auto">

    <item android:id="@+id/menu_settings"
          android:title="Settings"
          android:icon="@android:drawable/ic_menu_preferences"
          app:showAsAction="always"
          android:orderInCategory="100"/>

    <item android:id="@+id/menu_help"
        android:title="Help"
        android:icon="@android:drawable/ic_menu_help"
        app:showAsAction="ifRoom"
        android:orderInCategory="110" />

    <item android:id="@+id/menu_compass"
        android:title="Compass"
        android:icon="@android:drawable/ic_menu_compass"
        app:showAsAction="never"
        android:orderInCategory="105"/>
</menu>
现在Activity就是如下:
@Override
public boolean onCreateOptionsMenu(Menu menu) {
  getMenuInflater().inflate(R.menu.main_menu, menu);
  return true;
}
当用户选择菜单中的某一项的时候,会被自动捕获:
@Override
public boolean onOptionsItemSelected(MenuItem item) {
   int itemId = item.getItemId();
   String btnName = null;
   switch(itemId) {
     case R.id.menu_settings:
        btnName = "Settings";
        break;
     case R.id.menu_compass:
        btnName = "Compass";
        break;
    case R.id.menu_help:
        btnName = "Help";
        break;
  }
  Snackbar.make(layout, "Button " + btnName, Snackbar.LENGTH_SHORT).show();
  return true;
}
Android Navigation Drawer
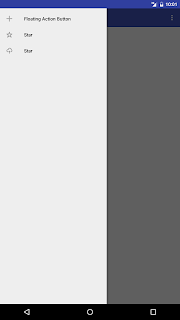
Navigation drawer是Google重点推荐的一种UI构建模式,它本质上是一种侧边菜单来辅助组织所有的导航相关的按钮。它提供了一种通用的方式来访问APP内的不同的页面与信息。首先我们需要将主Activity的布局文件修改为如下方式:
<?xml version="1.0" encoding="utf-8"?>
<android.support.v4.widget.DrawerLayout
    xmlns:android="http://schemas.android.com/apk/res/android"
    xmlns:app="http://schemas.android.com/apk/res-auto"
    xmlns:tools="http://schemas.android.com/tools"
    android:id="@+id/drawer_layout"
    android:layout_width="match_parent"
    android:layout_height="match_parent"
    android:fitsSystemWindows="true"
    tools:context=".MainActivity"
  >
    <LinearLayout
        android:layout_width="match_parent"
        android:layout_height="match_parent"
        android:orientation="vertical">
        <include layout="@layout/toolbar" />
        <!-- Let's add fragment -->
        <FrameLayout
            android:layout_width="match_parent"
            android:layout_height="match_parent"
            android:id="@+id/frame"/>
    </LinearLayout>
    <android.support.design.widget.NavigationView
        android:id="@+id/navigation"
        android:layout_width="wrap_content"
        android:layout_height="match_parent"
        android:layout_gravity="start"
        app:menu="@menu/nav_items" />
</android.support.v4.widget.DrawerLayout>
在这种情况下toolbar被放置在了LinearLayout之中,不过App中处理Toolbar的方式和之前是一样的。而所有的页面内容被放置在了FrameLayout中,NavigationView才是真正的App中的菜单,所有的菜单项被写在了nav_item中:
<?xml version="1.0" encoding="utf-8"?>
<menu xmlns:android="http://schemas.android.com/apk/res/android">
    <group android:checkableBehavior="single">
        <item android:id="@+id/fab"
              android:title="Floating Action Button"
              android:icon="@drawable/ic_action_fab" />
        <item android:id="@+id/star"
            android:title="Star"
            android:icon="@drawable/ic_action_star" />
        <item android:id="@+id/uploadr"
            android:title="Star"
            android:icon="@drawable/ic_action_upload" />
    </group>
</menu>
同样的对于用户点击的响应也是比较简单的:
private void setNavigationDrawer() {
    dLayout = (DrawerLayout) findViewById(R.id.drawer_layout);
    NavigationView navView = (NavigationView) findViewById(R.id.navigation);
    navView.setNavigationItemSelectedListener(new NavigationView.OnNavigationItemSelectedListener() {
        @Override
        public boolean onNavigationItemSelected(MenuItem menuItem) {
            Fragment frag = null;
            int itemId = menuItem.getItemId();
            if (itemId == R.id.fab) {
               frag = new Fragment1();
            }
            else if (itemId == R.id.star) {
                frag = new Fragment2();
            }
            if (frag != null) {
                FragmentTransaction transaction = getSupportFragmentManager().beginTransaction();
                transaction.replace(R.id.frame, frag);
                transaction.commit();
                dLayout.closeDrawers();
                return true;
            }
            return false;
        }
    });
}
最后一步就是将Drawer与用户的点击事件绑定到一起:
@Override
public boolean onOptionsItemSelected(MenuItem item) {
     int itemId = item.getItemId();
     String btnName = null;
     switch(itemId) {
         ...
         // Android home
         case android.R.id.home: {
             dLayout.openDrawer(GravityCompat.START);
             return true;
         }
     }
   .....
 }

**粗体** _斜体_ [链接](http://example.com) `代码` - 列表 > 引用。你还可以使用@来通知其他用户。