GeccoSpider爬虫例子
前些天,想要用爬虫抓取点东西,但是网上很多爬虫都是使用python语言的,本人只会java,因此,只能找相关java的爬虫资料,在开源中国的看到国内的大神写的一个开源的爬虫框架,并下源码研究了一下,发现跟官网描述的一样,够简单,简洁易用!有兴趣的朋友可以到官网了解下!
我这个例子也是在查看了官网的《教您使用java爬虫gecco抓取JD全部商品信息》这篇博客之后,自己动手实现的,并且加入了持久化操作,由于京东的商品比较具有层次结构,类似一棵树,因此,传统的SQL数据库很显然不能很好存储,于是我选用文档型的NoSQL数据库MongoDB在Monogo里存储类似json的数据,很容易表达出数据之间的层次关系。下面记录一下我的实现过程,并且向Gecco作者大神致敬,也建议对这方面有兴趣的朋友去官网查看作者的博客,会有更大的收获,毕竟小弟水平有限,这里写的也只是个人理解后实现的!
环境准备
jdk 我使用的是jdk1.8.0_74
IDE eclipse4.6
jar jar包有点多,主要是依赖包,所有的依赖包都在源码中的lib目录下。这里就不一一贴出来了
DB mongoDB 3.2.10
mongo driver 3.3
程序入口
程序从cn.succy.geccospider.engine.jd.JDEngine这个类开始
public class JDEngine {

    public static void main(String[] args) {
        String url = "https://www.jd.com/allSort.aspx";
        String classpath = "cn.succy.geccospider";
        HttpRequest request = new HttpGetRequest(url);
        request.setCharset("gb2312");
        // 如果pipeline和htmlbean不在同一个包,classpath就要设置到他们的共同父包
        // 本引擎主要是把京东分类的页面手机板块给抓取过来封装成htmlbean
        GeccoEngine.create().classpath(classpath).start(request).interval(2000).run();

        // 本引擎是负责抓取每一个细目对应的页面的第一页的所有商品列表的数据,开启5个线程同时抓取,提升效率
        GeccoEngine.create().classpath(classpath).start(AllSortPipeline.cateRequests).thread(5)
                .interval(2000).run();
    }
}
在这段代码里边,总共用了两个引擎,第一个先是抓取京东分类的入口url里边的版块入口 https://www.jd.com/allSort.aspx,在程序启动的时候,底层会在指定的classpath包路径下,寻找有> @Gecco注解的类,并且url和注解matchUrl对应,这个类就是抓取到的数据要映射成的HtmlBean,里边的属性可以通过注解把这个url下符合条件的节点对应起来,从而,可以把我们想要的数据通过一个HtmlBean给封装起来了。要注意一点,classpath应该设置到能包含所有有类注解的类的包路经,如果同时两个子包里边的类都存在类注解,那么,这个classpath应该就是设置到他们的共同父包下,以此类推……interval(2000)方法是指,隔多长时间执行一次抓取,单位毫秒。下面我们看一下京东的分类页面的结构,并且看一下我要抓取的是那一部分!

在这张图片里边,我们可以看到,实际上我们要抓取的是先把圈出部分抓取出来,把每一块封装成一个AllSort对象,下面我们看一下这个类!
@Gecco(matchUrl = "https://www.jd.com/allSort.aspx", pipelines = { "allSortPipeline",
        "consolePipeline" })
public class AllSort implements HtmlBean {
    private static final long serialVersionUID = 3422937382621558860L;

    @Request
    private HttpRequest request;

    /**
     * 抓取手机模块的数据
     */
    @HtmlField(cssPath = "div.category-items > div:nth-child(1) > div:nth-child(2) > div.mc > div.items > dl")
    private List<Category> cellPhone;

    public HttpRequest getRequest() {
        return request;
    }

    public void setRequest(HttpRequest request) {
        this.request = request;
    }

    public List<Category> getCellPhone() {
        return cellPhone;
    }

    public void setCellPhone(List<Category> cellPhone) {
        this.cellPhone = cellPhone;
    }
}先看注解@Gecco ,这个注解里边的matchUrl对应的就是引擎开始爬的那个url,pipeline在我的理解是一个管道,玩过linux的朋友应该知道linux的管道是什么,java里边也有管道输入输出流,和这些相似,这里的大致意思是,当这个类里边的属性都装配好了之后,接着把这个类的对象当成一个输入条件,传递到pipline里边配置好的pipleline类处理,pipeline类要实现一个叫做Pipeline的接口,并且通过@PipelineName注解指定这个pipeline叫啥名,关于Pipeline相关的,待会儿再说。实际上,在AllSort这个类里边,把对应选择器选中的内容,直接注入到一个叫做cellPhone的列表,关于这个待会儿再说。我们先看一下这个List<Category> cellPhone;装载的到底是什么!

实际上,这里圈出的就是一个Category对象,手机模块所有的Category就是List<Category> cellPhone!那么,Category到底是什么样的一个东西呢?我们看一下这个类是怎么实现的就明白了!
public class Category implements HtmlBean {

    private static final long serialVersionUID = -1808704248579938878L;

    /**
     * 对应的是大的分类名字,如手机通讯,运营商,手机配件等
     */
    @Text
    @HtmlField(cssPath = "dt > a")
    private String typeName;

    /**
     * 相对于上面的大的分类下的小类目名字
     */
    @HtmlField(cssPath = "dd > a")
    private List<HrefBean> categories;

    public String getTypeName() {
        return typeName;
    }

    public void setTypeName(String typeName) {
        this.typeName = typeName;
    }

    public List<HrefBean> getCategories() {
        return categories;
    }

    public void setCategories(List<HrefBean> categories) {
        this.categories = categories;
    }
}
也就是如下图所示的标签对应的文本和url

细心的朋友应该会发现,这里的@HtmlField(cssPath = "dd > a")的选择器直接从dd开始,那是因为,在gecco里边,Category对象是作为上面AllSort的一部分,因此,选择器可以承接上级,也就是说,
@HtmlField(cssPath = "div.category-items > div:nth-child(1) > div:nth-child(2) > div.mc > div.items > dl")
private List<Category> cellPhone;
已经到了dl这一层,那么它里边的Category里的元素就可以直接从dl下面开始获取,所以会看到像注解@HtmlField(cssPath = "dd > a")这种样子的选择器。
到了这个时候,我们已经可以把京东的分类首页的手机模块给抓取下来,并且保存成javaBean。好了,下面可以说说对于注解上面的pipeline到底是什么,怎么用了!
上面我们也有说到,pipeline是一个管道连接,也就是当页面的HtmlBean解析完成后,再以此执行注解中配置的所有的pipeline,我们在AllSort中配置有两个pipeline,分别是"allSortPipeline","consolePipeline",第二个是往控制台输出,输出的格式是json的格式的,这个没有什么好讲的,这里面我想说一下的是第一个,这个是我自定义的。好,接下来先上代码看一下这个类是怎么实现的。
@PipelineName("allSortPipeline")
public class AllSortPipeline implements Pipeline<AllSort> {

    public static List<HttpRequest> cateRequests = new ArrayList<>();

    @Override
    public void process(AllSort allSort) {
        List<Category> cellPhones = allSort.getCellPhone();
        for (Category category : cellPhones) {
            // 获取mongo的集合
            MongoCollection<Document> collection = MongoUtils.getCollection();
            // 把json转成Document
            Document doc = Document.parse(JSON.toJSONString(category));
            // 向集合里边插入一条文档
            collection.insertOne(doc);
            List<HrefBean> hrefs = category.getCategories();
            // 遍历HrefBean,取出里边保存的url
            for (HrefBean href : hrefs) {
                HttpRequest request = allSort.getRequest();
                // 把url保存起来,方便后面开启一个新的引擎进行多线程抓取数据
                cateRequests.add(request.subRequest(href.getUrl()));
            }
        }
    }
}
最上面的注解就是给这个pipeline起个名字,接着是把数据先入库,入库的数据长得像这样子:
{“typeName":"手机通讯","categories":[{"title":"手机","url":"……"},……]}这种样子,接下来就可以顺着刚刚提取出来的每一个小类目的url进行抓取他们对应的页面的数据了,我们先看一下手机这个小类目对应的页面长什么样的!如下图
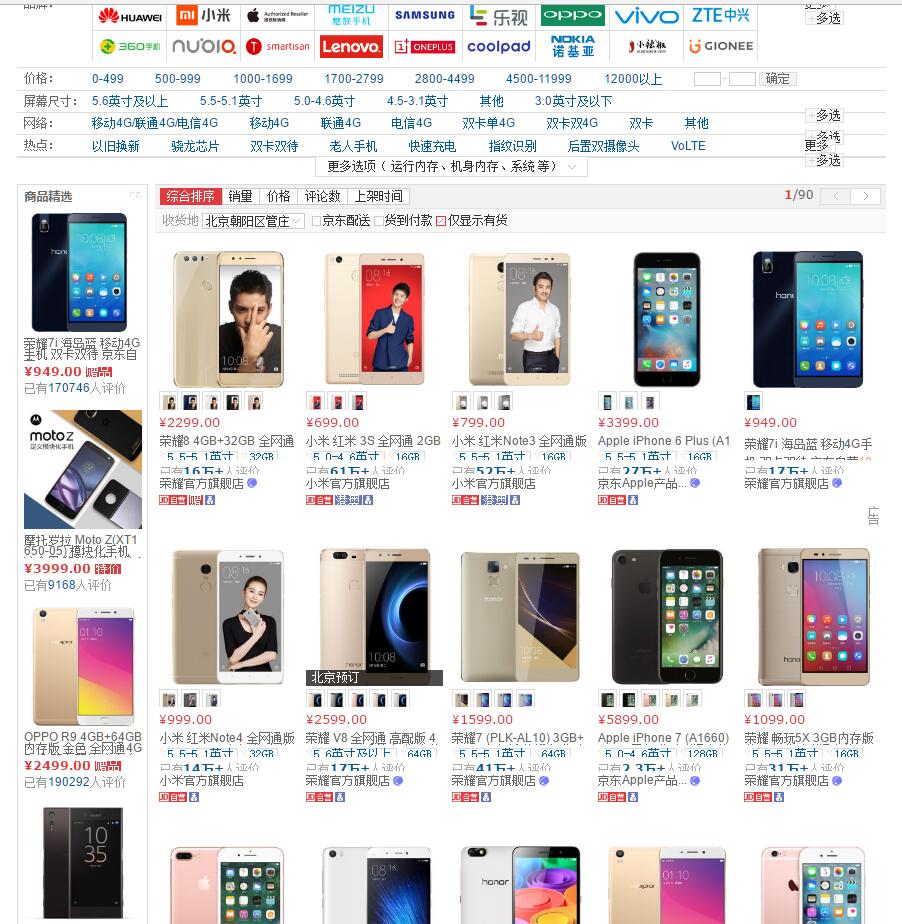
这里边的商品item就是我们想要抓取的数据,每一页有60条,对应的每个页面封装成一个ProductList类,具体规则抽取在上面已经提及到,在这里就不再提及怎么提取规则了,相信看到这里的朋友,应该可以依葫芦画瓢了,下面贴出代码,看一下ProductList的实现类!
@Gecco(matchUrl = "https://list.jd.com/list.html?cat={cat}", pipelines = { "consolePipeline",
        "filePipeline" ,"mongoPipeline"})
public class ProductList implements HtmlBean {

    private static final long serialVersionUID = -6580138290566056728L;

    /**
     * 获取请求对象,从该对象中可以获取抓取的是哪个url
     */
     @Request
     private HttpRequest request;

    // #plist > ul > li.gl-item > div.j-sku-item
    @HtmlField(cssPath = "#plist > ul > li.gl-item")
    private List<ProductDetail> details;

     public HttpRequest getRequest() {
     return request;
     }

     public void setRequest(HttpRequest request) {
     this.request = request;
     }

    public List<ProductDetail> getDetails() {
        return details;
    }

    public void setDetails(List<ProductDetail> details) {
        this.details = details;
    }

}
值得提一下的是,matchUrl里边有一个{cat},这个是像url传递参数,在HttpRequest里的url保存的就是填充参数之后url字符串,mongoPipeline就是对这里边完成填充HtmlBean之后,执行对应mongoDB操作的pipeline,我们先看一下这个pipeline!
@PipelineName("mongoPipeline")
public class MongoPipeline implements Pipeline<ProductList> {

    @Override
    public void process(ProductList productList) {
        MongoCollection<Document> collection = MongoUtils.getCollection();
        HttpRequest req = productList.getRequest();
        // 从productList里边获取url,目的是为了从之前存进数据库中找到对应url的小类目
        String url = req.getUrl();
        // 把类目名对应的商品详情的列表获取,例如,手机对应到的页面的60条记录
        List<ProductDetail> details = productList.getDetails();
        // 转成json字符串
        String jsonString = JSON.toJSONString(details);
        // 通过url找到数组里边对应url的类目,然后添加一个字段叫做details,并且把details的值
        // 给添加进去
        collection.updateOne(new Document("categories.url", url),
                Document.parse("{\"$set\":{\"categories.$.details\":" + jsonString + "}}"));
    }
}
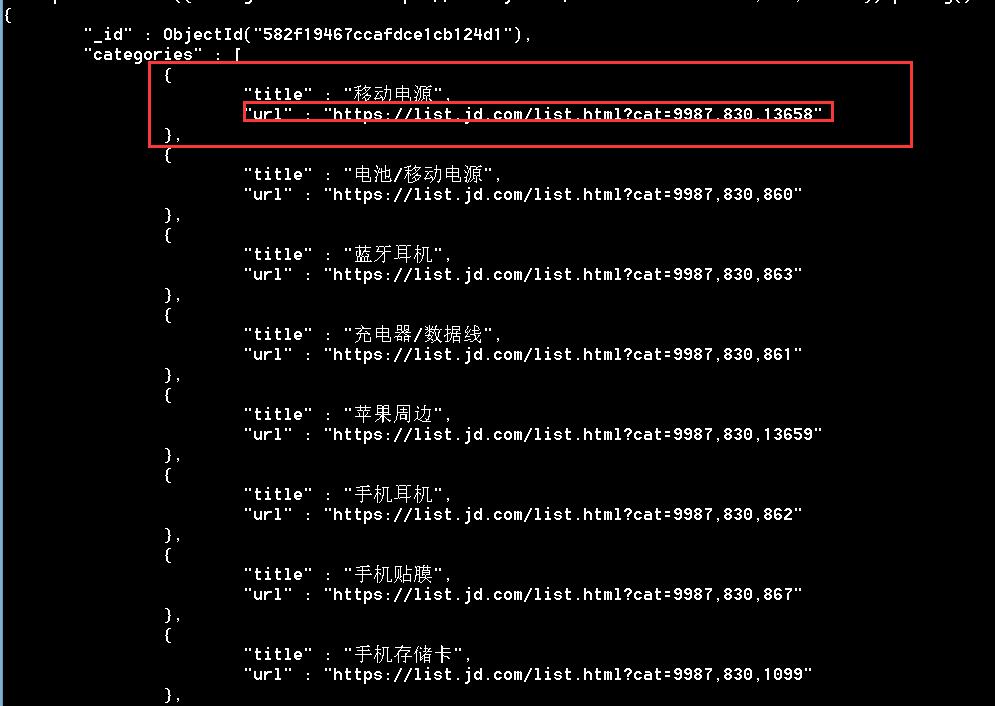
上面代码就可以实现通过获取到请求对象里边的url,因为url是唯一的,所以可以找到对应的类目的信息,如下图

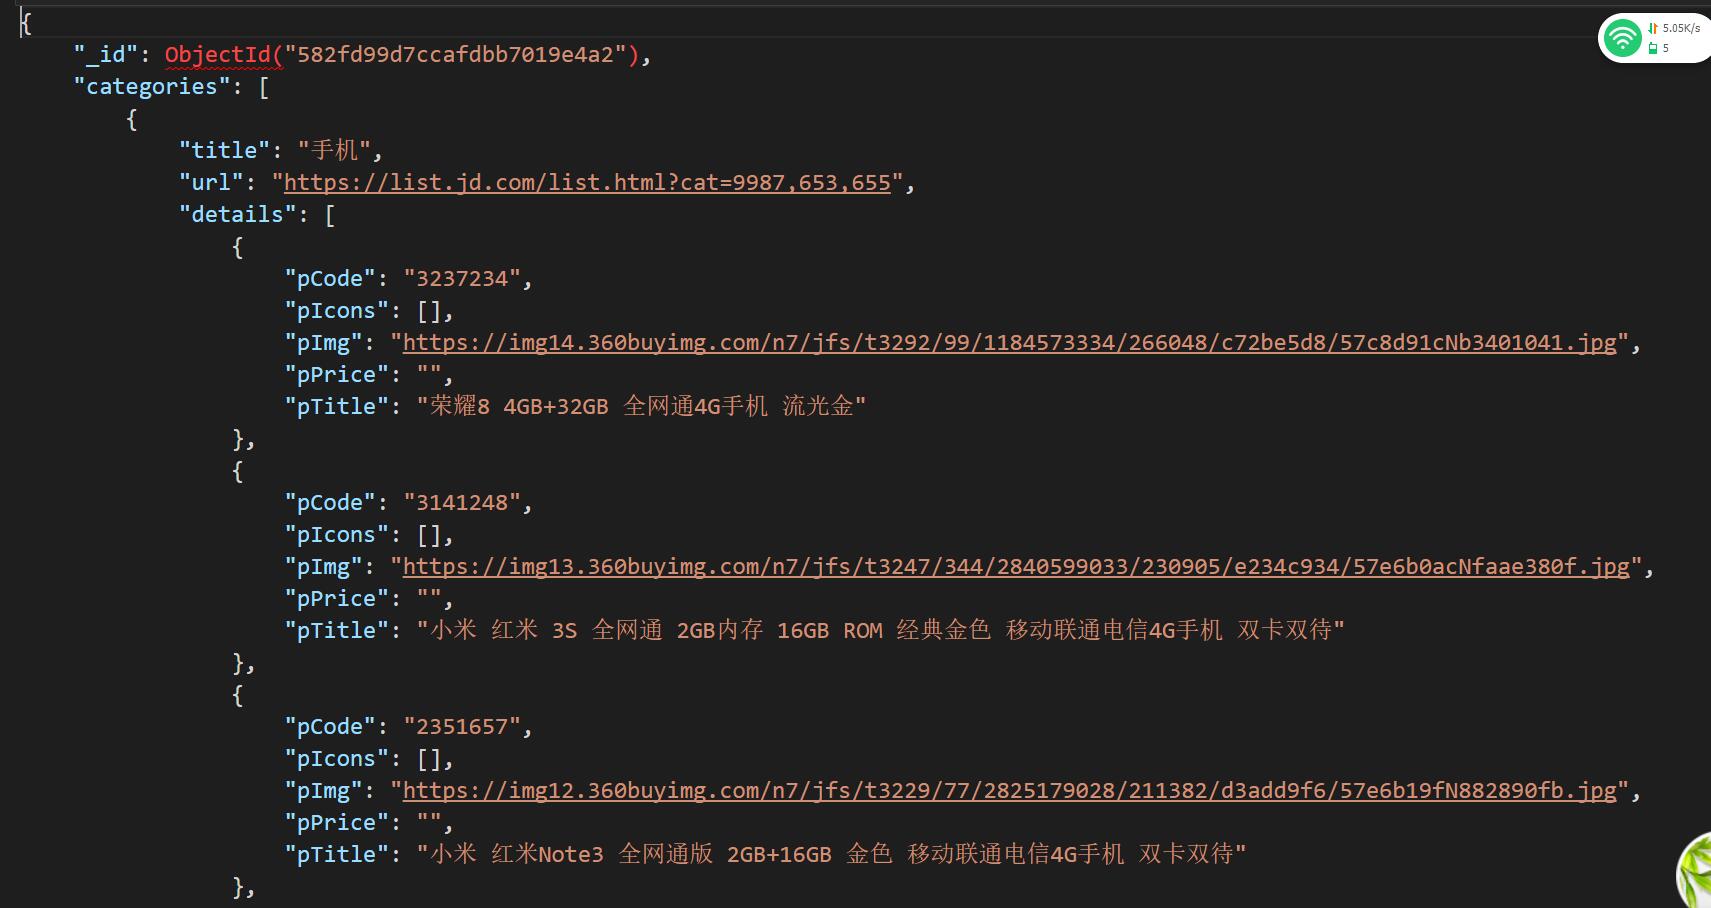
这样子就可以在这个记录下面把抓取到的商品详情列表插进去,表示该类目下面有这么多(60条)商品,保存进去之后,成下面的样子。

我们看下ProductDetail怎么实现的,这也是一个普通的HtmlBean,和上面的没有什么区别,都是规则抽取,然后把里边想要的数据给注入到bean的属性即可
public class ProductDetail implements HtmlBean {

    private static final long serialVersionUID = -6362237918542798717L;

    @Attr(value = "data-sku")
    @HtmlField(cssPath = "div.j-sku-item")
    private String pCode;

    @Image({ "data-lazy-img", "src" })
    @HtmlField(cssPath = "div.j-sku-item > div.p-img > a > img")
    private String pImg;


    //#plist > ul > li:nth-child(1) > div > div.p-price > strong:nth-child(1) > i
    @Text
    @HtmlField(cssPath = "div.j-sku-item > div.p-price > strong:nth-child(1) > i")
    private String pPrice;

    @Text
    @HtmlField(cssPath = "div.j-sku-item > div.p-name > a > em")
    private String pTitle;

    @Text
    @HtmlField(cssPath = "div.j-sku-item > div.p-comment > strong > a.comment")
    private String pComment;

    @Text
    @HtmlField(cssPath = "div.j-sku-item > div.p-shop > span > a")
    private String pShop;

    @Text
    @HtmlField(cssPath = "div.j-sku-item > div.p-icons > *")
    private List<String> pIcons;

    public String getpCode() {
        return pCode;
    }

    public void setpCode(String pCode) {
        this.pCode = pCode;
    }

    public String getpImg() {
        return pImg;
    }

    public void setpImg(String pImg) {
        this.pImg = pImg;
    }

    public String getpPrice() {
        return pPrice;
    }

    public void setpPrice(String pPrice) {
        this.pPrice = pPrice;
    }

    public String getpTitle() {
        return pTitle;
    }

    public void setpTitle(String pTitle) {
        this.pTitle = pTitle;
    }

    public String getpComment() {
        return pComment;
    }

    public void setpComment(String pComment) {
        this.pComment = pComment;
    }

    public String getpShop() {
        return pShop;
    }

    public void setpShop(String pShop) {
        this.pShop = pShop;
    }

    public List<String> getpIcons() {
        return pIcons;
    }

    public void setpIcons(List<String> pIcons) {
        this.pIcons = pIcons;
    }

}
到这里,基本上就已经实现了数据的抓取和入库了,从整体上来看,就只有一条数据,呈一棵树一样,这种结构如果用SQL数据库做的话,会存在大量自连接,造成很多数据冗余,因此,使用文档数据库是最好不过的了
如果这个对您有所帮助,请点个Star哟
源代码
代码已经上传到osc的代码仓库,由于本人网速不是非常好,因此并没有使用maven管理项目,所有所需的jar包也都在项目源码的lib包里边,点击源代码下载

**粗体** _斜体_ [链接](http://example.com) `代码` - 列表 > 引用。你还可以使用@来通知其他用户。