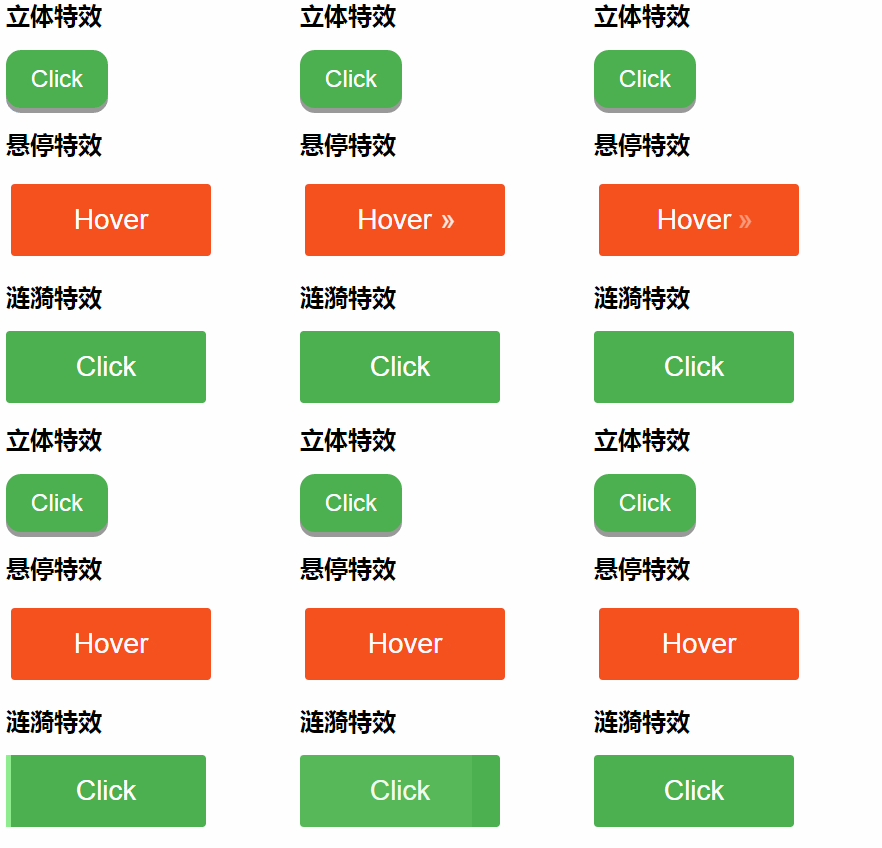
动效按钮
初衷:很多人在初学前端的时候都会问,“如何入门前端?”
同为在前端学习道路上,奋力追赶的一员,本人对于目前网络上所能看到的 “入门级” 的教材并不太满意。学习一门新知识,实例是尤其重要的。在这里本人整理了目前页面上常见功能实现的具体实例。愿能为大家提供一些帮助。
希望能够与大家互相分享,共同进步。
效果预览
HTML 部分
创建按钮
    <div>
        <h2>立体特效</h2>
        <button class="button pressed">Click</button>
    </div>
    <div>
        <h2>悬停特效</h2>
        <button class="button arrow">Hover</button>
    </div>
    <div>
        <h2>涟漪特效</h2>
        <button class="button ripple">Click</button>
    </div>
CSS 部分
设置.button样式
/*设置按钮样式*/
.button {
  padding: 15px 25px;
  font-size: 24px;
  text-align: center; /*内容居中*/
  cursor: pointer;    /*设置光标样式*/
  outline: none;      /*消除outline*/
  color: #fff;
  border: none;       /*消除border*/
}
为每个按钮单独设置样式
/*立体特效*/
.pressed {
  font-size: 24px;
  padding: 15px 25px;
  background-color: #4CAF50;
  border-radius: 15px;      /*设置边框圆角*/
  box-shadow: 0 5px #999;   /*设置阴影*/
}

.pressed:hover {
  background-color: #3e8e41; /*悬停变背景色*/
}

.pressed:active {
  background-color: #3e8e41;
  box-shadow: 0 2px #666;    /*点击后阴影变化*/
  transform: translateY(3px);/*点击后按钮沿着Y轴位移,位移量等于阴影变化量*/
}

/*悬停出现箭头特效*/
.arrow {
  font-size: 28px;
  padding: 20px;
  width: 200px;
  border-radius: 4px;
  background-color: #f4511e;
  margin: 5px;
}

.arrow span {
  position: relative; /*span相对定位,使span:after可以据其进行绝对定位*/
  transition: 0.5s;
}

.arrow span:after {
  content: '\00bb';  /*伪元素content编码*/
  position: absolute;/*根据span进行绝对定位*/
  opacity: 0;        /*透明度为0,正常状态下隐身*/
  top: 0;            /*拉高与span内文字同行*/
  right: -20px;      /*right为0时,箭头在span内文字最右边,与文字重合。用负值让箭头更靠右*/
  transition: 0.5s;
}

.arrow:hover span {
  padding-right: 25px; /*悬停时增加右边padding,给箭头留出空间*/
}

.arrow:hover span:after {
  opacity: 1;     /*hover时,箭头显现*/
  right: 0;       /*在span最右边,因为现在span右边有padding,所以不会与文字重合*/
}

/*涟漪特效*/
.ripple {
  position: relative; /*设置为相对定位*/
  background-color: #4CAF50;
  font-size: 28px;
  padding: 20px;
  width: 200px;
  border-radius: 4px;
  overflow: hidden;  /*让:after超出按钮边框部分隐藏*/
  text-decoration: none;
}

.ripple:after {
  content: "";
  background: #90EE90;
  display: block;      /*设置为块级元素,以可以设置尺寸*/
  position: absolute;  /*相对按钮绝对定位*/
  left: 0;             /*如果是right为0,则靠右边出现涟漪*/
  top: 0;
  padding-top: 100%;
  padding-right: 100%;
  opacity: 0;          /*默认状态下隐藏*/
  transition: all 0.8s
}

.ripple:active:after {
  padding-right: 0;   /*padding-right为0,使:after宽度为0*/
  opacity: 1;         /*点击时出现*/
  transition: 0s      /*点击时瞬间出现*/
}
/*点击时,:after瞬间出现,但是尺寸为0。
  点击完,在0.8s内,:after宽度增加,但是透明度逐渐为0。
  用此方法,实现涟漪效果。
*/
延展阅读: CSS伪元素;伪元素content编码
好啦,现在我们已经写完。
怎么样,是不是很简单。赶快打开浏览器看看吧!
在这里,只是给大家提供一种思路,参考。
具体的实现,每个人都可以有不同的方法。
请大家赶快发挥想象,把你最想实现的功能,在电脑敲出来吧!

**粗体** _斜体_ [链接](http://example.com) `代码` - 列表 > 引用。你还可以使用@来通知其他用户。