statistics
| source | download | download/month |
|---|---|---|
| npmjs.com |  |
 |
| npm.taobao.org |  |
|
| cnpmjs.org |  |
|
需求很简单:
- 可以放大任意一处我想放大的地方
- 可以移动,查看任意图片细节
- 支持网络图片和本地图片
技术实现
一、加载图片和获取图片尺寸
二、设置尺寸、放大到刚好满屏、居中
- react-native图片transform的缩放的中心点在图片的中心,因此,把图片先发居中就好
- 比较图片的长宽比和屏幕的宽高比,如果是图片比较宽那么就横向满屏,如果比较高就纵向满屏,如下图:
    /*
    * center and zoom to fit the window
    * @ _width: the picture width
    * @ _height: the picture height
    * */
    center(_width, _height){
        let {width, height} = Dimensions.get('window'),
            rateImage = _width/_height,
            rateWindow = width/height,
            top,
            left,
            scale
        if (rateImage > rateWindow) {
            scale = width/_width
        } else {
            scale = height/_height
        }
        top = (height - _height)/2
        left = (width - _width)/2
        this.setState({
            left,
            top,
            width:_width,
            height: _height,
            scale,
            rate: scale
        })
    }
三、准备移动和缩放动作
1.设置两个变量来记录(上一次手指的和缩放的)状态
        this._touches = [
            {},
            {}
        ]
        this._zoom = undefined
2.每次动作结束之后清除状态
            onPanResponderRelease: (evt, gestureState) => {
                // reset
                this._touches = [
                    {},
                    {}
                ]
                this._zoom = undefined
            }
3.每次开始触摸的时候的时候记录状态
// touche start
onPanResponderGrant:(evt, gestureState) => {
    // mark touches info
    for (let x in this._touches) {
    if (evt.nativeEvent.touches[x]) {
        this._touches[x].x = evt.nativeEvent.touches[x].pageX
        this._touches[x].y = evt.nativeEvent.touches[x].pageY
        this._touches[x].identifier = evt.nativeEvent.touches[x].identifier
        }
    }
},
4.每次移动的时候,如果没有记录状态就记录状态,如果有记录就开始做动作啦↓↓↓
四、移动图片
1.这个很简单,只要图片跟着手指动就可以了,因为缩放变换的中心是图片的中心,所以只需要简单的改变left 和 top 就可以了,??
// compute the distance has touch moved
let moveX = evt.nativeEvent.touches[0].pageX - this._touches[0].x
let moveY = evt.nativeEvent.touches[0].pageY - this._touches[0].y
// set the state
this.state.left += moveX
this.state.top += moveY
this.setState({
    left: this.state.left,
    top: this.state.top
})
五、 放大图片
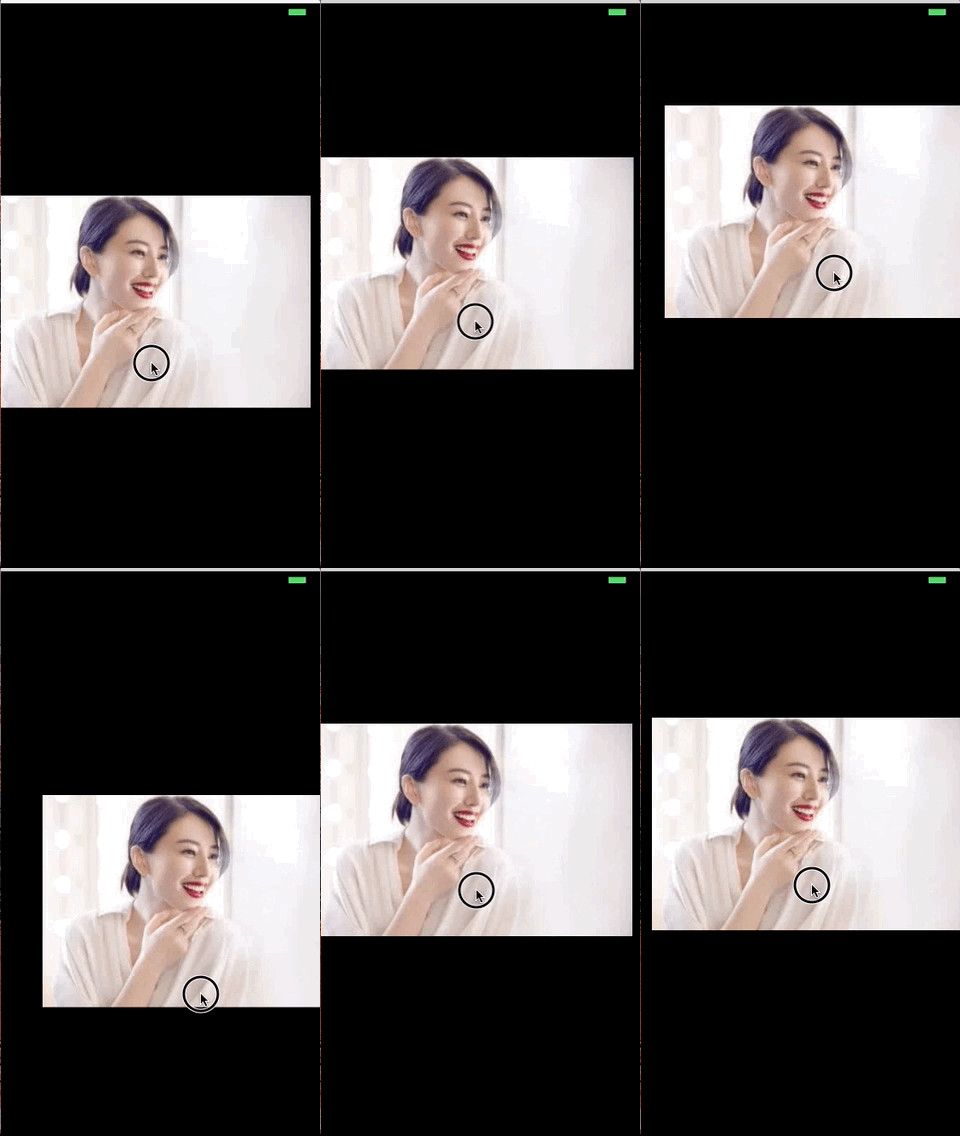
一个宗旨:图片跟着手指动。什么意思呢?看图吧!
合理的解释:缩放操作时,上面的始终触点在圆圆的眼睛上面(对不起圆圆了),下面的触点始终在中指戒指上一点点。
1、缩放比例计算(以上图为例)
// 缩放前,戒指到眼睛的距离为 d,这个是图片的真实距离
// 屏幕上,戒指到眼睛的距离为D
// 缩放比例为 S,屏幕的尺寸/图片的尺寸
// 因此有个等式
d * S = D
// 那么,在新的位置
dn * Sn = Dn
// 在图片中,dn是相等的
// 因此,解个方程可以得到
Sn = Dn/D * S
// Dn 和 D 分别可以有 新的触点的坐标 和 旧的 触点的坐标 表示,S已知
// 这样我们就得到了 新的缩放比例 和 触点坐标的关系了
2、图片位置的计算 (已上图为例)
刚刚已经说到,RN变换的中心点是图片的中心,那么,我要放大一个角落的位置,如何让图片看起来是以这个角落为缩放中心呢?改变left 和 top 就可以了。
// 以left为例,top同理可得
// 上图中,两个触点的连线的中点位置大约是圆圆的第二颗牙齿(下面称为牙齿)
// 设牙齿的X坐标为 X (屏幕的坐标)
// 牙齿在图片中距离图片中线的距离为 d
// 图片的实际宽度为w
// 图片的位置为l(事实上为放大前的左边距)
// 缩放比例为 S,屏幕的尺寸/图片的尺寸
// 图片的缩放中心是图片的中心,因此有一个等式:
X = (0.5 * w + l) - d * S
// 那么对于新的位置也有一样的等式
Xn = (0.5 * wn + ln) - dn * Sn
// 事实上就,X的位置不变,d的位置不变,w也不会变,那么就有等式了
(0.5 * w + l) - d * S = (0.5 * w + ln) - d * Sn
// 由这里就可以解出ln 和 l , S ,Sn的关系了。
// l,S已知,Sn上面已经算出来了
结语
到此整个思路已经出来了,代码看github。
不过这也是为了满足自己的开发需求,没有开放很多可定制的内容。
最后为了装个X(学英语??),写英文的README


**粗体** _斜体_ [链接](http://example.com) `代码` - 列表 > 引用。你还可以使用@来通知其他用户。