1 要实现的功能
我们使用React开发项目的时候,基本上是单页面应用,也就离不开路由。路由看似神秘,当我们简单的模拟一下它的核心功能后,发现也就这么回事儿。本文就详细的介绍一下react-router-dom 的 HashRouter的核心实现逻辑。
本文实现的功能主要包含:
HashRouterRouteLinkMenuLinkSwitchRedirect
2 实现的逻辑
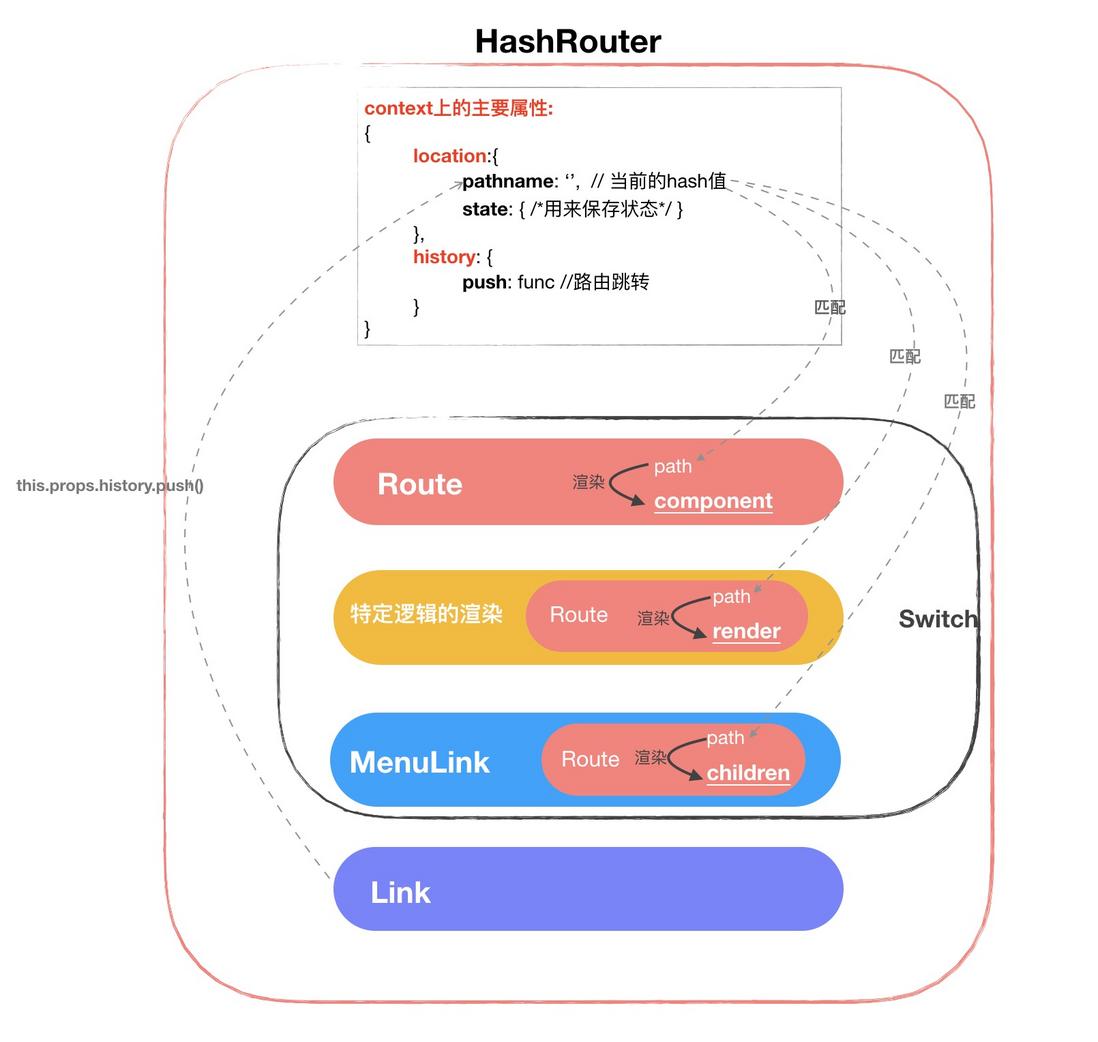
先不说代码是怎样写的,先上图,让大家看一下这个HashRouter到底是个什么东东:
好吧,肯定有人会说这些圈圈又是什么东东呀,客官不要着急,待我慢慢解释:
-
HashRouter是一个大的容器,它控制着他自己到底渲染成什么样子,那么它是通过什么控制的呢,看它的名字就能猜出来,那就是window.location.hash。 - 当
HashRouter开始渲染的时候就会拿它自己身上的pathname属性跟它肚子里的Route的path进行匹配,匹配上的话,就会渲染Route的component对应的组件。 -
Link是怎样切换路由的呢,很简单,就是通过this.props.history.push(path)来改变HashRouter中的pathname属性,进而驱动Route们进行重新渲染,再次匹配我们的路由,最终实现路由的切换。
介绍了一下简单的逻辑,接下来我们就看一下具体是怎样实现的吧,如下图:
-
HashRouter是一个继承了React.Component的类,这个类上的state包括location,监听着hash的变化以驱动Route组件的重新渲染,另外还有一个history属性,可以切换页面的路由。 - 本文要实现的功能中包括
Route、Link、MenuLink、Switch、Redirect,其中Route的是基础是核心,MenuLink和某些有特定逻辑的渲染都是在Route的基础上实现的。 -
Route组件上可以接收三种变量,包括component、render、children,其中render、children是都是函数,render是根据特定的逻辑渲染元素,children是用来渲染MenuLink,这两个函数都接收当前路由的props,函数的返回值是要渲染的元素。 -
Switch实现的逻辑是,返回children中跟hash匹配到的第一个“孩子”。
3 具体的代码逻辑
(1) HashRouter
HashRouter将window.loacation.hash跟自己的state挂钩,通过改变自己的state驱动页面的重新渲染。
import React, {Component} from 'react';
import PropTypes from 'prop-types';

export default class HashRouter extends Component {
    constructor() {
        super();
        this.state = {
            location: {
                pathname: window.location.hash.slice(1) || '/', // 当前页面的hash值
                state: {}   //保存的状态
            }
        };
    }

    // 定义上下文的变量类型
    static childContextTypes = {
        location: PropTypes.object,
        history: PropTypes.object
    }

    // 定义上下文的变量
    getChildContext() {
        return {
            location: this.state.location,
            history: {
                push: (path) => { // 就是更新 window.hash值
                    if (typeof path === 'object') {
                        let {pathname, state} = path;
                        this.setState({
                            location: {
                                ...this.state.location,
                                state // {from: '/profile'}
                            }
                        }, () => {
                            window.location.hash = pathname;
                        })
                    } else {
                        window.location.hash = path;
                    }
                }
            }
        }
    }

    render() {
        return this.props.children; // 渲染页面元素
    }

    componentDidMount() {
        window.location.hash = window.location.hash.slice(1) || '/';
        // 监听window的hash的变化,驱动页面的重新刷新
        window.addEventListener('hashchange', () => {
            this.setState({
                location: {
                    ...this.state.location,
                    pathname: window.location.hash.slice(1) || '/'
                }
            });
        })
    }
}
(2) Route
Route的渲染核心逻辑就是将自己的path和当前页面的hash进行匹配,匹配上了就渲染相应的元素,匹配不上就什么都不渲染。
import React, {Component} from 'react';
import PropTypes from 'prop-types';
import pathToRegexp from 'path-to-regexp'

export default class Route extends Component {
    // 定义上下文context的类型
    static contextTypes = {
        location: PropTypes.object,
        history: PropTypes.object
    }

    render() {
        // 解构传入Route的props
        let {path, component: Component, render, children} = this.props;

        // 解构上下文的属性
        let {location, history} = this.context;
        let props = {
            location,
            history
        };

        // 将传入Route的path和当前的hash进行匹配
        let keys = [];
        let regexp = pathToRegexp(path, keys, {end: false});
        keys = keys.map(key => key.name);

        let result = location.pathname.match(regexp);

        if (result) { // 匹配上了
            let [url, ...values] = result;
            props.match = {
                path,
                url,
                params: keys.reduce((memo, key, index) => { // 获取匹配到的参数
                    memo[key] = values[index];
                    return memo;
                }, {})
            };

            if (Component) { // 普通的Route
                return <Component {...props} />;
            } else if (render) { // 特定逻辑的渲染
                return render(props);
            } else if (children) { // MenuLink的渲染
                return children(props);
            } else {
                return null;
            }
        } else { // 没有匹配上
            if (children) { // MenuLink的渲染
                return children(props);
            } else {
                return null;
            }
        }
    }
}
(3) Redirect
Redirect就干了一件事,就是改变HashRouter的state,驱动重新渲染。
import React, {Component} from 'react';
import PropTypes from 'prop-types';

export default class Redirect extends Component {
    // 定义上下文context的Type
    static contextTypes = {
        history: PropTypes.object
    }

    componentDidMount() {
        // 跳转到目标路由
        this.context.history.push(this.props.to);
    }

    render() {
        return null;
    }
}
(4) MenuLink
import React, {Component} from 'react';
import Route from "./Route";
import Link from './Link'

export default ({to, children}) => {
    // 如果匹配到了,就给当前组件一个激活状态的className
    return <Route path={to} children={props => (
        <li className={props.match ? "active" : ""}>
            <Link to={to}>{children}</Link>
        </li>
    )
    }/>
}
(5) Link
Link就是渲染成一个a标签,然后给一个点击事件,点击的时候更改HashRouter的状态,驱动重新渲染。
import React, {Component} from 'react';
import PropTypes from 'prop-types';

export default class Link extends Component {
    static contextTypes = {
        history: PropTypes.object
    }

    render() {
        return (
            <a onClick={() => this.context.history.push(this.props.to)}>{this.props.children}</a>
        )
    }
}
(6) Switch
import React, {Component} from 'react';
import PropTypes from 'prop-types';
import pathToRegexp from 'path-to-regexp';

export default class Switch extends Component {
    static contextTypes = {
        location: PropTypes.object
    }

    render() {
        let {pathname} = this.context.location;

        let children = this.props.children;
        for (let i = 0, l = children.length; i < l; i++) {
            let child = children[i];
            let path = child.props.path;

            if (pathToRegexp(path, [], {end: false}).test(pathname)) {
                // 将匹配到的第一个元素返回
                return child;
            }
        }
        return null
    }
}
4 写在最后
好了,这几个功能介绍完了,你是否对HashRouter的原理有所了解了呢?本文只是贴出部分代码,如果有需要请看demo可以手动体验一下哦。
参考文献:


**粗体** _斜体_ [链接](http://example.com) `代码` - 列表 > 引用。你还可以使用@来通知其他用户。