由于公司业务需求的需要,在这一周需要开发小程序,加急看了下小程序的文档,发现用其原生来编写程序不是很顺手,公司前端用的技术栈是vue, 询问了谷哥和度娘发现大部分推荐了 wepy和 mpvue,对比了两个框架,还是选用了 mpvue, 因为 mpvue 继承自 vue.js,其技术规范和语法特点与 Vue.js 保持一致。
快速搭建 mpvue 目录
// 全局安装 vue-cli
$ npm install --global vue-cli
// 创建一个基于 mpvue-quickstart 模板的新项目
$ vue init mpvue/mpvue-quickstart wx-mpvue-demo
// 安装依赖
$ cd wx-mpvue-demo
$ npm install
// 启动构建
$ npm run dev
一个简单的工程目录就搭建完成了。
封装自己的公用模块
1.封装Totast
由于小程序原生的消息提示实在是让人崩溃,所以我们先自己来封装下 totast, 在 util目录新建 totast.js
class toast {
  static msg (title, {icon = 1}) {
    wx.showToast({
      title,
      icon: ['success', 'none'][icon]
    })
  }
  static confirm ({title = '提示', content, callback}) {
    wx.showModal({
      title,
      content,
      success: function (res) {
        if (res.confirm) {
          callback(res.confirm)
        } else if (res.cancel) {
          console.log('用户点击取消')
        }
      }
    })
  }
}

export default toast我们挂载到main.js中, 在组件里可以方便调用
import toast from './utils/toast'
Vue.prototype.$totast = toast
2.封装 publicRequest
小程序的网路请求不是很方便,我们也对其封装一下。
import totast from './toast'

const Authorization = 'Bearer xxx'
class publicRequest {
  static get ({url, data = {}, isJson = false, hasToken = true, header}) {
    let hasNetWork = checkNetWork()

    if (!hasNetWork) {
      totast.msg('网路异常', {})
      return false
    }

    let contentType = isJson ? 'application/json' : 'application/x-www-form-urlencoded'
    let _authorization = hasToken ? {'Authorization': Authorization} : {}
    let _header = Object.assign({'content-type': contentType}, _authorization, header)
    wx.showLoading({title: '加载中...'})
    return new Promise((resolve, reject) => {
      wx.request({
        url,
        header: _header,
        dataType: 'json',
        method: 'GET',
        data,
        success: (res) => {
          if (res.statusCode === 200) {
            resolve(res.data)
          }
        },
        fail: (error) => {
          totast.msg(error.errMsg, {})
          reject(error)
        },
        complete: res => {
          if (res.statusCode !== 200) {
            totastMessage({
              statusCode: res.statusCode,
              message: res.data.msg
            })
          }
          wx.hideLoading()
        }
      })
    })
  }
  static post ({url, data = {}, isJson = false, hasToken = true, header}) {
    let hasNetWork = checkNetWork()

    if (!hasNetWork) {
      totast.msg('网路异常', {})
      return false
    }
    let contentType = isJson ? 'application/json' : 'application/x-www-form-urlencoded'
    let _authorization = hasToken ? {'Authorization': Authorization} : {}
    let _header = Object.assign({'content-type': contentType}, _authorization, header)
    wx.showLoading({title: '加载中...'})
    return new Promise((resolve, reject) => {
      wx.request({
        url,
        header: _header,
        method: 'POST',
        data,
        dataType: 'json',
        success: (res) => {
          resolve(res.data)
        },
        fail: (error) => {
          totast.msg(error.errMsg, {})
          reject(error)
        },
        complete: res => {
          if (res.statusCode !== 200) {
            totastMessage({
              statusCode: res.statusCode,
              message: res.data.msg
            })
          }
          wx.hideLoading()
        }
      })
    })
  }
}
const checkNetWork = function () {
  return new Promise(resolve => {
    wx.getNetworkType({
      success: res => {
        let networkType = res.networkType;
        if (networkType === 'none' || networkType === 'unknown') {
          resolve(false)
        } else {
          resolve(true)
        }
      },
      fail: () => {
        resolve(false)
      }
    })
  })
}
const totastMessage = function ({statusCode, message}) {
  switch (statusCode) {
    case 502:
      totast.msg('服务器异常', {})
      break
    default:
      totast.msg(message, {})
      break
  }
}
export default publicRequest
我们呢也对其挂载到 vue 上去。
import publicRequest from './utils/publicRequest'
Vue.prototype.$http = publicRequest
3.扫一扫的调用
我们先公用出扫一扫
const handleScan = function () {
  return new Promise((resolve, reject) => {
    wx.scanCode({
      success: (res) => {
        console.log(res)
        resolve(res)
      },
      fail: error => {
        reject(error)
      }
    })
  })
}
export default handleScan
公用出来后挂载到我们的 vue 上后可以在组件里直接调用 this.$handleScan,如
methods: {
  async scanCodeInfo () {
    let goods = await this.$handleScan()
    console.log(goods)
    this.codeInfo = goods.result
  }
}4.如何引入iconfont图标
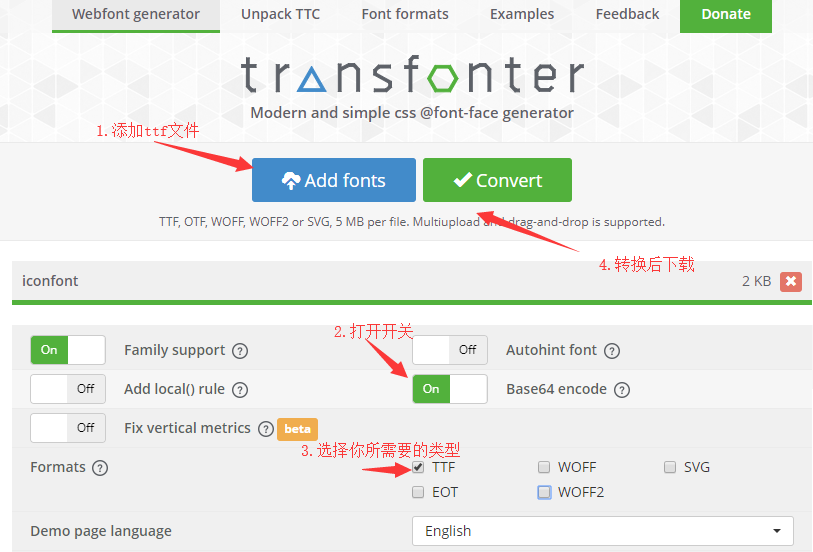
因为小程序的wxss文件的font-face的url不接受http地址作为参数,但可以接受base64,因此需将字体文件下载后,转换为base64,然后引用。
所以我们可以在阿里巴巴图标库下载下来,将iconfont.ttf转换。转换地址:https://transfonter.org/
下载文件后解压得到stylesheet.css文件,将此文件引入到项目。最后写一个公用的样式:
.icon:after{
  font-family: 'iconfont';
  font-weight: lighter;
  font-style: normal;
}

.icon-saoyisao:after { content: "\e7c7"; }

.icon-hebingxingzhuang:after { content: "\e61a"; }
就可以使用了。
现在我们可以愉快的使用其开发了,如果对 vue开发比较熟悉的话,完全迁移过来是没有问题的。最后附上项目demo和原文地址
每个人都有第一次,哈哈~这就是我的第一次写文章,不到之处,望指正。

**粗体** _斜体_ [链接](http://example.com) `代码` - 列表 > 引用。你还可以使用@来通知其他用户。