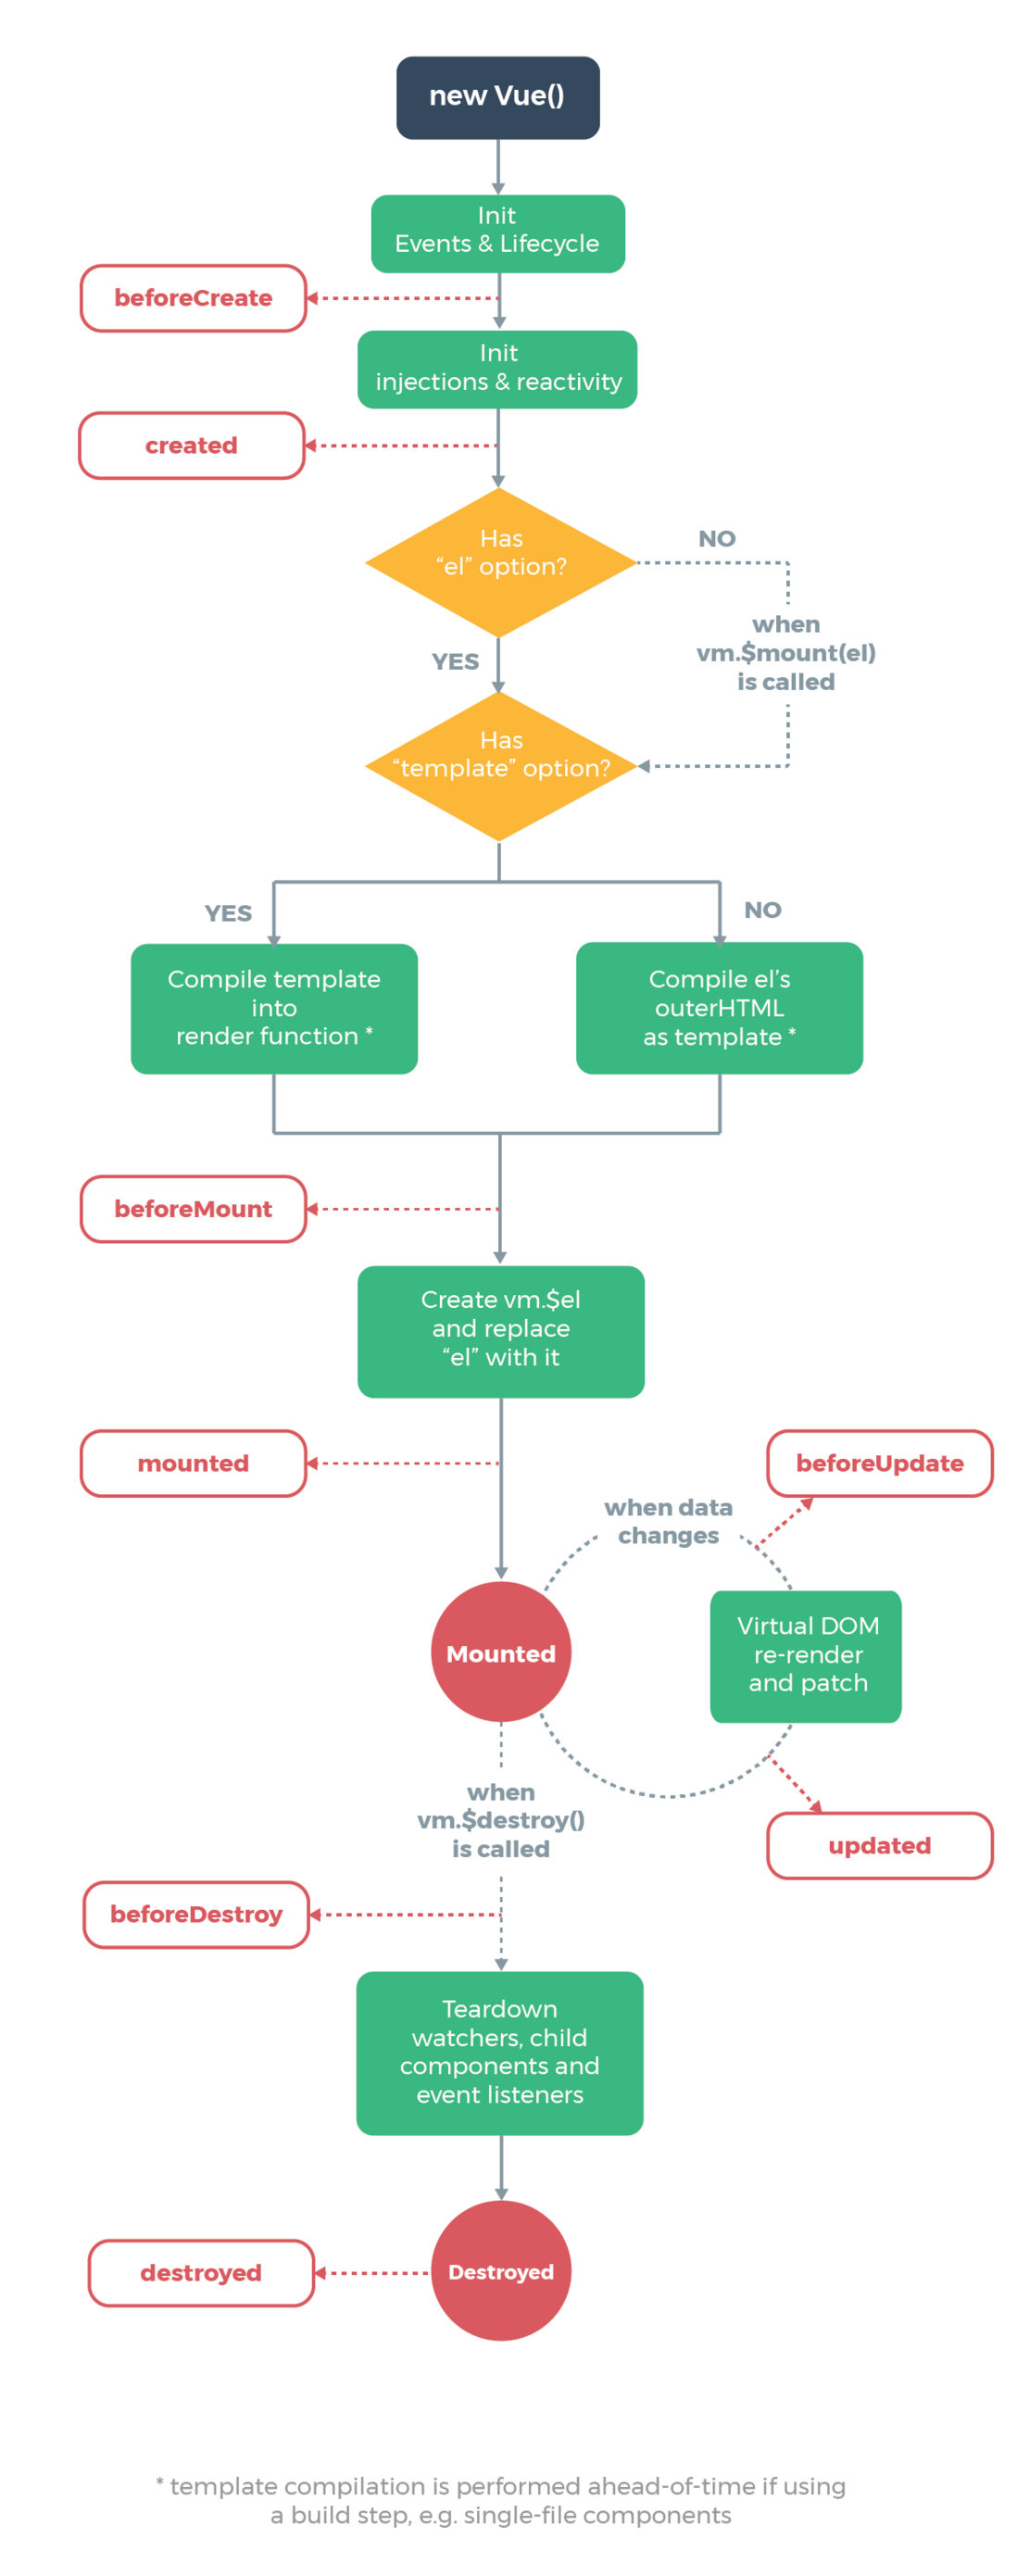
1.vue的开始
var vm = new Vue({
    el: '#app',        //            el: 用来挂载 Vue 实例的元素
    data: {},          //          data: 要绑定的资料
    props: {},         //         props: 用来接收外部资料的属性
    methods: {},       //       methods: 用来定义在 Vue 实例内使用的函数(方法)
    watch: {},         //         watch: 用来观察 Vue 实例内资料的变动
    computed: {},      //      compoted: 自动为内部资料计算过的属性
    template: "...",   //      template: 提供 Vue 实例编译后的样板
    components: {}     //    components: 用来定义子元件
});
2.组件注册
组件注册分为两种:局部注册 和 全局注册
2.1 组件局部注册
<div class="app">
    <my-component></my-component>
    <my-component></my-component>
    <my-component></my-component>
    <my-component></my-component>
</div>

<script>
    // 组件的局部注册,在 new Vue() 里面
    var app = new Vue({
        el: '.app',
        components: {
            //  注册组件
            'my-component': {
                template: '<div class="myComponent">这是一个注册组件</div>'
            }
        }
    });
</script>
2.2 组件全局注册
<div class="se_app">
    <global-component></global-component>
</div>

<script>
    // 组件的全局注册
    Vue.component('global-component', {
        template: '<div class="global">这是一个全局注册的组件</div>'
    });


    var se_app = new Vue({
        el: '.se_app'
    });
</script>
2.3 复杂组件的打包?
// 子组件怎么做?怎么用?


// 对于复杂的组件,可以将其用下面的方法打包
var app2 = new Vue({
    el: '.app2',
    components: {
        CustomHeader: Vue.extend({        // extend 是构造一个组件的语法器. 你给它参数 他给你一个组件
            template: '<div class="header">header</div>'
        }),

        CustomMain: Vue.extend({
            template:
                '<div class="Main">' +
                  '<div style="margin: 10px;">Main</div>' +
                  '<custom-block></custom-block>' +
                  '<custom-block></custom-block>' +
                  '<custom-block></custom-block>' +
                  '<custom-block></custom-block>' +
                  '<custom-block></custom-block>' +
                  '<custom-block></custom-block>' +
                  '<custom-block></custom-block>' +
                '</div>',
            components: {
                CustomBlock: Vue.extend({
                    template: '<div class="block">B</div>'
                })
            }
        }),

        CustomAside: Vue.extend({
            template: '<div class="aside">Aside</div>'
        })
    }
});
3.将网页模板封装成 Component
3.1 将 HTML 模板封装在js中
    var CustomMain = Vue.extend({
        template:
            '<div class="Main">' +
              '<div style="margin: 10px;">Main</div>' +
              '<custom-block></custom-block>' +
              '<custom-block></custom-block>' +
              '<custom-block></custom-block>' +
              '<custom-block></custom-block>' +
              '<custom-block></custom-block>' +
            '</div>',
        components: {
            CustomBlock
        }
    });
3.2 将 HTML 模板封装在HTML的Script标签中
<div id="app3">
    <my-component></my-component>
</div>

<script type="text/x-template" id="my-components">
    // 模板的最外层只能有一个标签包着(根节点)
    <div>
        <div class="component">1 A custom component of Vue!</div>
        <div class="component">2 A custom component of Vue!</div>
        <div class="component">3 A custom component of Vue!</div>
        <div class="component">4 A custom component of Vue!</div>
    </div>
</script>

<script>
    Vue.component('my-component', {
        template: '#my-components'
    });

    // create a root instance 创建一个根实例
    new Vue({
        el: '#app3'
    })
</script>
3.3 render function ?
Vue的template模板 其实最后会被vue引擎编译为 render function,最终渲染到网页上
4.Vue元件生命周期
<div id="app">
    <h1>{{ count }}</h1>
    <button @click="updateEvent">Update</button>
</div>

<button id="del">Del</button>


<script>
    var vm = new Vue({
        el: '#app',
        data: {
            count: 0
        },

        methods: {
            updateEvent: function(){
                this.count += 1;
            }
        },

        beforeCreate: function(){
            // 元件实体刚被建立,属性计算之前。
            console.log('beforeCreate - this.count: ', this.count);        // undefined
            console.log('beforeCreate - this.$el: ', this.$el);            // undefined
        },
        created: function(){
            // 元件实体已建立,属性已绑定,但 DOM 还没生成。
            console.log('created - this.count: ', this.count);            // 0
            console.log('created - this.$el: ', this.$el);                // undefined
        },
        beforeMount: function(){
            // 模板 (template) 编译或挂载至 HTML 之前                    // DOM内的代码仍然是Vue源码,DOM内的 data 属性尚未编译,仍是{{ count }}
            console.log('beforeMount - this.$el: ', this.$el);        // <div id="app"></div>
        },
        mounted: function(){
            // 模板 (template) 编译或挂载至 HTML 之后                    // DOM内的代码已编译,DOM内的 data 属性尚已编译,替换为需要的 0
            console.log('mounted - this.$el: ', this.$el);            // <div id="app"></div>
        },
        beforeUpdate: function(){
            // 元件被更新之前
            console.log('beforeUpdate: ',
                this.$el.querySelector('h1').innerText,
                this.count );
        },
        updated: function(){
            // 元件被更新之后
            console.log('updated: ',
                this.$el.querySelector('h1').innerText,
                this.count );
        },
        // activated: function(){
        //     // keep-alive 用,元件被启动时呼叫
        // },
        // deactivated: function(){
        //     // keep-alive 用,元件被移除时呼叫
        // },
        beforeDestroy: function(){
            // 移除 vue instance (实例) 之前
            console.log('beforeDestroy');
        },
        destroyed: function(){
            // 移除 vue instance (实例) 之后
            console.log('destroyed');

            // destroy 做的事情就是,把 watch,child components 和 event listeners 拿掉,
            // 让 vue 和 DOM 脱钩(不相互关联),但是不会移除它生成的 DOM,这个 vue 实例无法再对DOM操作
        }
    });

    document.getElementById('del').addEventListener('click',function(){
        vm.$destroy();
    })


    // Vue.js 教學 - 從 Vuejs 初探 Web Component 的世界 (HD)
    // https://www.youtube.com/watch?v=T2JsTE0Hq58&list=PLYrA-SsMvTPNPhv8KeSNtPTY8q85-SSJA&index=3
    // 40:22
    // 2018-10-12 19:17:25
</script>
4.2追踪物件变化
Object.defineProperty() 的MDN文档
资料变动检测
5.props 从外部接受指定的资料
// props 案例1

<div id="app">
    <my-component v-bind:parent-msg="msg"></my-component>
</div>

<script type="text/x-template" id="my-component">
    <div class="component">
        <div> ParentMsg: {{ parentMsg }} </div>
        <div> ChildMsg: {{ msg }} </div>
    </div>
</script>

<script>
    // register
    Vue.component("my-component", {
        props: ["parentMsg"],
        template: "#my-component",
        data: function(){
            return {
                msg: "Msg of child!"
            }
        }
    });

    new Vue({
        el: "#app",
        data: {
            msg: "Msg of parent!"
        }
    });
</script>
// props 案例2
<div id="myApp">
<h1>你的成绩评价</h1>
<test-result :score="50"></test-result>
<test-result :score="65"></test-result>
<test-result :score="90"></test-result>
<test-result :score="100"></test-result>
</div>
<script>
Vue.component('test-result', {
props: ['score'],
template: '<div><strong>{{score}}分,{{testResult}}</strong></div>',
computed: {
testResult: function(){
var strResult = "";
if (this.score < 60)
strResult = '不及格';
else if (this.score < 90)
strResult = '中等生';
else if (this.score <= 100)
strResult = '优秀生';
return strResult;
}
}
});
var myApp = new Vue({
el: "#myApp"
})
</script>5.1 Prop 接收参数验证
组件可以为 props 指定验证要求。如果未指定验证要求,Vue 会发出警告。当组件给其他人使用时这很有用。
prop 是一个对象而不是字符串数组时,它包含验证要求:
<div id="app">
    <my-component :pro-c="msg" :prop-d="num"></my-component>
</div>

<script type="text/x-template" id="my-component">
    <div class="component">
        {{ propD }}
    </div>
</script>

<script>
    // 09-data-props-validation

    // register
    Vue.component("my-component", {
        props: {
            parentMsg: null,    // null 代表不验证类别
            propA: Number,      // 限定数字
            propB: [String, Number],    // 多重条件可用 [] 隔开
            propC: {
                // 必要栏位,且限定字串类别
                type: String,
                require: true
            },
            propD: {
                // 数字类型,且有预设值
                type: Number,
                default: 100
            },
            propE: {
                // Object 类型,代表可接受的是对象或者数组
                type: Object,
                default: function(){
                    return {
                        message: 'hello'
                    }
                }
            },
            propF: {
                // 自定义的条件验证
                validator: function(value){
                    return value > 10
                }
            }
        },
        template: '#my-component',
        data: function(){
            return {
                msg: 'Msg of Child!'
            }
        }
    });

    // a root instance  一个根实例
    new Vue({
        el: '#app',
        data: {
            msg: 'true',
            num: 123456
        }
    });
</script>
5.2 单向数据流
所有的 prop 都使得其父子 prop 之间形成了一个单向下行绑定:父级 prop 的更新会向下流动到子组件中,但是反过来则不行。这样会防止从子组件意外改变父级组件的状态,从而导致你的应用的数据流向难以理解。
额外的,每次父级组件发生更新时,子组件中所有的 prop 都将会刷新为最新的值。这意味着你不应该在一个子组件内部改变 prop。如果你这样做了,Vue 会在浏览器的控制台中发出警告。
<div id="app">
    单向数据流:<br>
    Parent: {{ message }} <input v-model="message">

    <hr>

    Child:
    <my-component :parent-message="message"></my-component>

</div>


<script>
    Vue.component("my-component", {
        props: {
            parentMessage: String
        },
        template: "<span>{{ parentMessage }}<input v-model='message'></span>",
        data: function(){
            return {
                message: this.parentMessage
            }
        }
    })

    var vm = new Vue({
        el: "#app",
        data: {
            message: "hello!"
        }
    });
</script>


**粗体** _斜体_ [链接](http://example.com) `代码` - 列表 > 引用。你还可以使用@来通知其他用户。