原文:Pause Your Code With Breakpoints
作者:Kayce Basques Chrome DevTools & Lighthouse技术作家
参考这份指南,结合自己手上的vue项目进行实践,可以说对原指南进行了plus,因为实践过程中会有很多指南之外的新发现。
主要内容包括如下:
- 预览几种不同的breakpoint类型
-
代码行级(Line-of-code)断点
- 代码里的某一行上打断点
- 有条件的行级断点
- 管理行级断点
-
DOM变化级断点
- 几种不同的DOM级断点
- XHR/Fetch断点
- 事件Listener断点
- Exception 断点
-
Function 断点
- 确保目标函数在作用域中
- Feedback
使用breakpoints去为我们的JavaScript代码打断点。这个指南涉及了在DevTools上适用的每一种breakpoint类型,并且会讲解如何使用并设置每种类型的断点。如果是想学习如何在Chrome DevTools上调试代码,可以看Get Started with Debugging JavaScript in Chrome DevTools
预览几种不同的breakpoint类型
众人皆知的breakpoint类型是line-of-code。但是line-of-code型breakpoint有的时候没法设置(其实就是没法在代码左边点出一个绿点来),或者如果你正在使用一个大型的代码库。通过学习如何和何时使用这些不同类型的breakpoint debug,会大大节约你的时间。
| 断点类型 | 当你想Pause的时候使用 |
|---|---|
| Line-of-code | 代码具体某一行(其实就是没法在代码左边点出一个绿点来) |
| Conditional line-of-code | 代码具体某一行,但是只有在一些条件为true时 |
| DOM | 在改变或者移除一个DOM节点或者它的DOM子节点时 |
| XHR | 当一个XHR URL包含一个string pattern |
| Event Listener | 在运行了某个特定事件后的代码上,例如click事件触发 |
| Exception | 在抛出了一个caught或者uncaught的exception时 |
| Function | 当一个函数被调用时 |
Line-of-code breakpoints
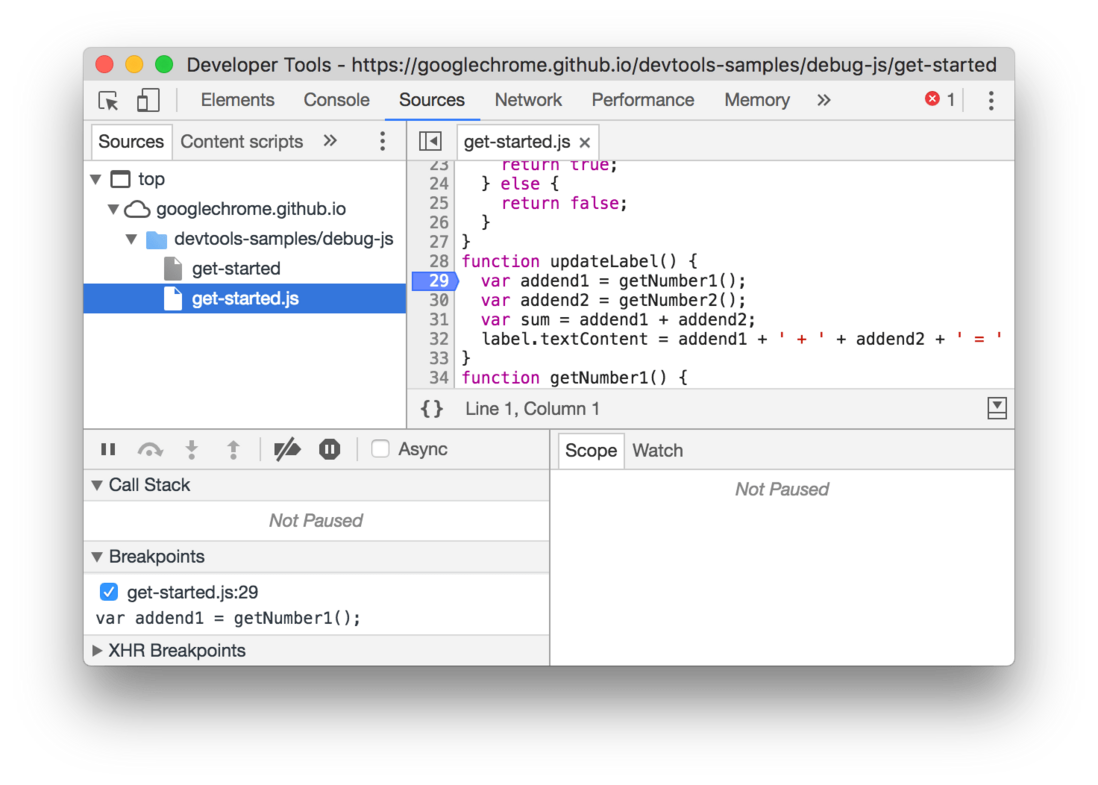
如果你知道自己想在哪一具体的代码行检查代码,会用到line-of-code breakpoint。DevTools会在这行代码执行前暂停住。
为了在DevTools某一行设置断点:
- 1.点击Scources tab
- 2.打开包含你想打断点的文件
- 3.跳到那一行
- 4.点击那一行的左边,一个蓝色或者绿色的图标
图1: 在某一行设置一个断点
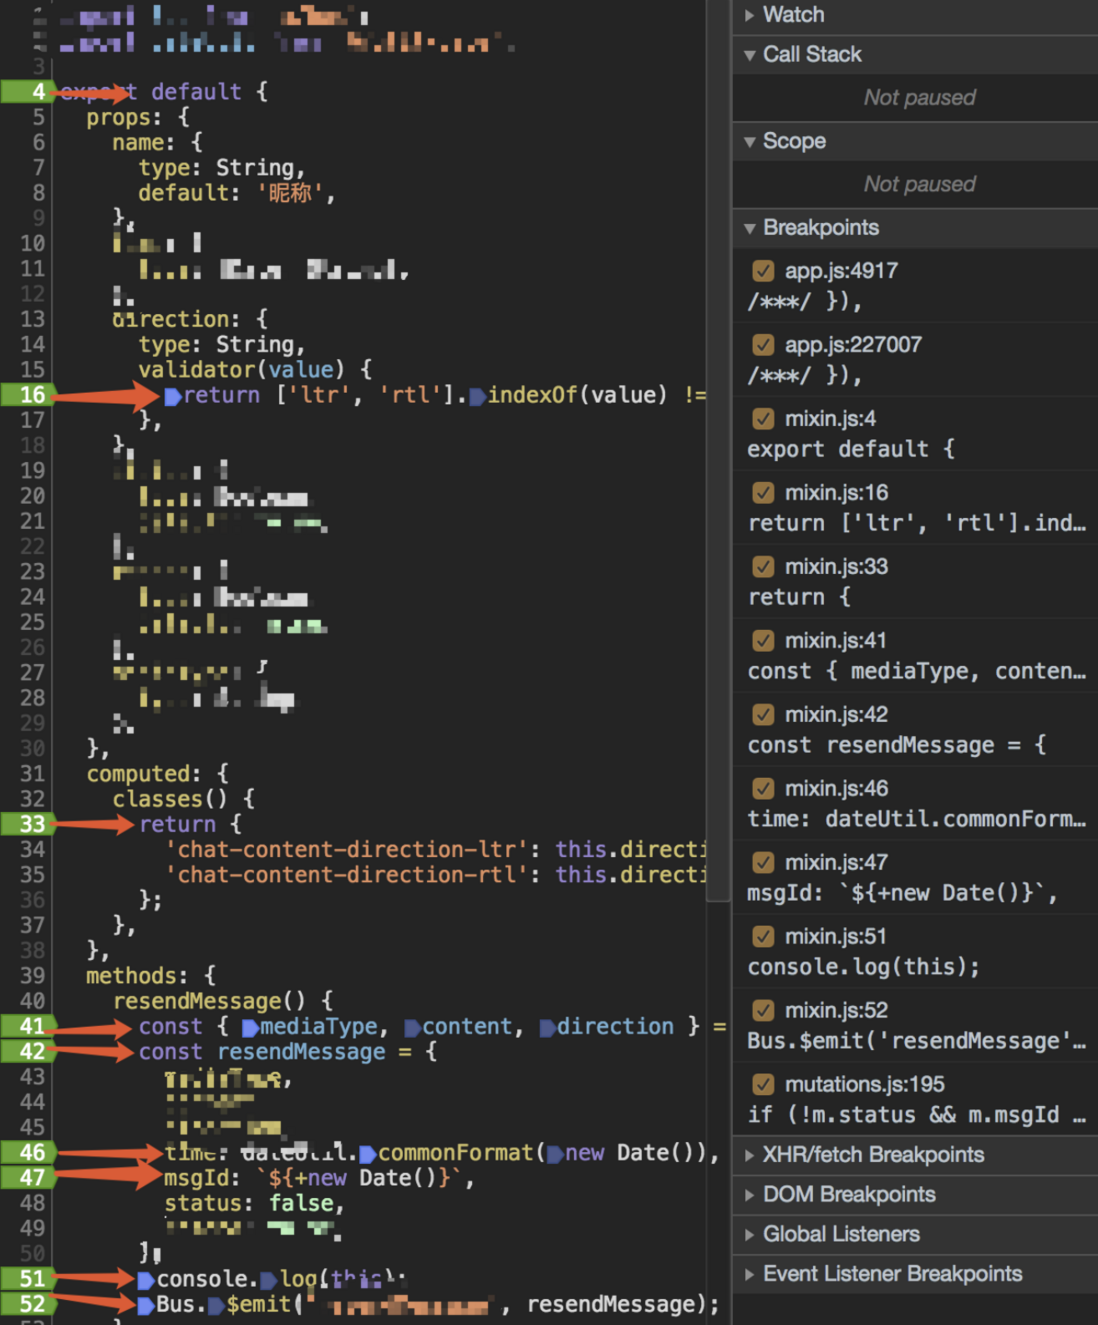
下面的图是我本地调试的图,只有部分有定义,解构,回调,return等有需要process的地方,才可以打断点。
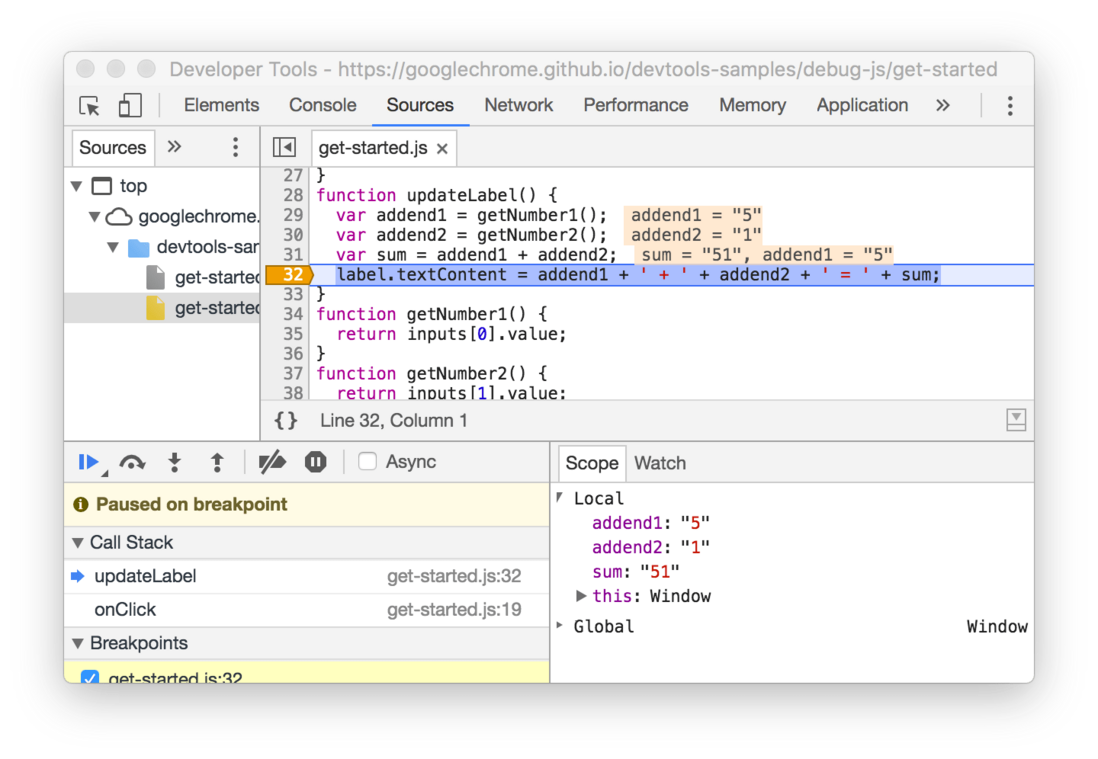
代码里生成一个Line-of-code断点
调用debugger在那一行暂停。debugger等价于一个line-of-code断点,这可以让端点直接出现在代码中,而不是在DevTools UI中,可以在任何机器上进行debug。
console.log('a');
console.log('b');
debugger;
console.log('c');
有条件的行级断点
在我们知道自己需要检查的一个特定代码行时,使用有条件的行级断点,但是只有在一些其他满足时才可以暂停。
如何设置一个有条件的行级断点:
- 1.点击Sources tab
- 2.打开代码文件
- 3.跳到那一行
- 4.在那一行Right-click,鼠标右键(此处有surprise!)
- 5.选择Add conditional breakpoint。一个对话框会出现在那一行代码的下面。
- 6.在对话框中键入条件
- 7.按下enter去激活breakpoint。一个橘色icon会出现在左边。
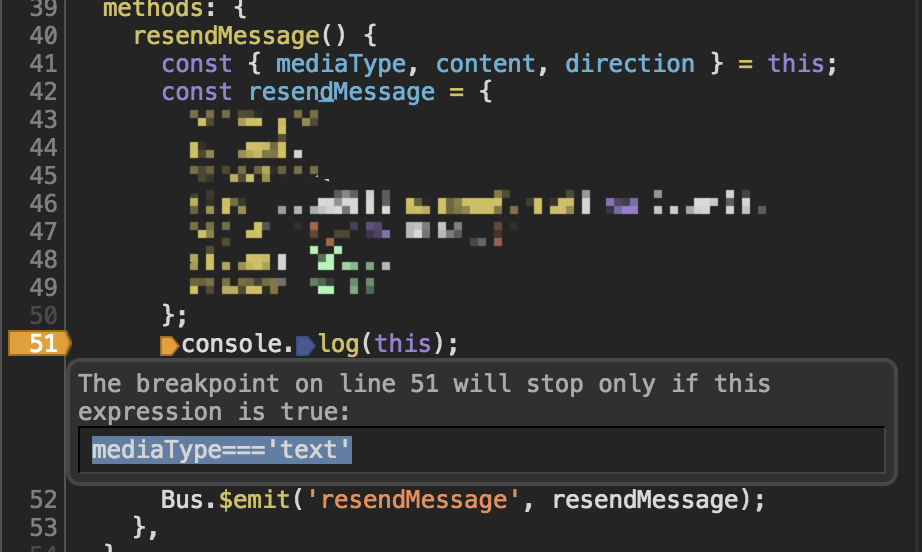
图2:在某一行设置条件行级断点
Add breakPoint是普通的行级断点,Add conditional breakPoint是有条件的行级断点。Never Pause Here会让这里永远不进断点。Blackbox Script可以让当前打开的文件黑盒化,用不进入断点。
点击Add conditional breakPoint后,会出现dialog:
点击Blackbox Script后,文件头部会出现The script is blackboxed in debugger:
在我的代码中,添加了mediaType==='text'的条件,而mediaType还会有'img','mini'等类型,但是通过添加conditional breakpoint,我可以只在类型是text的时候pause,亲测有效。
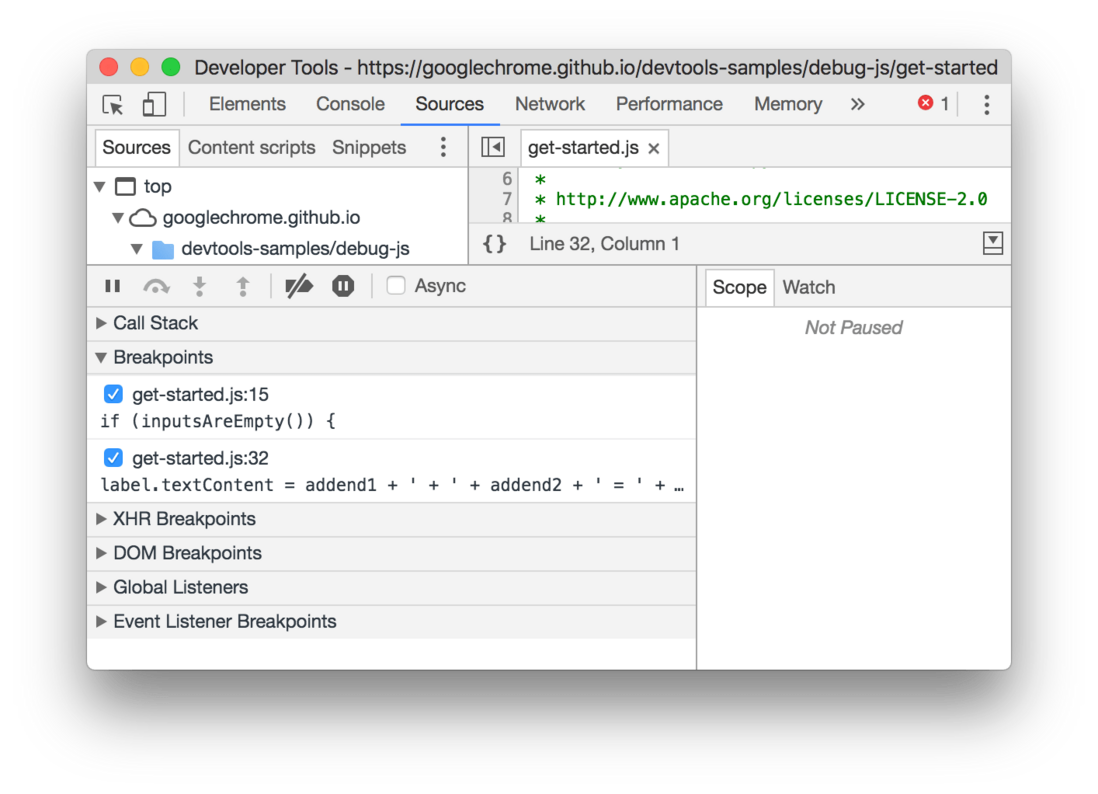
管理line-of-code断点
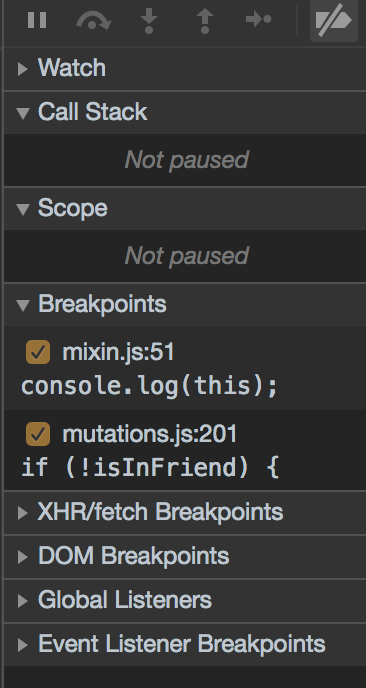
图3:Breakpoints面板展示了get-started.js的2个断点
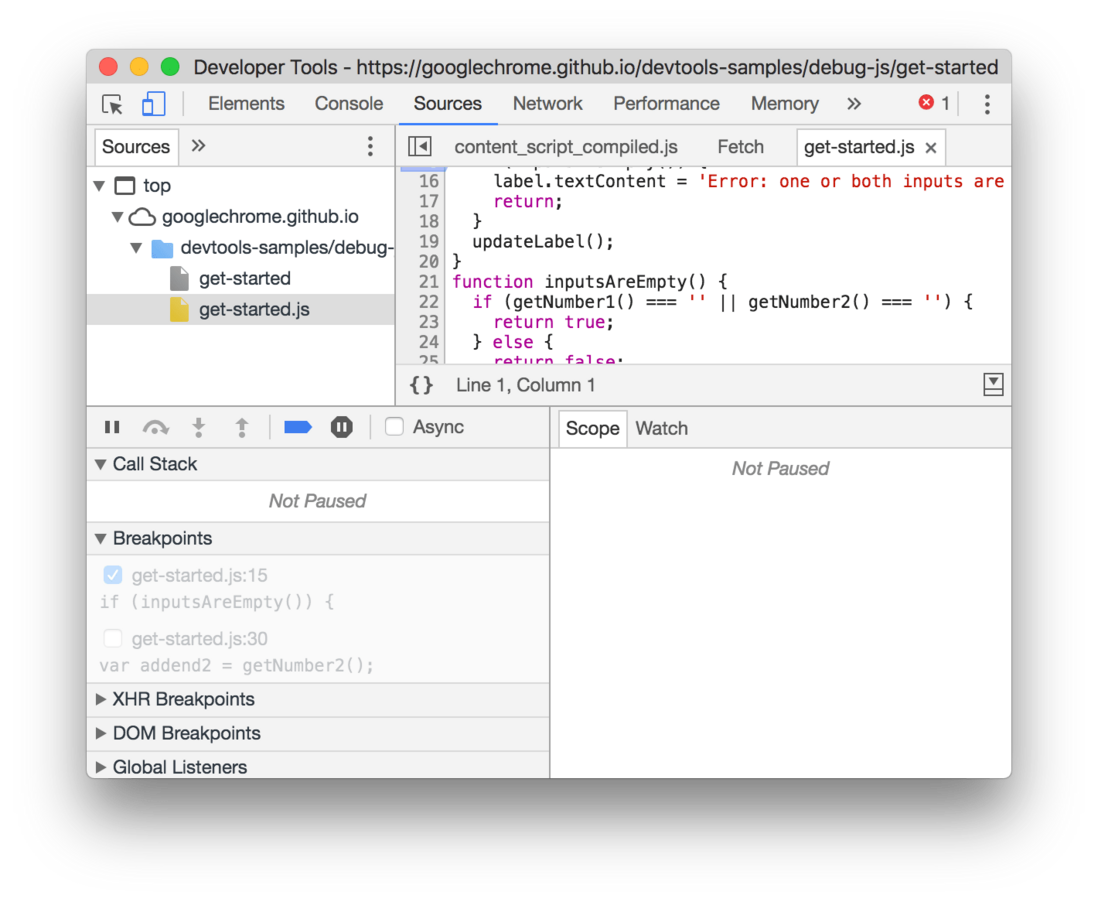
图4:使用Breakpoints面板去禁用或者移除line-of-code断点。
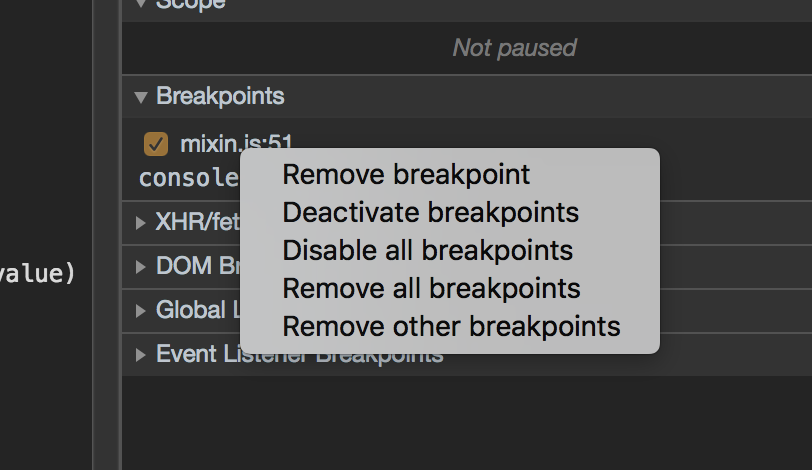
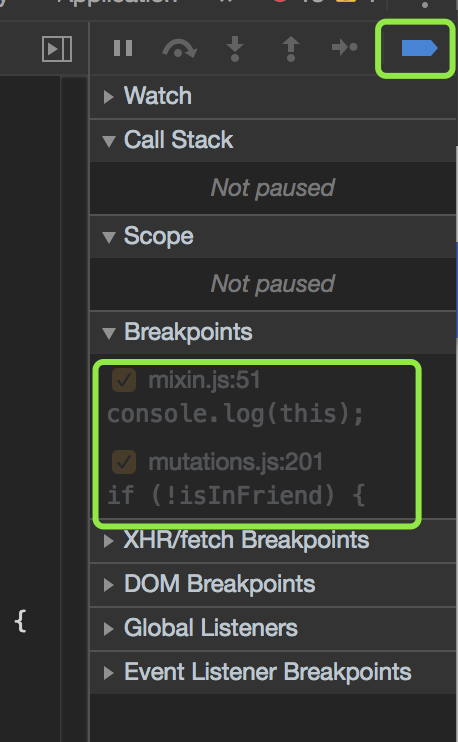
可以对单个断点启用,禁用,移除;对所有断点启用,禁用,移除;对除当前断点外的断点启用,禁用,移除。
- 选中checkbox禁用断点
- 右键移除断点
- Deactivate断点,会保留他们激活时的状态,这样方便再次激活,右上角的label为蓝色激活状态时,Breakpoints全部为Deactive状态,白色带阻塞斜杠时,为断点激活状态。
DOM变化级断点
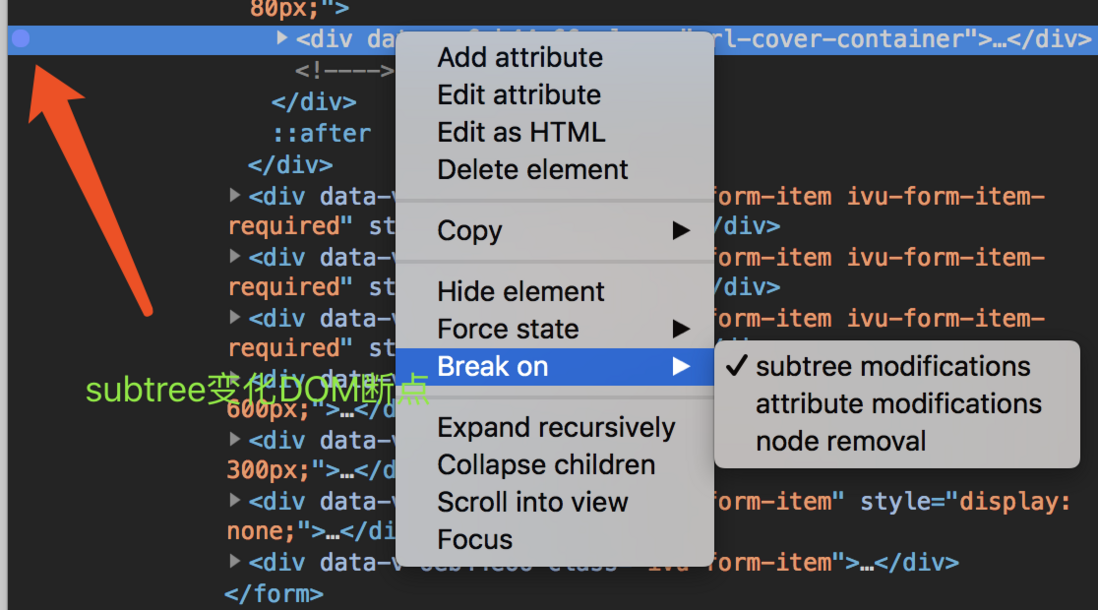
- Subtree modifications。当当前选中的节点的child被移除或新增时触发,或者是child的内容发生改变时。在child的节点属性发生变化时不会触发,或者当前节点改变时不会触发。(亲测当自己被移除时都不会触发)
- Attributes modifications。当当前选中的节点新增属性,移除属性,或者属性值发生变化时触发。
- Node Removal。当当前选中的节点被移除时触发。
在改变或者移除一个DOM节点或者它的DOM子节点时会用到DOM change breakpoint。
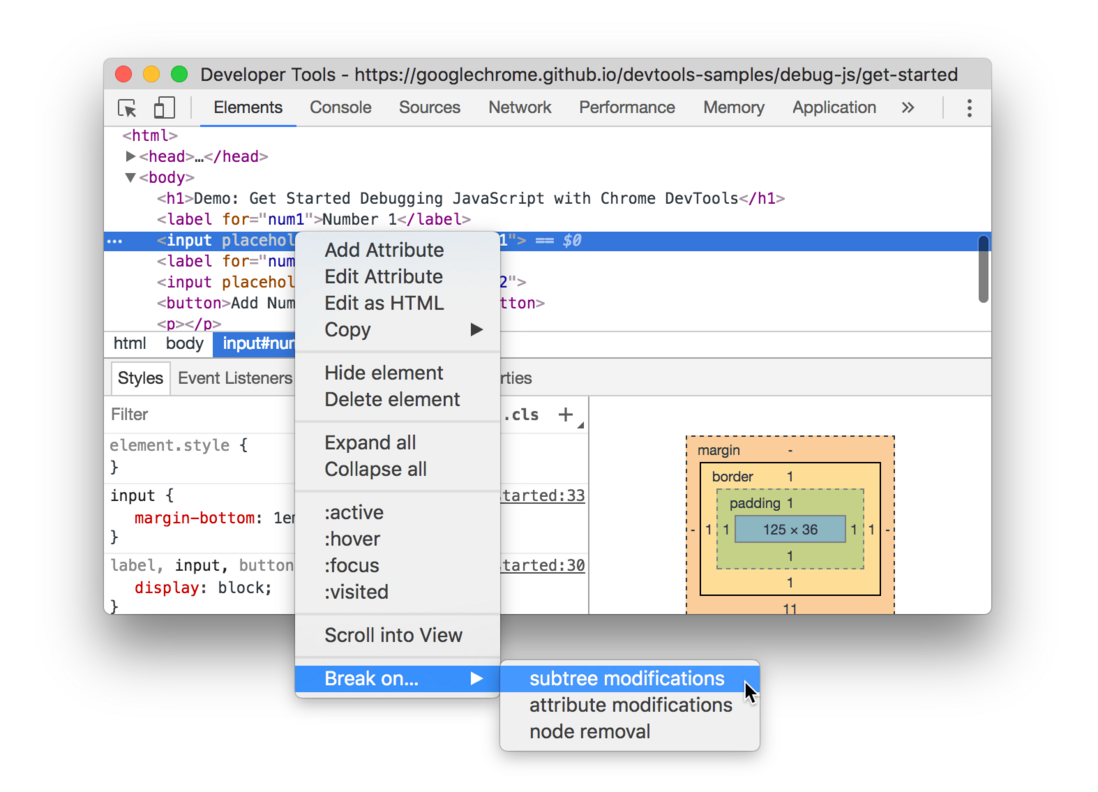
图5:创建一个DOM change breakpoint的上下文菜单
设置DOM级断点的步骤如下:
- 1.单击Elements tab
- 2.选中我们想为其设置breakpoint的元素
- 3.右键元素
- 4.悬浮在Break on上,选择Subtree modifications,Attribute modifications或者Node removal。
我会在这样一段代码上测试Subtree modifications,Attribute modifications或者Node removal几个DOM型断点。
          <div class="url-cover-container">
            <cUpload accept="image/*" v-model="moment.params.url.cover" @finish="urlCoverUpload"
                     v-if="urlCoverUploadShow">
              <Button type="info">上传封面</Button>
            </cUpload>
            <img v-else :src="moment.params.url.cover"/>
          </div>
渲染结果如下:
<div data-v-6eb44e66="" class="c-upload”>
    <input type="file" accept="image/*" style="display: none;”>
    <button data-v-6eb44e66="" type="button" class="ivu-btn ivu-btn-info”>
        <!——> // iview内部组件v-if else
        <!——>
        <span>上传封面</span>
    </button>
    <!——> // v-if为false,因此只保留一个注释结束符
</div>
Subtree modifications
当我点击上传按钮后,一次完整的上传文件会引起5次DOM节点的变化:
<div data-v-6eb44e66="" class="url-cover-container">
    <div data-v-6eb44e66="" class="c-upload">
        <input type="file" accept="image/*" style="display: none;">
        <button data-v-6eb44e66="" type="button" class="ivu-btn ivu-btn-info">
            <!---->
            <!---->
            <span>上传封面</span>
        </button>
        <!---->
    </div>
</div>
<div data-v-6eb44e66="" class="url-cover-container">
<div data-v-6eb44e66="" class="c-upload">
<input type="file" accept="image/*" style="display: none;">
<button data-v-6eb44e66="" type="button" class="ivu-btn ivu-btn-info">
<!---->
<!---->
<span>上传封面</span>
</button>
// 下面的div.c-upload-loading-container就是div.c-upload新增的Descendant
<div class="c-upload-loading-container">
<div class="c-upload-loading">
<svg data-v-65d9369a="" viewBox="25 25 50 50" class="circular">
<circle data-v-65d9369a="" cx="50" cy="50" r="20" stroke-dasharray="125.66370614359172" stroke-dashoffset="0"
class="path"></circle>
</svg>
</div>
</div>
<!---->
</div>
</div><div data-v-6eb44e66="" class="url-cover-container">
<div data-v-6eb44e66="" class="c-upload">
<input type="file" accept="image/*" style="display: none;">
<button data-v-6eb44e66="" type="button" class="ivu-btn ivu-btn-info">
<!---->
<!---->
<span>上传封面</span>
</button>
<div class="c-upload-loading-container">
<div class="c-upload-loading">
<svg data-v-65d9369a="" viewBox="25 25 50 50" class="circular">
<circle data-v-65d9369a="" cx="50" cy="50" r="20" stroke-dasharray="125.66370614359172" stroke-dashoffset="-125.66370614359172"
class="path"></circle>
</svg>
</div>
</div>
// 这里的<!-- --> 注释DOM子Descendant节点被移除
</div>
</div><div data-v-6eb44e66="" class="url-cover-container">
// 下面的img就是div.url-cover-container新增的Child
<img data-v-6eb44e66="" src="http://img.test.weidiango.com/FsHXLY5bu94-s6323xLHFSwh8GGM">
<div data-v-6eb44e66="" class="c-upload">
<input type="file" accept="image/*" style="display: none;">
<button data-v-6eb44e66="" type="button" class="ivu-btn ivu-btn-info">
<!---->
<!---->
<span>上传封面</span>
</button>
<div class="c-upload-loading-container">
<div class="c-upload-loading">
<svg data-v-65d9369a="" viewBox="25 25 50 50" class="circular">
<circle data-v-65d9369a="" cx="50" cy="50" r="20" stroke-dasharray="125.66370614359172" stroke-dashoffset="-125.66370614359172"
class="path"></circle>
</svg>
</div>
</div>
</div>
</div><div data-v-6eb44e66="" class="url-cover-container">
// 这里的div.c-upload就是被移除的Descendant
<img data-v-6eb44e66="" src="http://img.test.weidiango.com/FsHXLY5bu94-s6323xLHFSwh8GGM">
</div>child和descendant区别是什么?
child仅仅包含一个子节点;descendant包含多个后代节点,会有一个孙子节点的情况,例如上面移除的#comment类型的注释子节点。
Attribute Modifications
在3个状态间切换,会触发class属性值的变化,因为需要使激活的按钮高亮。
<div data-v-6eb44e66="" name="ivuRadioGroup_1538124450566_3" class="ivu-radio-group ivu-radio-group-default ivu-radio-default ivu-radio-group-button">
<label data-v-6eb44e66="" class="ivu-radio-wrapper ivu-radio-group-item ivu-radio-default">
图文
</label>
<label data-v-6eb44e66="" class="ivu-radio-wrapper ivu-radio-group-item ivu-radio-default">
小视频
</label>
<label data-v-6eb44e66="" class="ivu-radio-wrapper ivu-radio-group-item ivu-radio-wrapper-checked ivu-radio-default ivu-radio-focus">
图文链接
</label>
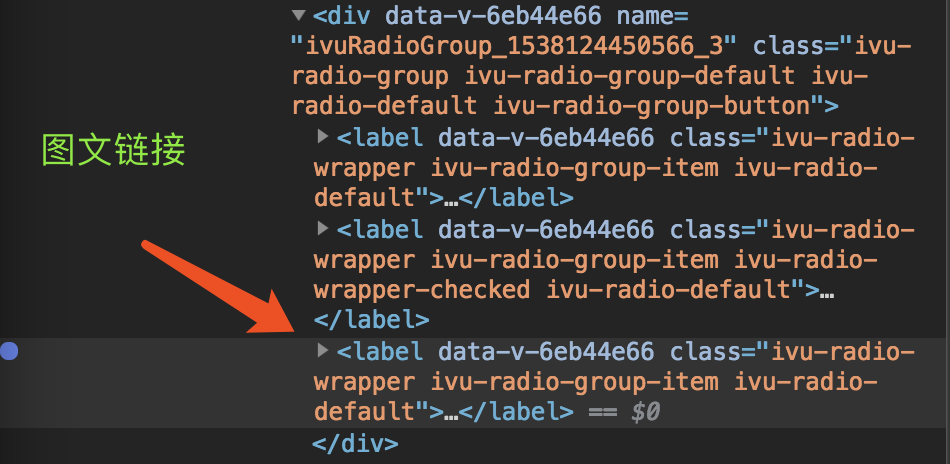
</div>当状态从图文链接切换到小视频时,会进入Attribute Modifications断点,:
<div data-v-6eb44e66="" name="ivuRadioGroup_1538124450566_3" class="ivu-radio-group ivu-radio-group-default ivu-radio-default ivu-radio-group-button">
<label data-v-6eb44e66="" class="ivu-radio-wrapper ivu-radio-group-item ivu-radio-default">
图文
</label>
<label data-v-6eb44e66="" class="ivu-radio-wrapper ivu-radio-group-item ivu-radio-wrapper-checked ivu-radio-default ivu-radio-focus">
小视频
</label>
<label data-v-6eb44e66="" class="ivu-radio-wrapper ivu-radio-group-item ivu-radio-wrapper-checked ivu-radio-default">
图文链接
</label>
</div>通过这次DOM Attribute Modification断点,我们发现,iview的单选ButtonGroup高亮依赖.ivu-radio-focus,并且会为之前选择过的radio添加.ivu-raido-wrapper-checked。
因为我们只对图文链接label设置了Attribute Modification断点,所以小视频label的属性变化不会被检测到:
node removal
移除一个DOM节点时会进入断点。
因此,其实就是subtree modifications中的最后一次DOM变化,把div.c-upload完全移除,只显示一个上传后的图片。但是可能与subtree modifications的断点提示不一样,因此我将重新记录断点。
<div data-v-6eb44e66="" class="url-cover-container">
    // 下面的img就是div.url-cover-container新增的Child
    <img data-v-6eb44e66="" src="http://img.test.weidiango.com/FsHXLY5bu94-s6323xLHFSwh8GGM">
    <div data-v-6eb44e66="" class="c-upload">
        <input type="file" accept="image/*" style="display: none;">
        <button data-v-6eb44e66="" type="button" class="ivu-btn ivu-btn-info">
            <!---->
            <!---->
            <span>上传封面</span>
        </button>
        <div class="c-upload-loading-container">
            <div class="c-upload-loading">
                <svg data-v-65d9369a="" viewBox="25 25 50 50" class="circular">
                    <circle data-v-65d9369a="" cx="50" cy="50" r="20" stroke-dasharray="125.66370614359172" stroke-dashoffset="-125.66370614359172"
                        class="path"></circle>
                </svg>
            </div>
        </div>
    </div>
</div>
<div data-v-6eb44e66="" class="url-cover-container">
// 这里的div.c-upload就是被移除的Descendant
<img data-v-6eb44e66="" src="http://img.test.weidiango.com/FsHXLY5bu94-s6323xLHFSwh8GGM">
</div>确实与之前的不同,直接提醒当前node被移除,而不是作为Child或者Descendant被移除。
XHR/Fetch breakpoint
XHR的请求URL包含指定字符串时,使用XHR中断。当XHR调用send()方法时在对应行暂停。
注意:这个特性同样作用于Fetch请求。
在XHR/Fetch上打断点的场景,非常适用于请求一个不正确的URL,而且你想很快找到AJAX或者Fetch 源代码去发现导致错误请求的原因。
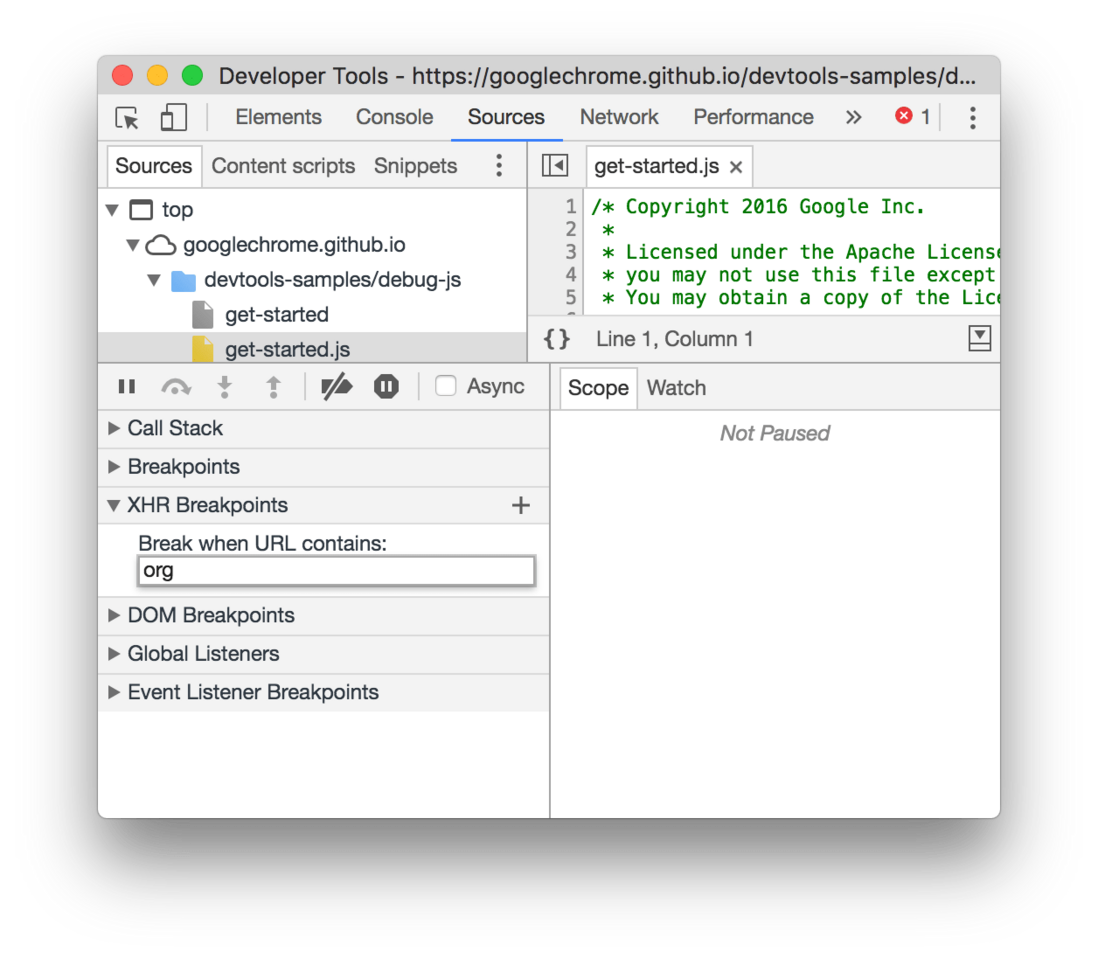
设置一个XHR类型的断点的步骤如下:
- 1.单击Sources tab
- 2.展开XHR Breakpoints
- 3.单击Add breakpoint
- 4.键入你想断点的string。DevTools会在string出现在任何XHR的请求的URL时进入断点
- 5.按下Enter进行确认
在XHR Breakpoints中为包含URL中的org的任何请求创建XHR断点
实验:
当前页有5个来自crm.test.foo.com的请求,每次都会进入到XHR断点。
- 可以对协议做断点。例如http,https,ws,wss等等。
- 可以对域名做断点。例如github.com,segmentfault.com等等。
- 可以对端口号做断点。例如http://test.foo.com:8080,http://test.bar.com:9090等等。
- 可以对路径做断点。例如http://test.foo.com/bar,http://test.foo.com/bar/baz
- 可以对参数做断点。例如http://test.foo.com/bar;type=baz
- 可以对查询字符串做断点。例如http://test.foo.com/bar?type=...
- 可以对片段做断点。例如http://test.foo.com/bar/#foo
发出请求前进行断点:
会进入到xhr.js中,开心地debug:
Event Listener breakpoints
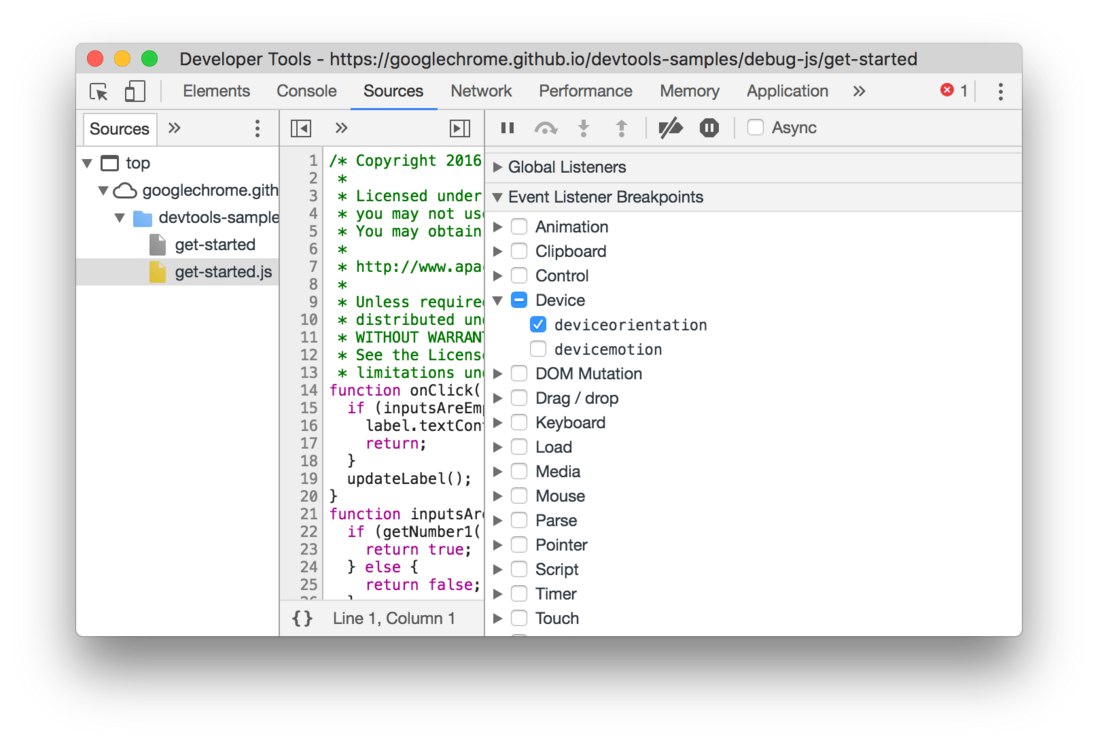
如果要暂停事件触发后运行的事件侦听器代码,请使用事件侦听器断点。我们可以选择特定的事件,例如click事件;或者事件类别,例如所有的鼠标事件。
- 1.点击Sources tab
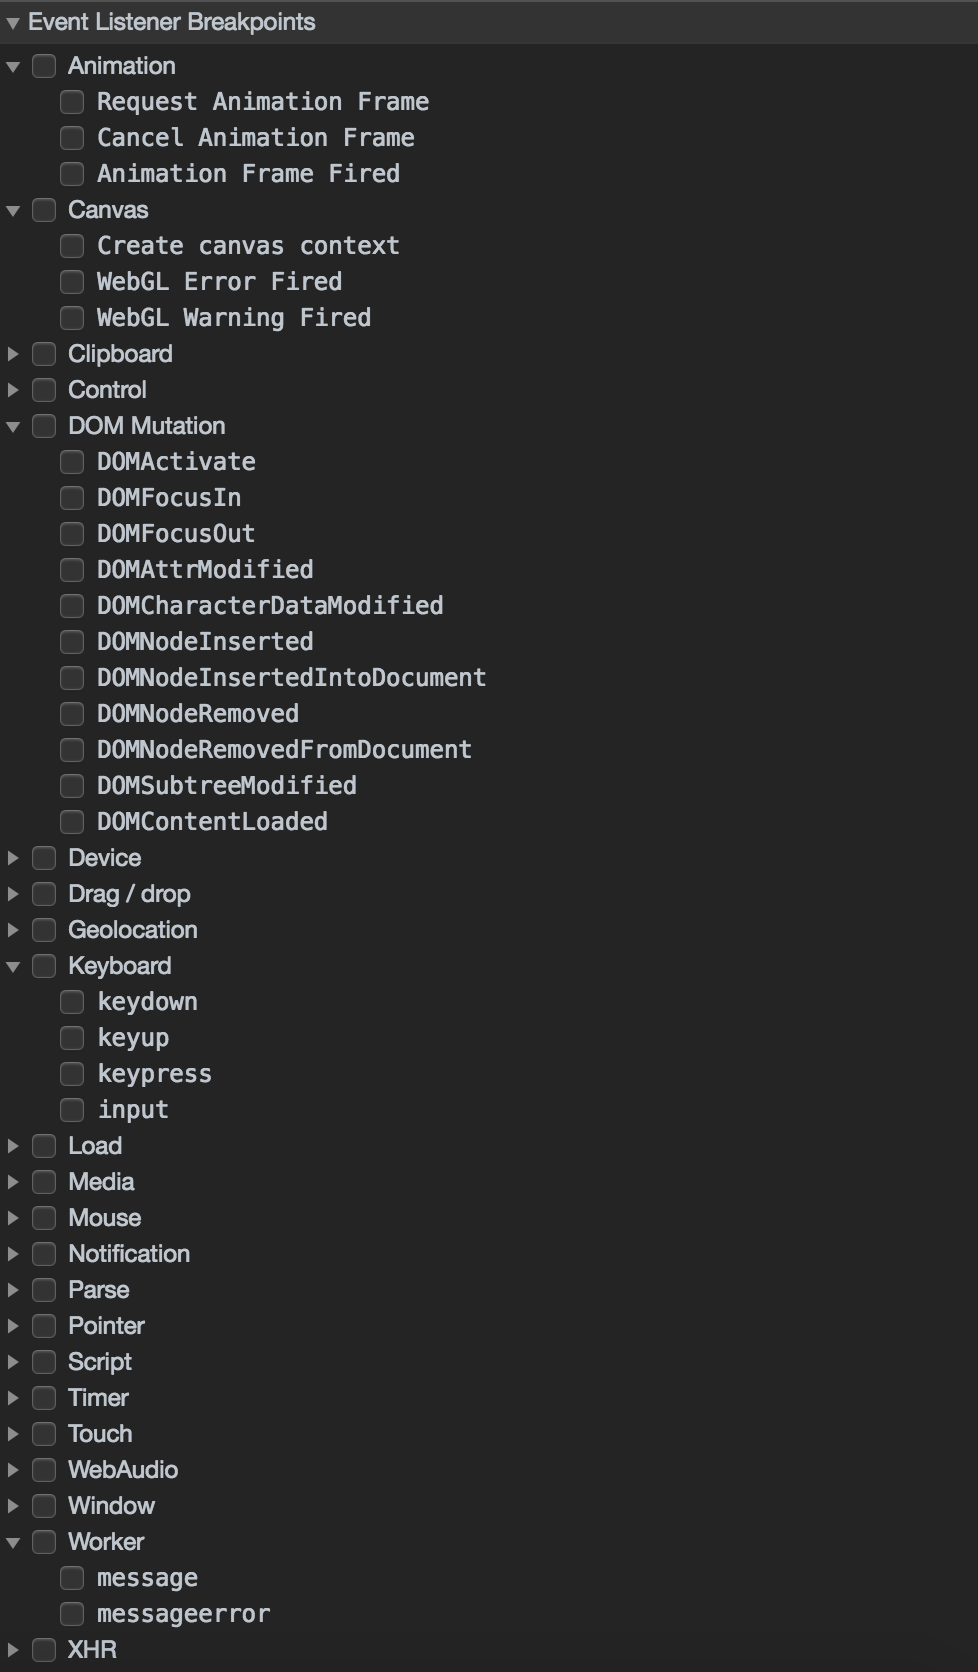
- 2.展开Event Listener Breakpoints面板。DevTools展示了一个事件目录的列表,例如Animation。
- 3.选中这些事件类别中的一个做断点,这个断点会在事件触发时进入,或者是选择事件类别下的一个或多个做断点。
图7:为deviceorientation新建一个事件监听断点
有很多类型的Event Listener。
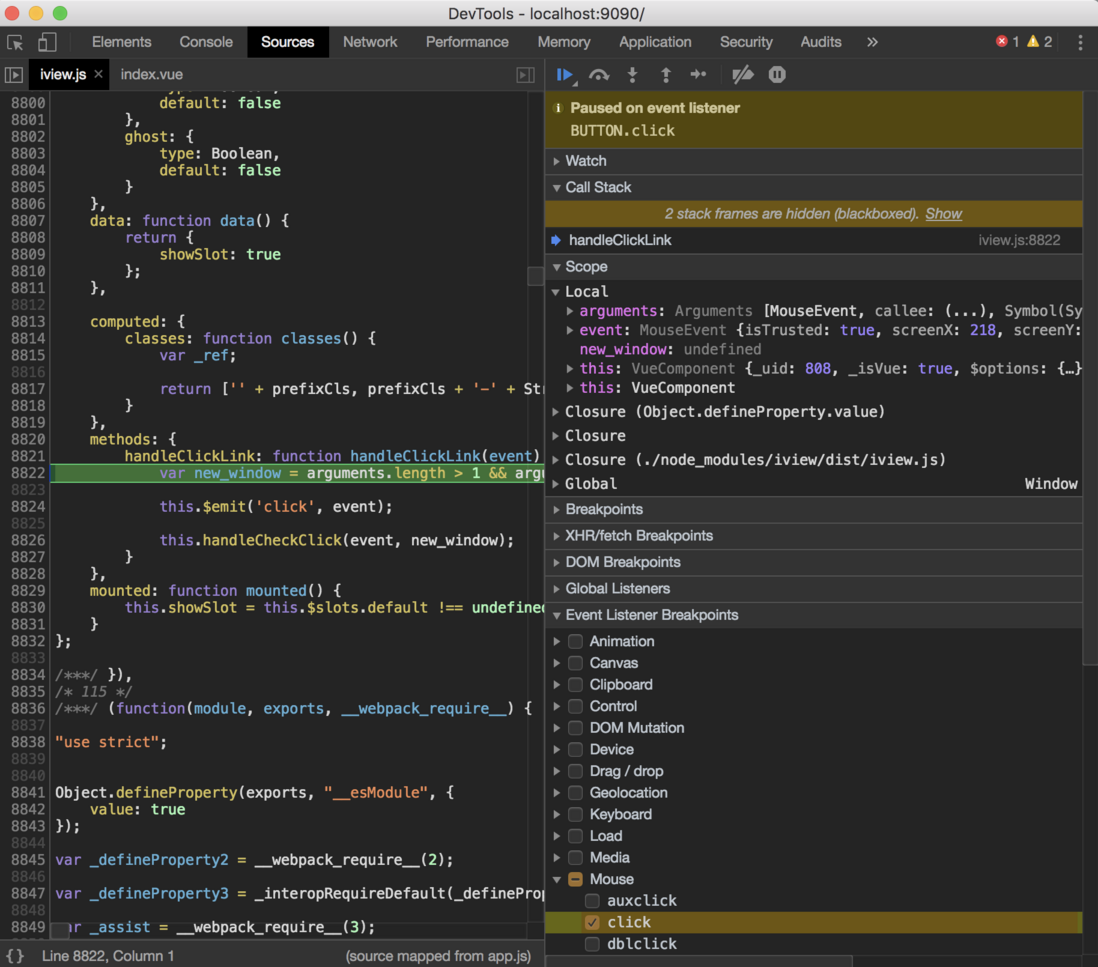
实验:
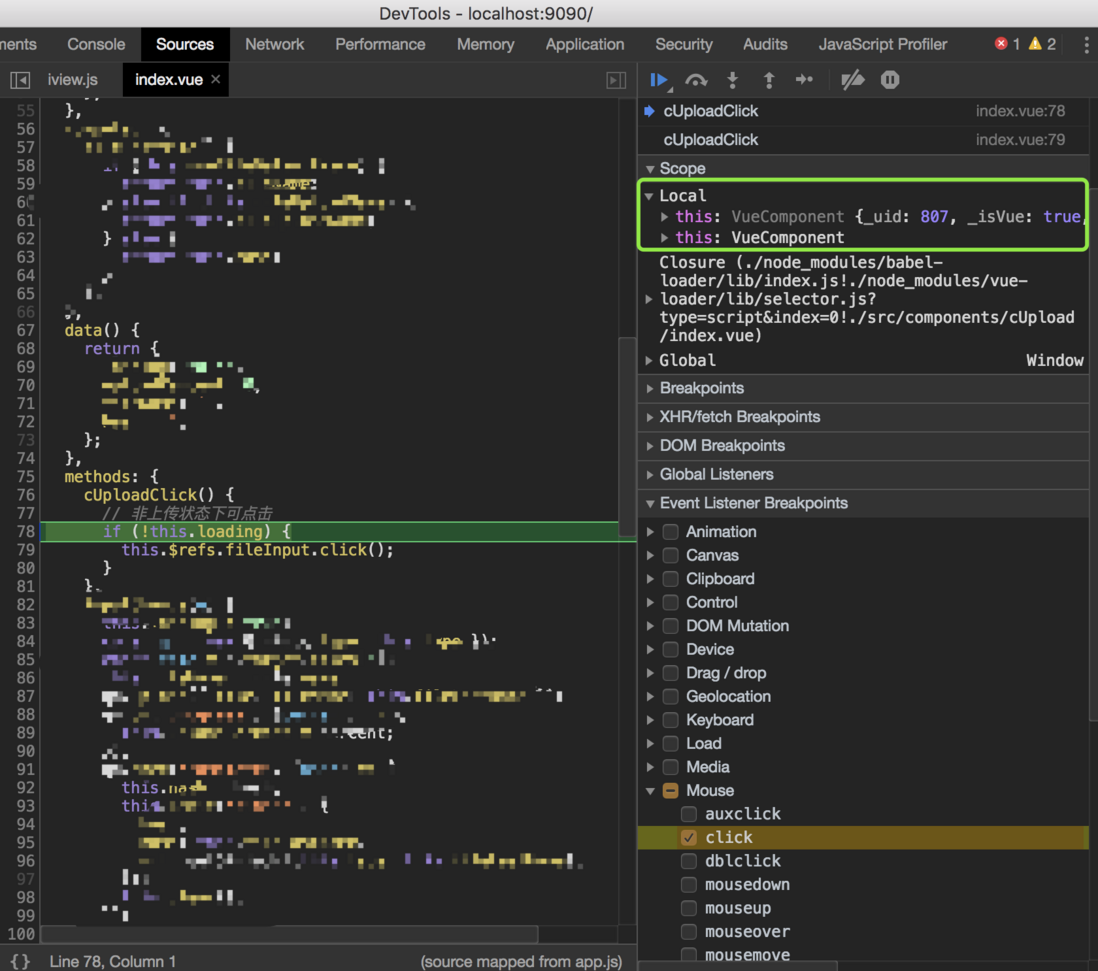
会进入到第三方库监听事件的代码,可以用Blackbox Script跳过进入这个文件的断点,直接进入到我们的监听click事件的业务代码的地方,方便debug。结合CallStack和Scope,可以提升我们的debug效率。
如果想深入学习第三库的源码,可以打开断点,每次都去看一次事件发生,第三方库到底做了什么。
Exception breakpoints
当我们想在某一行抛出caught or uncaught异常时进入断点,可以使用exception breakpoint。
- 1.单击Sources tab
- 2.单击Pause on exceptions上,也就是

- 3.选中Pause On Caught Exceptions,可以使得捕获的异常也进入断点。
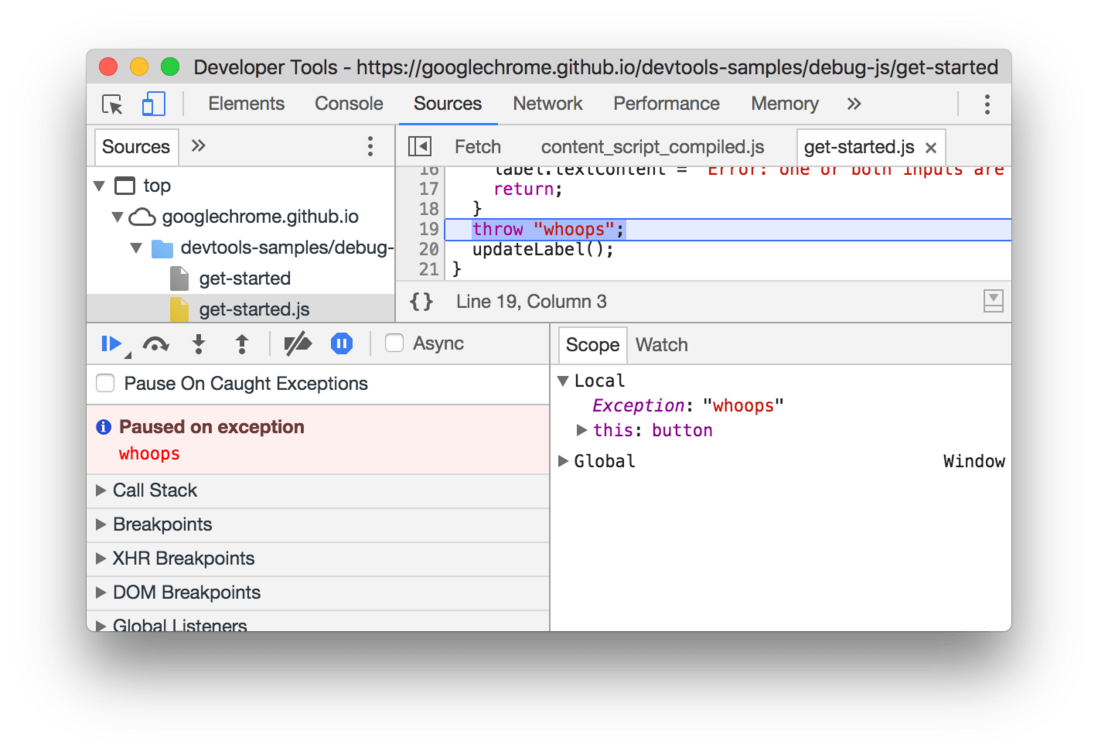
图7:在一个未捕获的异常处暂停
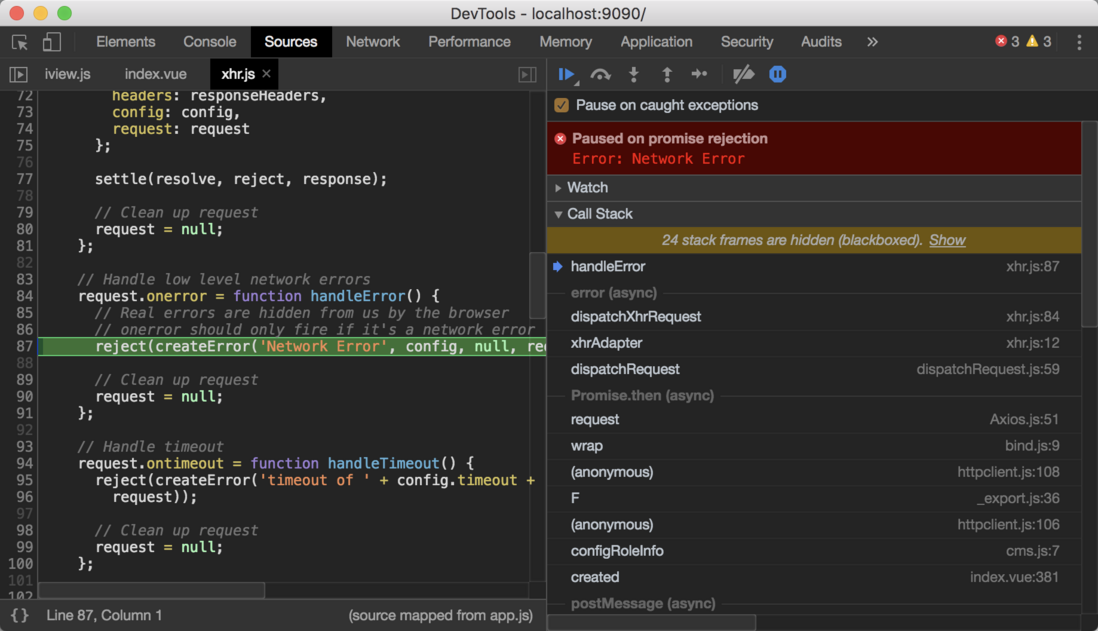
捕获到一个CORS异常:
通过异常捕获断点,我们可以进入到axios,以及二次封装的httpclient中,去看Exception是如何被处理的,出现问题时,可以精确定位。
有些时候可能不是我们业务代码的bug,是第三方库的bug,通过这样的断点,我们可以在业务代码没有问题的情况下,深入到第三方库找问题(虽然一般都是自己业务代码的问题)。
什么是caught和uncaught的exception?
- 通过throw,catch对exception做处理的,属于caught exception
- 没有对异常做捕获的exception,可能导致程序崩溃的exception,就属于uncaught exception
亲测:默认捕获的异常时uncaught类型,开启Pause on caught exceptions,会让uncaught和caught类型的均进入断点。
Function Breakpoints
假设我们想对某一个函数做debug的话,例如调用debug(functionNmae),functionName是我们想debug的函数。你可以在你的代码中像插入console.log()一样,插入debug(),或这在控制台里直接输入debug()。debug()相当于在某个函数的第一行设置了一个line-of-code breakpoint。
function sum(a, b) {
  let result = a + b; // DevTools pauses on this line.
  return result;
}
debug(sum); // Pass the function object, not a string.
sum();
可以用来确保目标函数位于scope中
如果我们想要debug的函数不在当前作用域中,DevTools会抛出一个ReferenceError。
(function () {
  function hey() {
    console.log('hey');
  }
  function yo() {
    console.log('yo');
  }
  debug(yo); // This works.
  yo();
})();
debug(hey); // This doesn't work. hey() is out of scope.
如果从DevTools控制台调用debug(),确保目标函数在范围内可能会很棘手,有一个办法:
- 1.函数作用域某一行设置一个line-of-code breakpoint。
- 2.触发断点
- 3.在断点出暂停时调用
debug()
嗯,上面这个方法很鸡肋,亲测。
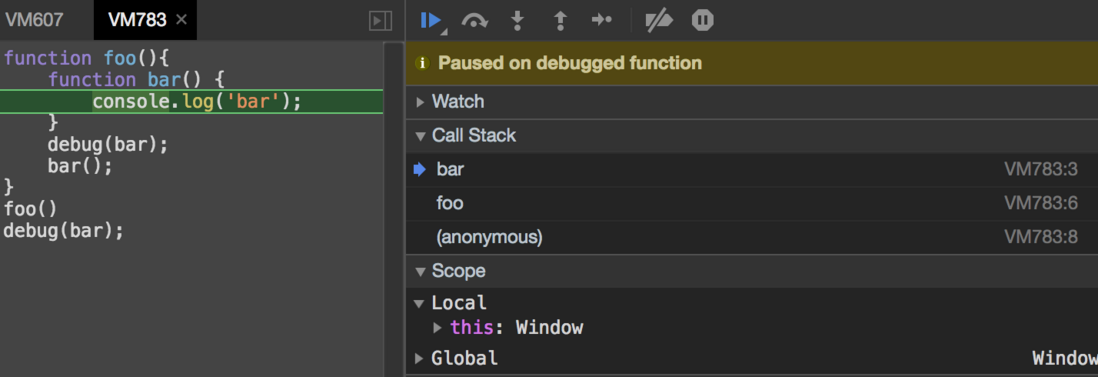
实验:
function foo(){
    function bar() {
    console.log('bar');
    }
    debug(bar);
    bar();
}
foo(); // 进入断点
debug(bar); // 抛出Uncaught ReferenceError: bar is not defined
期待和大家交流,共同进步,欢迎大家加入我创建的与前端开发密切相关的技术讨论小组:
- SegmentFault技术圈:ES新规范语法糖
- SegmentFault专栏:趁你还年轻,做个优秀的前端工程师
- 知乎专栏:趁你还年轻,做个优秀的前端工程师
- Github博客: 趁你还年轻233的个人博客
- 前端开发QQ群:660634678
- 微信公众号: 人兽鬼 / excellent_developers
努力成为优秀前端工程师!













**粗体** _斜体_ [链接](http://example.com) `代码` - 列表 > 引用。你还可以使用@来通知其他用户。