本文将使用Docker容器(使用docker-compose编排)快速部署Elasticsearch 集群,可用于开发环境(单机多实例)或生产环境部署。
注意,6.x版本已经不能通过 -Epath.config 参数去指定配置文件的加载位置,文档说明:
For the archive distributions, the config directory location defaults to$ES_HOME/config. The location of the >config directorycan be changedvia theES_PATH_CONFenvironment variable as follows:ES_PATH_CONF=/path/to/my/config ./bin/elasticsearch
Alternatively, you can export the ES_PATH_CONF environment variable via the command line or via your shell profile.
即交给环境变量 ES_PATH_CONF 来设定了(官方文档),单机部署多个实例且不使用容器的同学多多注意。
准备工作
安装 docker & docker-compose
这里推进使用 daocloud 做个加速安装:
#docker
curl -sSL https://get.daocloud.io/docker | sh

#docker-compose
curl -L \
https://get.daocloud.io/docker/compose/releases/download/1.23.2/docker-compose-`uname -s`-`uname -m` \
> /usr/local/bin/docker-compose

chmod +x /usr/local/bin/docker-compose

#查看安装结果
docker-compose -v
数据目录
#创建数据/日志目录 这里我们部署3个节点
mkdir /opt/elasticsearch/data/{node0,node1,node2} -p
mkdir /opt/elasticsearch/logs/{node0,node1,node2} -p
cd /opt/elasticsearch
#权限我也很懵逼啦 给了 privileged 也不行 索性0777好了
chmod 0777 data/* -R && chmod 0777 logs/* -R

#防止JVM报错
echo vm.max_map_count=262144 >> /etc/sysctl.conf
sysctl -p
docker-compse 编排服务
创建编排文件
vim docker-compose.yml
参数说明
- cluster.name=elasticsearch-cluster
集群名称
- node.name=node0- node.master=true- node.data=true
节点名称、是否可作为主节点、是否存储数据
- bootstrap.memory_lock=true
锁定进程的物理内存地址避免交换(swapped)来提高性能
- http.cors.enabled=true- http.cors.allow-origin=*
开启cors以便使用Head插件
- "ES_JAVA_OPTS=-Xms512m -Xmx512m"
JVM内存大小配置
- "discovery.zen.ping.unicast.hosts=elasticsearch_n0,elasticsearch_n1,elasticsearch_n2"- "discovery.zen.minimum_master_nodes=2"
由于5.2.1后的版本是不支持多播的,所以需要手动指定集群各节点的tcp数据交互地址,用于集群的节点发现和failover,默认缺省9300端口,如设定了其它端口需另行指定,这里我们直接借助容器通信,也可以将各节点的9300映射至宿主机,通过网络端口通信。
设定failover选取的quorum = nodes/2 + 1
当然,也可以挂载自己的配置文件,ES镜像的配置文件是/usr/share/elasticsearch/config/elasticsearch.yml,挂载如下:
volumes:
  - path/to/local/elasticsearch.yml:/usr/share/elasticsearch/config/elasticsearch.yml:ro
docker-compose.yml
version: '3'
services:
  elasticsearch_n0:
    image: elasticsearch:6.6.2
    container_name: elasticsearch_n0
    privileged: true
    environment:
      - cluster.name=elasticsearch-cluster
      - node.name=node0
      - node.master=true
      - node.data=true
      - bootstrap.memory_lock=true
      - http.cors.enabled=true
      - http.cors.allow-origin=*
      - "ES_JAVA_OPTS=-Xms512m -Xmx512m"
      - "discovery.zen.ping.unicast.hosts=elasticsearch_n0,elasticsearch_n1,elasticsearch_n2"
      - "discovery.zen.minimum_master_nodes=2"
    ulimits:
      memlock:
        soft: -1
        hard: -1
    volumes:
      - ./data/node0:/usr/share/elasticsearch/data
      - ./logs/node0:/usr/share/elasticsearch/logs
    ports:
      - 9200:9200
  elasticsearch_n1:
    image: elasticsearch:6.6.2
    container_name: elasticsearch_n1
    privileged: true
    environment:
      - cluster.name=elasticsearch-cluster
      - node.name=node1
      - node.master=true
      - node.data=true
      - bootstrap.memory_lock=true
      - http.cors.enabled=true
      - http.cors.allow-origin=*
      - "ES_JAVA_OPTS=-Xms512m -Xmx512m"
      - "discovery.zen.ping.unicast.hosts=elasticsearch_n0,elasticsearch_n1,elasticsearch_n2"
      - "discovery.zen.minimum_master_nodes=2"
    ulimits:
      memlock:
        soft: -1
        hard: -1
    volumes:
      - ./data/node1:/usr/share/elasticsearch/data
      - ./logs/node1:/usr/share/elasticsearch/logs
    ports:
      - 9201:9200
  elasticsearch_n2:
    image: elasticsearch:6.6.2
    container_name: elasticsearch_n2
    privileged: true
    environment:
      - cluster.name=elasticsearch-cluster
      - node.name=node2
      - node.master=true
      - node.data=true
      - bootstrap.memory_lock=true
      - http.cors.enabled=true
      - http.cors.allow-origin=*
      - "ES_JAVA_OPTS=-Xms512m -Xmx512m"
      - "discovery.zen.ping.unicast.hosts=elasticsearch_n0,elasticsearch_n1,elasticsearch_n2"
      - "discovery.zen.minimum_master_nodes=2"
    ulimits:
      memlock:
        soft: -1
        hard: -1
    volumes:
      - ./data/node2:/usr/share/elasticsearch/data
      - ./logs/node2:/usr/share/elasticsearch/logs
    ports:
- 9202:9200这里我们分别为node0/node1/node2开放宿主机的9200/9201/9202作为http服务端口,各实例的tcp数据传输用默认的9300通过容器管理通信。
如果需要多机部署,则将ES的transport.tcp.port: 9300端口映射至宿主机xxxx端口,discovery.zen.ping.unicast.hosts填写各主机代理的地址即可:
#比如其中一台宿主机为192.168.1.100
    ...
    - "discovery.zen.ping.unicast.hosts=192.168.1.100:9300,192.168.1.101:9300,192.168.1.102:9300"
    ...
ports:
  ...
  - 9300:9300
创建并启动服务
[root@localhost elasticsearch]# docker-compose up -d
[root@localhost elasticsearch]# docker-compose ps
      Name                    Command               State                Ports
--------------------------------------------------------------------------------------------
elasticsearch_n0   /usr/local/bin/docker-entr ...   Up      0.0.0.0:9200->9200/tcp, 9300/tcp
elasticsearch_n1   /usr/local/bin/docker-entr ...   Up      0.0.0.0:9201->9200/tcp, 9300/tcp
elasticsearch_n2   /usr/local/bin/docker-entr ...   Up      0.0.0.0:9202->9200/tcp, 9300/tcp

#启动失败查看错误
[root@localhost elasticsearch]# docker-compose logs
#最多是一些访问权限/JVM vm.max_map_count 的设置问题
查看集群状态
192.168.20.6 是我的服务器地址
访问http://192.168.20.6:9200/_cat/nodes?v即可查看集群状态:
ip         heap.percent ram.percent cpu load_1m load_5m load_15m node.role master name
172.25.0.3           36          98  79    3.43    0.88     0.54 mdi       *      node0
172.25.0.2           48          98  79    3.43    0.88     0.54 mdi       -      node2
172.25.0.4           42          98  51    3.43    0.88     0.54 mdi       -      node1
验证 Failover
通过集群接口查看状态
模拟主节点下线,集群开始选举新的主节点,并对数据进行迁移,重新分片。
[root@localhost elasticsearch]# docker-compose stop elasticsearch_n0
Stopping elasticsearch_n0 ... done
集群状态(注意换个http端口 原主节点下线了),down掉的节点还在集群中,等待一段时间仍未恢复后就会被剔出
ip         heap.percent ram.percent cpu load_1m load_5m load_15m node.role master name
172.25.0.2           57          84   5    0.46    0.65     0.50 mdi       -      node2
172.25.0.4           49          84   5    0.46    0.65     0.50 mdi       *      node1
172.25.0.3                                                       mdi       -      node0
等待一段时间
ip         heap.percent ram.percent cpu load_1m load_5m load_15m node.role master name
172.25.0.2           44          84   1    0.10    0.33     0.40 mdi       -      node2
172.25.0.4           34          84   1    0.10    0.33     0.40 mdi       *      node1
恢复节点 node0
[root@localhost elasticsearch]# docker-compose start elasticsearch_n0
Starting elasticsearch_n0 ... done
等待一段时间
ip         heap.percent ram.percent cpu load_1m load_5m load_15m node.role master name
172.25.0.2           52          98  25    0.67    0.43     0.43 mdi       -      node2
172.25.0.4           43          98  25    0.67    0.43     0.43 mdi       *      node1
172.25.0.3           40          98  46    0.67    0.43     0.43 mdi       -      node0
配合 Head 插件观察
git clone git://github.com/mobz/elasticsearch-head.git
cd elasticsearch-head
npm install
npm run start
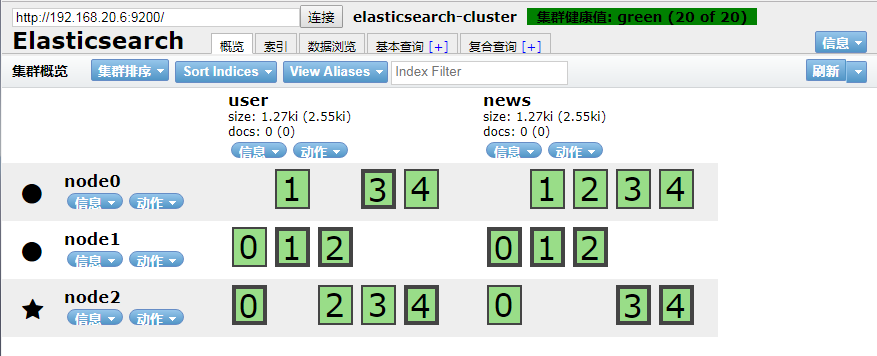
集群状态图示更容易看出数据自动迁移的过程
1、集群正常 数据安全分布在3个节点上
2、下线 node1 主节点 集群开始迁移数据
迁移中
迁移完成
3、恢复 node1 节点
安装IK分词器
analysis-ik:https://github.com/medcl/elas... 注意对应版本,这里我们部署的ES为 6.6.2。
在集群每一个节点上执行安装
docker exec -it elasticsearch_n0 bash
# 使用 elasticsearch-plugin 安装
elasticsearch-plugin install \
https://github.com/medcl/elasticsearch-analysis-ik/releases/download/v6.6.2/elasticsearch-analysis-ik-6.6.2.zip
重启服务
docker-compose restart验证分词
默认使用standard分词器只能处理英文,中文会被拆分成一个个的汉字,没有语义。
GET /_analyze
{
    "text": "我爱祖国"
}
# reponse
{
    "tokens": [
        {
            "token": "我",
            "start_offset": 0,
            "end_offset": 1,
            "type": "<IDEOGRAPHIC>",
            "position": 0
        },
        {
            "token": "爱",
            "start_offset": 1,
            "end_offset": 2,
            "type": "<IDEOGRAPHIC>",
            "position": 1
        },
        {
            "token": "祖",
            "start_offset": 2,
            "end_offset": 3,
            "type": "<IDEOGRAPHIC>",
            "position": 2
        },
        {
            "token": "国",
            "start_offset": 3,
            "end_offset": 4,
            "type": "<IDEOGRAPHIC>",
            "position": 3
        }
    ]
}使用ik分词器
GET /_analyze
{
    "analyzer": "ik_smart",
    "text": "我爱祖国"
}
# reponse
{
    "tokens": [
        {
            "token": "我",
            "start_offset": 0,
            "end_offset": 1,
            "type": "CN_CHAR",
            "position": 0
        },
        {
            "token": "爱祖国",
            "start_offset": 1,
            "end_offset": 4,
            "type": "CN_WORD",
            "position": 1
        }
    ]
}
分词模式有 ik_smart/ ik_max_word两种方式,可自行根据业务需求选择。
设定默认分词器
如果我们的业务中很多字段都是中文,那在字段定义是都要去指定analyzer是个很繁琐的工作,我们可以设定默认的分词器为ik,这样中英文都能做分词处理了。
PUT /index
{
    "settings" : {
        "index" : {
            "analysis.analyzer.default.type": "ik_smart"
        }
    }
}
注意:5.x版本后已无法在 elasticsearch.yaml中设定分词器配置,只能通过 restApi设定:
*************************************************************************************
Found index level settings on node level configuration.

Since elasticsearch 5.x index level settings can NOT be set on the nodes
configuration like the elasticsearch.yaml, in system properties or command line
arguments.In order to upgrade all indices the settings must be updated via the
/${index}/_settings API. Unless all settings are dynamic all indices must be closed
in order to apply the upgradeIndices created in the future should use index templates
to set default values.

Please ensure all required values are updated on all indices by executing:

curl -XPUT 'http://localhost:9200/_all/_settings?preserve_existing=true' -d '{
  "index.analysis.analyzer.default.type" : "ik_smart"
}'
*************************************************************************************
index.analysis.analyzer.default.type: ik_smart #默认索引/检索分词器
index.analysis.analyzer.default_index.type: ik_smart #默认索引分词器
index.analysis.analyzer.default_search.type: ik_smart #默认检索分词器问题小记
-
elasticsearch watermark
部署完后创建索引发现有些分片处于 Unsigned 状态,是由于 elasticsearch watermark:low,high,flood_stage的限定造成的,默认硬盘使用率高于85%就会告警,开发嘛,手动关掉好了,数据会分片到各节点,生产自行决断。curl -X PUT http://192.168.20.6:9201/_cluster/settings \ -H 'Content-type':'application/json' \ -d '{"transient":{"cluster.routing.allocation.disk.threshold_enabled": false}}'
完


**粗体** _斜体_ [链接](http://example.com) `代码` - 列表 > 引用。你还可以使用@来通知其他用户。