rwx
root用户除外 root用户不受任何限制
文件:
r(read,读取):对文件而言,具有读取文件内容的权限;
w(write,写入):对文件而言,具有新增、修改文件内容的权限;
x(execute,执行):对文件而言,具有执行文件的权限;
[skyuser1@VM_158_86_centos test]$ll
total 0
-r-xr-xr-x 1 skyuser1 skyuser1 0 May 23 17:25 a.txt
#没有w写入权限
[skyuser1@VM_158_86_centos test]$echo "aaa" > a.txt
-bash: a.txt: Permission denied

#没有r读取权限
[skyuser1@VM_158_86_centos test]$chmod 333 a.txt
[skyuser1@VM_158_86_centos test]$ll a.txt
--wx-wx-wx 1 skyuser1 skyuser1 0 May 23 17:27 a.txt
[skyuser1@VM_158_86_centos test]$cat a.txt
cat: a.txt: Permission denied
目录:
r(Read,读取):具有浏览目录的权限。
w(Write,写入):具有删除、移动、修改目录内文件的权限。
x(eXecute,执行):该用户具有进入目录的权限。
exec:
#根目录的目录权限
[skyuser1@VM_158_86_centos /]$ ll -d
dr-xr-xr-x. 20 root root 4096 May 23 11:39 .
#没有写入权限,所以对于普通用户而言不能创建任何文件
[skyuser1@VM_158_86_centos /]$ touch a.txt
touch: cannot touch ‘a.txt’: Permission denied
#不能删除文件
[skyuser1@VM_158_86_centos /]$ ll /a.txt
-rw-r--r-- 1 root root 24 Mar 12 17:34 /a.txt
[skyuser1@VM_158_86_centos /]$ rm -rf a.txt
rm: cannot remove ‘a.txt’: Permission denied
#不能移动文件
[skyuser1@VM_158_86_centos /]$ mv /a.txt  /home
mv: cannot move ‘/a.txt’ to ‘/home/a.txt’: Permission denied
root用户 无所不能
[root@VM_158_86_centos /]# touch b.txt
[root@VM_158_86_centos /]# ls /b.txt
/b.txt
文件的x执行权限
可以通过sh或bash执行.sh文件
但是不能通过./bill.sh执行文件
[skyuser1@VM_158_86_centos test]$ll bill.sh
-rw-rw-r-- 1 skyuser1 skyuser1 23 May 23 17:30 bill.sh
[skyuser1@VM_158_86_centos test]$sh bill.sh
123
[skyuser1@VM_158_86_centos test]$./bill.sh
-bash: ./bill.sh: Permission denied
感觉这个机制还是有问题的,只要执行bash xxx.sh文件在根目录下的root .sh文件就可以执行了
那拿x权限来干啥呢?
[wuyuhong@VM_158_86_centos temp_bird]$ su - root
Password:
Last login: Thu May 23 17:54:36 CST 2019 on pts/0
Last failed login: Thu May 23 17:59:49 CST 2019 on pts/0
There was 1 failed login attempt since the last successful login.
welcome to my world.please smile

[root@VM_158_86_centos ~]# cd /
[root@VM_158_86_centos /]# vim test.sh
[root@VM_158_86_centos /]# bash test.sh
我是root创建的可执行文件
[root@VM_158_86_centos /]# su - skyuser1
Last login: Thu May 23 17:52:27 CST 2019 on pts/0
welcome to my world.please smile

[skyuser1@VM_158_86_centos /]$bash test.sh
我是root创建的可执行文件
[skyuser1@VM_158_86_centos /]$ll test.sh
-rw-r--r-- 1 root root 54 May 23 18:00 test.sh
umask
建立一个新的文件或目录时,该文件的默认权限会根据umask来设定
umask就是指定 目前用户在建立文件或目录时候的权限默认值
[root@VM_158_86_centos vbird]# umask
0022
[root@VM_158_86_centos vbird]# umask -S
u=rwx,g=rx,o=rx
一般文件的建立不应该有执行权限,一般文件通常用于数据的记录,所以不需要x权限
-rw-rw-rw-目录的x权限决定用户是否能进入该目录,所以一般需要x权限
drwxrwxrwxumask的分数指的是该默认值需要减掉的权限
所以上面减下来:
-rw-r--r--
drwxr-xr-x
出于安全考虑root的默认umask 022,普通用户的默认umask 002,保留同群组的写入权利
文件隐藏属性
操作:
+ :增加一个特殊参数
- :移除一个特殊参数
= :设定一个特殊参数
option:
a:这个文件只能新增数据,不能删除,修改数据,只有root能设定
i:不能删除,改名,设定连结,无法新增编辑数据,只有root能设定
command:
lsattr [-adR] file Or Directory
-a:隐藏文件的属性显示出来
-d: 目录本身的隐藏属性
-R:连同子目录也一并列出来
chattr:
chattr +aiS testFile文件特殊权限
rwt
rws
[root@VM_158_86_centos ~]# ll -d /tmp
drwxrwxrwt. 7 root root 4096 5月  27 03:31 /tmp
[root@VM_158_86_centos ~]# ll /usr/bin/passwd
-rwsr-xr-x. 1 root root 27832 6月  10 2014 /usr/bin/passwd
Set UID(SUID)
/etc/shadow:保存着账户信息
[root@VM_158_86_centos ~]# ll /etc/shadow
---------- 1 root root 1133 May 23 17:55 /etc/shadow
/etc/shadow这个文件只有root可以读写
但普通用户能通过/usr/bin/passwd命令执行写入或更改密码的操作,也就是可以通过passwd向文件/etc/shadow写入修改数据的原因就是SUID
-rwsr-xr-x. 1 root root 27832 6月 10 2014 /usr/bin/passwd[wuyuhong@VM_158_86_centos ~]$ passwd
Changing password for user wuyuhong.
Changing password for wuyuhong.
(current) UNIX password:
New password:
Retype new password:
passwd: all authentication tokens updated successfully.SUID生效过程
wuyuhong对于/usr/bin/passwd具有x权限,表示wuyuhong能执行passwd

passwd的拥有者是root;

wuyuhong执行passwd的过程,会<暂时>获得root的权限;

/etc/shadow就可以被wuyuhong所执行的passwd所修改;prefect
然而
[wuyuhong@VM_158_86_centos ~]$ cat /etc/shadow
cat: /etc/shadow: Permission denied
[wuyuhong@VM_158_86_centos ~]$ ll /usr/bin/cat
-rwxr-xr-x 1 root root 54160 Oct 31  2018 /usr/bin/cat
cat指令没有SUID属性,so 不能cat /etc/shadow
SUID只对二进制可执行文件有效
SET GID(SGID)
locate指令具有SGID属性
[root@VM_158_86_centos ~]# ll /usr/bin/locate
-rwx--s--x 1 root slocate 40520 Apr 11  2018 /usr/bin/locate
locate的本质是去查询/var/lib/mlocate/mlocate.db数据库,从而获取结果
updatedb手动更新数据库,更新新增的文件、配置等
[root@VM_158_86_centos ~]# ll /var/lib/mlocate/mlocate.db
-rw-r----- 1 root slocate 3107582 May 27 16:13 /var/lib/mlocate/mlocate.db
这里可以看出只有root能读写mlocate.db,slocate群组能读取mlocate.db
见证奇迹
[root@VM_158_86_centos ~]# ll /usr/bin/locate
-rwx--s--x 1 root slocate 40520 Apr 11  2018 /usr/bin/locate
[root@VM_158_86_centos ~]# ll /var/lib/mlocate/mlocate.db
-rw-r----- 1 root slocate 3107582 May 27 16:13 /var/lib/mlocate/mlocate.db
[root@VM_158_86_centos ~]# su - wuyuhong
Last login: Mon May 27 16:13:58 CST 2019 on pts/0
welcome to my world.please smile

[wuyuhong@VM_158_86_centos ~]$ locate /usr/bin/passwd
/usr/bin/passwd
[root@VM_158_86_centos ~]# ll /usr/bin/locate
-rwx--s--x 1 root slocate 40520 Apr 11  2018 /usr/bin/locate
和SUID很相似,locate的other用户执行权限是x,具有执行权限
locate群组拥有者是slocate
执行locate的过程,会<暂时>获得slocate的权限;
so.slocate可以读取mlocate;prefect
SGID对二进制程序有用;
程序执行者对于该程序来说,需具备x的权限;
执行者在执行的过程中会获得该程序群组的支持
SGID不仅对二进制可执行文件有效,对目录依然有效
用户若对于此目录具有r与x权限,该用户能够进入此目录;
用户在此目录下的有效群组(effective group)将变成该目录的群组;
用途:若用户在此目录下具有w权限,则使用者所建立的新文件,该新文件的群组与此目录的群组相同
模拟测试:
[root@VM_158_86_centos ~]# groupadd project
[root@VM_158_86_centos ~]# useradd -G project pro_user1
[root@VM_158_86_centos ~]# useradd -G project pro_user2
[root@VM_158_86_centos ~]# id pro_user1
uid=1006(pro_user1) gid=1011(pro_user1) groups=1011(pro_user1),1010(project)
[root@VM_158_86_centos ~]# id pro_user2
uid=1007(pro_user2) gid=1012(pro_user2) groups=1012(pro_user2),1010(project)
[root@VM_158_86_centos ~]# mkdir /srv/prohome
[root@VM_158_86_centos ~]# ll -d /srv/prohome/
drwxr-xr-x 2 root root 4096 May 27 16:51 /srv/prohome/
[root@VM_158_86_centos ~]# chgrp project /srv/prohome/
[root@VM_158_86_centos ~]# chmod 770 /srv/prohome/
[root@VM_158_86_centos ~]# ll -d /srv/prohome/
drwxrwx--- 2 root project 4096 May 27 16:51 /srv/prohome/

[root@VM_158_86_centos ~]# su - pro_user1
welcome to my world.please smile

[pro_user1@VM_158_86_centos ~]$ cd /srv/prohome/
[pro_user1@VM_158_86_centos prohome]$ touch abc.txt
[pro_user1@VM_158_86_centos prohome]$ exit
logout

[root@VM_158_86_centos ~]# su - pro_user2
welcome to my world.please smile

[pro_user2@VM_158_86_centos ~]$ cd /srv/prohome/
[pro_user2@VM_158_86_centos prohome]$ echo "hello" > abc.txt
-bash: abc.txt: Permission denied
[pro_user2@VM_158_86_centos prohome]$ ll abc.txt
-rw-rw-r-- 1 pro_user1 pro_user1 0 May 27 17:14 abc.txt
abc.txt文件属于pro_user1的用户,同时也属于pro_user1
因此 pro_user2没有写入权限 只有r只读权限
这时就需要赋予/srv/prohome/的SGID权限 让pro_user1和pro_user2创建的文件为project群组文件
[pro_user1@VM_158_86_centos ~]$ cd /srv/prohome/
[pro_user1@VM_158_86_centos prohome]$ touch hello
[pro_user1@VM_158_86_centos prohome]$ ll hello
-rw-rw-r-- 1 pro_user1 project 0 May 27 22:37 hello


su: Authentication failure
[pro_user1@VM_158_86_centos prohome]$ su - root
Password:
Last login: Mon May 27 22:28:36 CST 2019 from 183.220.26.92 on pts/0
welcome to my world.please smile


[root@VM_158_86_centos ~]# su - pro_user2
Last login: Mon May 27 17:14:36 CST 2019 on pts/0
Last failed login: Mon May 27 22:38:49 CST 2019 on pts/0
There was 1 failed login attempt since the last successful login.
welcome to my world.please smile

[pro_user2@VM_158_86_centos ~]$ cd /srv/prohome/
[pro_user2@VM_158_86_centos prohome]$ echo "123" > hello
[pro_user2@VM_158_86_centos prohome]$ cat hello
123
添加SGID后创建的文件就为同组的主组project 同组的成员就可以访问和修改文件了
Sticky Bit
只对目录有效
当用户对于此目录具有w,x权限,即具有写入权限时;
当用户在该目录下建立文件或目录时,仅有自己和root才有权利操作该文件
意思就是只有自己能操作该目录下自己创建的文件,不能操作其他人创建的文件,其他人(同组,或other具有权限)有执行权限,也不能操作我的文件,我有其他人(同组,或other具有权限)的执行权限,也不能操作其他人的文件
设定SUID SGID SBIT
4为SUID
2为GID
1为SBIT

chmod 4755 XXX;
chmod 7755 XXX;
chmod u=rwxs,go=x XXX;
chmod u+s g+s o+t XXX

chmod 7666 test;ls -l test;
-rwSrwSrwT
666表示没有执行权限 所以这里设置7,所以为SST,SST表示无效状态
ACL (access control list)灵活的赋予特殊权限
为什么需要ACL?
传统的Linux权限只能针对一个用户(创建者),一个群组以及非此群组的其他人设定权限

假如我需要对该文件设定3个不同用户,两个不同群组的不同权限此时应该怎么办?
传统的权限控制是无法做到的,只有用ACL这个更细致的权限控制可以解决,
而传统的权限控制控制了一个大的范围,ACL再细分小的范围,真是太完美啦
那 ACL 主要可以针对哪些方面来控制权限呢?他主要可以针对几个项目:
使用者 (user):可以针对使用者来配置权限;
群组 (group):针对群组为对象来配置其权限;
默认属性 (mask):还可以针对在该目录下在创建新文件/目录时,规范新数据的默认权限;
getfacl
setfacl
shell,/sbin/nologin
系统账号的shell就是使用/sbin/nologin,
重点在于系统账号是不需要登录的,所以就给他这个无法登录的合法shell,
这个账号虽然无法登录,但是可以使用其他的系统资源、
ex:
WWW这个服务由apache这个账号在管理
mongodb这个数据库服务由mongodb账号在管理
使用者身份切换 su
su与su -
为了安全起见,尽量以一般身份使用者来操作linux的日常作业,
等到需要设定系统环境时,才变成为root来进行系统管理
#使用su切换身份时,读取的变量设定方式为non-login shell,这种方式很多原本的变量不会改变
[wuyuhong@VM_158_86_centos ~]$ su root
Password:
welcome to my world.please smile
[root@VM_158_86_centos wuyuhong]# env | grep "wuyuhong"
USER=wuyuhong
PATH=/root/.nvm/versions/node/v10.7.0/bin:/usr/local/bin:/bin:/usr/bin:/usr/local/sbin:/usr/sbin:/home/wuyuhong/.local/bin:/home/wuyuhong/bin
MAIL=/var/spool/mail/wuyuhong
PWD=/home/wuyuhong
LOGNAME=wuyuhong
#从普通用户使用su切换至root,当前shell的部分环境变量不会被改变
#然而使用su - 则是使用login-shell的方式切换用户,此时环境变量将完全改变
[wuyuhong@VM_158_86_centos ~]$ su - root
Password:
Last login: Sun Jun 16 19:10:04 CST 2019 on pts/0
welcome to my world.please smile
[root@VM_158_86_centos ~]# env | grep 'root'
NVM_DIR=/root/.nvm
USER=root
MAIL=/var/spool/mail/root
PATH=/root/.nvm/versions/node/v10.7.0/bin:/usr/local/sbin:/usr/local/bin:/sbin:/bin:/usr/sbin:/usr/bin:/root/bin
PWD=/root
HOME=/root
LOGNAME=root
NVM_BIN=/root/.nvm/versions/node/v10.7.0/bin
这种方式虽然很方式方便,但是需要知道root密码才行,所以不太安全
sudo
一开始系统默认仅有root可以执行sudo
sudo可以切换身份来进行某项任务
ex:当我们需要使用apache的账号来执行WWW某项服务时,但是 apache是/sbin/nologin的,无法使用su -进行切换,这时就要使用sudo来执行了。
sudo的执行流程:
1.当用户执行sudo时,系统会搜索/etc/sudoers文件中该使用者是否有执行sudo的权限
2.如果有权限,输入密码确认
3.密码成功,便开始sudo的后续接的命令
visudo和/etc/sudoers
编辑/etc/sudoers来管理sudo的使用者和使用范围PAM模块
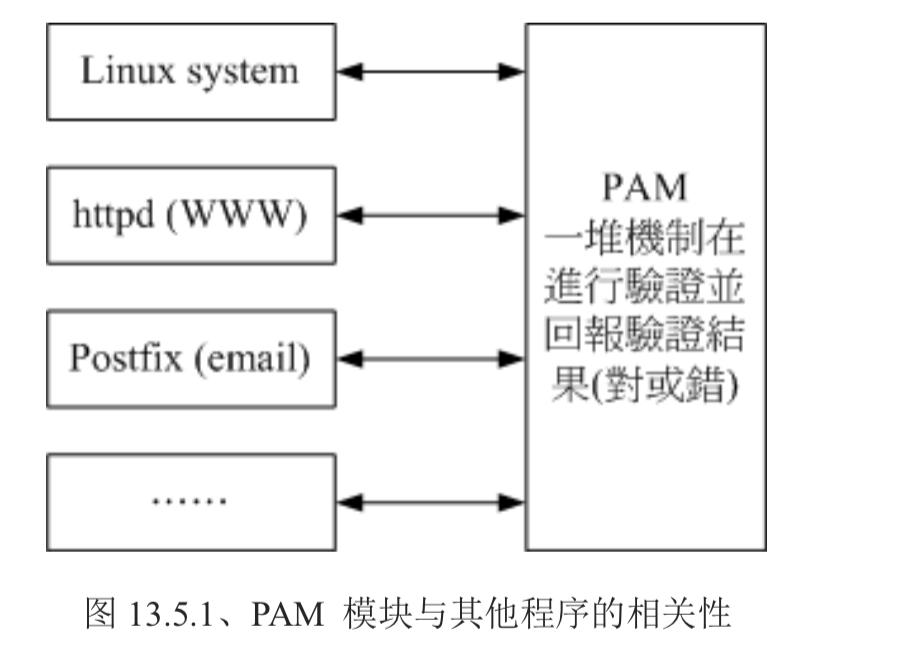
PAM是一套应用程序编程接口,他提供了一连串的验证机制,
只要使用者将验证阶段的需求告知PAM后,PAM就能回报使用者验证结果
PAM重点在于/etc/pam.d/里面的配置文件
SELinux
SELinux:Security Enhanced Linux:安全强化的Linux
其实SELinux是在进行进程、文件等细部权限设定依据的核心模块。
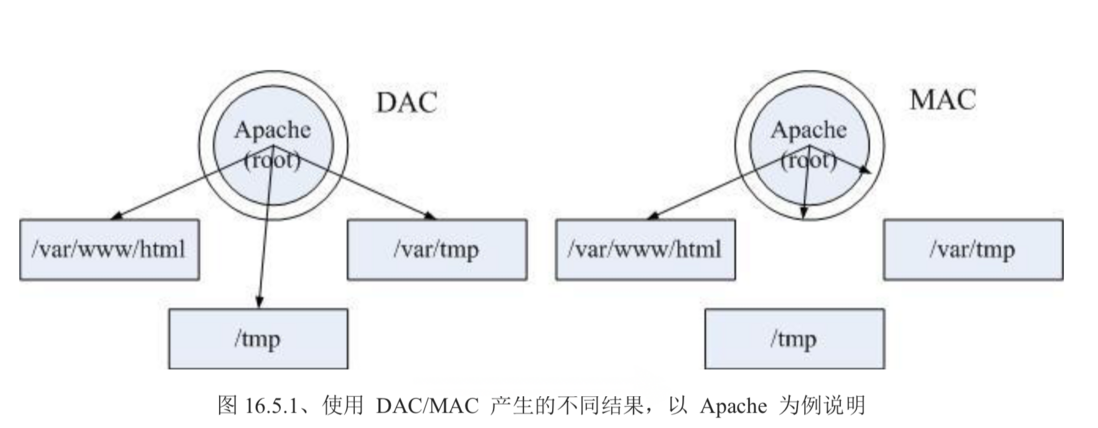
自主式访问控制- Discretionary Access Control,DAC
DAC:是依据进程的拥有者(root或一般用户)与文件资源的rwx来决定有无存取能力。
DAC弊端:
1.root具有最高的权限,如果该进程属于root的权限,那么该进程就可以在系统上进行任何资源的操作
2.使用者可变更资源的rwx权限,ex:把文件改为777权限,那么任何人都可以访问
委托式访问控制:Mandatory Access Control,MAC
MAC,可以根据特定的文件资源来进行权限的管控。


**粗体** _斜体_ [链接](http://example.com) `代码` - 列表 > 引用。你还可以使用@来通知其他用户。