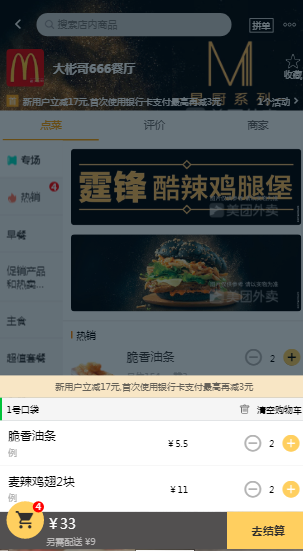
上次我们为商品分类菜单添加了显示购物数量,这篇我们继续推进项目,来实现购物车的详情页面,在开始之前我们先看它在页面中的样子:
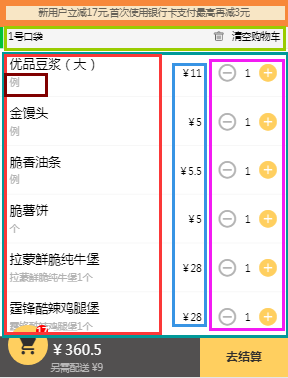
如上所示,此页面包含了购物列表,而它由商品名称,单价,增减商品功能构成,增减商品功能我们在商品列表中实现过,那么我们现在可以进行复用。
搭出购物车结构
我们将购物车底部构建出来,
<templete>
<div class="shopcart" :class="{'highligh':totalCount>0}">
        <div class="shopcart-wrapper">

        </div>
</div>
</templete>
老情况,在templete模板下的shopcart-wrapper内完成底部购物车一栏:
1 count大于0.让它打开
 <!-- 左=>内容包含购物车icon 金额 配送费 -->
            <div class="content-left">
                <div class="logo-wrapper" :class="{'highligh':totalCount>0}" @click="toggleList">
                    <span class="icon-shopping_cart logo" :class="{'highligh':totalCount>0}"></span>
                    <i class="num" v-show="totalCount">{{totalCount}}</i>
                </div>
                <div class="desc-wrapper">
                    <p class="total-price" v-show="totalPrice">¥{{totalPrice}}</p>
                    <p class="tip" :class="{'highligh':totalCount>0}">另需{{poiInfo.shipping_fee_tip}}</p>
                </div>
            </div>
            <!-- 去结算 -->
            <div class="content-right" :class="{'highligh':totalCount>0}">
                {{payStr}}
            </div>
搭建所选商品列表
如图所示,我们分好结构,紧接着搭建所选商品的列表
所选商品的列表 shopcart-list默认隐藏的,也就是说我们在没有选择食品的时候,点击购物车它不会展开。
1.list-hearder,左右结构包括1号口袋与清空购物车

2.list-content 列表,存放我们选择的食物

2.1左边是我们的食物名字,商品描述;右侧是数量,加减商品的组件。

<div class="shopcart-list" v-show="listShow" :class="{'show':listShow}">
                <!--列表顶部满减信息-->
                <div class="list-top" v-if="poiInfo.discounts2">
                    {{poiInfo.discounts2[0].info}}
                </div>
                <!--1号口袋 清空功能-->
                <div class="list-header">
                    <h3 class="title">1号口袋</h3>
                    <div class="empty" @click="emptyFn">
                        <img src="./ash_bin.png" />
                        <span>清空购物车</span>
                    </div>
                </div>
                <!--所选商品列表-->
                <div class="list-content" ref='listContent'>
                    <ul>
                        <li class="food-item" v-for="food in selectFoods">
                            <div class="desc-wrapper">
                                <!--左侧-->
                                <div class="desc-left">
                                    <!--所选商品名字-->
                                    <p class="name">{{food.name}}</p>
                                    <!--所选商品描述 unit 例 des 霆锋苦辣鸡腿堡1个-->
                                    <p class="unit" v-show="!food.description">{{food.unit}}</p>
                                    <p class="description" v-show="food.description">{{food.description}}</p>
                                </div>
                                <!--商品单价-->
                                <div class="desc-right">
                                    <span class="price">¥{{food.min_price}}</span>
                                </div>
                            </div>
                            <!--复用商品增减组件 Cartcontrol-->
                            <div class="cartcontrol-wrapper">
                                <Cartcontrol :food='food'></Cartcontrol>
                            </div>
                        </li>
                    </ul>
                </div>
                <div class="list-bottom"></div>
            </div>
加入遮罩层
        <!-- 遮罩层 -->
        <div class="shopcart-mask" v-show="listShow" @click="hideMask()"></div>
到这里,结构咱们就搭好了。
注册组件,添加功能
我们通过props为购物车组件传入所需要的数据;
计算属性:
通过totalCount计算所选的商品数量;
通过totalPrice计算所选商品的总价;
通过payStr控制去结算;
listShow是我们控制购物车详情页展示的要点,依据totalCount所选商品数量对fold折叠进行控制,fold为true,商品数量为0.购物车详情页为折叠状态。
接着我们将状态取反赋值到show,并且依据show,来控制商品详情页面商品一定多时,可以进行鼠标滚动。
方法:
通过toggleList点击购物车logo时候,进行判断,如果没有选择商品那么我们什么也不做。如果我们选择了商品,那么将fold取反。因为我们在计算属性listShow中设置过实例中的fold属性为true,所有它是折叠的。在我们取反后,它就会展开。
emptyFn清空购物车
最后我们点击遮罩层的时候,让遮罩层隐藏,也就是fold为true。
<script>
    // 导入BScroll
    import BScroll from 'better-scroll'
    // 导入Cartcontrol
    import Cartcontrol from 'components/Cartcontrol/Cartcontrol'

    export default {
        data() {
            return {
                fold: true
            }
        },
        props: {
            poiInfo: {
                type: Object,
                default: {}
            },
            selectFoods: {
                type: Array,
                default() {
                    return [
                        //                        {
                        //                            min_price: 10,
                        //                            count: 3
                        //                        },
                        //                        {
                        //                            min_price: 7,
                        //                            count: 1
                        //                        }
                    ];
                }
            }
        },
        computed: {
            // 总个数
            totalCount() {
                let num = 0;
                this.selectFoods.forEach((food) => {
                    num += food.count;
                });

                return num;
            },
            // 总金额
            totalPrice() {
                let total = 0;
                this.selectFoods.forEach((food) => {
                    total += food.min_price * food.count;
                });

                return total;
            },
            payStr() {
                if(this.totalCount > 0) {
                    return "去结算";
                } else {
                    return this.poiInfo.min_price_tip;
                }
            },
            listShow() {
                if(!this.totalCount) { // 个数为0
                    this.fold = true;

                    return false;
                }

                let show = !this.fold;

                // BScoll相关
                if(show) {
                    this.$nextTick(() => {
                        if(!this.shopScroll) {
                            this.shopScroll = new BScroll(this.$refs.listContent, {
                                click: true
                            });
                        } else {
                            this.shopScroll.refresh();
                        }
                    });
                }

                return show;
            }
        },
        methods: {
            toggleList() {
                if(!this.totalCount) { // 个数为0
                    return;
                }
                this.fold = !this.fold;
            },
            emptyFn() {
                this.selectFoods.forEach((food) => {
                    food.count = 0;
                });
            },
            hideMask() {
                this.fold = true;
            }
        },
        components: {
            Cartcontrol,
            BScroll
        }
    }
</script>
样式
<style>
.shopcart-wrapper{
    width: 100%;
    height: 51px;
    background: #514f4f;
    position: fixed;
    left: 0;
    bottom: 0;
    display: flex;
    z-index: 99;
}
.shopcart-wrapper.highligh{
    background: #2d2b2a;
}


.shopcart-wrapper .content-left{
    flex: 1;
}
.shopcart-wrapper .content-left .logo-wrapper{
    width: 50px;
    height: 50px;
    background: #666666;
    border-radius: 50%;
    position: relative;
    top: -14px;
    left: 10px;
    text-align: center;
    float: left;
}
.shopcart-wrapper .content-left .logo-wrapper.highligh{
    background: #ffd161;
}
.shopcart-wrapper .content-left .logo-wrapper .logo{
    font-size: 28px;
    color: #c4c4c4;
    line-height: 50px;
}
.shopcart-wrapper .content-left .logo-wrapper .logo.highligh{
    color: #2D2B2A;
}
.shopcart-wrapper .content-left .logo-wrapper .num{
    width: 15px;
    height: 15px;
    line-height: 15px;
    border-radius: 50%;
    font-size: 9px;
    color: white;
    background: red;
    position: absolute;
    right: 0;
    top: 0;
}
.shopcart-wrapper .content-left .desc-wrapper{
    float: left;
    margin-left: 13px;
}
.shopcart-wrapper .content-left .desc-wrapper .total-price{
    font-size: 18px;
    line-height: 33px;
    color: white;
}
.shopcart-wrapper .content-left .desc-wrapper .tip{
    font-size: 12px;
    color: #bab9b9;
    line-height: 51px;
}
.shopcart-wrapper .content-left .desc-wrapper .tip.highligh{
    line-height: 12px;
}


.shopcart-wrapper .content-right{
    flex: 0 0 110px;
    font-size: 15px;
    color: #BAB9B9;
    line-height: 51px;
    text-align: center;
    font-weight: bold;
}
.shopcart-wrapper .content-right.highligh{
    background: #FFD161;
    color: #2D2B2A;
}


.shopcart-wrapper .shopcart-list{
    position: absolute;
    left: 0;
    top: 0;
    z-index: -1;
    width: 100%;
}
.shopcart-wrapper .shopcart-list.show{
    transform: translateY(-100%);
}

.shopcart-wrapper .shopcart-list .list-top{
    height: 30px;
    text-align: center;
    font-size: 11px;
    background: #f3e6c6;
    line-height: 30px;
    color: #646158;
}

.shopcart-wrapper .shopcart-list .list-header{
    height: 30px;
    background: #F4F4F4;
}
.shopcart-wrapper .shopcart-list .list-header .title{
    float: left;
    border-left: 4px solid #53c123;
    padding-left: 6px;
    line-height: 30px;
    font-size: 12px;
}
.shopcart-wrapper .shopcart-list .list-header .empty{
    float: right;
    line-height: 30px;
    margin-right: 10px;
    font-size: 0;
}
.shopcart-wrapper .shopcart-list .list-header .empty img{
    height: 14px;
    margin-right: 9px;
    vertical-align: middle;
}
.shopcart-wrapper .shopcart-list .list-header .empty span{
    font-size: 12px;
    vertical-align: middle;
}

.shopcart-wrapper .shopcart-list .list-content{
    max-height: 360px;
    overflow: hidden;
    background: white;
}
.shopcart-wrapper .shopcart-list .list-content .food-item{
    height: 38px;
    padding: 12px 12px 10px 12px;
    border-bottom: 1px solid #F4F4F4;
}
.shopcart-wrapper .shopcart-list .list-content .food-item .desc-wrapper{
    float: left;
    width: 240px;
}
.shopcart-wrapper .shopcart-list .list-content .food-item .desc-wrapper .desc-left{
    float: left;
    width: 170px;
}
.shopcart-wrapper .shopcart-list .list-content .food-item .desc-wrapper .desc-left .name{
    font-size: 16px;
    margin-bottom: 8px;

    /* 超出部分隐藏*/
    -webkit-line-clamp: 1;
    display: -webkit-box;
    -webkit-box-orient: vertical;
    overflow: hidden;
    height: 16px;
}
.shopcart-wrapper .shopcart-list .list-content .food-item .desc-wrapper .desc-left .unit{
    font-size: 12px;
    color: #B4B4B4;
}
.shopcart-wrapper .shopcart-list .list-content .food-item .desc-wrapper .desc-left .description{
    font-size: 12px;
    color: #B4B4B4;

    /* 超出部分隐藏*/
    overflow: hidden;
    height: 12px;
}
.shopcart-wrapper .shopcart-list .list-content .food-item .desc-wrapper .desc-right{
    float: right;
    width: 70px;
    text-align: right;
}
.shopcart-wrapper .shopcart-list .list-content .food-item .desc-wrapper .desc-right .price{
    font-size: 12px;
    line-height: 38px;
}

.shopcart-wrapper .shopcart-list .list-content .food-item .cartcontrol-wrapper{
    float: right;
    margin-top: 6px;
}


.shopcart .shopcart-mask{
    position: fixed;
    top: 0;
    right: 0;
    width: 100%;
    height: 100%;
    z-index: 98;
    background: rgba(7,17,27,0.6);
}

</style>
总结
我们从搭购物车结构,到所选商品列表细化,这里我们复用了增减商品的组件,然后加入遮罩层。通过计算属性与方法,加入控制逻辑完成了购物车的详情页面。
下一篇我们来实现商品的详情页面,下周我们不见不散。


**粗体** _斜体_ [链接](http://example.com) `代码` - 列表 > 引用。你还可以使用@来通知其他用户。