[toc]
通过本文, 你可以学到一些vue中jsx的语法。
vue更加推荐使用模板开发组件,但是在一些基础组件开发中,为了获取js的完全编程能力,不可避免需要使用一些jsx语法,而官方vue jsx对vue特有的语法糖这方面的文档特别少, 本文记录一些本人在开发过程中使用jsx的经验和思考。
整体上来看,由于vue的createElement跟react的createElement有区别,导致jsx的写法也有一些区别.但整体上还是符合react的jsx,react jsx进阶的语法。
如果需要了解vue jsx特殊写法的原理,可以阅读babel-plugin-transform-vue-jsx , 本文不做探讨。
data写法
jsx本质上是createElement的语法糖,最终会被编译器转为createElement函数.当在jsx的标签中使用{ ...obj }时, obj将会编译为createElement的第二个参数.
vue的createElement跟react的createElement函数第二个参数意义是不一样的.在vue中,第二个参数是 data对象, 而react第二个参数是props。所以本人将这种方式称为data写法。
如在vue中需要设置动态属性时:
const props={
  name: 'joyer',
},

<my-button {...{
  props:props,
}}></my-button>
当不知道模板中某个vue语法怎么用jsx中实现时,可以先转换为createElement的data对象,然后使用{...data}写在jsx标签上(本文重点).
如官方推荐原生dom属性的jsx写法:
<button domPropsType="submit"><button>采用data写法为:
<button { ...{
  domProps: {
    type: 'submit',
  },
}}><button>
该方式不够优雅,如果官方有更加优雅的语法糖,推荐使用官方推荐。如果某个语法,官方没有案例,该方式就可以作为最终选择。 并且通过这种方式,createElement中所有的特性都可以用于jsx的开发了。
下文中所有的写法, 都可以使用data写法。
v-model的写法
官网中v-model写法不可行。
模板中写法为:
<el-input v-model.trim="inputValue"/>jsx写法需要为:
<el-input vModel_trim={inputValue}/>
// 或者使用
<el-input
 value={this.inputValue}
 on-input={val => this.inputValue = val.trim()}/>
v-for
模板中的写法:
<el-tag
 v-for="(item, index) in content"
 :key="index"
 type="success"
 >
    {{item.name}}
</el-tag>jsx的写法:
{
  this.content.map((item, index) = >{
    return (<el-tag
      key={ index }
      type="success">{ item.name }</el-tag>);
  })
}
事件 & 按键修饰符
官方的写法
<input vOn:click_stop_prevent="newTodoText" />一些编辑器会提示语法错误(因为react的jsx不允许这样写),推荐使用下面的写法
<input
 nativeOn-keyup={arg => arg.keyCode === 13 && this.fetch()}
on-click={event => {event.stopPropagation();event.preventDefault();this.click()} }/>修饰符需要自己在代码中实现。或者可以使用修饰符简写,对照官网的语法, jsx写法为:
<input {...{
    on: {
     '!click': () => this.doThisInCapturingMode,
    '~keyup': () => this.doThisOnce,
    '~!mouseover': () => this.doThisOnceInCapturingMode
    }
}} />
事件处理都采用了箭头函数, 跟react一样, 需要处理this绑定问题,可以使用bind绑定,
`on-click={this.click.bind(this, args) }`不能直接赋值函数on-click={this.click}。
高阶组件中的v-on="$listeners"和v-bind="$attrs"
在高阶组件中, 一般都会使用v-on="$listeners"和v-bind="$attrs",但在官方文档没有说明jsx如何实现,只有createElement中说明了实现:
return createElement('div', {
    props: {
      ...$attrs,
      otherProp: value,
    },
    on: {
      ...$listeners,
      click() {
      },
    }
},this.$slots.default])参照data写法, jsx实现为:
const data = {
  props: {
     ...$attrs,
     otherProp: value,
  },
  on: {
     ...$listeners,
     click() {
     },
  }
}

<button { ...data }><button>对于$attrs和$listeners可以有更加灵活的用法。如要实现elemet-ui中一个可以快速布局el-form-item高阶组件,将el-form-item跟el-col的结合:
render(h) {
 // 拆分出作用于col和form-item上的属性
 const colAttrs = {};
 const itemAtts = {};
 this.$attrs.forEach((attrName) => {
    // 这里使用了lodash
    if (_.startsWith(attrName, `col-`)) {
         colAttrs[attrName.replace(`col-`, '')] = this.$attrs[attrName];
         return;
    }
    itemAtts[attrName] = this.$attrs[attrName];
 });
 return (<el-col {
    ...{
       props: this.colAttrs,
    }
 }>
    <el-form-item {
        ...{
            props: this.itemAtts,
        }
    }></el-form-item>
 </el-col>);
}
该高阶组件可以传递两种类型的属性, 带col-开头的属性,作用于el-col上面, 其他属性作用于el-form-item组件上。
如果需要标签属性透传,将当前组件的所有attrs传递给内部组件(内部组件也用v-bind="$attrs"),还需设置attrs值。
如高阶组件my-button:
<el-button v-bind="$attrs" type="primary">
 <slot></slot>
</el-button>高阶组件high-button:
render(h) {
 return (<my-button { ...{
  props: this.attrs,
  attrs: this.$attrs,
 } }><my-button>);
}通过设置attrs将high-button接收到的所有标签设置传递给my-button中。如果不这样做, 那么my-button中将接收不到任何属性设置,因为只传递props,在high-button组件中对于没有匹配high-button的props声明的标签属性都会被丢弃。
slot写法
默认插槽模板写法:
<button>
    <slot></slot>
</button>jsx的写法:
<button>
    {this.$scopedSlots.default()}
</button>
具名插槽模板写法:
<button>
    <slot name="before"></slot>
    <slot ></slot>
</button>jsx写法:
let before = '';
if (this.$scopedSlots.before) {
    before = this.$scopedSlots.before(props => props.text);
}
return (<button>
    { before }
    {this.$scopedSlots.default()}
</button>)
作用域插槽模板写法:
<slot :isAdvancedPanelShow="isAdvancedPanelShow"></slot>jsx写法:
{this.$scopedSlots.default({
    isAdvancedPanelShow: this.isAdvancedPanelShow
})}
动态组件名字
还记得官网怎么介绍 createElement 获取js的完全编程能力吗? 举了一个根据不同的等级使用不同标题的案例:
Vue.component('anchored-heading', {
  render: function (createElement) {
    return createElement(
      'h' + this.level, // 标签名称
      this.$slots.default // 子节点数组
    )
  },
  props: {
    level: {
      type: Number,
      required: true
    }
  }
})这个案例通过jsx的写法为:
Vue.component('anchored-heading', {
  render: function (h) {
   const TagName = 'h' + this.level;
    return <TagName>{ this.$slots.default(this.props) }</TagName>
  },
  props: {
    level: {
      type: Number,
      required: true
    }
  }
})要知道,vue的createElement函数的第一个参数可以是一个 HTML 标签名、组件选项对象,或者resolve了上述任何一种的一个async函数。
动态组件编排
在实际开发中, 碰到一种场景, 有组件CompA, CompB, CompC 。如果是a情况,需要在当前组件按照CompA, CompB, CompC顺序展示, 如果是不是a情况, 则通过CompC, CompB, CompA来展示。jsx写法为:
render(h) {
 // 假设组件A是需要特殊设置一些属性的
 const compA = (<CompA name="joyer">hellow word</CompA>)
 const content = this.status === 'a' ? [compA, CompB, CompC] : [CompC, CompB, compA];
 return (<div>{content}</div>)
}
这里末尾也可以这样写:
return (<div>{...content}</div>)但在有些编辑器会报错,因为在react不允许这样写:
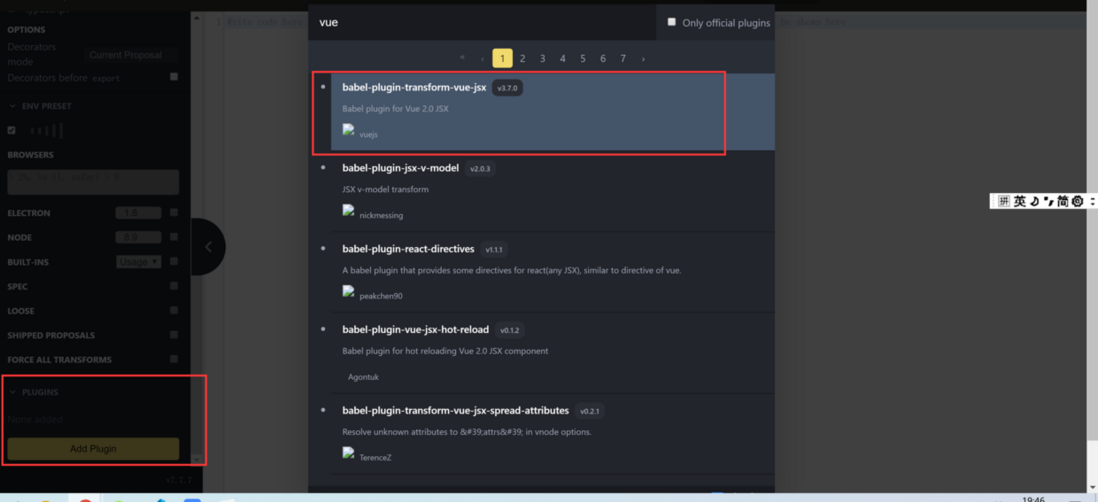
Spread children are not supported in React.在babel官方编辑器中尝试
可以在babel官方提供的编辑器中jsx尝试代码,不过需要记得在左边最下角添加babel=plugin-transform-vue-jsx插件:

**粗体** _斜体_ [链接](http://example.com) `代码` - 列表 > 引用。你还可以使用@来通知其他用户。