introduction
vite2-electron-admin a set of lightweight mid- and back-end system solutions. It integrates the development and implementation vite.js + electron12 Using the latest front-end technology stack, includes i18n international language, dynamic authority routing, and provides multi-functional form/form business functions.
Technical framework
- vue3 technology: vite.js+vue3.0+vuex4+vue-router@4
- Cross-end framework: electron^12.0.4
- Packaging tool: vue-cli-plugin-electron-builder
- UI component library: element-plus (eah? vue3 component library)
- Table drag and drop: sortablejs
- Chart component: echarts^5.1.1
- Internationalization: vue-i18n^9.1.6
- Mock data: mockjs
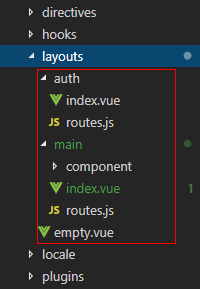
The project structure is as follows
feature
- Support PC and tablet adaptive layout
- The latest front-end technology Vite2, Vue3, Electron12, Element Plus, Vue-i18n, Echarts5.x
- Support component type + instruction type two authorization authentication methods
- Support Chinese/English/Traditional Internationalization program
- Support table drag and drop sorting, full screen, tree table and other functions
- Support multi-theme skin switching
electron-vite-admin also supports opening multiple windows. Take the following skinning window as an example. There have been related sharing articles before, so I won’t introduce them in detail here.
import { createWin } from '@/windows/actions'

// 换肤窗口
const handleOpenTheme = () => {
    createWin({
        title: '主题换肤',
        route: '/skin',
        width: 750,
        height: 480,
    })
}
electron+vite imitating mac style navigation bar
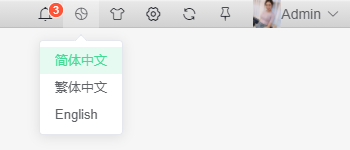
As shown above: For the consistency of the project UI, the top navigation bar is implemented with custom components, and the style is somewhat similar to mac navigation.
<template>
    <WinBar zIndex="1000">
        <template #wbtn>
            <MsgMenu />
            <Lang />
            <a class="wbtn" title="换肤" @click="handleSkinWin"><i class="iconfont icon-huanfu"></i></a>
            <Setting />
            <a class="wbtn" title="刷新" @click="handleRefresh"><i class="iconfont el-icon-refresh"></i></a>
            <a class="wbtn" :class="{'on': isAlwaysOnTop}" :title="isAlwaysOnTop ? '取消置顶' : '置顶'" @click="handleAlwaysTop"><i class="iconfont icon-ding"></i></a>
            <Avatar @logout="handleLogout" />
        </template>
    </WinBar>
</template>
As for the specific implementation, I won't introduce too much here. There have been some related sharing articles before.
Entry page main.js
/**
 * 渲染进程主入口
 * @author XiaoYan
 */
import { createApp } from 'vue'
import App from './App.vue'
import Router from './router'
import Store from './store'

// 引入公共配置
import gPlugins from './plugins'
import { winCfg, loadWin } from './windows/actions'

loadWin().then(config => {
    winCfg.window = config
    createApp(App).use(Router).use(Store).use(gPlugins).mount('#app')
})
Introduce the public component plugin.js
/**
 * 公共组件/插件配置文件
 * @author XiaoYan
 */

// 引入公共样式
import "@/assets/fonts/iconfont.css"
import "@/assets/css/common.scss"

// 引入elementPlus组件库
import ELPlus from "element-plus"

// 引入国际化配置
import VueI18n, { elPlusLang, getLang } from './i18n'

// 引入vue3自定义组件
import V3Layer from '@/components/v3layer'
import V3Scroll from '@/components/v3scroll'

// 引入公共组件模板
import WinBar from '@/components/winbar'
import WinBtn from '@/components/winbar/winbtn.vue'
import MacBtn from '@/components/winbar/macbtn.vue'
import Icon from '@/components/Icon'

import Utils from '@/utils'
import ElUtil from './elUtil'

const gPlugins = (app) => {
    app.use(ELPlus, {
        size: 'small',
        locale: elPlusLang[getLang()]
    })
    app.use(VueI18n)

    app.use(V3Layer)
    app.use(V3Scroll)

    // 注册公共组件
    app.component('WinBar', WinBar)
    app.component('WinBtn', WinBtn)
    app.component('MacBtn', MacBtn)
    app.component('Icon', Icon)

    // 注入全局依赖
    app.provide('utils', Utils)
    app.provide('elUtil', ElUtil)
}
Internationalization configuration vue-i18n
Create a new i18n.js to introduce international language configuration.
/**
 * 国际化配置 VueI18n util
 * @author XiaoYan  Q:282310962
 */

import { createI18n } from "vue-i18n"
import Storage from "@/utils/storage"

// 默认值
export const langKey = 'lang'
export const langVal = 'zh-CN'

/* elementPlus国际化配置 */
import enUS from "element-plus/lib/locale/lang/en"
import zhCN from "element-plus/lib/locale/lang/zh-cn"
import zhTW from "element-plus/lib/locale/lang/zh-tw"
export const elPlusLang = {
    'en-US': enUS,
    'zh-CN': zhCN,
    'zh-TW': zhTW,
}

/* 初始化多语言 */
export const $messages = importAllLang()
export const $lang = getLang()
const i18n = createI18n({
    legacy: false,
    locale: $lang,
    messages: $messages
})

/* 获取语言 */
export function getLang() {
    const lang = Storage.get(langKey)
    return lang || langVal
}

/**
 * 持久化存储
 * @param lang 语言类型 zh-CN / zh-TW / en-US
 */
export function setLang(lang, reload = false) {
    if(getLang() !== lang) {
        Storage.set(langKey, lang || '')
        // 设置全局语言
        // i18n.global.locale.value = lang

        // 重载页面
        if(reload) {
            window.location.reload()
        }
    }
}

/**
 * 自动化导入本地locale目录下语言配置
 */
export function importAllLang() {
    const langModule = {}
    try {
        const localeCtx = require.context('@/locale', true, /([a-z]{2})-?([A-Z]{2})?\.js$/)
        localeCtx.keys().map(path => {
            const pathCtx = localeCtx(path)
            if(pathCtx.default) {
                const pathName = path.replace(/(.*\/)*([^.]+).*/ig, '$2')
                if(langModule[pathName]) {
                    langModule[pathName] = {
                        ...langModule[pathName], ...pathCtx.default
                    }
                }else {
                    langModule[pathName] = pathCtx.default
                }
            }
        })
    } catch (error) {
        console.log(error)
    }
    return langModule
}
Project template layout
The project layout is divided into two main modules, Auth and Main.
- auth module template
<template>
    <div class="vadmin__wrapper">
        <router-view class="vadmin__layouts-auth"></router-view>
    </div>
</template>

<script>
import { useRoute } from "vue-router"
import useTitle from '@/hooks/useTitle'

export default {
    components: {},
    setup() {
        const route = useRoute()

        // 设置标题
        useTitle(route)
    }
}
</script>- main module template
<template>
    <div class="vadmin__wrapper" :style="{'--themeSkin': store.state.skin}">
        <div v-if="!route.meta.isNewin" class="vadmin__layouts-main flexbox flex-col">
            <!-- 顶部导航 -->
            <div class="layout__topbar">
                <TopNav />
            </div>

            <div class="layout__workpanel flex1 flexbox">
                <!-- 侧边栏 -->
                <div v-show="rootRouteEnable" class="panel__leftlayer">
                    <SideMenu :routes="mainRoutes" :rootRoute="rootRoute" />
                </div>

                <!-- 中间栏 -->
                <div class="panel__middlelayer" :class="{'collapsed': collapsed}">
                    <RouteMenu
                        :routes="getAllRoutes"
                        :rootRoute="rootRoute"
                        :defaultActive="defaultActive"
                        :rootRouteEnable="rootRouteEnable"
                    />
                </div>

                <!-- //右边栏 -->
                <div class="panel__rightlayer flex1 flexbox flex-col">
                    <!-- 面包屑 -->
                    <BreadCrumb />

                    <v3-scroll autohide>
                        <div class="lay__container">
                            <permission :roles="route.meta.roles">
                                <template #tooltips>
                                    <Forbidden />
                                </template>
                                <router-view></router-view>
                            </permission>
                        </div>
                    </v3-scroll>
                </div>
            </div>
        </div>
        <router-view v-else class="vadmin__layouts-main flexbox flex-col"></router-view>
    </div>
</template>
Chart Hook
In order to simplify the chart call, encapsulate a chart hooks. The element-resize-detector is used to monitor the dom size change.
import { onMounted, onBeforeUnmount, ref } from "vue"
import * as echarts from "echarts"
import elementResizeDetectorMaker from "element-resize-detector"
import utils from "@/utils"

export default function useChart(refs, options) {
    let chartInst
    let chartRef = ref(null)
    let erd = elementResizeDetectorMaker()

    const handleResize = utils.debounce(() => {
        chartInst.resize()
    }, 100)

    onMounted(() => {
        if(refs.value) {
            chartInst = echarts.init(refs.value)
            chartInst.setOption(options)
            chartRef.value = chartInst
        }
        erd.listenTo(refs.value, handleResize)
    })

    onBeforeUnmount(() => {
        chartInst.dispose()
        erd.removeListener(refs.value, handleResize)
    })

    return chartRef
}
In this way, every time you call, you only need to pass in the chart dom element and chart data to quickly generate a chart.
Okey, using electron+vite.js cross-terminal development back-end management system to temporarily share here.
finally attached Electron+Vue3 desktop imitating short video + live
https://segmentfault.com/a/1190000039725671


**粗体** _斜体_ [链接](http://example.com) `代码` - 列表 > 引用。你还可以使用@来通知其他用户。