最近看了 vue-design 项目,写的很棒,文中 diff 的思路全是来自该项目,这里只是做一个学习的记录。作者(【掘金地址】hcysunyang)已经是 vue3 的 contributor 了。值得学习的一位 前端人。再次感谢👏👏👏
我是一名前端的小学生。行文中对某些设计原理理解有误十分欢迎大家讨论指正😁😁😁,谢谢啦!当然有好的建议也谢谢提出来
(玩笑)
当前前端框架都有 diff算法,作用主要是处理比对虚拟Dom(Vnode),最大化复用旧节点,最后渲染为真实 Dom,最大化降低节点创建、删除的的开销。
老样子,本来写一篇文章的。东西越写越多就裂开了🤣
【第一篇】和面试官聊聊Diff___React(本文)
【第二篇】和面试官聊聊Diff___vue2
【第三篇】和面试官聊聊Diff___Vue3
好了,不说废话了。我们开始吧。
前言
vue 、react中都是组件构成,每个组件又是标签元素构成。
我主要技术栈是Vue。稍微说一下vue
vue编译会涉及到几个过程 【参考剖析 Vue.js 内部运行机制,推荐看看】
parse(解析) => optimize(优化) => generate(节点生成)
parse(解析)
将模板字符串解析为AST(在计算机科学中,抽象语法树(abstract syntax tree或者缩写为AST),或者语法树(syntax tree),是源代码的抽象语法结构的树状表现形式,这里特指编程语言的源代码),里面含有class、style等。如果要学正则,也可以看看,写的真不错的。optimize(优化)optimize的主要作用是标记static静态节点,这是 Vue 在编译过程中的一处优化,后面当 update 更新界面时,会有一个patch的过程, diff 算法会直接跳过静态节点,从而减少了比较的过程,优化了patch的性能。generate(节点生成)generate是将 AST 转化成 render function 字符串的过程,得到结果是 render 的字符串以及 staticRenderFns 字符串。
这个diff算法是处在optimize(优化)阶段的一个操作。
另外,各个框架的节点比对都是同级比对,即同一层级的相应子节点比对。
本文注重的是patch过程,具体的细节和边界就没有考虑。
==另 外 注 意==
- 三篇文章 diff 的讲解,为了方便展示 节点复用, 用了
children保存内容,实际上这是不合理的,因为children不同还会递归补丁(patch)- diff也不是vue optimize的全部,只是其中一部分,例如compile时确定节点类型,不同类型 不同的
mount/patch处理方式等等。
React_diff
基本思路
先说思路,
现在比如说由若干个新老节点(preNodes / nextNodes )。
- 先将新节点(
nextNodes)与老节点(preNodes)一一比对, - 遇到相同的节点(本文假设key相同即相同),根据索引相对大小判断节点是否需要移动
- 遇到新节点,就挂载到
nextNodes中上一个节点的前面 - 最后将移动后的节点(
newNodes)与新节点(nextNodes)比对去除多余节点
最后的结果就是由 nextNodes 、preNodes 产生的 节点树(newNodes)。
比如有如下新旧节点:
// 旧节点
const preNodes = [
  {key: "k-1", children: "<span>old1</span>"},
  {key: "k-2", children: "<span>old2</span>"},
  {key: "k-3", children: "<span>old3</span>"},
  {key: "k-4", children: "<span>old4</span>"},
  {key: "k-5", children: "<span>old5</span>"},
  {key: "k-6", children: "<span>old6</span>"},
]
//新节点,想要最后呈现的节点
const nextNodes = [
  {key: "k-11", children: "<span>11</span>"},
  {key: "k-0", children: "<span>0</span>"},
  {key: "k-5", children: "<span>5</span>"},
  {key: "k-13", children: "<span>13</span>"},
  {key: "k-1", children: "<span>1</span>"},
  {key: "k-7", children: "<span>7</span>"},
  {key: "k-16", children: "<span>16</span>"},
  {key: "k-3", children: "<span>3</span>"},
  {key: "k-15", children: "<span>15</span>"},
  {key: "k-17", children: "<span>7</span>"},
  {key: "k-4", children: "<span>4</span>"},
  {key: "k-6", children: "<span>6</span>"}
]
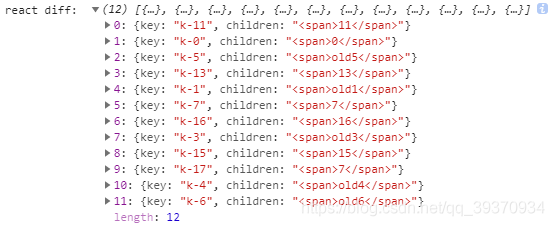
如上,在 preNodes 里如果有老节点可以复用,便用老节点替代他。期望的结果应该是
可以看到老节点都得到了复用~
下面就具体讲解得到最后新节点的过程。
图例讲解
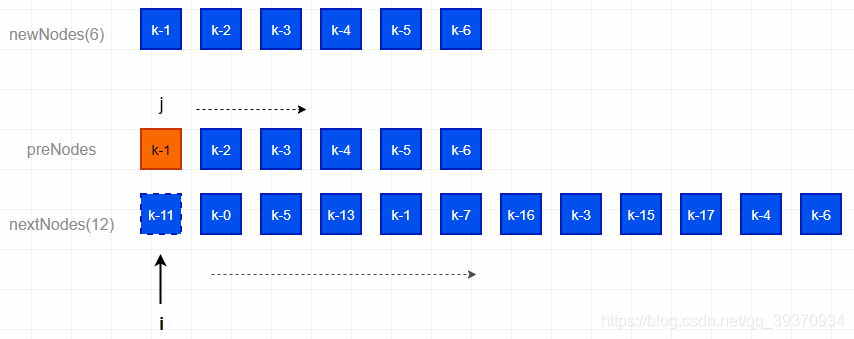
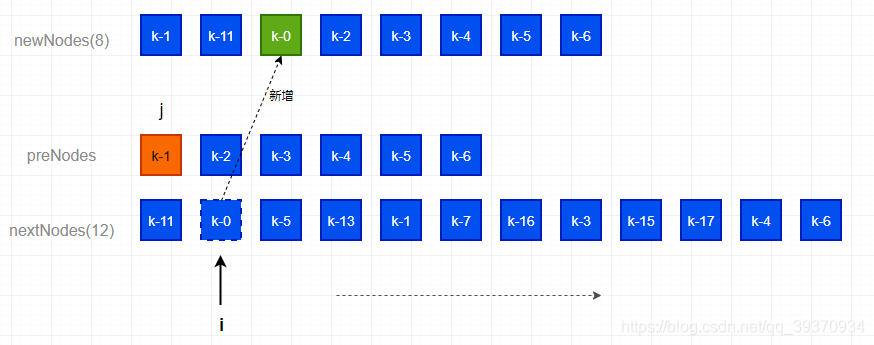
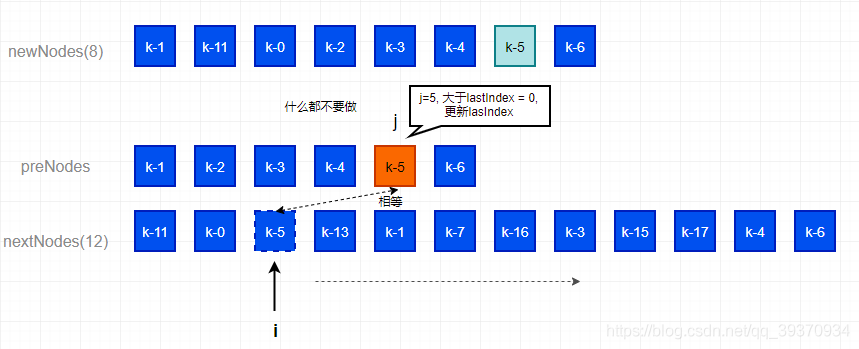
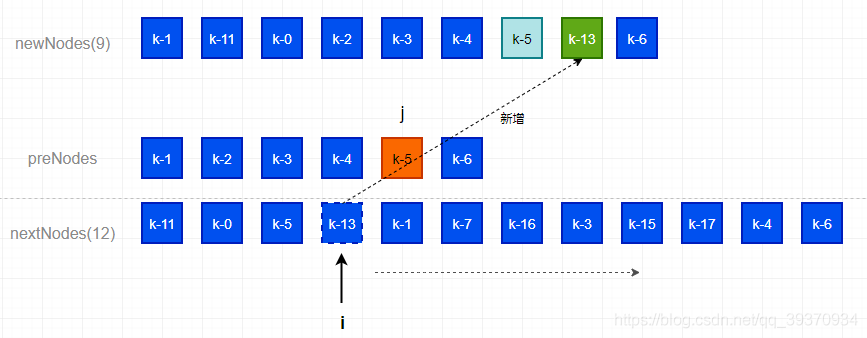
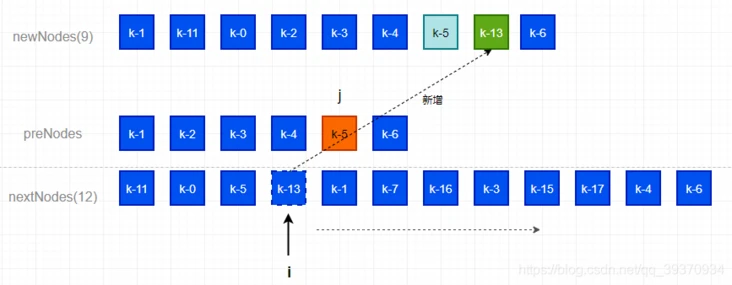
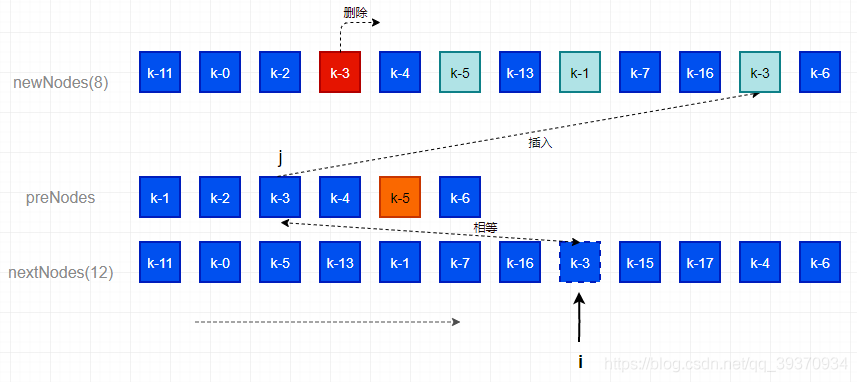
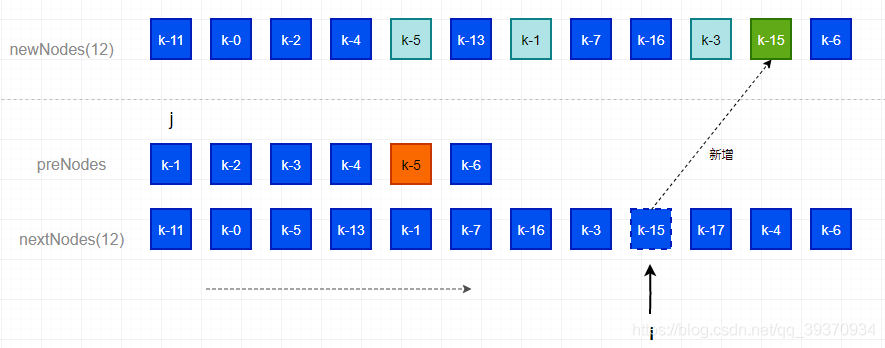
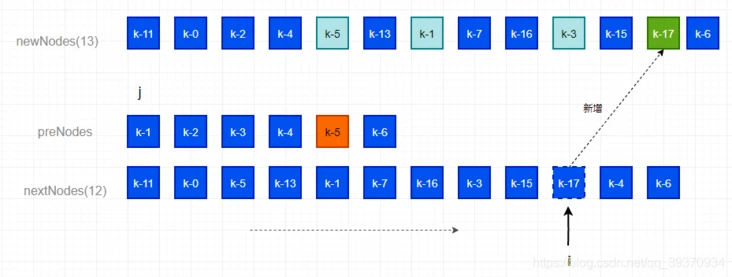
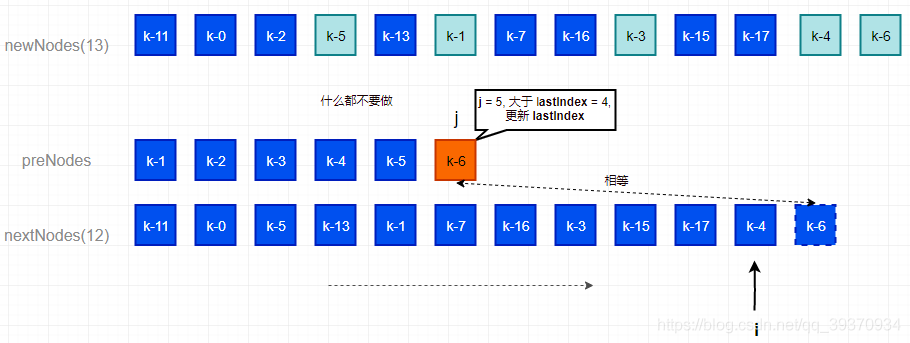
i是nextNodes的索引,j是preNodes的索引,每个nextNode都要与所有preNode节点作比对。preNodes的上一个索引节点橙色标记,虚线标记当前遍历的节点,绿色为新增节点,j标记的是相等的节点(如果有)
初始状态,新生成节点(newNodes)基于老节点
i=0, lastIndex=0 (默认值),k-11 在 preNodes 未找到, 为新节点。插入至 0 后
i=1, lastIndex=0(默认值),k-0 在 preNodes 未找到, 为新节点。插入至 i -1 节点后面
i=2, lastIndex=4(更新后),k-5 在preNodes找到索引(j=4 > lastIndex,index更新)插入(删除+新增),复用节点
i=3, lastIndex=4,k-13 在preNodes未找到, 为新节点。插入至 i -1节点 后
i=4, lastIndex=4,k-1 在 preNodes 找到索引(j=0 < lastIndex)插入(删除+新增)至 i - 1 后
i=5, lastIndex=0,k-7 在 preNodes 未找到,为新节点。插入至 i-1 节点后
i=6, lastIndex=0,k-16 在 preNodes 未找到,为新节点。插入至 i -1 节点后
i=7, lastIndex=4,k-3 在 preNodes 找到索引(j=2 < lastIndex)插入(删除+新增)至 i - 1 后
i=8, lastIndex=0,k-5 在 preNodes 未找到,为新节点。插入至 i -1 节点后
i=9, lastIndex=0,k-17 在 preNodes 未找到,为新节点。插入至 i-1 节点 后
i=10, lastIndex=4,k-4 在preNodes找到索引(j=3 < lastIndex)插入(删除+新增)至 i - 1 后
i=11, lastIndex=6(更新后),k-6 在 preNodes 找到索引(j=5 > lastIndex,index更新)插入(删除+新增),复用节点
遍历完成,清除多余节点。
最终结果
建议仔细理解。
代码实现
本节是代码的具体实现,不多做讲解,如果有任何疑虑建议精度图例讲解。或者留言交流,十分欢迎~~~
初版
// React_diff()
function React_diff(){
  console.log(nextNodes.map(item => item.key));
  const newNodes = JSON.parse(JSON.stringify(preNodes));
  let lastIndex = 0;
  for(let i=0; i< nextNodes.length; i++){
    const nextNode = nextNodes[i];
    let find = false;
    for(let j=0; j< preNodes.length; j++){
      const preNode = preNodes[j];
      if(preNode.key === nextNode.key){
        find = true;
        if(j < lastIndex){ // 需要移动
          /*
            insertBefore 效果时遇到同样的删除原来的再添加,
            这里因为是数组模拟,所以需要先添加再删除 ,
            数组处理有点不同,插入和删除索引 都是从老节点找的。
            [1,2,3].splice(0,0,4) => [4,1,2,3]
          */
          const index = i > 0 ? i-1 : 0;
          const insertPos = newNodes.findIndex(node => node.key === nextNodes[index].key);
          const deleteIndex = newNodes.findIndex(node => node.key === preNode.key);

          //添加由于 splice 是在某索引前面加。所以insertPos+1
          newNodes.splice(insertPos+1, 0, preNode)
          //删除
          newNodes.splice(deleteIndex, 1);
        }else {
          lastIndex = j;
        }
      }
    }
    if(!find) {// 插入新节点
      const index = i > 0 ? i-1 : 0;
      const insertPos = newNodes.findIndex(node => node.key === nextNodes[index].key);
      newNodes.splice(insertPos + 1, 0, nextNode);
    }
  }

  for(let i = newNodes.length - 1; i>=0; i--){
    let find = false;
    for(let j =0; j<nextNodes.length; j++){
      if(nextNodes[j].key === newNodes[i].key){
        find = true;
        continue;
      }
    }
    if(!find){
      newNodes.splice(i, 1);
    }
  }
  console.log('react diff: ', newNodes);
}
优化版
优化点可以利用key与index的做个对应关系,少一层遍历.
function React_diff(){
  const newNodes = JSON.parse(JSON.stringify(preNodes));
  let lastIndex = 0;

  //产生nextNodes 的keyInIndexmap
  const prekeyInIndex = {};
  for(let i =0; i< preNodes.length; i++){
    prekeyInIndex[preNodes[i].key] = i;
  }

  for(let i=0; i< nextNodes.length; i++){
    const nextNode = nextNodes[i];
    let find = false;
    const j = prekeyInIndex[nextNode.key];
    if(typeof j !== 'undefined') {
      find = true;
      const preNode = preNodes[j];
      console.log(j, lastIndex);
      if(j < lastIndex){ // 需要移动
        /*
          insertBefore 效果时遇到同样的删除原来的再添加,
          这里因为是数组模拟,所以需要先添加再删除 ,
          数组处理有点不同,插入和删除索引 都是从老节点找的。
          [1,2,3].splice(0,0,4) => [4,1,2,3]
        */
        const index = i > 0 ? i-1 : 0;
        const insertPos = newNodes.findIndex(node => node.key === nextNodes[index].key);
        const deleteIndex = newNodes.findIndex(node => node.key === preNode.key);

        //添加由于 splice 是在某索引前面加。所以insertPos+1
        newNodes.splice(insertPos+1, 0, preNode)
        //删除
        newNodes.splice(deleteIndex, 1);
      }else {
        lastIndex = j;
      }
    }
    if(!find) {// 插入新节点
      const index = i > 0 ? i-1 : 0;
      const insertPos = newNodes.findIndex(node => node.key === nextNodes[index].key);
      newNodes.splice(insertPos + 1, 0, nextNode);
    }
  }

  //产生nextNodes 的keyInIndexmap
  const nextkeyInIndex = {};
  for(let i =0; i< nextNodes.length; i++){
    nextkeyInIndex[nextNodes[i].key] = i;
  }
  for(let i = newNodes.length - 1; i>=0; i--){
    const idx = nextkeyInIndex[newNodes[i].key];
    if(typeof idx === 'undefined'){
      newNodes.splice(i, 1);
    }
  }
  console.log('react diff: ', newNodes);
}
总结
本文中例子只是为了更好理解 diff 思路, patch 过程与真实情况还有些差异(下面为与vue patch的一些差异。可做参考)
重复节点问题。新老节点有重复节点时,本文diff函数没处理这种情况。仅是用数组模拟了Vnode,真实的Vnode 不止 key和children,还有更多的参数比对相同节点时,仅比对了 key, 真实其实还涉及到 class(类名) 、attrs(属性值)、孩子节点(递归)等属性比对;另外上面的children也要比对若不同也要递归遍历插入、删除、添加节点我用的数组。其实应该用。insertbefore、delete、add。这些方法均是单独封装不能采用相对应的 Dom Api,因为 vue 不止用在浏览器环境- ...
Vue@3.2⇲ 已经出来了,React@18也快了,哎,框架学不完。还是多看看不变的东西吧(js, 设计模式, 数据结构,算法...)哎哎哎,,同志,看完怎么不点赞,别看别人就说你呢,你几个意思?
参考
站在别人肩膀能看的更远。
【推荐】vue-design
【掘金小册】剖析Vue.js内部运行机制
【CSDN】React、Vue2.x、Vue3.0的diff算法
以上。








**粗体** _斜体_ [链接](http://example.com) `代码` - 列表 > 引用。你还可以使用@来通知其他用户。