背景
项目开发中,前端同学经常会本地联调测试环境,联调的方法有很多,在《前端项目本地调试方案》一文中我最后讲述到在浏览器与前端项目本地服务之间加一层代理服务(正向代理),帮助自动登录拿到令牌后转发请求获取静态页面、静态资源以及受保护资源,从而实现联调。
原理
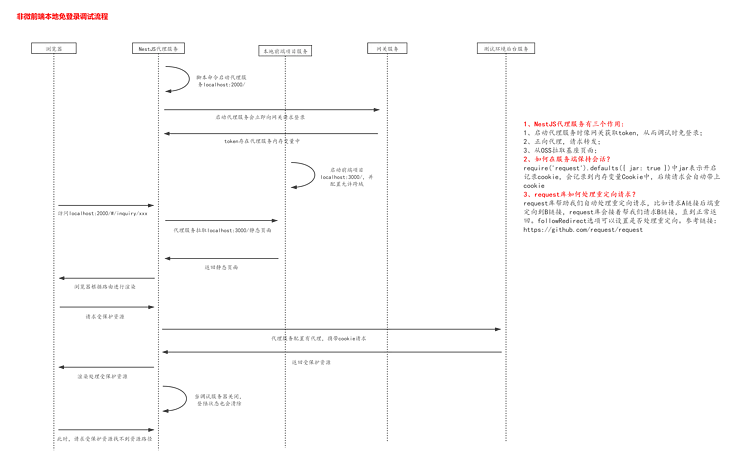
流程描述:
- 首先本地启动前端本地项目和代理服务,代理服务帮助实现自动登录,拿到令牌
- 浏览器输入访问地址,请求首先会到代理服务,代理服务会根据代理配置判断该请求是向前端本地服务获取静态资源还是向后端服务获取受保护资源。这里的请求可以大致分为三种,一是构建后的静态页面以及构建的静态资源(脚本、样式);二是向后端服务请求受保护资源;三是页面加载后向OSS获取静态资源,一般是图片
- 代理服务获取到资源后返回给浏览器渲染
实践
首先,创建工程文件夹fe-debug-cli,在当前文件夹执行npm init生成package.json管理依赖
然后执行以下命令安装项目所需要的包。使用express框架搭建代理服务;body-parser用来解析请求体参数;request用来发送请求,它还有一个很重要的功能就是可以将获取到的令牌存在服务的内存中,下次请求会自动携带令牌;yargs用来解析命令行参数;项目打算引入typescript,执行tsc --init生成并初始化tsconfig.json,使用tsc-watch编译,tsc-watch会监听文件变化,只要发生改变就会再次编译。
yarn add express body-parser request yargs typescript tsc-watch按如下结构初始化项目空间
fe-debug-cli
├── bin // 存放自定义命令所执行的脚本
├── cmds // 存放定义的子命令
├── config // 配置文件
├── src
    ├── interfaces // 类型文件
    ├── routes // 请求路由
    ├── utils // 工具类
    ├── app.ts // 应用主文件
├── index.js // 入口文件
├── package.json
└── tsconfig.json
从app.ts主文件开始编写代理服务
// app.ts
/* eslint-disable @typescript-eslint/no-var-requires */
import express from 'express';
import bodyParser, { OptionsJson } from 'body-parser';

/** 路由 */
const indexRouter = require('./routes/index');
/** 端口 */
const port = process.env.PORT || 2000;
const app = express();

/** body解析 */
app.use(bodyParser.json({ extended: false } as OptionsJson));
/** 注册路由 */
app.use('/', indexRouter);


app.listen(port, () => {
  console.log(`代理已启动: http://localhost:${port}`);
});
请求路由处理,服务启动时会调登录接口获取令牌存放在内存中
// src/routes/index.ts
import express, { Request, Response } from 'express';
import { userAgent } from '@src/interfaces';
import { config, getProxy } from '@src/utils';
import request, { RequiredUriUrl, CoreOptions } from 'request';

const router = express.Router();
const ask = request.defaults({ jar: true }); // jar表示存储登录状态

// 请求转发
router.all('*', async (req: Request, res: Response) => {
    const options: RequiredUriUrl & CoreOptions = {
        method: req.method,
        url: getProxy(req.originalUrl),
        headers: {
            'Content-Type': req.headers['content-type'] || req.headers['Content-Type'],
            'User-Agent': userAgent,
        },
    };
    if (req.method === 'POST' && JSON.stringify(req.body) !== '{}') {
        options.json = true;
        options.body = req.body;
    }
    const result = ask(options);
    if (result instanceof Promise) {
        const { result: r } = await result;
        res.send(r);
        return;
    }
    result.pipe(res);
    return;
});

/** 自动登录 */
const login = () => {
    const host = config.proxy[0].target;
    console.log('url', `${host}/passport/login`);
    const options = {
        method: 'POST',
        url: `${host}/passport/login`,
        headers: {
            'Content-Type': 'multipart/form-data',
            'User-Agent': userAgent,
        },
        formData: {
            ...config.user,
            logintype: 'PASSWORD',
        },
    };
    ask(options, (error) => {
        if (error) throw new Error(error);
        ask({
            method: 'GET',
            url: host,
            headers: {
                'User-Agent': userAgent,
            },
        }, (e, r, b) => {
            if (e) {
                throw new Error(e);
            }
            if (b && b.indexOf('登录') > -1 && b.indexOf('注册') > -1) {
                console.log(chalk.green.bold('登录失败,请检查!'));
            } else {
                console.log(chalk.green.bold('登录成功!'));
            }
        });
    });
};

login();

module.exports = router;
工具类
// src/utils/index.ts
import { IProxy } from '@src/interfaces';

/** 读取配置文件 */
// eslint-disable-next-line @typescript-eslint/no-var-requires
export const config = require(process.env.CONFIG_PATH || '../../config/debug.js');

/** 代理url */
export const getProxy = (path: string): string => {
    const { proxy, html } = config;
    const t = proxy.filter((p: IProxy) => p.path.some((s: string) => path.includes(s)));
    return t.length ? t[0].target + path : html + path;
};
入口文件,其中不执行编译前的主文件是因为项目发布不会把源代码也发布出去,只会发布编译构建之后的代码
// index.js
const path = require('path');
// 编译和运行时路径映射不一样,tsconfig.json配置路径映射仅仅在编译时生效,在运行时不会起作用,因此这里需要引入module-alias库帮助在运行时解析路径映射
const moduleAlias = require('module-alias');

(function run() {
  moduleAlias.addAlias('@src', path.resolve(__dirname, './dist'));
  // 执行编译后的主文件
  require('./dist/app');
})();
现在,代理服务相关代码基本完成,下面来配置一下编译选项、package.json以及命令行参数
编译后得脚本需要在node环境执行,因此module属性需要指定为"commonjs",tsconfig.json配置如下:
{
  "compilerOptions": {
    /* Basic Options */
    "incremental": true,                         /* Enable incremental compilation */
    "target": "ES2017",                                /* Specify ECMAScript target version: 'ES3' (default), 'ES5', 'ES2015', 'ES2016', 'ES2017', 'ES2018', 'ES2019', 'ES2020', 'ES2021', or 'ESNEXT'. */
    "module": "commonjs",                           /* Specify module code generation: 'none', 'commonjs', 'amd', 'system', 'umd', 'es2015', 'es2020', or 'ESNext'. */
    "declaration": true,                         /* Generates corresponding '.d.ts' file. */
    "declarationMap": true,                      /* Generates a sourcemap for each corresponding '.d.ts' file. */
    "removeComments": true,                      /* Do not emit comments to output. */
    /* Strict Type-Checking Options */
    "strict": true,                                 /* Enable all strict type-checking options. */
    /* Module Resolution Options */
    "baseUrl": "./",                             /* Base directory to resolve non-absolute module names. */
    "paths": {
      "@src/*": ["./src/*"],
    },                                 /* A series of entries which re-map imports to lookup locations relative to the 'baseUrl'. */
    "esModuleInterop": true,                        /* Enables emit interoperability between CommonJS and ES Modules via creation of namespace objects for all imports. Implies 'allowSyntheticDefaultImports'. */
    /* Advanced Options */
    "skipLibCheck": true,                           /* Skip type checking of declaration files. */
    "forceConsistentCasingInFileNames": true        /* Disallow inconsistently-cased references to the same file. */
  },
  "exclude": [
    "node_modules", "test", "dist", "**/*spec.ts"
  ],
  "include": [
    "src"
  ]
}
package.json中主要配置编译命令、加上bin属性定义命令,以及files属性定义安装的文件
"scripts": {
    "build": "rimraf dist && tsc -p tsconfig.json",
    "start:dev": "tsc-watch -p tsconfig.json --onSuccess \"node index.js\"",
    "start:debug": "tsc-watch -p tsconfig.json --onSuccess \"node --inspect-brk index.js\""
},
"bin": {
    "fee": "./bin/index.js"
},
"files": [
    "bin/*",
    "cmds/*",
    "config/*",
    "dist/*",
    "index.js",
    "package.json",
    "tsconfig.json",
    "README.md"
]
接下来解析命令行参数,#!/usr/bin/env node的作用是指明该脚本在node环境下执行;commandDir制定子命令,子命令会执行入口文件index.js,从而启动代理服务
#!/usr/bin/env node
require('yargs')
  .scriptName('fee')
  .usage('Usage: $0 <command> [options]')
  .commandDir('../cmds')
  .demandCommand()
  .example('fee debug -c debug.js -p 3333')
  .help('h')
  .alias('v', 'version')
  .alias('h', 'help')
  .argv;
子命令
const fs = require('fs');
const path = require('path');

exports.command = 'debug';

exports.describe = '调试应用';

exports.builder = yargs => {
    return yargs
        .option('config', {
            alias: 'c',
            default: 'debug.js',
            describe: '配置文件',
            type: 'string',
        })
        .option('port', {
            alias: 'p',
            default: 3000,
            describe: '端口',
            type: 'number',
        })
    .argv
};

exports.handler = function(argv) {
    const configPath = path.resolve(process.cwd(), argv.config);
    if (!fs.existsSync(configPath)) {
        console.log('没有配置文件');
        process.exit();
    }

    process.env.PORT = argv.port;
    process.env.CONFIG_PATH = configPath;
    process.env.NAMESPACE = argv.namespace;
    require('../index.js'); // 执行入口文件
};
现在,只剩下最后的发布工作,先npm login登录npm仓库,然后执行编译命令yarn build,接着就可以执行npm publish发布了,这里需要注意执行发布命令之前需要切回到npm镜像
全局安装fee-debug-cli调试看看效果
浏览器发送的请求在控制台是没有携带令牌的,携带上令牌是代理服务做的事
注意:代理服务启动后出现了一个奇怪的现象,钉钉消息经常发不出去,时常断线,这可能是因为代理服务代理转发了所有的请求,并没有区分域名。因此,需要判断代理的请求是否来源于localhost:xxx域名下。
仓库地址:fe-debug-cli


**粗体** _斜体_ [链接](http://example.com) `代码` - 列表 > 引用。你还可以使用@来通知其他用户。