【Spring Web MVC】
Request
@RequestMapping
提供路由信息,负责URL到Controller中具体函数的映射。
@GetMapping 👈
GET请求:从服务器获取特定资源。
@GetMapping("/blog")相当于@RequestMapping(value="/blog",method=RequestMethod.GET)
@PostMapping 👈
POST请求:在服务器上创建一个新的资源。
@PostMapping("/blogs/save")等价于@RequestMapping(value="/blog/save",method=RequestMethod.POST)
consumes属性用于指定请求输入,而produces用于指定请求输出。
@PostMapping(consumes="application/json")
    @ResponseStatus(HttpStatus.CREATED)
    public Taco postTaco(@RequestBody Taco taco) {
        return tacoRepo.save(taco);
    }
@PutMapping
PUT请求:更新服务器上的资源,客户端提供更新后的整个资源。
@DeleteMapping
DELETE请求:从服务器删除特定的资源
@PatchMapping
PATCH请求:更新服务器上的资源,客户端提供更改的属性,可以看作为部分更新
params
@PathVariable 👈
获取路径参数,从url模板里取值,接收请求路径中占位符的值。
比如:
 @GetMapping("/blog/{id}")
 public Result detail(@PathVariable(name = "id") Long id){
     Blog blog = blogService.getById(id);
     return Result.succ200(blog);
}
@RequestParam 👈
获取查询参数,从request里拿数据。
@GetMapping("/blog") //分页处理
public Result list(@RequestParam(defaultValue = "1") Integer currentPage){
   Page page = new Page(currentPage,5);
   IPage pageData = ……
   return Result.succ200(pageData);
}
这里前端的代码是这样的:
_this.$axios.get("/blog?currentPage=" + currentPage)@RequestParam 支持下面四种参数
- defaultValue 如果本次请求没有携带这个参数,或者参数为空,那么就会启用默认值
- name 绑定本次参数的名称,要跟URL上面的一样
- required 这个参数是不是必须的
- value 跟name一样的作用,是name属性的一个别名
@RequestBody 👈
用于读取Request请求的body部分,并且ContentType为application/json格式的数据,接收到数据后会自动将数据绑定到Java对象上。系统会使用HttpMessageConverter(或者自己定义)将请求的body中的json字符串转换为java对象。
@RequiresAuthentication //需要认证之后才能访问
@PostMapping("/blog/edit")
public Result edit(@Validated @RequestBody Blog blog) {
    Blog temp = null;
    if(blog.getId() != null) {
           ……
一个请求方法只可以有一个@RequestBody,但是可以有多个@RequestParam和@PathVariable。
@ModelAttribute
@ModelAttribute标注可被应用在方法或方法参数上。
标注在方法上的@ModelAttribute说明方法是用于添加一个或多个属性到model上。这样的方法能接受与@RequestMapping标注相同的参数类型,只不过不能直接被映射到具体的请求上。
@CrossOrigin
允许来自任何域的客户端消费该API
@RestController  //REST控制器
@RequestMapping(path="/design",produces="application/json")
@CrossOrigin(origins="*")  //允许跨域请求
public class DesignTacoController {
    private TacoRepository tacoRepo;
    @Autowired
    EntityLinks entityLinks;
    public DesignTacoController(TacoRepository tacoRepo) {
        this.tacoRepo = tacoRepo;
    }
    ……
@Controller
对应Spring MVC控制层,主要用于接收用户请求并调用Service层提供的功能返回数据给前端。
@RestController 👈
@RestController注解:
相当于@Controller+@ResponseBody两个注解的结合。
返回json数据不需要在方法前面加@ResponseBody注解了,但使用@RestController这个注解,就不能返回jsp,html页面,视图解析器无法解析jsp,html页面。
该注解将函数的返回值直接填入HTTP响应体,是REST风格的控制器。
@ControllerAdvice
定义全局异常处理类。包含@Component。
@RestControllerAdvice

@InitBinder
@InitBinder用于在@Controller中标注于方法,表示为当前控制器注册一个属性编辑器或者其他,只对当前的Controller有效。
Response
@ResponseStatus
@ResponseStatus(HttpStatus.CREATED)@ResponseStatus(HttpStatus.UNAUTHORIZED) //401 没有权限
@ExceptionHandler(value = ShiroException.class)
public Result handler(ShiroException e){
log.error("没有权限");
return Result.succ(401,e.getMessage(),null);
}@ResponseBody
表示该方法的返回结果直接写入HTTP response body中,一般在异步获取数据时使用,用于构建REST风格的api。
在使用@RequestMapping后,返回值通常解析为跳转路径,加上@ResponseBody后返回值不会被解析为跳转路径,而是直接写入HTTP response body中。
@ExceptionHandler
声明异常处理方法。
/**
* 全局异常处理
*/
@Slf4j
@RestControllerAdvice //@RestControllerAdvice都是对Controller进行增强的,可以全局捕获spring mvc抛的异常
public class GlobalExceptionHandler {
@ResponseStatus(HttpStatus.UNAUTHORIZED) //401 没有权限
    @ExceptionHandler(value = ShiroException.class)
    public Result handler(ShiroException e){
        log.error("没有权限");
        return Result.succ(401,e.getMessage(),null);
    }
@ResponseStatus(HttpStatus.BAD_REQUEST)
@ExceptionHandler(value = RuntimeException.class)
public Result handler(RuntimeException e){
log.error("运行时异常");
return Result.succ400(e.getMessage());
}
【Spring Bean】
@ComponentScan
见Spring Boot部分。
@Component
通用的注解,可标注任意类为Spring组件。当一个Bean难以明确为哪个层时,可以使用这个。
@Service
对应服务层,主要涉及一些逻辑。
@Repository
对应持久层Dao层,常用于数据库相关。
@Bean 👈
方法级别上的注解,主要用在@Configuration或@Component注解的类里
- @Bean 注解作用在方法上
- @Bean 指示一个方法返回一个 Spring 容器管理的 Bean
- @Bean 方法名与返回类名一致,首字母小写
- @Bean 一般和 @Component 或者 @Configuration 一起使用
- @Bean 注解默认作用域为单例 singleton 作用域,可通过@Scope(“prototype”) 设置为原型作用域
默认情况下 Bean 名称就是方法名
@Bean
public MyBean myBean() {
    return new MyBean();
}
@Bean 注解支持设置别名,myBean1和myBean都可以用
@Bean("myBean1")
public MyBean myBean() {
    return new MyBean();
}
可以通过 @Bean 注解的 initMethod 和 destrodMethod 进行指定 Bean 在初始化和销毁时需要调用相应的方法,相当于XML文件bean标签里的:init-method和destroy-method--> <bean id="personService" class="com.myapp.core.beanscope.PersonService" scope="singleton" init-method="init" destroy-method="cleanUp">
public class MyBean {
    public void init() {
        System.out.println("MyBean开始初始化...");
    }

    public void destroy() {
        System.out.println("MyBean销毁...");
    }

    public String get() {
        return "MyBean使用...";
    }
}
@Bean(initMethod="init", destroyMethod="destroy")
public MyBean myBean() {
return new MyBean();
}@Scope
声明Spring Bean的作用域
@Bean
@Scope("singleton")
public User userSingleton(){
    return new User();
}
这里singleton其实是Spring Bean的默认作用域。
【容器配置】
@Autowired 👈
自动导入对象到类中,被注入进的类同样要被Spring容器管理,比如:Service类注入到Controller类中。
@Service
public class XxxService{

}

@Controller
public class xxxController{
    @Autowired
    private XxxService xxxService;
}@Autowired可以对类成员变量、方法以及构造方法进行标注,让Spring完成Bean自动装配的工作。
默认是按照类去匹配,配合@Qualifier按指定名称去装配bean
想把类标识为可用于@Autowired注解自动装配的Bean类,可以使用@Component、@Repository、@Service、@Controller注解修饰类。
- @Autowired(required=true):当使用@Autowired注解的时候,其实默认就是@Autowired(required=true),表示注入的时候,该bean必须存在,否则就会注入失败。
- @Autowired(required=false):表示忽略当前要注入的bean,如果有直接注入,没有跳过,不会报错。
@Autowired 在构造函数上
首先让我们在构造函数上使用@Autowired。我们将看到SampleServiceSpring将其注入到AutowireDITestService.@Component public class SampleService { public void sample() { System.out.println("Sample Service"); } }
@Component
public class AutowireDITestService {

        // ...
  private SampleService sampleService;

  @Autowired
  public AutowireDITestService(SampleService sampleService) {
    this.sampleService = sampleService;
  }

        // ...
}- 在 setter 方法上添加 @Autowired
在以下示例中,setter 方法ExampleService在AutowireDITestService创建时使用实例调用。
@Component
public class ExampleService {

  public void example() {
    System.out.println("Example Service");
  }
}
@Component
public class AutowireDITestService {
// ...
private ExampleService exampleService;
@Autowired
public void setExampleService(ExampleService exampleService) {
this.exampleService = exampleService;
}
// ...
}//We can also apply @Autowired on methods with any number of arguments.
@Component
public class AutowireCustomMethodDITestService {
private DemoService demoService;
private ExampleService exampleService;
private SampleService sampleService;
@Autowired
public void initialize(DemoService demoService, ExampleService exampleService, SampleService sampleService) {
this.demoService = demoService;
this.exampleService = exampleService;
this.sampleService = sampleService;
}
// ...
}- 在属性上使用@Autowired
这样我们就可以避免自动装配属性的 setter 和 getter。
package com.javabydeveloper.spring.autowire.service;

@Component
public class DemoService {

  public void demo() {
    System.out.println("Demo Service");
  }
}
@Component
public class AutowireDITestService {
// @Autowired on property
@Autowired
private DemoService demoService;
// ...
}- 从 5.0 开始,Spring 支持对单个方法和构造函数参数进行@Autowired注解。但核心 Spring Framework 中唯一主动支持自动装配参数的部分是spring-test 模块中的 JUnit Jupiter 支持 。
@SpringJUnitConfig(AppConfigForAutowired.class)
class AutowireParametersTest {

  private SampleService sampleService;

  // @Autowired on constructor parameters
  AutowireParametersTest(@Autowired SampleService sampleService) {
    this.sampleService = sampleService;
  }

  // @Autowired on method parameters
  @Test
  void injectServicesTest(@Autowired DemoService demoService,
      @Autowired(required = true) ExampleService exampleService) {

    demoService.demo();
    exampleService.example();
    sampleService.sample();
  }
}
@Primary
当一个接口有2个不同实现时,使用@Autowired注解时会报org.springframework.beans.factory.NoUniqueBeanDefinitionException异常信息,
Primary可以理解为默认优先选择,不可以同时设置多个,内部实质是设置BeanDefinition的primary属性。
@PostConstruct
当我们在 Spring Bean 中使用@PostConstruct注解注解一个方法时,它会在 Spring bean 初始化后执行。
我们只能用@PostConstruct注解来注解一种方法。这个注解是Common Annotations API 的一部分,也是 JDK 模块的一部分javax.annotation-api。因此,如果您在 Java 9 或更高版本中使用此注释,则必须显式地将此 jar 添加到您的项目中。如果您使用的是 maven,则应向其中添加以下依赖项。
<dependency>
    <groupId>javax.annotation</groupId>
    <artifactId>javax.annotation-api</artifactId>
    <version>1.3.2</version>
</dependency>
如果您使用的是 Java 8 或更低版本,则无需添加上述依赖项。
@PreDestroy
When we annotate a Spring Bean method with PreDestroy annotation, it gets called when bean instance is getting removed from the context.
This is a very important point to understand – if your spring bean scope is “prototype” then it’s not completely managed by the spring container and PreDestroy method won’t get called.
@Qualifier
当有多个同一类型的Bean时,可以用Qualifier("name")来指定。与@Autowired配合使用。
【Spring Boot】
Conditional 条件装配
Spring 4.0添加的新注解,用来标识一个Spring Bean或者Configuration配置文件,当满足指定的条件才开启配置。
按条件注册Bean
- @ConditionalExpression
- @ConditionalOnNotWebApplication
- @ConditionalOnWebApplication
- @ConditionalOnResource
- @ConditionalOnProperty
- @ConditionalOnMissingBean
- @ConditionalOnBean
- @ConditionalOnMissingClass
@ConditionalOnClass
@SpringBootApplication
@SpringBootApplication自动加载所有配置文件并扫描当前包及其子包中的组件。
SpringBoot项目的基石,创建SpringBoot项目之后会默认在主类加上,标识这是一个SpringBoot应用。
是 @SpringBootConfiguration、@EnableAutoConfiguration、@ComponentScan 这三个注解的组合
@ComponentScan
Spring 3.1添加的注解,用来代替配置文件中的component-scan配置,开启组件扫描。
自动扫描包路径下的@Component注解进行注册bean实例到context中。
扫描被@Component(@Service,@Controller)注解的bean,注解默认会扫描该类所在包下所有的类。
@EnableAutoConfiguration
启用SpringBoot的自动配置机制,开启这个注解之后,SpringBoot就能根据当前类路径下的包或者类来配置Spring Bean。
@AutoConfigurationPackage
@SpringBootConfiguration
@Configuration注解的变体,只是用来修饰是SpringBoot配置而已。
@Configuration 👈
等同于Spring的XML配置文件里的<Beans\>标签
@Bean可以理解为用Spring时的<Bean\>
在@Configuration类中被@Bean标注的方法会被Spring进行CGLIB代理,从而进行增强。
允许在Spring上下文中注册额外的bean或导入其他配置类
用于声明配置类,可以使用@Component注解替代。
Configuration的两种配置
Full 模式:@Configuration(proxyBeanMethods = true) 全模式
Lite 模式:@Configuration(proxyBeanMethods = false) 轻量级模式
【读取配置信息】
@value ⚙
读取简单的配置信息。
假设yml文件里有car: 巴拉巴拉
@Value("${car}")
String car;
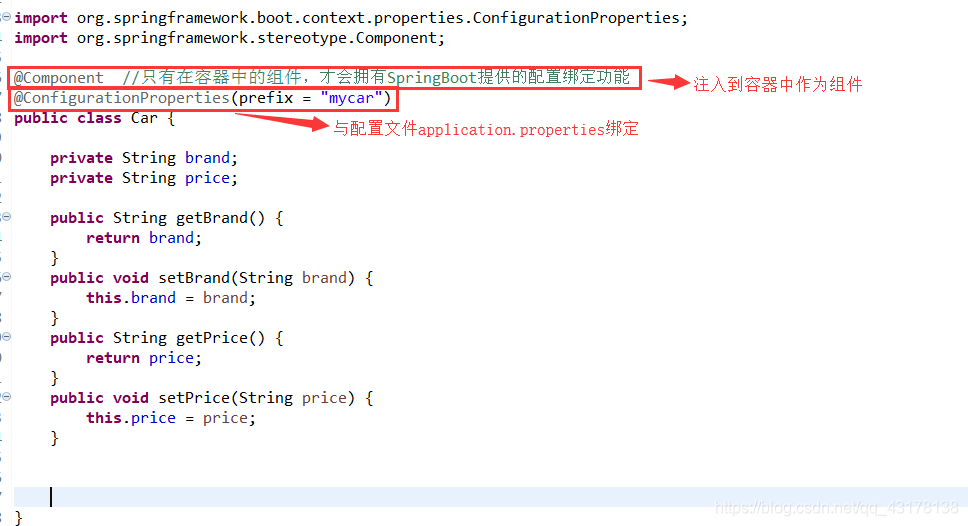
@ConfigurationProperties ⚙
用来加载额外的配置(如.properties文件),可用在@Configuration注解类、或@Bean注解方法上。
@Component:注入到容器中作为组件
@ConfigurationProperties:和配置文件绑定


@EnableConfigurationProperties ⚙
一定要配合@ConfigurationProperties注解使用,用来开启@ConfigurationProperties注解配置Bean的支持。
@EnableConfigurationProperties:开启指定类的属性配置功能,并且注入到容器中
和配置文件绑定还是要绑定的。
【参数校验】
JSR是一套JavaBean参数校验的标准,定义了很多常用的校验注解,可以将注解直接加在Java Bean的属性上。
校验时实际用的是Hibernate Validator框架。
SpringBoot项目中的spring-boot-starter-web依赖中已经有hibernate-validator包,不需要引入依赖。
使用注解的时候,推荐import的是:
import javax.validation.constraints.xxxx;- @NotEmpty 被注释的字符串的不能为 null 也不能为空
- @NotBlank 被注释的字符串非 null,并且必须包含一个非空白字符
- @Null 被注释的元素必须为 null
- @NotNull 被注释的元素必须不为 null
- @AssertTrue 被注释的元素必须为 true
- @AssertFalse 被注释的元素必须为 false
- @Pattern(regex=,flag=)被注释的元素必须符合指定的正则表达式
- @Email 被注释的元素必须是 Email 格式。
- @Min(value)被注释的元素必须是一个数字,其值必须大于等于指定的最小值
- @Max(value)被注释的元素必须是一个数字,其值必须小于等于指定的最大值
- @DecimalMin(value)被注释的元素必须是一个数字,其值必须大于等于指定的最小值
- @DecimalMax(value) 被注释的元素必须是一个数字,其值必须小于等于指定的最大值
- @Size(max=, min=)被注释的元素的大小必须在指定的范围内
- @Digits (integer, fraction)被注释的元素必须是一个数字,其值必须在可接受的范围内
- @Past被注释的元素必须是一个过去的日期
- @Future 被注释的元素必须是一个将来的日期
……
import javax.validation.constraints.NotBlank;

@Data
@EqualsAndHashCode(callSuper = false)
@Accessors(chain = true)
@TableName("m_blog")
public class Blog implements Serializable {

    private static final long serialVersionUID = 1L;

    @TableId(value = "id", type = IdType.AUTO)
    private Long id;

    private Long userId;

    @NotBlank(message = "标题不能为空")
    private String title;

    @NotBlank(message = "摘要不能为空")
    private String description;

    @NotBlank(message = "内容不能为空")
    private String content;

    //这里时间在前端显示的格式不太满意,加个注解
    @JsonFormat(pattern = "yyyy-MM-dd")
    private LocalDateTime created;

    private Integer status;

}
【Spring Cloud】
@SpringCloudApplication
@EnableDiscoveryClient
@SpringBootApplication
常用配合
- @Controller类 + @Autowired属性(Service类)
- @Configuration类 + @Bean方法,集成其他框架
**粗体** _斜体_ [链接](http://example.com) `代码` - 列表 > 引用。你还可以使用@来通知其他用户。