In web design, it is very important to use an organized method to display data, so that users can clearly understand the data structure and content displayed on the website. Using an ordered list is a way to achieve an organized display of data. The simple way.
If you need more in-depth control over the style of ordered list numbers, you may feel that you have to add more html DOM structures or through JavaScript . Fortunately, using the CSS counter can solve this problem more easily. In this article, I mainly introduce what is the CSS counter and some use cases.
The problem with ordered lists
When you write an ordered list as follows, the browser will automatically add a number in front of the list item
<ol>
  <li>My First Item</li>
  <li>My Second Item</li>
  <li>My Third Item</li>
</ol>
This looks good, but it doesn't allow you to make style adjustments to the numbers. If you need to put the number before the list into a circle to decorate the list, what should you do?
One way is to delete the list completely and add the numbers manually by yourself.
<div>
  <span>1</span> My First Item
</div>
<div>
  <span>2</span> My Second Item
</div>
<div>
  <span>3</span> My Third Item
</div>
div {
margin-bottom:10px;
}
div span {
display:inline-flex;
align-items:center;
justify-content:center;
width:25px;
height:25px;
border-radius:50%;
background-color:#000;
color:#fff;
}This is indeed the effect we want to do, but it also has some disadvantages. First of all, it is cumbersome to add numbers manually. If you need to change a number, you must change them one by one. Faced with this situation, you can use JavaScript dynamically add <span> tags to solve these problems, but this will DOM , resulting in a lot of memory usage.
In most cases, it is better to use CSS counters. Let's take a look at the reasons.
Introduction to CSS counters
CSS counter is a page-wide variable, and its value can be CSS rule.
First, set the counter counter-reset list-number is the variable name used here.
div.list {
  counter-reset: list-number;
}
Next, use the counter-increment attribute to increase the value of the counter.
div.list div {
  counter-increment: list-number;
}
Now, every time the div.listdiv element appears, the list-number variable will increase by one.
Finally, use the :before content attribute and the counter() function to display the number.
div.list div:before {
  content: counter(list-number);
}
Here is the complete code:
<div class="list">
  <div>My first item</div>
  <div>My second item</div>
  <div>My third item</div>
</div>
div.list {
counter-reset: list-number;
}
/** 可以在:before 为元素中使用 counter-increment **/
div.list div:before {
counter-increment: list-number;
content: counter(list-number);
}We have not fully reached the goal yet. Let's :before pseudo-element to make it look better.
div.list div:before {
  counter-increment: list-number;
  content: counter(list-number);

  margin-right: 10px;
  margin-bottom:10px;
  width:35px;
  height:35px;
  display:inline-flex;
  align-items:center;
  justify-content: center;
  font-size:16px;
  background-color:#d7385e;
  border-radius:50%;
  color:#fff;
}
<iframe allowfullscreen="true" allowpaymentrequest="true" allowtransparency="true" class="cp_embed_iframe " frameborder="0" height="265" width="100%" name="cp_embed_1" scrolling="no" src="https://codepen.io/SupunKavinda/embed/OJybvoq?height=265&theme-id=dark&default-tab=css%2Cresult&user=SupunKavinda&slug-hash=OJybvoq&pen-title=OJybvoq&name=cp_embed_1" style="width: 100%; overflow:hidden; display:block;" title="OJybvoq" loading="lazy" id="cp_embed_OJybvoq"></iframe>
Modify the starting number
By default, counter-reset sets the counter to 0. When the first counter-increment is called, its initial value becomes 1. You can set the initial value by using an integer as the second parameter of the counter-reset
div.list {
  counter-reset: list-number 1;
}
If you want to start from 0 , you can set the initial value to -1 .
div.list {
  counter-reset: list-number -1;
}
Change the increment value
By default, counter-increment will increase the value of the counter by one. Just like counter-reset , you can define the offset value of the counter-increment
In this example, counter-reset sets list-number to 0 . Every time counter-increment is called, the list-number will increase by 2 , so you will see the list order is 2 , 4 and 6 .
div.list {
  counter-reset: list-number;
}
div.list div:before {
  counter-increment: list-number 2;
  // other styles
}
Counter format
counter() function can have two parameters: counter-name and counter-format . For the second parameter, you can use any valid list type value, including:
decimal(e.g., 1, 2, 3…)lower-latin(e.g., a, b, c…)lower-roman(e.g., i, ii, iii…)
The default value is a number.
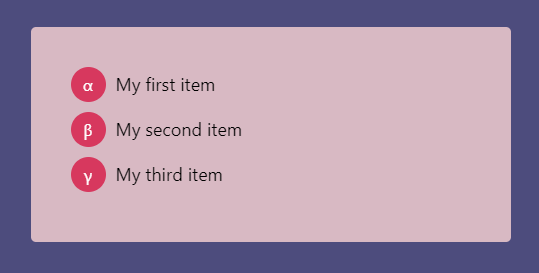
For example, if you are as scientific as me, you can use lower-greek lowercase Greek letters as the number value.
div.list div:before {
  counter-increment: list-number;
  content: counter(list-number, lower-greek);
  // ... other styles
}
Counter nesting
When using a nested order list, always display the number in this format:
If you need the numerical number of the item (for example, 1.1), you can use the 16170c2a9586d5 CSS counter counters() function.
<ol>
  <li>
     My First Item
    <ol>
      <li>My Nested First Item</li>
      <li>My Nested Second Item</li>
    </ol>
  </li>
  <li>My Second Item</li>
</ol>
ol {
list-style-type:none;
counter-reset:list;
}
ol li:before {
counter-increment:list;
content: counters(list, ".") ". ";
}Note that we are using the counters() function, not the counter() function.
counters() function is the connection string. It can also have a third parameter to set the format (for example, Greek or Roman numerals).
Nested counter with title
Elements such as <h1> and <h2> not nested in the document. They appear as different elements, but still represent a hierarchy. Here's how to set the nested number into the title:
body {
  counter-reset:h1;
}
h1 {
  counter-reset:h2;
}
h1:before {
  counter-increment: h1;
  content: counter(h1) ". ";
}
h2:before {
  counter-increment:h2;
  content: counter(h1) "." counter(h2) ". ";
}
Every time <h1> is found, the <h2> counter is reset. <h2> number obtained in the document and <h1> related.
Browser support
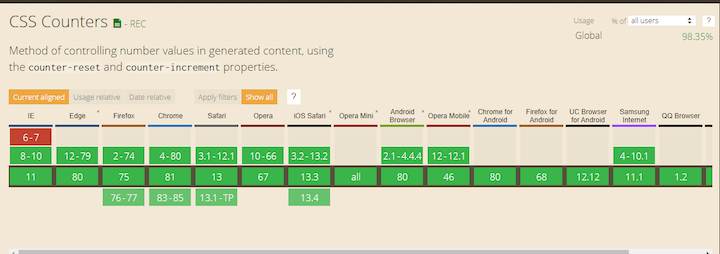
Fortunately, the CSS counter has been widely supported by browsers since it was launched together CSS2 Although the use of the counter() function in properties other than content is still experimental, you can perform all the examples covered in this tutorial without hesitation.
A simple challenge
Are you ready for the simple challenge involving CSS counters?
Use the CSS counter 1 to 1000 and its Roman characters in the 10 line of code.
If you are stumped, here is how you can do it:
To create 1000 div elements, you can use the following.
for (var i = 0; i < 1000; i++) {
  document.body.appendChild( document.createElement("div") );
}
CSS counter:
body {
  counter-reset:number;
}
div:before {
  counter-increment:number;
  content: counter(number) " => " counter(number, lower-roman);
}
in conclusion
CSS counters are a little-known feature in CSS, but you will be surprised how often they come in handy. In this tutorial, we discussed how and when to use CSS counters and showed some examples.
Below is the list of attributes we use.
| Attributes | usage |
|---|---|
| counter-reset | Reset (or create) the given value counter (default 0) |
| counter-increment | Increase the given counter by the given offset (default value 1) |
| counter(counter-name, counter-format) | Get the value of the counter from the given format |
| counters(counter-name, counter-string, counter-format) | Get the value of the nested counter from the given format |
CSS counter is cool though. But one thing to understand is that all counters are global. If you use it in a CSS files, you may not be able to find their creation, reset, and increment locations. Don't overuse them, be sure to use counters with descriptive names to avoid conflicts.
Some practical examples
  <style>
    html {
      box-sizing: border-box;
      font-size: 62.5%;
    }

    *,
    *::before,
    *:after {
      box-sizing: inherit;
    }

    body {
      font-family: Rambla, sans-serif;
      font-size: 2rem;
      line-height: 1.5;
      color: #03c03c;
    }

    h1 {
      text-align: center;
    }

    .wrapper {
      margin: 0 auto;
      width: 85%;
      display: -webkit-box;
      display: -webkit-flex;
      display: -ms-flexbox;
      display: flex;
      -webkit-justify-content: space-around;
      -ms-flex-pack: distribute;
      justify-content: space-around;
    }

    @media (max-width: 1100px) {
      .wrapper {
        -webkit-box-orient: vertical;
        -webkit-box-direction: normal;
        -webkit-flex-direction: column;
        -ms-flex-direction: column;
        flex-direction: column;
        -webkit-box-align: center;
        -webkit-align-items: center;
        -ms-flex-align: center;
        align-items: center;
      }
    }

    ol {
      counter-reset: li;
      margin: 20px 0;
      padding-left: 0;
    }

    ol>li {
      position: relative;
      margin: 0 0 25px 2em;
      padding: 4px 8px 4px 20px;
      list-style: none;
    }

    ol>li::before {
      content: counter(li);
      counter-increment: li;
      position: absolute;
      top: -2px;
      left: -2em;
      width: 2em;
      margin-right: 8px;
      padding: 4px;
      font-weight: bold;
      text-align: center;
    }

    li ol,
    li ul {
      margin-top: 6px;
    }

    ol ol li:last-child {
      margin-bottom: 0;
    }

    .disc>li::before {
      color: white;
      background-color: #03c03c;
      border-radius: 50%;
    }

    .circle>li::before {
      color: #03c03c;
      border: solid 2px #03c03c;
      border-radius: 50%;
    }

    .angle>li::before {
      color: #03c03c;
      border-right: solid 3px #03c03c;
      border-bottom: solid 3px #03c03c;
    }

    .shadow>li::before {
      color: white;
      background: #03c03c;
      box-shadow: 5px 5px 0 0 greenyellow;
    }

    .rombo>li {
      margin-bottom: 25px;
    }

    .rombo>li::before {
      color: white;
      z-index: 2;
    }

    .rombo>li::after {
      position: absolute;
      top: -2px;
      left: -2em;
      width: 2em;
      margin-right: 8px;
      padding: 4px;
      background-color: #03c03c;
      height: 2em;
      -webkit-transform: rotate(45deg);
      -ms-transform: rotate(45deg);
      transform: rotate(45deg);
      content: '';
      z-index: 1;
    }

    .underline>li::before {
      border-bottom: solid 3px #03c03c;
    }
  </style>
<body>
  <h1>Styling Ordered List Numbers</h1>
  <div class="wrapper">
    <ol class="disc">
      <li>Tomato</li>
      <li>Cucumber</li>
      <li>Onion</li>
      <li>Pepper</li>
    </ol>
    <ol class="circle">
      <li>Tomato</li>
      <li>Cucumber</li>
      <li>Onion</li>
      <li>Pepper</li>
    </ol>
    <ol class="angle">
      <li>Tomato</li>
      <li>Cucumber</li>
      <li>Onion</li>
      <li>Pepper</li>
    </ol>
    <ol class="shadow">
      <li>Tomato</li>
      <li>Cucumber</li>
      <li>Onion</li>
      <li>Pepper</li>
    </ol>
    <ol class="rombo">
      <li>Tomato</li>
      <li>Cucumber</li>
      <li>Onion</li>
      <li>Pepper</li>
    </ol>
    <ol class="underline">
      <li>Tomato</li>
      <li>Cucumber</li>
      <li>Onion</li>
      <li>Pepper</li>
    </ol>
  </div>
</body>
More excellent cases
https://css-tricks.com/custom-list-number-styling/
Article address: https://www.cnblogs.com/dragonir/p/14475600.html Author: dragonir


**粗体** _斜体_ [链接](http://example.com) `代码` - 列表 > 引用。你还可以使用@来通知其他用户。