Author: Tapas Adhikary
Translator: Frontend Xiaozhi
Source: dev
There are dreams, dry goods, WeChat search [Da Qian World] Pay attention to this Shuawanzhi who is still doing dishes in the early morning.
This article GitHub https://github.com/qq449245884/xiaozhi has been included, the first-line interview complete test site, information and my series of articles.
Introduction
The function of uploading files can be said to be a frequent requirement of the project. From uploading photos on social media to posting resumes on job search websites, file uploads are everywhere. In this article, we will discuss 10 usages of HTML file upload support, hope it will be useful to you.
1. Single file upload
We can input type file to use the file upload function in the web application.
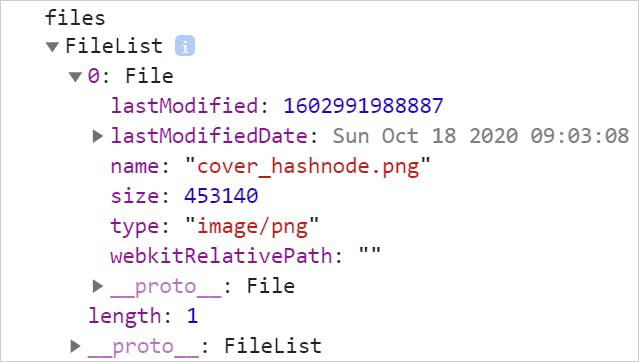
<input type="file" id="file-uploader">input filte provides a button to upload one or more files. By default, it uses the operating system's native file browser to upload a single file. After a successful upload, File API makes it possible to read the File object with simple JS code. To read the File object, we need to listen for the change event.
First, get an example of file upload id
const fileUploader = document.getElementById('file-uploader');Then add a change event listener to read the file object after the upload is complete. We get the uploaded file information event.target.files
fileUploader.addEventListener('change', (event) => {
  const files = event.target.files;
  console.log('files', files);
});
Observe the output in the console. Here, focus on the FileList array and the File object, which has all the metadata information about the uploaded file.
If you see this, you are a bit excited and want to be cheap, you can play with CodePen, address: https://codepen.io/atapas/pen/rNLOyRm
2. Multiple file upload
If we want to upload multiple files, we need to add the multiple attribute to the label:
<input type="file" id="file-uploader" multiple />Now, we can upload multiple files. Based on the previous example, after selecting multiple files to upload, observe the changes in the console:
If you are a little excited when you see this, you can play with CodePen, address: https://codepen.io/atapas/pen/MWeamYp
3. Understand file metadata
Whenever we upload a file, the File object has metadata information, such as file name , size , last update time, type and so on. This information is useful for further verification and special processing.
const fileUploader = document.getElementById('file-uploader');

// 听更 change 件并读取元数据
fileUploader.addEventListener('change', (event) => {
  // 获取文件列表数组
  const files = event.target.files;

  // 遍历并获取元数据
  for (const file of files) {
    const name = file.name;
    const type = file.type ? file.type: 'NA';
    const size = file.size;
    const lastModified = file.lastModified;
    console.log({ file, name, type, size, lastModified });
  }
});
The following is the output result of a single file upload:
If you see this, you are a little excited and want to be cheap, you can play with CodePen, address: https://codepen.io/atapas/pen/gOMaRJv
4. Understand the attributes of accept
We can use the accept attribute to limit the type of file to be uploaded. If the file format we only want to upload is .jpg , .png , we can do this:
<input type="file" id="file-uploader" accept=".jpg, .png" multiple>In the above code, only files with the .jpg and .png
If you see this, you are a bit excited and want to be cheap, you can play with CodePen, address: https://codepen.io/atapas/pen/OJXymRP
5. Manage file content
After the file is successfully uploaded, the content of the file is displayed. From the perspective of the user, if there is no preview after uploading, it is very strange and not considerate.
We can use the FileReader object to convert the file into a binary string. Then add the load event listener to get the binary string when the file is successfully uploaded.
// FileReader 实例
const reader = new FileReader();

fileUploader.addEventListener('change', (event) => {
  const files = event.target.files;
  const file = files[0];

  reader.readAsDataURL(file);

  reader.addEventListener('load', (event) => {
    const img = document.createElement('img');
    imageGrid.appendChild(img);
    img.src = event.target.result;
    img.alt = file.name;
  });
});
If you see this, you are a bit excited and want to be cheap, you can play with CodePen, address: https://codepen.io/atapas/pen/zYBvdjZ
6. Verify file size
If the user uploads a picture that is too large, in order to prevent the server from stressing, we need to limit the size of the picture. The following is to allow users to upload 1M . If they are larger than 1M the upload will fail.
fileUploader.addEventListener('change', (event) => {
  // Read the file size
  const file = event.target.files[0];
  const size = file.size;

  let msg = '';

 // 检查文件大小是否大于1MB
  if (size > 1024 * 1024) {
      msg = `<span style="color:red;">The allowed file size is 1MB. The file you are trying to upload is of ${returnFileSize(size)}</span>`;
  } else {
      msg = `<span style="color:green;"> A ${returnFileSize(size)} file has been uploaded successfully. </span>`;
  }
  feedback.innerHTML = msg;
});
If you are a little excited when you see this, you can play with CodePen, address: https://codepen.io/atapas/pen/pobjMKv
7. Show file upload progress
A better user experience is to let users know the progress of the file upload. We used FileReader and the events of reading and loading files.
const reader = new FileReader();FileReader also has a progress event, which represents the current upload progress. With the HTML5 progress , let's simulate the file upload progress.
reader.addEventListener('progress', (event) => {
  if (event.loaded && event.total) {
    // 计算完成百分比
    const percent = (event.loaded / event.total) * 100;
    // 将值绑定到 `progress`标签
    progress.value = percent;
  }
});
If you see this, you are a bit excited and want to be cheap, you can play with CodePen, address: https://codepen.io/atapas/pen/eYzpwYj
8. How to upload the catalog upload?
Can we upload the entire catalog? Well, it is possible, but there are some restrictions. There is a webkitdirectory (currently only Google Chrome and Microsoft Edge support uploading by folder), which allows us to upload entire directories.
At present, only Google Chrome and Microsoft Edge support uploading according to folders. For details, you can see the upload button of the web version of Baidu Cloud Disk. Under Firefox, uploading according to files is supported, while under Google and Edge, it will give you The user provides a drop-down to let the user choose whether to upload according to the file or according to the folder.
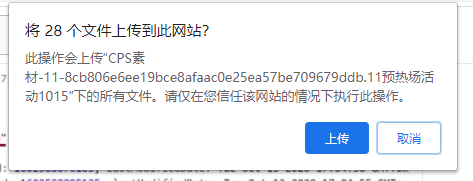
<input type="file" id="file-uploader" webkitdirectory />User must confirm before uploading catalog
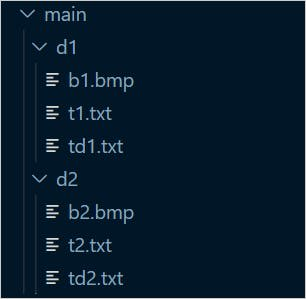
After the user clicks the "Upload" button, the upload will proceed. An important point to note here. FileList array will contain information about all files in the upload directory in the form of a flat structure. For each File object, the webkitRelativePath attribute represents the directory path.
For example, upload a home directory and other folders and files under it:
Now, the File object will webkitRelativePath as:
If you see this, you are a little excited and want to be cheap, you can play with CodePen, address: https://codepen.io/atapas/pen/dyXYRKp
9. Drag and drop upload
Drag and drop that doesn't support file upload is a bit low, isn't it? Let's see how to achieve this in a few simple steps.
First, create a drag and drop area and an optional area to display the uploaded file content.
<div id="container">
  <h1>Drag & Drop an Image</h1>
  <div id="drop-zone">
    DROP HERE
  </div>

  <div id="content">
    Your image to appear here..
  </div>

</div>
dropzone and content areas by their respective IDs.
 const dropZone = document.getElementById('drop-zone');
 const content = document.getElementById('content');
Add a dragover event handler to show the effect of the content to be copied:
dropZone.addEventListener('dragover', event => {
  event.stopPropagation();
  event.preventDefault();
  event.dataTransfer.dropEffect = 'copy';
});
Next, we need a drop event listener to handle it.
dropZone.addEventListener('drop', event => {
  // Get the files
  const files = event.dataTransfer.files;


});
If you are a little excited when you see this, you can play with CodePen, address: https://codepen.io/atapas/pen/ExyVoXN
10. Use objectURL process files
There is a special method called URL.createobjecturl() , which is used to create a unique URL from a file. You can also use the URL.revokeObjectURL() method to release it.
URL.revokeObjectURL()static method is used to release an existing URL object createdURL.createObjectURL()When you finish using a URL object, you should call this method to let the browser know that you don't need to keep a reference to this file in memory.
fileUploader.addEventListener('change', (event) => {
  const files = event.target.files;
  const file = files[0];

  const img = document.createElement('img');
  imageGrid.appendChild(img);
  img.src = URL.createObjectURL(file);
  img.alt = file.name;
});
If you see this, you are a bit excited and want to be cheap, you can play with CodePen, address: https://codepen.io/atapas/pen/BazzaoN
Summarize
Whenever you want to learn some of the knowledge involved in this article, you can try it here.
https://html-file-upload.netlify.app/
code is deployed, the possible bugs cannot be known in real time. In order to solve these bugs afterwards, a lot of time was spent on log debugging. By the way, I would like to recommend a useful BUG monitoring tool Fundebug .
Original: https://dev.to/atapas/10-useful-file-upload-tips-for-web-developers-2d1d
comminicate
There are dreams and dry goods. WeChat search [Moving to the World] pays attention to this wise brush who is still doing dishes in the early morning.
This article GitHub https://github.com/qq449245884/xiaozhi has been included, the first-line interview complete test site, information and my series of articles.


**粗体** _斜体_ [链接](http://example.com) `代码` - 列表 > 引用。你还可以使用@来通知其他用户。