Data preparation remains one of the major challenges in the field of machine learning (ML). Data scientists and engineers need to write queries and code to fetch data from source data stores, and then write queries to transform this data to create features for model development and training. All of this data pipeline development work does not focus on building machine learning models, but on building the data pipelines needed to feed the models with data. Amazon SageMaker Data Wrangler enables data scientists and engineers to more easily prepare data in the early stages of developing machine learning (ML) applications by using a visual interface.
- Amazon SageMaker Data Wrangler
https://aws.amazon.com/sagemaker/data-wrangler/
Amazon SageMaker Data Wrangler simplifies the process of data preparation and feature engineering using a single visual interface. Amazon SageMaker Data Wrangler comes with over 300 built-in data transformation functions that help standardize, transform, and combine features without writing a single line of code. You can now easily prepare Snowflake data for machine learning (ML) using Snowflake as a data source in Amazon SageMaker Data Wrangler.
📢 To learn more about the latest technology releases and practical innovations of Amazon Cloud Technology, please pay attention to the 2021 Amazon Cloud Technology China Summit! Click on the image to sign up
In this post, we use a simulated dataset of loan data from financial service providers, courtesy of Snowflake. This dataset contains data on lenders that make loans to individuals. We use Amazon SageMaker Data Wrangler to transform and prepare data for use in ML models, first building a data stream in Amazon SageMaker Data Wrangler and exporting it to Amazon SageMaker Pipelines . First, we'll finish setting up Snowflake as a data source, then use the Amazon SageMaker Data Wrangler to explore and transform the data.
- Amazon SageMaker Pipelines
https://aws.amazon.com/sagemaker/pipelines/
Prerequisites
This article assumes that you have met the following prerequisites:
Snowflake account with permissions to create storage integrations
Data in Snowflake tables
Amazon Cloud Tech account with permissions to create Identity and Access Management
A Amazon Simple Storage Service (Amazon S3) bucket that the Amazon SageMaker Data Wrangler can use to output the transformed data
- Identity and Access Management
http://aws.amazon.com/iam - Amazon Simple Storage Service
http://aws.amazon.com/s3
Setting up Amazon SageMaker
Data Wrangler
In this section, we describe the permissions required to set up Snowflake as a data source for Amazon SageMaker Data Wrangler. This section requires you to perform the steps Amazon Cloud Technology Management Console Users in each environment should have permissions to create policies, roles, and keys in the Amazon cloud technology platform, and permissions to create storage integrations in Snowflake.
- Amazon Cloud Technology Management Console
http://aws.amazon.com/console
All permissions for Amazon Cloud Technology resources are managed through IAM roles Amazon SageMaker Studio 161e54c399d05f instance. Snowflake-specific permissions are managed by Snowflake administrators; they can grant granular permissions and privileges to each Snowflake user. This includes databases, schemas, tables, warehouses, and storage integration objects. Make sure the correct permissions are set outside of Amazon SageMaker Data Wrangler.
- Amazon SageMaker Studio
https://docs.aws.amazon.com/sagemaker/latest/dg/studio.html
Access Requirement
Snowflake requires the following permissions on the output Amazon S3 bucket and prefix to access these objects:
Amazon S3:GetObject
Amazon S3:GetObjectVersion
Amazon S3:ListBucket
You can add a bucket policy to ensure that Snowflake only communicates with the bucket over HTTPS. For instructions, see What Amazon S3 Bucket Policy Should I Use to Comply with Amazon Config Rule s3-bucket-ssl-requests-only?
Creating an Amazon IAM Policy that Allows Amazon S3 Access
In this section, we'll describe how to create the required policies for Snowflake to access data in an Amazon S3 bucket of your choice. If you already have a policy and role that allows access to the Amazon S3 bucket you plan to use for Amazon SageMaker Data Wrangler output, you can skip this and the next section and start creating your storage integration in Snowflake.
- On the Amazon IAM console, choose Policies in the left navigation pane.
- Choose Create policy.
- On the JSON tab, enter the following JSON snippet, replacing the placeholders with the bucket and prefix name:
# S3 写入访问权限的示例策略
# 这里需要更新
# 确保删除 <bucket> 和 <prefix> 周围的尖括号
# 然后用自己的存储桶和前缀名称替换(例如:MY-SAGEMAKER-BUCKET/MY-PREFIX)
{
  "Version":"2012-10-17",
  "Statement":[
    {
      "Effect":"Allow",
      "Action": [
        "s3:PutObject",
        "s3:GetObject",
        "s3:GetObjectVersion",
        "s3:DeleteObject",
        "s3:DeleteObjectVersion"
      ],
      "Resource":["arn:aws:s3:::<bucket>/<prefix>/*"]
    },
    {
      "Effect":"Allow",
      "Action": [
        "s3:ListBucket"
      ],
      "Resource":["arn:aws:s3:::<bucket>"],
      "Condition": {
        "StringLike": {
          "s3:prefix": ["<prefix>/*"]
        }
      }
    }
  ]
}- Select Next: Tags.
- Select Next: Review.
- For Name, enter the name of the policy (for example, snowflake_datawrangler_s3_access)
- Choose Create policy.
Creating an Amazon IAM role
- In this section, we created an Amazon IAM role and attached it to the policy we created.
- On the Amazon IAM console, choose Roles in the left navigation pane.
- Choose Create role.
- Select Another AWS account as the Trusted Entity Type
- For the Account ID field, enter your own Amazon Cloud Technology account ID.
Later you can modify the trust relationship and grant access to Snowflake.
- Select Require External ID
- Enter a virtual ID, such as your own account ID.
Later, we will modify the trust relationship and specify the external ID for the Snowflake stage. An external ID is required to grant a third party (Snowflake) access to your Amazon cloud technology resources such as Amazon S3.
- Select Next.
- Find the policy you created earlier for the Amazon S3 bucket and select this policy.
- Select Next.
- Enter a name and description for the role, then choose Create role.
You have now created an Amazon IAM policy for the Amazon IAM role, and the policy is attached to the role.
- Record the role ARN value on the role summary page.
In the next step, you'll create a Snowflake integration that references this role.
Create storage integration in Snowflake
Storage integration in Snowflake uses storage-generated Amazon IAM entities for external cloud storage and optionally configures allowed or blocked locations in Amazon S3. The Amazon Cloud Technology administrator in your organization grants the generated Amazon IAM entity permission for the storage location. With this feature, users do not need to provide credentials during the creation phase or when loading or unloading data.
Create a storage integration with the following code:
CREATE STORAGE INTEGRATION IF NOT EXISTS SAGEMAKER_DATAWRANGLER_INTEGRATION
  TYPE = EXTERNAL_STAGE
  STORAGE_PROVIDER = S3
  STORAGE_AWS_ROLE_ARN = '<iam_role_arn>'
  ENABLED = true
  STORAGE_ALLOWED_LOCATIONS = ('s3://<your_s3_bucket>/<optional_path>/')
Retrieve the Amazon IAM user for your Snowflake account
Run the following DESCRIBE INTEGRATION command to retrieve the ARN of the Amazon IAM user automatically created for your Snowflake account:
DESC INTEGRATION SAGEMAKER_DATAWRANGLER_INTEGRATION;Record the value of the following output:
- STORAGE_AWS_IAM_USER_ARN — the IAM user created for your Snowflake account
- STORAGE_AWS_EXTERNAL_ID — the external ID required to establish the trust relationship
Update Amazon IAM role trust policy
Now we update the trust policy.
- On the Amazon IAM console, choose Roles in the left navigation pane.
- Select the role you created.
- On the Trust relationship tab, select Edit trust relationship.
Modify the policy document as shown in the following code, using the DESC STORAGE INTEGRATION output value you recorded in the previous step:
{
  "Version": "2012-10-17",
  "Statement": [
    {
      "Sid": "",
      "Effect": "Allow",
      "Principal": {
        "AWS": "<snowflake_user_arn>"
      },
      "Action": "sts:AssumeRole",
      "Condition": {
        "StringEquals": {
          "sts:ExternalId": "<snowflake_external_id>"
        }
      }
    }
  ]
}- Select Update trust policy.
Create an external stage in Snowflake
We use an external stage in Snowflake to load data into Snowflake from an Amazon S3 bucket in your own account. In this step, we created an external (Amazon S3) stage that references the storage integration you created. For more information, see Creating an Amazon S3 Stage.
- Create an Amazon S3 stage
https://docs.snowflake.com/en/user-guide/data-load-s3-create-stage.html
This requires a role with CREATE_STAGE permission on the schema and USAGE permission on the storage integration. You can grant these permissions to roles as shown in the code in the next step.
Use the CREATE_STAGE command to create a stage with a placeholder, Amazon S3 bucket, and prefix for the external stage. The stage also references a named file format object called my_csv_format:
Exposing the create phase on the schema to the role
<iam_role>
Grants the use of the integrated SAGEMAKE_DATAWRANGLER_INTEGRATION to the role;
<iam_role_arn>
create stage
<external_stage>
storage_integration = SAGEMAKE_DATAWRANGLER_INTEGRATION
url = '<s3_bucket>/<prefix>'
file_format = my_csv_format;
Create keys for Snowflake credentials (optional)
Amazon SageMaker Data Wrangler allows users to access Snowflake using the Amazon Secrets Manager secret's ARN or Snowflake account name, username, and password. If you plan to use the Snowflake account name, username, and password options, skip to the next section, which covers adding a data source. By default, Amazon SageMaker Data Wrangler creates a Secrets Manager secret on your behalf when using the second option.
- Amazon Secrets Manager
https://aws.amazon.com/secrets-manager/
To manually create an Amazon Secrets Manager secret, complete the following steps:
- In the Amazon Secrets Manager console, choose Store a new secret.
- For Amazon Select secret type, choose Other types of secrets.
- Specify the details of the key as key-value pairs.
The name of the key is case-sensitive and must be in lowercase. Amazon SageMaker Data Wrangler will report an error if there are any errors in your input.
If you prefer, you can use the plain text option and enter the password value in JSON:
{

    "username": "<snowflake username>",

    "password": "<snowflake password>",

    "accountid": "<snowflake account id>"

}
- Select Next.
- For the key name, prefix AmazonSageMaker (for example, our key is AmazonSageMaker-DataWranglerSnowflakeCreds).
- In the Labels section, add a label with the key SageMaker and the value true.
- Select Next.
- The remaining fields are optional; choose Next until you can choose Store to store the password.
- After the password is stored, you will be returned to the Secrets Manager console.
- Select the key you just created and retrieve the key ARN.
- Store it in a text editor of your choice for later use when creating an Amazon SageMaker Data Wrangler data source.
in Amazon SageMaker
Data Wrangler set data source
In this section, we'll describe how to set up Snowflake as a data source in Amazon SageMaker Data Wrangler. In this article, we assume that you have access to Studio's instance of SageMaker, and have a user of Studio. For more information on prerequisites, see Getting Started with Amazon SageMaker Data Wrangler .
- Getting started with Amazon SageMaker Data Wrangler:
https://docs.aws.amazon.com/sagemaker/latest/dg/data-wrangler-getting-started.html
Create a new data stream
To create a data flow, complete the following steps:
- On the Amazon SageMaker Data Wrangler console, choose Amazon SageMaker Studio in the navigation pane.
- Select Open Studio.
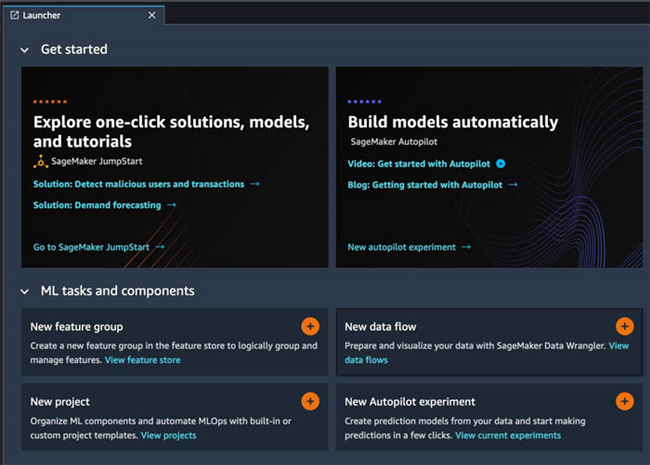
- In the launcher, choose New data flow.
Alternatively, in the File drop-down list, choose New, and then choose Amazon SageMaker Data Wrangler Flow.
Creating a new process may take a few minutes. After the process is created, you will see the Import Data page.
added Snowflake as a data source in the Amazon SageMaker Data Wrangler
Next, we'll add Snowflake as a data source.
- On the Add data source menu, select Snowflake.
- Add your Snowflake connection details.
Amazon SageMaker Data Wrangler uses HTTPS to connect to Snowflake.
- If you created the Secrets Manager secret manually, select the Authentication method drop-down menu, and then select the ARN.
- Select Connect.
You are redirected to the Import menu.
run query
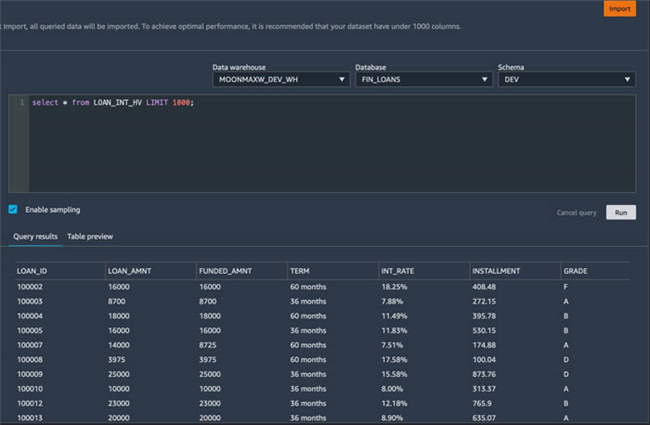
Now that Snowflake is set up as a data source, you can access data in Snowflake directly from the Amazon SageMaker Data Wrangler query editor. The query we write in the editor is what Amazon SageMaker Data Wrangler uses to import data from Snowflake to start the data stream.
- In the drop-down menu, select the data warehouse, database, and schema to use for the query.
In this article, our dataset is located in the database FIN_LOANS, the schema is DEV, and the table is LOAN_INT_HV. My data warehouse is named MOONMAXW_DEV_WH; these may vary depending on your setup.
Alternatively, you can specify the full path to the dataset in the query editor. Make sure you still select Database and Schema in the drop-down menus.
- In the query editor, enter a query and preview the results.
In this article, we retrieve all columns from 1,000 rows.
- Select Import.
- Enter a dataset name when prompted (in this article, we use snowflake_loan_int_hv).
- Select Add.
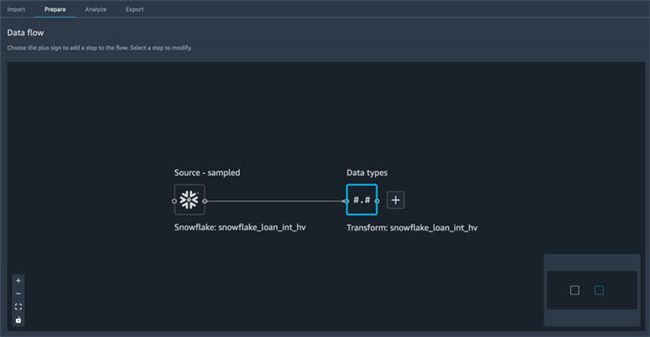
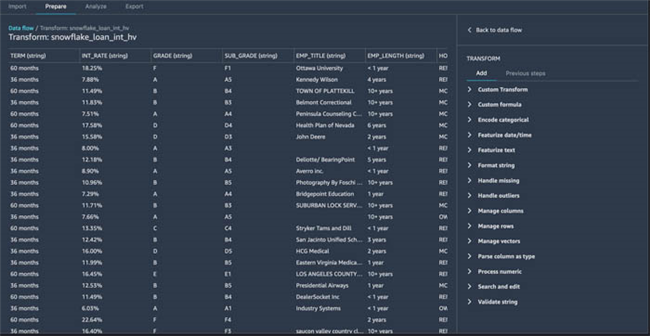
You'll be taken to the Prepare page, where you can add transformations and analytics to the data.
Add transform to data
Amazon SageMaker Data Wrangler has over 300 built-in transformations. In this section, we use some of these transformations to prepare datasets for machine learning (ML) models.
On the Amazon SageMaker Data Wrangler process page, make sure the Prepare tab is selected. If you follow the steps in the article, you will automatically be directed here after adding the dataset.
Convert data type
The first step we want to perform is to check that the correct data type is inferred at the ingestion of each column.
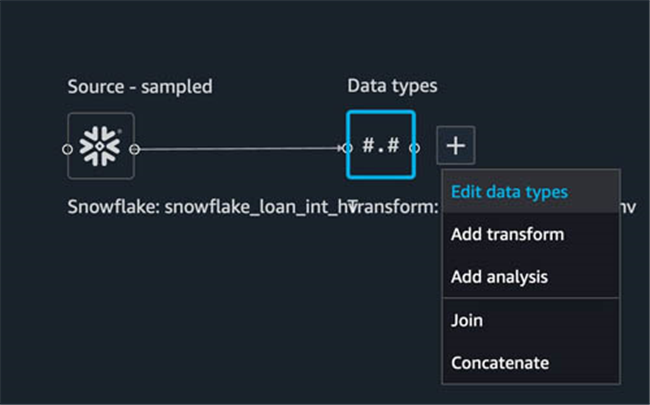
- Next to Data types, select the plus sign.
- Select Edit data types.
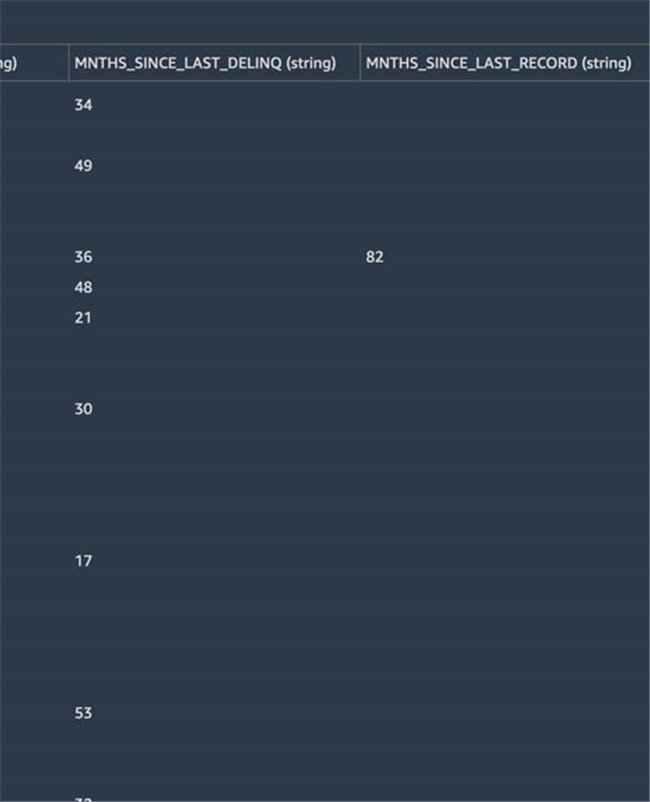
From these columns, we find that MNTHS_SINCE_LAST_DELINQ and MNTHS_SINCE_LAST_RECORD are most likely represented as numeric types, not strings.
- On the right menu, scroll down until you find
- MNTHS_SINCE_LAST_DELINQ and MNTHS_SINCE_LAST_LAST_RECORD.
In the drop-down menu, select Float.
With the dataset, we can confirm that the remaining columns appear to be inferred correctly.
- Select Preview to preview the changes.
- Choose Apply to apply the changes.
- Select Back to data flow to view the current state of the flow.
manage columns
The dataset we are working with has several columns that may not be useful for future models, so we start the transformation process by removing those columns that are not useful first.
- Next to Data types, select the plus sign.
- Choose Add transformation.
The conversion console opens. Here you can preview the dataset, choose from available transformations, and preview transformations.
From the data, we can see that the EMP_TITLE, URL, DESCRIPTION, and TITLE fields may not provide value to our model in our use case, so we remove them.
- On the transformation menu, choose Manage columns.
- In the transition drop-down menu, leave the "Delete" column
- Enter EMP_TITLE for the column to delete.
- Select Preview to see the changes.
- Choose Add to add a step.
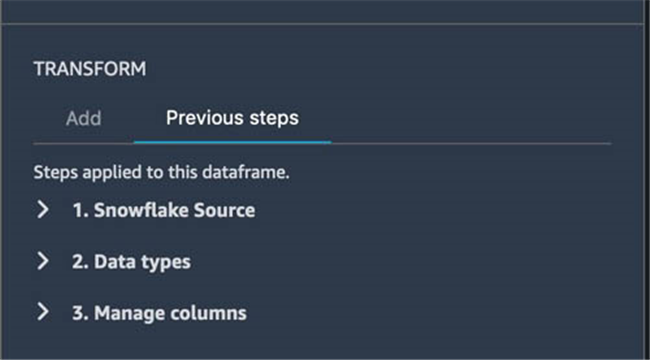
- If you want to see added steps and previous steps, in Transform, select Previous steps
- Repeat these steps for the remaining columns (URL, DESCRIPTION, and TITLE).
- Select Back to data flow to view the current state of the flow.
In the data flow view, we can see that this node in the process has four steps, which represent the four columns we removed for this part of the process.
format string
Next, we look for columns of string data that can be formatted to aid subsequent use. With our dataset, we can see that INT_RATE may be useful in future floating point models, but with % as a trailing character. Before we can convert it to a float using another built-in conversion (parse to type), we have to strip off the trailing characters.
- Next to Steps, select the plus sign.
- Select Add transform.
- Select Format string.
- In the Transform drop-down list, select Remove Symbols.
- In the Input column drop-down list, select the INT_RATE column.
- For the symbol, enter %.
- Optionally, in the output field, enter the name of the column to which this data is written.
For this article, we keep the original column and set the output column to INT_RATE_PERCENTAGE to explain to future users that this column is a percentage of the interest rate. After that, we convert it to float.
- Select Preview.
When Amazon SageMaker Data Wrangler adds a new column, it is automatically added as the rightmost column.
- Review changes for accuracy.
- Select Add.
column as type
Continuing the example above, we have determined that INT_RATE_PERCENTAGE should be converted to a float.
- Next to Steps, select the plus sign.
- Select Add transform.
- Select Parse Column as Type.
- In the Column drop-down list, select INT_RATE_PERCENTAGE.
The From field will be populated automatically.
- In the to drop-down menu, select Float.
- Select Preview.
- Select Add.
- Select Back to data flow.
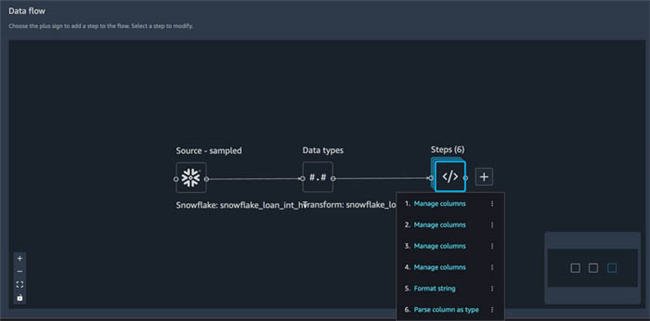
As you can see, we now have six steps in this part of the process, four of which represent the columns being dropped, one for the string formatting, and one for the parsed column types.
categorical data
Next, we want to find categorical data in the dataset. Amazon SageMaker Data Wrangler has built-in capabilities to encode categorical data using ordinal and one-hot encoding. Looking at our dataset, we can see that the TERM, HOME_OWNERSHIP and PURPOSE columns all appear to be categorical in nature.
- Next to Steps, select the plus sign.
- Select Add transform.
The first column in our list, TERM, has two possible values: 60 months and 36 months. Maybe one-hot encoding these values and putting them into new columns will benefit our future models.
- Select Encode Categorical.
- In the Transform drop-down list, select One-hot encode
- For Inputcolumn, choose TERM.
- In the Output style drop-down list, select Columns.
- All other fields and checkboxes are reserved.
- Select Preview.
We can now see two columns,
TERM_36 months and TERM_60 months, are one-hot encoded to represent the corresponding values in the TERM column.
- Select Add.
The HOME_OWNERSHIP column has four possible values: RENT, MORTGAGE, OWN, and other.
- Repeat the above steps to apply the one-hot encoding method to these values.
Finally, the PURPOSE column has several possible values. For these data, we also use the one-hot encoding method, but we set the output to be a vector instead of a column.
- In the Transform drop-down list, select One-hot encode.
- For Inputcolumn, choose PURPOSE.
- In the Output style drop-down list, select Vector.
- For the output column, we call this column PURPOSE_VCTR.
This will keep the original PURPOSE column if we decide to use it later.
- All other fields and checkboxes are reserved.
- Select Preview.
- Select Add.
- Select Back to data flow.
We can now see nine different transformations in this flow, but we haven't written a single line of code yet.
Handling outliers
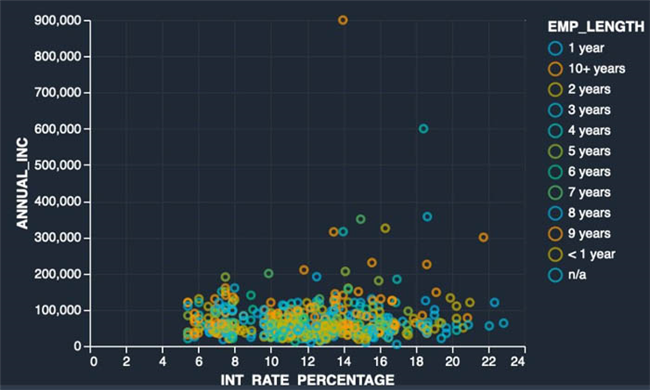
As the last step in this process, we want to deal with outliers in the dataset. As part of the data exploration process, we can create an analysis (covered in the next section). In the following example scatterplot, I explore whether insights can be gained by looking at a dataset on a scatterplot to see the relationship between annual income, interest rates, and hours of employment.
On the graph, we have loan recipients INT_RATE_PERCENTAGE on the X-axis, ANNUAL_INC on the Y-axis, and the data is color-coded with EMP_LENGTH. There are some outliers in the dataset that may distort the results of our model later. To address this, we use Amazon SageMaker Data Wrangler's built-in transformations to handle outliers.
- Next to Steps, select the plus sign.
- Select Add transform.
- Select Handle outliers.
- In the Transform drop-down list, select Standard deviation numeric outliers.
- For the Input column, enter ANNUAL_INC.
- For the Output column, enter ANNUAL_INC_NO_OUTLIERS.
This is optional, but it's good to note that one column has already been transformed for subsequent consumers.
- In the Fix method drop-down menu, keep Clip
This option automatically clips the values to the corresponding outlier detection boundary, which we set next.
- For standard deviation, leave the default value of 4 to start.
This allows values within four standard deviations of the mean to be considered valid (and therefore not clipped). Values that exceed this limit will be clipped.
- Select Preview.
- Select Add.
The output includes the object type. We need to convert it to float for it to be valid in our dataset and visualization.
- Follow the steps when parsing columns to types, this time using the ANNUAL_INC_NO_OUTLIERS column.
- Select Back to data flow to view the current state of the flow.
Add analytics to data
In this section, we'll cover adding analytics to the dataset. We're focused on visualization, but there are several other options, including detecting target leaks, generating deviation reports, or adding your own custom visualizations using the Altair library.
- Altair library
https://altair-viz.github.io/
Scatterplot
- To create a scatter plot, complete the following steps:
- On the data flow page, next to Steps, select the plus sign.
- Select Add analysis.
- For Analysis type, choose Scatter plot.
- Using the previous example, we named this analysis EmpLengthAnnualIncIntRate.
- For the X axis, enter
INT_RATE_PERCENTAGE。 - For Y axis, enter
ANNUAL_INC_NO_OUTLIERS。 - For Color by, enter EMP_LENGTH.
- Select Preview.
The screenshot below shows our scatter plot.
Before removing the exception, we can compare it with the old version.
The results look good so far, let's add a facet to break down each category in the level column into its own chart.
- For Facet by, choose GRADE.
- Select Preview.
The screenshots below have been adjusted for ease of display. The Y axis still represents ANNUAL_INC. For faceted plots, this will be displayed on the bottommost plot.
- Select Save to save the analysis.
Export data stream
Finally, we export the entire data flow as a pipeline, which creates a Jupyter notebook with pre-populated code. With Amazon SageMaker Data Wrangler, you can also export data to Jupyter notebooks as SageMaker Processing tasks, SageMaker Feature Store, or directly to Python code.
- On the Data Flow console, select Export
- Select the steps to export. In our use case, we select each box that represents a step.
- Choose Export step, and then choose Pipeline.
A pre-populated Jupyter notebook automatically loads and opens, showing all the steps and code generated by the dataflow. The following screenshot shows the input section that defines the data source.
clean up
If your work with Amazon SageMaker Data Wrangler is complete, shut down Amazon SageMaker Data Wrangler instance
to avoid additional charges.
- Shut down the Amazon SageMaker Data Wrangler instance
https://docs.aws.amazon.com/sagemaker/latest/dg/data-wrangler-shut-down.html
Conclusion
In this article, we covered setting up Snowflake as a data source for Amazon SageMaker Data Wrangler, adding transformations and analytics to a dataset, and exporting to a data stream for further use in Jupyter notebooks. After visualizing the dataset using the analytics capabilities built into Amazon SageMaker Data Wrangler, we further improved the data flow. Most notably, we built the data preparation pipeline without writing a single line of code.
To get started with Amazon SageMaker Data Wrangler, see Using Amazon SageMaker the Data Wrangler preparation machine learning (ML) data , and look at the Data Wrangler SageMaker Amazon product page latest information on.
- Prepare Machine Learning (ML) Data with Amazon SageMaker Data Wrangler
https://docs.aws.amazon.com/sagemaker/latest/dg/data-wrangler.html - product page
https://aws.amazon.com/sagemaker/data-wrangler/
Amazon SageMaker Data Wrangler makes it easy to ingest data and perform data preparation tasks such as exploratory data analysis, feature selection, and feature engineering. In this post, we've only covered some of the data preparation capabilities of Amazon SageMaker Data Wrangler; you can also use Amazon SageMaker Data Wrangler for more advanced data analysis, such as feature importance, target leakage, and Model interpretability.
The author of this article
Maxwell Moon
Amazon Cloud Technology Senior Solution Architect
Partnering with an Independent Software Vendor (ISV) to design and scale their applications at Amazon Cloud Technologies.
Bosco Albuqerqu
Amazon Cloud Technologies Senior Partner Solutions Architect
Over 20 years of experience using database and analytics products from enterprise database vendors and cloud providers, and helping large technology companies design data analytics solutions, leading engineering teams to design and implement data analytics platforms and data products.










**粗体** _斜体_ [链接](http://example.com) `代码` - 列表 > 引用。你还可以使用@来通知其他用户。