1.原子操作类有哪些
2.基本类型原子类
3.数组类型原子类
4.引用类型原子类
5.对象的属性修改原子类
6.LongAdder原理分析
7.LongAdder源码解读
8.总结
1.原子操作类有哪些
JAVA并发编程——CAS概念以及ABA问题我们通过以前这篇博客,基础性地了解了一下CAS的概念以及ABA的用法,而且使用了一下基本的AtomicInteger类,对原子引用类有了一个初步的了解。今天我们来系统归类一下原子引用类:
2.基本类型原子类
首先是基本类型原子类:
这是我们之前的博客介绍过的,我们就罗列一下我们经常使用的api:
public final int get() //获取当前的值
public final int getAndSet(int newValue)//获取当前的值,并设置新的值,cas
public final int getAndIncrement()//获取当前的值,并自增,cas
public final int getAndDecrement() //获取当前的值,并自减,cas
public final int getAndAdd(int delta) //获取当前的值,并加上预期的值
boolean compareAndSet(int expect, int update) //如果输入的数值等于预期值,则以原子方式将该值设置为输入值(update)
无非就是使用了cas,对数据的操作进行了原子性校验,这样多线程操作数据的时候就不会丢失操作了。
3.数组类型原子类
这一组api也比较简单
 AtomicIntegerArray atomicIntegerArray = new AtomicIntegerArray(new int[5]);//创建数组
atomicIntegerArray.getAndSet(0,1122);
atomicIntegerArray.getAndIncrement(1);
public class AtomicIntegerArrayDemo {
    public static void main(String[] args) {
        //初始化一个数组
        AtomicIntegerArray atomicIntegerArray = new AtomicIntegerArray(new int[5]);
        //AtomicIntegerArray atomicIntegerArray = new AtomicIntegerArray(5);
        //AtomicIntegerArray atomicIntegerArray = new AtomicIntegerArray(new int[]{1,2,3,4,5});
        //打印一下看看原始值
        for(int i =0;i<atomicIntegerArray.length();i++){
            System.out.println(atomicIntegerArray.get(i));
        }
        System.out.println();
        System.out.println();
        System.out.println();

        int tmpInt = 0;
        //把下标为0的值换成1122
        tmpInt = atomicIntegerArray.getAndSet(0, 1122);
        //获取下标为0的值
        System.out.println(tmpInt + "\t" + atomicIntegerArray.get(0));
        //将下标为1的值进行+1
        atomicIntegerArray.getAndIncrement(1);
        atomicIntegerArray.getAndIncrement(1);
        tmpInt = atomicIntegerArray.getAndIncrement(1);
        System.out.println(tmpInt + "\t" + atomicIntegerArray.get(1));
    }
}
4.引用类型原子类
这个类,我们在 JAVA并发编程——CAS概念以及ABA问题里介绍过,就是将这个值设置一个版本号,可以解决ABA问题。
5.对象的属性修改原子类
这个类比较有意思,我们来介绍一下:
我们使用这几个类的目的就是要以一种线程安全的方式,操作非线程安全类的某些字段:比如操作一个Account(账户类)中的Balance(余额)字段,因为其它字段比如username(用户名)不容易更改,我们只需要对Balance进行加锁就行了。
注意:
1)更新的对象属性必须使用 public volatile 修饰符。
2)使用静态方法newUpdater()创建一个更新器,并且需要设置想要更新的类和属性。
@Data
public class BankAccount {

    private volatile int money;

    public void transferMoney(BankAccount bankAccount) {
        //创建一个更新器
        AtomicIntegerFieldUpdater<BankAccount> integerFieldUpdater = AtomicIntegerFieldUpdater.newUpdater(BankAccount.class,"money");
        integerFieldUpdater.incrementAndGet(bankAccount);
    }
}
public class AtomicIntegerFieldUpdaterDemo {
    public static void main(String[] args) {
        BankAccount bankAccount = new BankAccount();

        for (int i = 1; i<=1000;i++){
            int finalI = i;
            new Thread(() -> {
                bankAccount.transferMoney(bankAccount);
            }, String.valueOf(i)).start();
        }

        //暂停毫秒
        try {
            TimeUnit.MILLISECONDS.sleep(2000);
        } catch (InterruptedException e) {
            e.printStackTrace();
        }

        System.out.println(bankAccount.getMoney());

    }
}
6.LongAdder原理分析
接下来介绍一下最重要的一个类:LongAdder!
我们都知道,如果在并发的情况下,做一个点赞计数器,可以使用AtomicInteger,它采用自旋的乐观锁方式,进行自增,但是如果并发量更大一点,就会让很多线程取抢占AtomicInteger,造成线程空转,这个时候,我们可以使用LongAdder!
LongAdder的性能比AtomicInteger高出很多,我们可以先来对比着看一下这两个类的性能:
import java.util.concurrent.CountDownLatch;
import java.util.concurrent.atomic.AtomicLong;
import java.util.concurrent.atomic.LongAccumulator;
import java.util.concurrent.atomic.LongAdder;

public class LongAdderDemo {

    static class ClickNumberNet {
        int number = 0;
        //使用synchronized锁进行自增
        public synchronized void clickBySync() {
            number++;
        }

        AtomicLong atomicLong = new AtomicLong(0);
        //使用原子类进行自增
        public void clickByAtomicLong() {
            atomicLong.incrementAndGet();
        }

        LongAdder longAdder = new LongAdder();
        //使用longAdder进行自增
        public void clickByLongAdder() {
            longAdder.increment();
        }

        LongAccumulator longAccumulator = new LongAccumulator((x, y) -> x + y, 0);
        //使用longAccumulator(自定义自增函数内容)进行自增
        public void clickByLongAccumulator() {
            longAccumulator.accumulate(1);
        }
    }

    public static void main(String[] args) throws InterruptedException {
        ClickNumberNet clickNumberNet = new ClickNumberNet();

        long startTime;
        long endTime;
        CountDownLatch countDownLatch = new CountDownLatch(50);
        CountDownLatch countDownLatch2 = new CountDownLatch(50);
        CountDownLatch countDownLatch3 = new CountDownLatch(50);
        CountDownLatch countDownLatch4 = new CountDownLatch(50);


        startTime = System.currentTimeMillis();
        for (int i = 1; i <= 50; i++) {
            new Thread(() -> {
                try {
                    for (int j = 1; j <= 100 * 10000; j++) {
                        clickNumberNet.clickBySync();
                    }
                } finally {
                    countDownLatch.countDown();
                }
            }, String.valueOf(i)).start();
        }
        countDownLatch.await();
        endTime = System.currentTimeMillis();
        System.out.println("synchronized----costTime: " + (endTime - startTime) + " 毫秒" + "\t clickBySync result: " + clickNumberNet.number);

        startTime = System.currentTimeMillis();
        for (int i = 1; i <= 50; i++) {
            new Thread(() -> {
                try {
                    for (int j = 1; j <= 100 * 10000; j++) {
                        clickNumberNet.clickByAtomicLong();
                    }
                } finally {
                    countDownLatch2.countDown();
                }
            }, String.valueOf(i)).start();
        }
        countDownLatch2.await();
        endTime = System.currentTimeMillis();
        System.out.println("AtomicInteger----costTime: " + (endTime - startTime) + " 毫秒" + "\t clickByAtomicLong result: " + clickNumberNet.atomicLong);

        startTime = System.currentTimeMillis();
        for (int i = 1; i <= 50; i++) {
            new Thread(() -> {
                try {
                    for (int j = 1; j <= 100 * 10000; j++) {
                        clickNumberNet.clickByLongAdder();
                    }
                } finally {
                    countDownLatch3.countDown();
                }
            }, String.valueOf(i)).start();
        }
        countDownLatch3.await();
        endTime = System.currentTimeMillis();
        System.out.println("LongAdder----costTime: " + (endTime - startTime) + " 毫秒" + "\t clickByLongAdder result: " + clickNumberNet.longAdder.sum());

        startTime = System.currentTimeMillis();
        for (int i = 1; i <= 50; i++) {
            new Thread(() -> {
                try {
                    for (int j = 1; j <= 100 * 10000; j++) {
                        clickNumberNet.clickByLongAccumulator();
                    }
                } finally {
                    countDownLatch4.countDown();
                }
            }, String.valueOf(i)).start();
        }
        countDownLatch4.await();
        endTime = System.currentTimeMillis();
        System.out.println("LongAccumulator----costTime: " + (endTime - startTime) + " 毫秒" + "\t clickByLongAccumulator result: " + clickNumberNet.longAccumulator.longValue());


    }
}
运行结果为:
我们发现,LongAdder的性能是AtomicInteger类性能的十倍!我们来看一下为什么LongAdder能这么快。
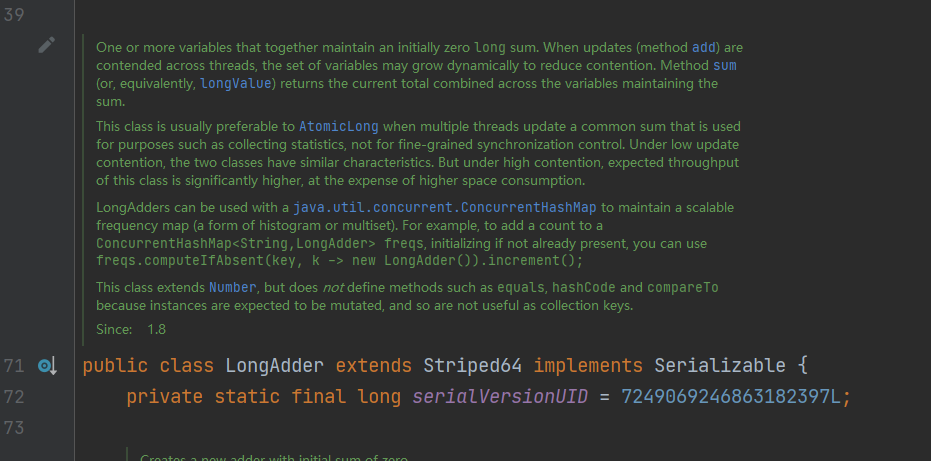
我们从源码的描述中可以看出:当使用少的并发来操作这个LongAdder类的时候,LongAdder和AtomicLong拥有差不多的性能,当并发量大的时候,LongAdder的性能会高很多,因为LongAdder花费了更多的空间。
也就是说,LongAdder采取的是用空间换时间的方法来提升了统计速度。
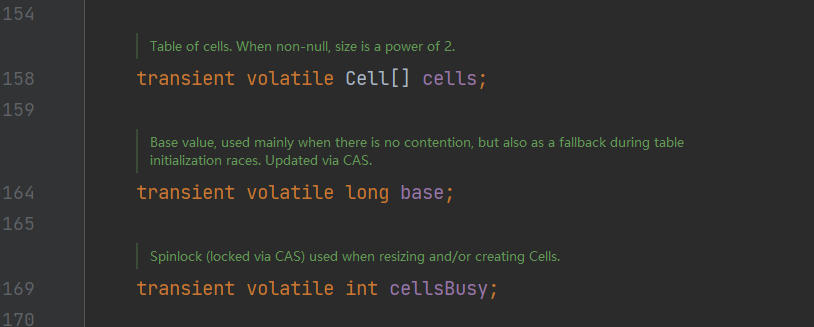
我们顺便来看一下LongAdder的父类Striped64:
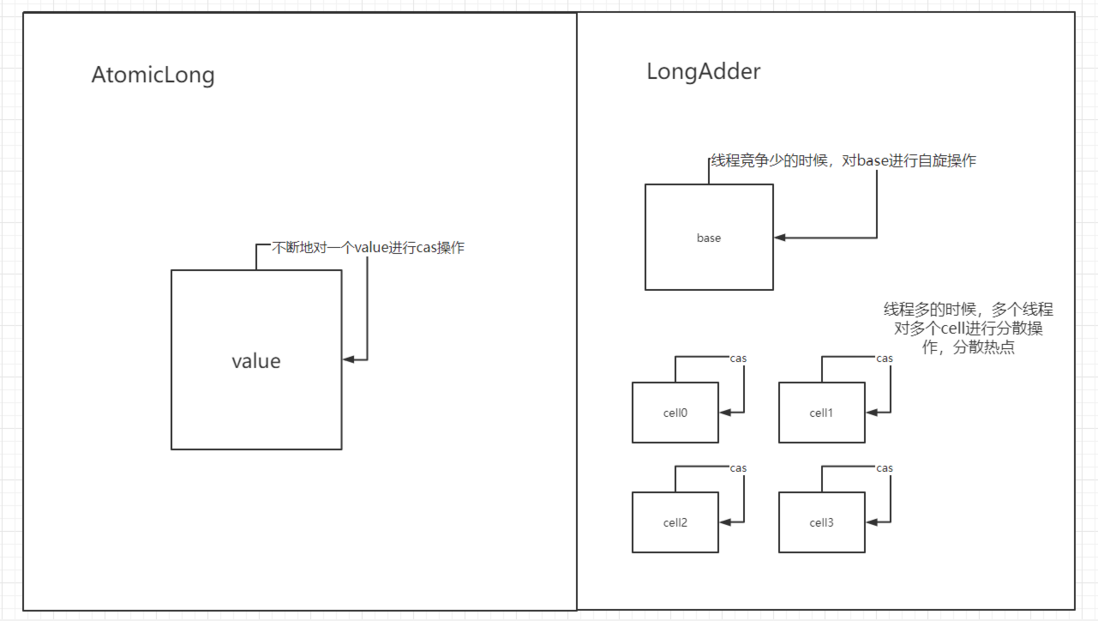
Striped64用了一个Cell数组和base以及cellsBusy,我们来看一下下面这个描述和这张原理图,我们就能大概明白LongAdder的底层原理了:
LongAdder的基本思路就是分散热点,将value值分散到一个Cell数组中,不同线程会命中到数组的不同槽位里面,各个线程对自己槽中的那个值进行CAS操作,这样热点就被分散了,冲突的概率就会小很多,如果要获取真正的long值,只要将各个槽的变量累计加回就可以了。
sum()方法会将所有cell数组中的value和base累加作为返回值,核心思想就是将AtomicLong的一个value的更新压力分到多个value当中去,以空间换时间,从而降级更新热点。
数学表达公式:
7.LongAdder源码解读
说了这么多,我们来看看LongAdder的源码:
    public void add(long x) {
        //cs表示cell的引用 ,b表示base的值,v表示期望值,m表示cell数组的长度,c表示命中cell的单元格
        Cell[] cs; long b, v; int m; Cell c;
        //首次操作线程,cell肯定为空,去走cas,失败的时候才会走到if里面
        //如果cell不为空,则肯定发生过竞争激烈的现象,进入if
        //如果cas失败,则竞争肯定也激烈,进入if
        if ((cs = cells) != null || !casBase(b = base, b + x)) {
            //不是竞争激烈的 true代表无竞争,false代表竞争积累
            boolean uncontended = true;
            //1.如果cell数组为空,则要进入初始化,进入方法(初始化cell数组)
            //2.如果数组长度小于0,则进入初始化(初始化cell数组)(一般不会进入这个条件)
            //3.getProbe()是通过算法返回这个线程应该落在哪个槽,如果这个槽还没初始化,则进入这个方法,初始化cell
           //4.如果这个槽cas失败,则进入这个方法(去扩容)
            if (cs == null || (m = cs.length - 1) < 0 ||
                (c = cs[getProbe() & m]) == null ||
                !(uncontended = c.cas(v = c.value, v + x)))
                longAccumulate(x, null, uncontended);
        }
    }
final void longAccumulate(long x, LongBinaryOperator fn,
boolean wasUncontended) {
int h;
//如果线程还未随机分配哈希值,给分配一个
if ((h = getProbe()) == 0) {
ThreadLocalRandom.current(); // force initialization
h = getProbe();
wasUncontended = true;
}
boolean collide = false; // True if last slot nonempty
done: for (;;) { //自旋
Cell[] cs; Cell c; int n; long v;
if ((cs = cells) != null && (n = cs.length) > 0) {
if ((c = cs[(n - 1) & h]) == null) {//如果命中了一个槽位,这个槽位还未初始化
if (cellsBusy == 0) { // Try to attach new Cell
Cell r = new Cell(x); // Optimistically create
if (cellsBusy == 0 && casCellsBusy()) {//双重检查锁
try { // Recheck under lock
Cell[] rs; int m, j;
if ((rs = cells) != null &&
(m = rs.length) > 0 &&
rs[j = (m - 1) & h] == null) {
rs[j] = r;
break done;
}
} finally {
cellsBusy = 0;
}
continue; // Slot is now non-empty
}
}
collide = false;
}
else if (!wasUncontended) // CAS already known to fail
wasUncontended = true; // Continue after rehash
else if (c.cas(v = c.value,
(fn == null) ? v + x : fn.applyAsLong(v, x)))//对某一个槽位进行cas
break;
else if (n >= NCPU || cells != cs)//容量已经超过CPU核数,不能扩容
collide = false; // At max size or stale
else if (!collide)
collide = true;
else if (cellsBusy == 0 && casCellsBusy()) {//扩容操作
try {
if (cells == cs) // Expand table unless stale
cells = Arrays.copyOf(cs, n << 1);
} finally {
cellsBusy = 0;
}
collide = false;
continue; // Retry with expanded table
}
h = advanceProbe(h);
}
else if (cellsBusy == 0 && cells == cs && casCellsBusy()) {//初始化cell数组
try { // Initialize table
if (cells == cs) {
Cell[] rs = new Cell[2];
rs[h & 1] = new Cell(x);
cells = rs;
break done;
}
} finally {
cellsBusy = 0;
}
}
// Fall back on using base
//如果全部操作都失败,进行casBase,兜底操作
else if (casBase(v = base,
(fn == null) ? v + x : fn.applyAsLong(v, x)))
break done;
}
}8.总结
今天我们学习了原子操作类以及LongAdder源码分析,
基本类型原子类我们平时最熟悉,使用乐观锁。
数组类型原子类可以操作数组。
引用类型原子类带版本号,可以解决aba问题。
对象的属性修改原子类,可以让加锁的粒度更细。
LongAdder是每个线程拥有自己的槽,各个线程一般只对自己槽中的那个值进行CAS操作。


**粗体** _斜体_ [链接](http://example.com) `代码` - 列表 > 引用。你还可以使用@来通知其他用户。