Nginx is a very popular web server. As a programmer, I believe that many of you deal with it. In the process of using Nginx, I always feel that its configuration is very troublesome, especially when I manually configure it with vim on a Linux server! Recently I found an open source Nginx visual configuration tool NginxConfig , which can easily generate Nginx configuration, I recommend it to everyone!SpringBoot actual e-commerce project mall (50k+star) address: https://github.com/macrozheng/mall
Introduction to NginxConfig
NginxConfig 15K+Star called the only Nginx configuration tool you need . It can use the visual interface to generate Nginx configuration. It is very powerful.
The following is a rendering of the use of NginxConfig, you can take a look!
Install
Next, I will introduce the installation of NginxConfig , which is relatively convenient to install on Linux.Install Node.js
SinceNginxConfigis a Vue-based front-end project, we first have to installNode.js.
- First download the installation package of
Node.jsfrom the official website, download address: https://nodejs.org/zh-cn/download/
- After the download is successful, extract the installation package to the
/usr/local/src/directory, and use the following command;
 cd /usr/local/src/
tar xf node-v16.14.2-linux-x64.tar.xz
cd node-v16.14.2-linux-x64/
./bin/node -v- Use the
./bin/node -vcommand to view the current installed version;
- If you want to run it directly in the Linux command line, you need to create soft links for the
nodeandnpmcommands;
 ln -s /usr/local/src/node-v16.14.2-linux-x64/bin/node /usr/bin/node
ln -s /usr/local/src/node-v16.14.2-linux-x64/bin/npm /usr/bin/npm
node -v
npm -v- After the creation is complete, use the command to view the version, so far
Node.jsinstallation is complete.
Install NginxConfig
Node.jsAfter the installation is complete, you can start the installationNginxConfig.
- First download the installation package of
NginxConfig, download address: https://github.com/digitalocean/nginxconfig.io
- After the download is complete, extract it to the specified directory, and use the
npmcommand to install and run the dependencies;
 tar -zxvf nginxconfig.io-master.tar.gz
npm install
npm run dev-
NginxConfigrunning successfully, you can directly access it. It is quite good to see that the interface supports Chinese. Access address: http://192.168.3.105:8080
use
Next, let's experience the visual configuration generation function of NginxConfig to see if it is powerful enough!Ready to use
- First, we need to install Nginx. For the installation of Nginx, please refer to the Nginx usage tutorial written before;
- We will implement the following functions, accessing static websites in different directories through static proxies, and accessing API interfaces provided by SpringBoot through dynamic proxies;
 # 静态代理,访问mall文档网站
docs.macrozheng.com
# 静态代理,访问mall前端项目
mall.macrozheng.com
# 动态代理,访问mall线上API
api.macrozheng.com- You need to modify the local host file in advance.
 192.168.3.105 docs.macrozheng.com
192.168.3.105 mall.macrozheng.com
192.168.3.105 api.macrozheng.com
Documentation site configuration
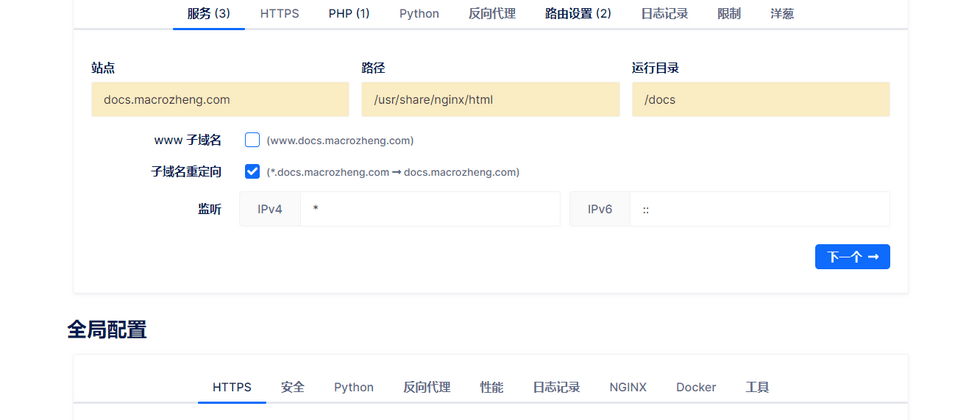
Let's first configure the access to the mall documentation website, the domain name is: docs.macrozheng.com.
- Select
NginxConfigin预设as the front end, then modify the service configuration, configure the site, path and running directory;
- If HTTPS is not required, you can choose not to enable it;
- Then in
全局配置->安全removeContent-Security-Policyset;
- Then modify the
性能configuration, enable Gzip compression, and delete the resource validity limit.
Front-end website configuration
Then configure the access to the mall front-end website, the domain name is: mall.macrozheng.com.
- Next, we add another site and modify the service configuration. The others are basically the same as the above.
API website configuration
Finally, configure the access to the mall 's Swagger API documentation website. The domain name is: api.macrozheng.com.
- Continue to add a site, modify the service configuration, just modify the site name;
- Then enable reverse proxy and set, reverse proxy to online API;
- The routing function can be turned off if it is not used temporarily.
use configuration
- Next, we can directly download
NginxConfigto generate the configuration for us;
- Let's first take a look at the configuration content generated by
NginxConfigfor us. This configuration is estimated to be better by handwriting;
- Click the button to download the configuration, change the name after completion, then upload it to the Nginx configuration directory of the Linux server, and use the following command to decompress;
tar -zxvf nginxconfig.io.tar.gz- You can see
NginxConfigwill generate the following configuration file for us;
- Next, put our previous mall document website and mall front-end website into the html directory of Nginx, and then restart Nginx to view the effect;
docker restart nginx- First visit our mall documentation website, visit address: http://docs.macrozheng.com
- After visiting the front-end website of mall, visit the address: http://mall.macrozheng.com
- Finally, visit the API documentation website of mall, and visit the address: http://api.macrozheng.com/swagger-ui.html
Summarize
I have experienced the configuration generation function of NginxConfig . This method of generating configuration directly through the visual interface without handwriting configuration is really useful. NginxConfig is indeed the easiest way to configure a high-performance, secure and stable NgInx server!


**粗体** _斜体_ [链接](http://example.com) `代码` - 列表 > 引用。你还可以使用@来通知其他用户。