
The purpose of using cache is to improve performance. Today, the code brother will take you to practice the application spring-boot-starter-cache the abstract cache component to integrate the king of local cache performance Caffeine .
What everyone needs to pay attention to is: in-memeory Cache is only suitable for single application, not suitable for distributed environment .
In the case of a distributed environment, the cache modification needs to be synchronized to each node, and a synchronization mechanism is required to ensure that the cache data of each node is eventually consistent.
What is Spring Cache
Instead of using the abstract caching interface of Spring Cache, we need to implement caching according to different caching frameworks, and we need to load, delete, and update the cache in the corresponding code.
For example, we use the bypass cache strategy for query: first query data from the cache, if it can't find it, query it from the database and write it to the cache.
The pseudo code is as follows:
 public User getUser(long userId) {
    // 从缓存查询
    User user = cache.get(userId);
    if (user != null) {
        return user;
    }
    // 从数据库加载
    User dbUser = loadDataFromDB(userId);
    if (dbUser != null) {
        // 设置到缓存中
        cache.put(userId, dbUser)
    }
    return dbUser;
}
We need to write a lot of such cumbersome code, Spring Cache abstracts the cache, and provides the following annotations to implement cache management:
- @Cacheable : Trigger the cache read operation for the query method. If it is found in the cache, it will directly fetch the cache and return it. Otherwise, the target method will be executed and the result will be cached.
- @CachePut : Compared with
Cacheablefor the method that triggers the cache update, the method of this annotation will always be executed, and the result returned by the method will be used to update the cache, which is applicable to the methods of insert and update behavior. - @CacheEvict : Trigger cache invalidation, delete cache items or clear cache, applicable to delete method.
In addition, abstract CacheManager can integrate both local memory-based monolithic applications and cache servers such as EhCache、Redis .
The most convenient way is to access different caching frameworks through some simple configuration and annotations without modifying any code.
Integrate Caffeine
The code brother takes you to use the annotation method to complete the cache operation method to integrate. For the complete code, please visit github : https://github.com/MageByte-Zero/springboot-parent-pom , add it in the pom.xml file The following dependencies:
 <dependency>
    <groupId>org.springframework.boot</groupId>
    <artifactId>spring-boot-starter-cache</artifactId>
</dependency>

<dependency>
    <groupId>com.github.ben-manes.caffeine</groupId>
    <artifactId>caffeine</artifactId>
</dependency>
Use JavaConfig to configure CacheManager :
 @Slf4j
@EnableCaching
@Configuration
public class CacheConfig {

    @Autowired
    @Qualifier("cacheExecutor")
    private Executor cacheExecutor;

    @Bean
    public Caffeine<Object, Object> caffeineCache() {

        return Caffeine.newBuilder()
                // 设置最后一次写入或访问后经过固定时间过期
                .expireAfterAccess(7, TimeUnit.DAYS)
                // 初始的缓存空间大小
                .initialCapacity(500)
                // 使用自定义线程池
                .executor(cacheExecutor)
                .removalListener(((key, value, cause) -> log.info("key:{} removed, removalCause:{}.", key, cause.name())))
                // 缓存的最大条数
                .maximumSize(1000);
    }

    @Bean
    public CacheManager cacheManager() {
        CaffeineCacheManager caffeineCacheManager = new CaffeineCacheManager();
        caffeineCacheManager.setCaffeine(caffeineCache());
        // 不缓存空值
        caffeineCacheManager.setAllowNullValues(false);
        return caffeineCacheManager;
    }
}
The preparation work is done, the next step is how to use it.
 @Slf4j
@Service
public class AddressService {

    public static final String CACHE_NAME = "caffeine:address";

    private static final AtomicLong ID_CREATOR = new AtomicLong(0);

    private Map<Long, AddressDTO> addressMap;

    public AddressService() {
        addressMap = new ConcurrentHashMap<>();

        addressMap.put(ID_CREATOR.incrementAndGet(), AddressDTO.builder().customerId(ID_CREATOR.get()).address("地址1").build());
        addressMap.put(ID_CREATOR.incrementAndGet(), AddressDTO.builder().customerId(ID_CREATOR.get()).address("地址2").build());
        addressMap.put(ID_CREATOR.incrementAndGet(), AddressDTO.builder().customerId(ID_CREATOR.get()).address("地址3").build());
    }

    @Cacheable(cacheNames = {CACHE_NAME}, key = "#customerId")
    public AddressDTO getAddress(long customerId) {
        log.info("customerId:{} 没有走缓存,开始从数据库查询", customerId);
        return addressMap.get(customerId);
    }

    @CachePut(cacheNames = {CACHE_NAME}, key = "#result.customerId")
    public AddressDTO create(String address) {
        long customerId = ID_CREATOR.incrementAndGet();
        AddressDTO addressDTO = AddressDTO.builder().customerId(customerId).address(address).build();

        addressMap.put(customerId, addressDTO);
        return addressDTO;
    }

    @CachePut(cacheNames = {CACHE_NAME}, key = "#result.customerId")
    public AddressDTO update(Long customerId, String address) {

        AddressDTO addressDTO = addressMap.get(customerId);
        if (addressDTO == null) {
            throw new RuntimeException("没有 customerId = " + customerId + "的地址");
        }

        addressDTO.setAddress(address);
        return addressDTO;
    }

    @CacheEvict(cacheNames = {CACHE_NAME}, key = "#customerId")
    public boolean delete(long customerId) {
        log.info("缓存 {} 被删除", customerId);
        return true;
    }
}
Use CacheName to isolate caches in different business scenarios, each Cache internally holds a map structure to store data, and the key can use Spring's Spel expression.
Unit testing starts:
 @RunWith(SpringRunner.class)
@SpringBootTest(classes = CaffeineApplication.class)
@Slf4j
public class CaffeineApplicationTests {

    @Autowired
    private AddressService addressService;

    @Autowired
    private CacheManager cacheManager;

    @Test
    public void testCache() {
        // 插入缓存 和数据库
        AddressDTO newInsert = addressService.create("南山大道");
        // 要走缓存
        AddressDTO address = addressService.getAddress(newInsert.getCustomerId());
        long customerId = 2;

        // 第一次未命中缓存,打印 customerId:{} 没有走缓存,开始从数据库查询
        AddressDTO address2 = addressService.getAddress(customerId);
        // 命中缓存
        AddressDTO cacheAddress2 = addressService.getAddress(customerId);

        // 更新数据库和缓存
        addressService.update(customerId, "地址 2 被修改");

        // 更新后查询,依然命中缓存
        AddressDTO hitCache2 = addressService.getAddress(customerId);
        Assert.assertEquals(hitCache2.getAddress(), "地址 2 被修改");

        // 删除缓存
        addressService.delete(customerId);

        // 未命中缓存, 从数据库读取
        AddressDTO hit = addressService.getAddress(customerId);
        System.out.println(hit.getCustomerId());
    }

}
Did you find that, you only need to add annotations to the corresponding methods, and you can use the cache happily. It should be noted that the set cacheNames must correspond, and each business scenario uses the corresponding cacheNames.
In addition, the key can use the spel expression. You can focus on @CachePut(cacheNames = {CACHE_NAME}, key = "#result.customerId") . The result represents the result returned by the interface. Spring provides several metadata for direct use.
| name | Place | describe | example |
|---|---|---|---|
methodName | root object | the name of the method being called | #root.methodName |
method | root object | method called | #root.method.name |
target | root object | the target object to be called | #root.target |
targetClass | root object | the class of the called target | #root.targetClass |
args | root object | Arguments for calling the target (as an array) | #root.args[0] |
caches | root object | Cached collection to run the current method | #root.caches[0].name |
| parameter name | Evaluation context | The name of any method parameter. If the name is not available (probably due to no debug information), the parameter name is also available under #a<#arg> where #arg represents the parameter index (from the beginning 0 ) . | #iban or #a0 (you can also use #p0 or #p<#arg> notation as an alias). |
result | Evaluation context | The result of the method call (value to cache). unless表达式、 cache put表达式(计算key ) cache evict表达式(when beforeInvocation is false ). For supported wrappers (eg Optional ), #result refers to the actual object, not the wrapper. | #result |
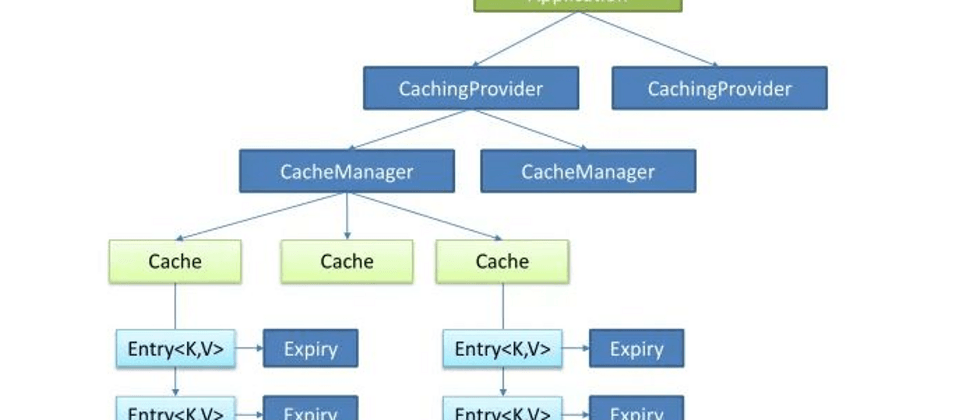
core principle
Java Caching定义了5个核心接口,分别是CachingProvider , CacheManager , Cache , Entry Expiry .

Core class diagram:

- Cache: abstracts cache operations, such as get(), put();
- CacheManager: Manage Cache, which can be understood as the collection management of Cache. The reason why there are multiple Caches is that different cache invalidation time and quantity limits can be used according to different scenarios.
- CacheInterceptor, CacheAspectSupport, AbstractCacheInvoker: CacheInterceptor is an AOP method interceptor that performs additional logic before and after the method, such as query operations, first check the cache, then execute the method if no data is found, and write the result of the method into the cache, etc. It inherits CacheAspectSupport (the main logic of the cache operation), AbstractCacheInvoker (encapsulates the read and write to the Cache).
- CacheOperation, AnnotationCacheOperationSource, SpringCacheAnnotationParser: CacheOperation defines the cache name, cache key, cache condition condition, CacheManager, etc. of the cache operation. AnnotationCacheOperationSource is a class for obtaining cache annotations corresponding to CacheOperation, while SpringCacheAnnotationParser is a class for parsing annotations, which will be encapsulated into CacheOperation after parsing Collection for AnnotationCacheOperationSource to look up.
CacheAspectSupport: Cache aspect support class, the parent class of CacheInterceptor, encapsulates the main logic of all cache operations.
The main process is as follows:
- Get a list of all CacheOperations through CacheOperationSource
- If it is annotated with @CacheEvict and marked to be executed before the call, delete/clear the cache
- Query cache if @Cacheable is annotated
- If the cache misses (the query result is null), it will be added to cachePutRequests, and will be written to the cache after subsequent execution of the original method
- When the cache hits, the cached value is used as the result; when the cache misses or is annotated with @CachePut, the original method needs to be called and the return value of the original method is used as the result
- If there is an @CachePut annotation, it will be added to cachePutRequests
- If the cache misses, write the query result value to the cache; if there is an @CachePut annotation, also write the method execution result to the cache
- If it is annotated with @CacheEvict and marked to be executed after the call, delete/clear the cache
That's all for today, I will share some working tips with you. Later, I will share how to access Redis, and take you to implement a distributed second-level cache based on Spring Boot to implement a Caffeine as the first-level cache and Redis as the second-level cache. Cache frame.
See you in the next issue, can you call me pretty boy in the comment area? It’s okay not to call, like and share is also an encouragement.
References
[1] https://segmentfault.com/a/1190000041640222
[2] https://docs.spring.io/spring-framework/docs/current/reference/html/integration.html#cache


**粗体** _斜体_ [链接](http://example.com) `代码` - 列表 > 引用。你还可以使用@来通知其他用户。