

foreword
Hello everyone, I'm webfansplz . After rendering Vue to the embedded LCD screen , today I want to share with you how to render Vue to command line tools:). About command line tools, everyone should be familiar with them, such as vue -cli, Vite, etc. When we write front-end applications for users, we usually pay a lot of attention to user experience. As developers, when we use tools, we will also pay great attention to the developer experience (DX) it gives us. Modern front-end Engineering is inseparable from the development and use of CLI, so is there a lower-cost solution that allows front-end partners to quickly develop CLI, and everyone can do it just like writing front-end applications. Therefore, Temir came into being.
Temir
introduce
Temir , a tool for writing command line interface applications with Vue components. Developers only need to use Vue to write command line applications without any additional learning costs.

 <script lang="ts" setup>
import { ref } from '@vue/runtime-core'
import { TBox, TText } from '@temir/core'
const counter = ref(0)
setInterval(() => {
  counter.value++
}, 100)
</script>

<template>
  <TBox>
    <TText color="green">
      {{ counter }} tests passed
    </TText>
  </TBox>
</template>
components
Temir provides some basic components to help developers write and extend command line tools:
Text component (Text)
The text component can display text, changing its style to bold, underline, italics, or strikethrough.
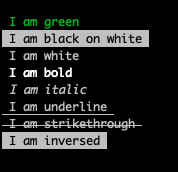
 <TText color="green">
  I am green
</TText>

<TText color="black" background-color="white">
  I am black on white
</TText>

<TText color="white">
  I am white
</TText>

<TText :bold="true">
  I am bold
</TText>

<TText :italic="true">
  I am italic
</TText>

<TText :underline="true">
  I am underline
</TText>

<TText :strikethrough="true">
  I am strikethrough
</TText>

<TText :inverse="true">
  I am inversed
</TText>
Box component
<Box> is an essential Temir component for building layouts. Just like in browsers <div style='display: flex'>. It provides some common properties for building layouts, such as size, margins, alignment, etc. .
 <template>
  <TBox justify-content="flex-start">
    <TText>X</TText>
  </TBox>
  // [X      ]

  <TBox justify-content="center">
    <TText>X</TText>
  </TBox>
  // [   X   ]

  <TBox justify-content="flex-end">
    <TText>X</TText>
  </TBox>
  // [      X]

  <TBox justify-content="space-between">
    <TText>X</TText>
    <TText>Y</TText>
  </TBox>
  // [X      Y]

  <TBox justify-content="space-around">
    <TText>X</TText>
    <TText>Y</TText>
  </TBox>
  // [  X   Y  ]
</template>
Newline component (Newline)
Add one or more newlines (\n). Must be used in <Text> component.
 <script>
import { TBox, TNewline, TText } from '@temir/core'
</script>

<template>
  <TBox>
    <TText>
      <TText color="green">
        Hello
      </TText>
      <TNewline />
      <TText color="red">
        World
      </TText>
    </TText>
  </TBox>
</template>
Filler component (Spacer)
A flexible space that unfolds along its main axis containing the layout. It is very useful as a shortcut to fill all available space between elements.
For example, using <Spacer> <Box> in ---d344d91ce113710327e31ccdfee84221--- with the default stretch direction ( row ) will position "Left" to the left and push "Right" to the right .
 <script lang="ts" setup>
import { TBox, TSpacer, TText } from '@temir/core'
</script>

<template>
  <TBox>
    <TText>Left</TText>
    <TSpacer />
    <TText>Right</TText>
  </TBox>
</template>
Hyperlink component (Link)
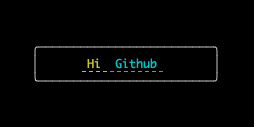
 <script lang="ts" setup>
import { TBox, TText } from '@temir/core'
import TLink from '@temir/link'
</script>

<template>
  <TBox
    :margin="5"
    width="20"
    border-style="round"
    justify-content="center"
  >
    <TLink url="https://github.com">
      <TText color="yellow">
        Hi
      </TText>
      <TText color="cyan">
        Github
      </TText>
    </TLink>
  </TBox>
</template>
Loading component (Spinner)

 <script lang="ts" setup>
import { TBox, TText } from '@temir/core'
import TSpinner from '@temir/spinner'
</script>

<template>
  <TBox
    :margin="5"
    width="20"
    border-style="round"
    justify-content="center"
  >
    <TText>
      <TText color="yellow">
        <TSpinner />
      </TText>
      Loading
    </TText>
  </TBox>
</template>
Tab Page Component (Tab)
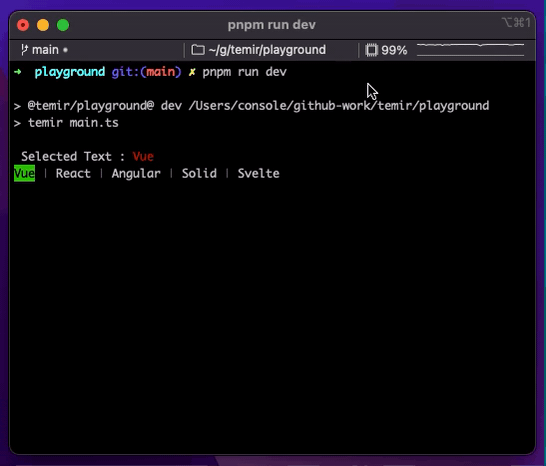
 <script lang="ts" setup>
import { computed, ref } from '@vue/runtime-core'
import { TBox, TText } from '@temir/core'
import { TTab, TTabs } from '@temir/tab'

const tabs = ['Vue', 'React', 'Angular', 'Solid', 'Svelte']
const activeIndex = ref(0)
const selectedText = computed(() => tabs[activeIndex.value])
</script>

<template>
  <TBox>
    <TText>
      Selected Text :
      <TText color="red">
        {{ selectedText }}
      </TText>
    </TText>
  </TBox>

  <TBox>
    <TTabs :on-change="(index) => activeIndex = +index">
      <TTab v-for="item in tabs" :key="item">
        {{ item }}
      </TTab>
    </TTabs>
  </TBox>
</template>
select components
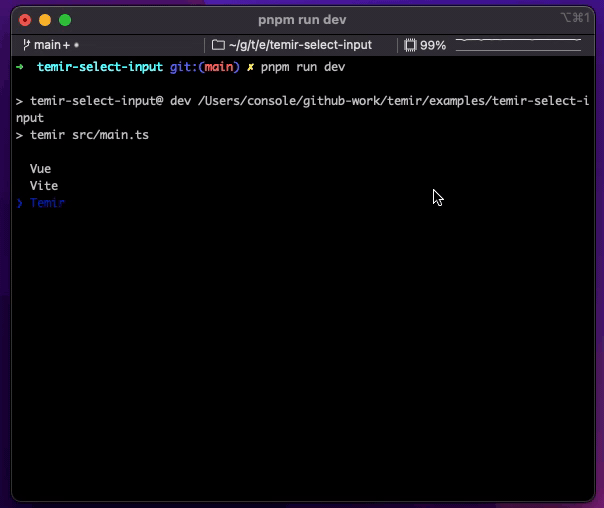
 <script lang="ts" setup>
import TSelectInput from '@temir/select-input'

const items = [
  {
    label: 'Vue',
    value: 'Vue',
  },
  {
    label: 'Vite',
    value: 'Vite',
  },
  {
    label: 'Temir',
    value: 'Temir',
  },
]
function onSelect(value) {
  console.log('selected', value)
}
</script>

<template>
  <TSelectInput :items="items" :on-select="onSelect" />
</template>
Install
npm install @temir/coreuse
 <script lang="ts" setup>
import { ref } from '@vue/runtime-core'
import { TBox, TText } from '@temir/core'
const counter = ref(0)
setInterval(() => {
  counter.value++
}, 100)
</script>

<template>
  <TBox>
    <TText color="green">
      {{ counter }} tests passed
    </TText>
  </TBox>
</template> 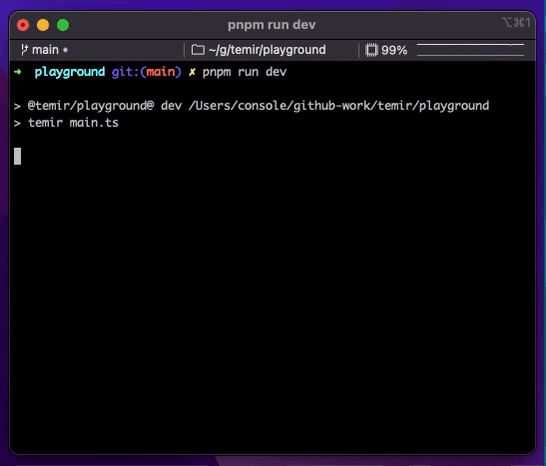
HMR support
We mentioned the developer experience (DX) earlier. In the current front-end engineering, HMR is very helpful and effective for developers. There is no reason why Temir does not own such a fragrant thing.

out of the box
Using Temir to customize the CLI is very simple, we provide @temir/cli to help you quickly build a Temir -based CLI.
 mkdir my-temir-cli

cd my-temir-cli

touch main.ts

npm install @temir/cl

# Dev (开发)

temir main.ts

# Build (打包)

temir build main.ts
You can get started quickly by downloading this example , or you can open the repl.it sandbox to experience and try it out online.
demo
Hi Temir

Borders
Table

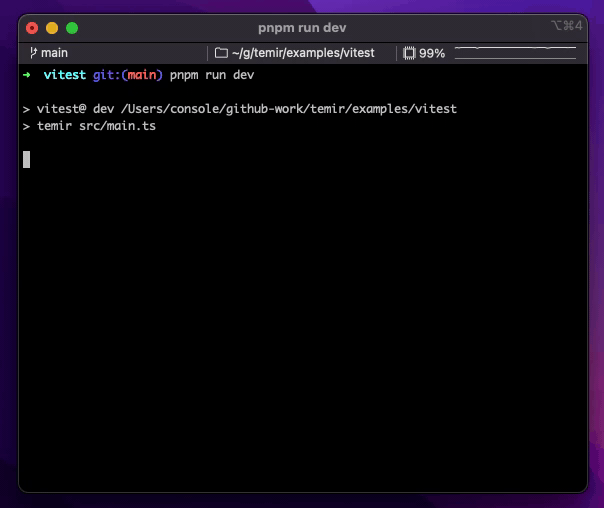
Vitest
accomplish
- createRenderer
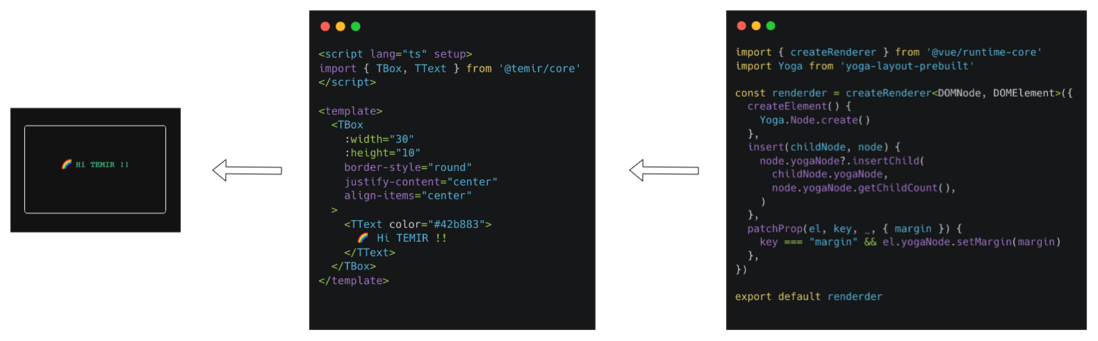
The implementation of Temir mainly benefits from the excellent cross-platform capabilities of Vue3. We can create a custom renderer through the createRenderer API, create the corresponding Node and Element in the host environment, and add, delete, modify and check the elements.
- Yoga
Vue provides an interface to run on the command line interface, so we still lack a layout engine to put Vue
Runs the command line tool. Temir uses Yoga, a Flexbox layout engine. Use the same CSS-like properties you've used when building browser apps to build great user interfaces for your CLI.
Thanks
Epilogue
The article ends here, if my articles and projects are inspiring and helpful to you, please give a star to support the author✌


**粗体** _斜体_ [链接](http://example.com) `代码` - 列表 > 引用。你还可以使用@来通知其他用户。