Some time ago, I introduced the use of Vite build tool to quickly create a Vue project (Vue3.0 project creation) . This article will develop and publish the project. The current Vue version is 3.0.4, which can be deployed to the server for release through the packaging of Vite.
Project configuration
1. The data comes from bilibili
2. The server is Nginx
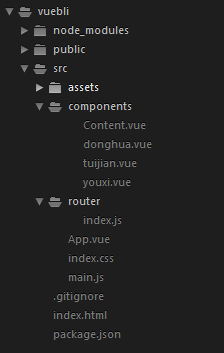
3. The project directory is as follows
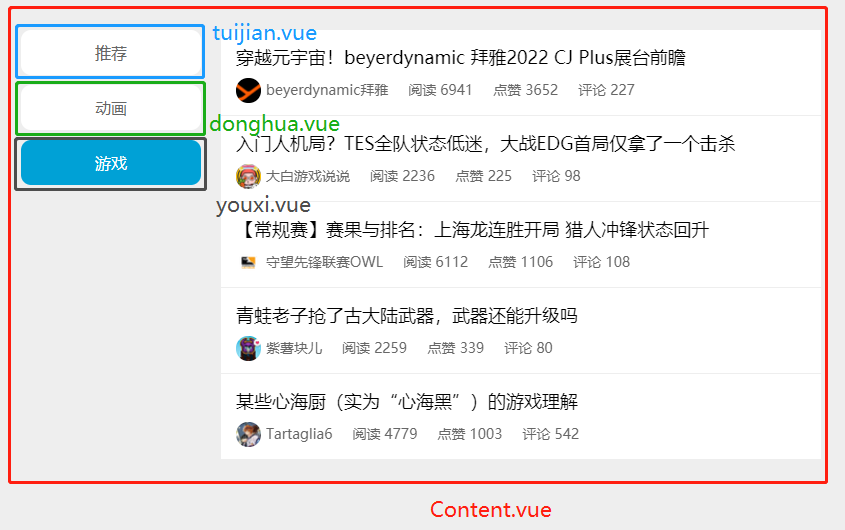
This project involves the basics of components, routing, etc. The interface after the project is formed is as follows:
component development
The advantage of the vue project is component development, dividing each function, or each page and container into components, on the one hand, it is easy to maintain, and on the other hand, it can improve efficiency when multiple people develop. Can increase code reusability, maintainability and testability. Improve development efficiency, facilitate repeated use, simplify debugging steps, improve the maintainability of the entire project, and facilitate collaborative development. It is a practice of high cohesion and low coupling code.
The components directory in the code directory is the directory of the component. Here you can create each component according to your own project, write HTML code directly in the component, and call the api of vue to achieve many functions, such as axios network At the same time, css styles can also be written in the component.
As shown in the figure, my component directory has 4 components, and these four components correspond to the following figure:
Component creation, registration, and mounting
1. Create the component
A component is a file with the suffix .vue . Create your .vue file in the components directory to create a component. There is a fixed format in the component. Take this project tuijian.vue as an example:
<template></template> The tag contains the template, which can write the html layout, such as div, p, span, li and other tags, this is the same as ordinary html, directly write the html layout of your current component in it .
<script></script> The tag contains some functions and effects that the current component needs to use some Vue APIs to achieve, such as data request, data rendering, etc.
<style></style> The tag contains the CSS style of the current component. One of them scope means that this style is only used by the current component. If this component is reused and referenced by other components later, then this style will not affect other components.
export default is to export the current component so that other components can be imported and used.
name is the component name.
data() is the data function of the current component, which returns data for page use by return.
 <template>
    <h1>{{title}}</h1>
</template>

<script>
export default {
  name: 'tuijian',
  data() {
      return {
          title:'这是推荐组件'
      }
  }
}
</script>

<style scope>

</style>
2. Register the component
When the component is created, export the component through export default , other components can import this component, and other components import this primary key, you need to register the component.
As the entry file, App.vue must import many components we wrote, so take the App.vue component of this project importing other components as an example.
The visible structure is the basic structure of a component. First, import the component, import it through import, and then directly fill in the path of the imported component.
import Content from './components/Content.vue' Register the component through components:{} , and directly fill in the name of the imported component. For example register Content component.
The last step is to embed the component in the template, <Content /> directly into the div.
 <template>
  <div id="content">
      <Content />
  </div>
</template>

<script>
import Content from './components/Content.vue'

export default {
  name: 'App',
  components: {
    Content
  }
}
</script>

<style>
    *{
        padding:0;
        margin:0;
    }
    body{
        background: #eee;
    }
    #content{
        width: 800px;
        height: 800px;
        margin:50px auto 0;
    }
</style>
Route configuration, mount, use
Routing is a plug-in outside of Vue, so it does not come with it. It needs to be installed through npm install. I use cnpm here, because the download is relatively fast, so I directly use the cnpm command to download here:
cnpm install vue-routerIf you do not have cnpm installed, you can use the Baidu cnpm installation method to use cnpm
1. Routing configuration
Create a router src in the router e65c518c0d65a47dda570de996fa4efd--- directory, and create a index.js file in the following format under ---13d0057884b52a53ebf4276e2aa83831---:
import {createRouter, createWebHistory} from 'vue-router'The above are createRouter and createWebHistory that introduce routes. One is to create routes, and the other is to create a History mode of routes.
Routing is divided into History mode and Hash mode, where History mode is equivalent to the path in the HTML5 standard, and Hash mode is a path mode with the number # , if you still don't understand, please see the following path example :
 // History模式
http://www.baidu.com/helloworld

// Hash模式
http://www.baidu.com/#/helloworld
I guess you understand it. In fact, because there is no # number difference in the path, although it is only a symbol difference, it will also affect subsequent development and configuration.
The other three imports are to introduce the corresponding components, because this project is to click the column on the left, and the components of the corresponding column are displayed on the right, so these three components must be imported here.
const routes=[] is the configuration of the routing path, path is the path of the routing, we need to configure the path of each component and the component name corresponding to each path.
 import {createRouter, createWebHistory} from 'vue-router'
import tuijian from '../components/tuijian.vue'
import donghua from '../components/donghua.vue'
import youxi from '../components/youxi.vue'

const routes = [
    {
        path:'/',
        component:tuijian
    },
    {
        path:'/tuijian',
        component:tuijian
    },
    {
        path:'/donghua',
        component:donghua
    },
    {
        path:'/youxi',
        component:youxi
    }
]

const routerHistory = createWebHistory()
const routers = createRouter({
    history: routerHistory,
    routes: routes
})
export default routers
The following is to export the configuration of the current route, select History as the route mode, and export the current route configuration through export default .
 const routerHistory = createWebHistory()
const routers = createRouter({
    history: routerHistory,
    routes: routes
})
export default routers
2. Mount the route
Open main.js , and enter the route just configured---475aa21013f684dab83d51d495b34272---through import index.js
import router from "./router/index.js"details as follows:
 import { createApp } from 'vue'
import App from './App.vue'
import router from "./router/index.js"
import './index.css'

const app = createApp(App)
app.use(router)
app.mount('#app')
Via app.use(router) hang on the route to the current vue instance.
3. Using Routing
This project uses routing in Content.vue . According to the following code, there are two divs, one is left and the other is right, the left displays the column, and the right displays the data of the currently clicked column.
Use the <router-link to=""></router-link> tag to implement the click event. This tag will eventually be rendered by the browser as an html <a href=""></a> tag, where to="" points to the routing path.
Through <router-view></router-view> this label is used to display the component corresponding to the data of the currently clicked column, in index.js the components that need to be rendered under each path have been configured.
 <template>
    <!-- 左侧导航 -->
    <div id="left">
        <div class="zhuanlan">
        <ul>
            <li v-for="zhuanlan in zlitem" :key="zhuanlan.zlname">
                <router-link :to="zhuanlan.zlrouter">{{zhuanlan.zlname}}</router-link>
            </li>
        </ul>
        </div>
    </div>
    <!-- 右侧列表 -->
    <div id="right">
        <router-view></router-view>
    </div>
</template>

<script>

export default {
  name: 'LeftDaoHang',
  data() {
      return {
          zlitem:[
              {'zlname':'推荐','zlrouter':'tuijian'},
              {'zlname':'动画','zlrouter':'donghua'},
              {'zlname':'游戏','zlrouter':'youxi'}
          ]
      }
  },
  created(){
      var that = this;
      // 请求资源
      async function getData() {
          const res = await fetch('tuijian.json');
          const result = await res.json();
          that.rightlist = result;
      }
      getData();
  }
}
</script>

<style scope>
    *{
        padding:0;
        margin:0;
        list-style: none;
    }
    #left{
        width: 180px;
        height: 800px;
        float: left;
    }
    #left .zhuanlan{
        width: 100%;
        height: 800px;
    }
    #left .zhuanlan .router-link-exact-active{
        background: #00a1d6;
        color: #fff;
        border-radius: 10px;
        transition: 0.1s;
    }
    #left .zhuanlan ul li{
        width: 100%;
        height: 45px;
        line-height: 45px;
        text-align: center;
        font-size: 16px;
        background: #fff;
        margin-bottom: 10px;
        border-radius: 10px;
        transition: 0.1s;
    }
    #left .zhuanlan a{
        display: block;
        text-decoration: none;
        color: #666;
    }
    #left .zhuanlan ul li a:hover{
        background: #00a1d6;
        font-weight: bold;
        color: #fff;
        cursor: pointer;
        border-radius: 10px;
        transition: 0.1s;
    }
    #right{
        width: 600px;
        height: 800px;
        float: right;
    }
    #right .rightlist{
        width: 100%;
        height: 800px;
    }
    #right .rightlist ul li{
        width: calc(100% - 15px);
        height: 70px;
        background: #fff;
        border-bottom: 1px solid #eee;
        padding:15px 0 0 15px;
    }
    #right .rightlist ul li .zl_artcle_title{
        width: 100%;
        height: 30px;
        float: left;
        font-size: 18px;
        white-space: nowrap;
        text-overflow: ellipsis;
        overflow: hidden;
        word-break: break-all;
    }
    #right .rightlist ul li .zl_info{
        width:100%;
        height: 30px;
    }
    #right .rightlist ul li .zl_info .zl_artcle_author_avatar{
        width: 30px;
        height: 30px;
        float: left;
        margin: 3px 0;
    }
    #right .rightlist ul li .zl_info .zl_artcle_author_avatar img{
        width: 25px;
        height: 25px;
        border-radius: 100px;
    }
    #right .rightlist ul li .zl_info .zl_info_num{
        float: left;
        font-size: 14px;
        color: #666;
        line-height: 30px;
        margin-right: 20px;
    }
</style>
Packaging and publishing of vue projects
Vite provides a very simple packaging command, run cmd directly in the root directory of its concept vue project, and then enter the following command to complete the fast packaging:
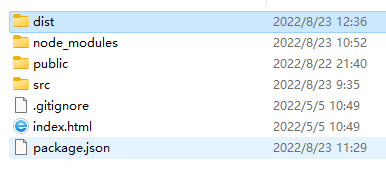
npm run build After the package is complete, a dist directory will be generated in the root directory of your project. This directory is the HTML code that has been packaged.
Because the code of the vue project cannot be run on the server, let alone executed in the browser, because the vue source code cannot be parsed by the browser, it needs to be packaged and compiled into HTML, CSS, and JavaScript code recognized by the browser to access it normally. .
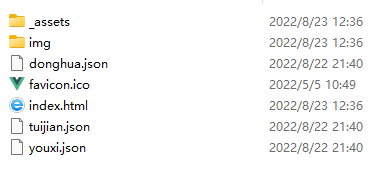
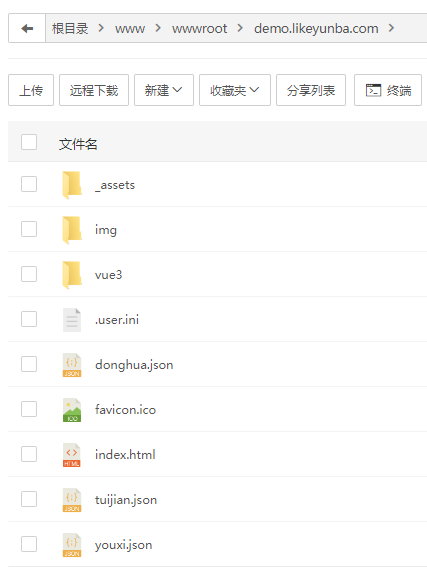
Finally, upload the code in the dist directory to your server to publish. Here I use the pagoda panel as an example to publish the vue project.
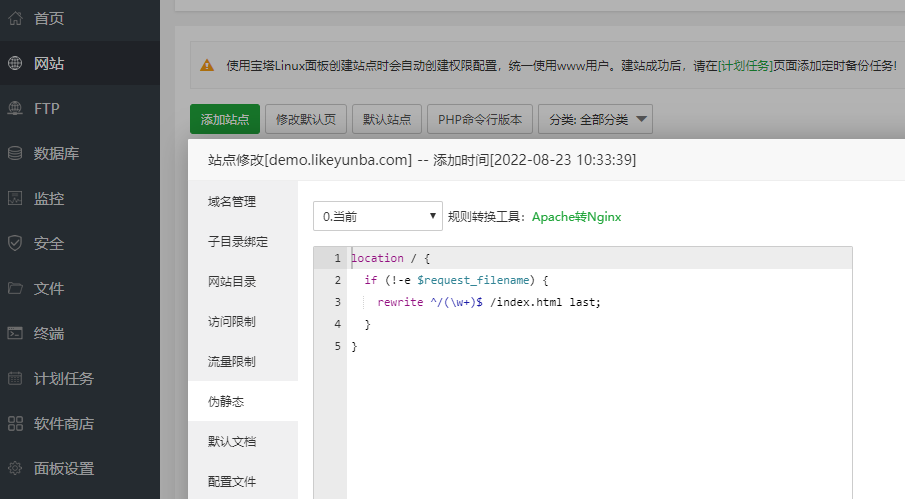
Because the route in the History mode is used, it is necessary to configure pseudo-static, otherwise the corresponding route will be 404 directly.
The pseudo-static rules are as follows:
 location / {
  if (!-e $request_filename) {
    rewrite ^/(\w+)$ /index.html last;
  }
}
Finally, you can access it normally:
Project demo: http://demo.likeyunba.com/
Summarize
Through simple learning, we can see the advantages of the vue project, component development, routing configuration, etc., it is actually quite easy to get started.
author
TANKING
WeChat: sansure2016



**粗体** _斜体_ [链接](http://example.com) `代码` - 列表 > 引用。你还可以使用@来通知其他用户。