基于Taro3.5.5
Find the entry file (packages/taro-cli/bin/taro) to create the taro project
 // packages/taro-cli/bin/taro
require('../dist/util').printPkgVersion()

const CLI = require('../dist/cli').default
new CLI().run()
Cli
packages/taro-cli/src/cli.ts
The function of this file is to accept built-in commands , decompose built-in commands , and register corresponding command plugins for different built-in commands .
First get our project path when initializing
 // packages/taro-cli/src/cli.ts
  constructor (appPath) {
    this.appPath = appPath || process.cwd()
  }
Execute in bin/taro file new CLI().run() see in cli run method executed this.parseArgs() the first method in parseArgs The only thing is to accept built-in commands and decompose built-in commands
 // packages/taro-cli/src/cli.ts
    const args = minimist(process.argv.slice(2), {
      alias: {
        version: ['v'],
        help: ['h'],
        port: ['p'],
        resetCache: ['reset-cache'], // specially for rn, Removes cached files.
        publicPath: ['public-path'], // specially for rn, assets public path.
        bundleOutput: ['bundle-output'], // specially for rn, File name where to store the resulting bundle.
        sourcemapOutput: ['sourcemap-output'], // specially for rn, File name where to store the sourcemap file for resulting bundle.
        sourceMapUrl: ['sourcemap-use-absolute-path'], // specially for rn, Report SourceMapURL using its full path.
        sourcemapSourcesRoot: ['sourcemap-sources-root'], // specially for rn, Path to make sourcemaps sources entries relative to.
        assetsDest: ['assets-dest'] // specially for rn, Directory name where to store assets referenced in the bundle.
      },
      boolean: ['version', 'help']
    })
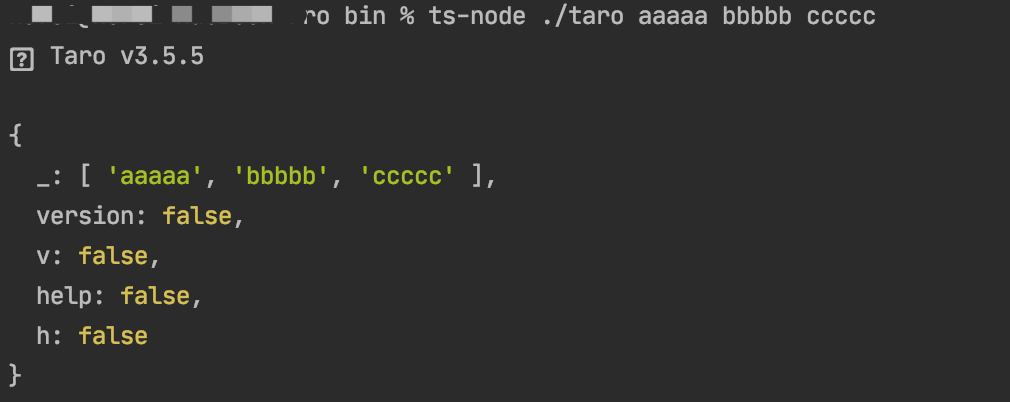
The result of printing args can be obtained
args._ is our command here aaaaa can be replaced with init、build、inspect the commands that taro knows
 // packages/taro-cli/src/cli.ts
    const _ = args._
    const command = _[0]
switch (command) {
case 'inspect':
case 'build': {...} // 构建项目
case 'init': {...} // 创建项目
...
} bbbbb is to replace our project name. For specific cli commands, please refer to: https://taro-docs.jd.com/taro/docs/cli
Get the path of some files when the command can be obtained by the project (the path note has been added as shown in the figure)
 // packages/taro-cli/src/cli.ts
      // 项目路径
      const appPath = this.appPath
      // 插件集路径 taro-cli/src/presets
      const presetsPath = path.resolve(__dirname, 'presets')
      // 插件集路径下的commands taro-cli/src/presets/commands
      const commandsPath = path.resolve(presetsPath, 'commands')
      // 插件集路径下的platforms taro-cli/src/presets/platforms
      const platformsPath = path.resolve(presetsPath, 'platforms')
Get the files in the commands folder
 // packages/taro-cli/src/cli.ts
   const commandPlugins = fs.readdirSync(commandsPath)
   const targetPlugin = `${command}.js`
Print commandPlugins is presets/commands an array of file names, each file in the array corresponds to different taro command plugins
Find the corresponding command plugin according to the command, and put the plugin in the kernel (the second important file Kernel class)
 // packages/taro-cli/src/cli.ts
      // 针对不同的内置命令注册对应的命令插件
      if (commandPlugins.includes(targetPlugin)) {
        kernel.optsPlugins.push(path.resolve(commandsPath, targetPlugin))
      }
Of course, before placing the command plugin in kernel there are also setting environment variables and instantiating the Kernel class
customCommand kernel.run (以init为例) customCommand kernel.run方法
// packages/taro-cli/src/cli.ts
        case 'init': {
          // 初始化创建
          customCommand(command, kernel, {
            _,
            appPath,
            projectName: _[1] || args.name,
            description: args.description,
            typescript: args.typescript,
            templateSource: args['template-source'],
            clone: !!args.clone,
            template: args.template,
            css: args.css,
            h: args.h
          })
          break
        }
Kernel
packages/taro-service/src/Kernel.ts
Kernel Class inherited from EventEmitter , is one of the core classes of Taro-Cli , the main function is to initialize project configuration and parameters; (Plug-in mechanism); modify webpack; execute hook functions .
When the Kernel is instantiated in the cli, the first thing is to initialize the project configuration, that is, those configured in your config directory, initialize the project resource directory, such as: output directory, dependency directory, src, config configuration directory, etc. Some configurations are in the config of your project. Things configured in config in /index.js, such as sourcePath and outputPath
https://taro-docs.jd.com/taro/docs/plugin plugin environment variables
 // packages/taro-service/src/Kernel.ts
  const kernel = new Kernel({
        appPath,
        presets: [
          path.resolve(__dirname, '.', 'presets', 'index.js')
        ],
        plugins: []
      })
      kernel.optsPlugins ||= []
1. The core method run the general execution flow of the method
 // packages/taro-service/src/Kernel.ts
async run (args: string | { name: string, opts?: any }) {
    ...
    // 设置参数,前面cli.ts中传入的一些项目配置信息参数,例如isWatch等
    this.setRunOpts(opts)
    // 重点:初始化插件集和插件
    this.initPresetsAndPlugins()
    // 注意:Kernel 的前两个生命周期钩子是 onReady 和 onStart,并没有执行操作,开发者在自己编写插件时可以注册对应的钩子
    // 执行onStart钩子
    await this.applyPlugins('onReady')
    await this.applyPlugins('onStart')
    // 处理 --help 的日志输出 例如:taro build --help
    if (opts?.isHelp) {
      return this.runHelp(name)
    }
    // 获取平台配置
    if (opts?.options?.platform) {
      opts.config = this.runWithPlatform(opts.options.platform)
      // 执行钩子函数 modifyRunnerOpts
      // 作用:修改webpack参数,例如修改 H5 postcss options
      await this.applyPlugins({
        name: 'modifyRunnerOpts',
        opts: {
          opts: opts?.config
        }
      })
    }
    // 执行传入的命令这里是init
    await this.applyPlugins({
      name,
      opts
    })
  }
There are three hook methods mentioned above, and you can print them out to know that there are many hook methods
 Map(15) {
  'onReady' => [ [Function: bound ] ],
  'onStart' => [ [Function: bound ] ],
  'modifyWebpackChain' => [ [Function: bound ] ],
  'modifyBuildAssets' => [ [Function: bound ] ],
  'modifyMiniConfigs' => [ [Function: bound ] ],
  'modifyComponentConfig' => [ [Function: bound ] ],
  'onCompilerMake' => [ [Function: bound ] ],
  'onParseCreateElement' => [ [Function: bound ] ],
  'onBuildStart' => [ [Function: bound ] ],
  'onBuildFinish' => [ [Function: bound ] ],
  'onBuildComplete' => [ [Function: bound ] ],
  'modifyRunnerOpts' => [ [Function: bound ] ],
  'writeFileToDist' => [ [Function (anonymous)] ],
  'generateProjectConfig' => [ [Function (anonymous)] ],
  'generateFrameworkInfo' => [ [Function (anonymous)] ]
}
2. Initialization initPresetsAndPlugins method (the official remarks are also very detailed)
 // packages/taro-service/src/Kernel.ts
  initPresetsAndPlugins () {
    const initialConfig = this.initialConfig
    // 收集了所有的插件集和插件集合。
    const allConfigPresets = mergePlugins(this.optsPresets || [], initialConfig.presets || [])()
    const allConfigPlugins = mergePlugins(this.optsPlugins || [], initialConfig.plugins || [])()
    ...
    process.env.NODE_ENV !== 'test' && createSwcRegister({
      only: [...Object.keys(allConfigPresets), ...Object.keys(allConfigPlugins)]
    }) // babel转化

    this.plugins = new Map()
    this.extraPlugins = {}

    // 加载插件集和插件导出对应的每一个 plugin 都包含了一个 apply 函数,执行该该函数可以导出对应的 Plugin 模块
    this.resolvePresets(allConfigPresets)
    this.resolvePlugins(allConfigPlugins)
  }
Printing this.plugin execute apply can export the corresponding Plugin module
 Map(6) {
  '.../taro/packages/taro-cli/dist/presets/index.js' => {
    id: '.../taro/packages/taro-cli/dist/presets/index.js',
    path: '.../taro/packages/taro-cli/dist/presets/index.js',
    type: 'Preset',
    opts: {},
    apply: [Function: apply]
  },
  ...
}
3. Execute the hook function applyPlugins
 // packages/taro-service/src/Kernel.ts
async applyPlugins (args: string | { name: string, initialVal?: any, opts?: any }) {
    let name
    let initialVal
    let opts
    if (typeof args === 'string') {
      name = args
    } else {
      name = args.name
      initialVal = args.initialVal
      opts = args.opts
    }
...
    // 此处打印this.hooks
    const hooks = this.hooks.get(name) || []
    if (!hooks.length) {
      return await initialVal
    }
    const waterfall = new AsyncSeriesWaterfallHook(['arg'])
    if (hooks.length) {
...
    }
    return await waterfall.promise(initialVal)
  }
onReady and onStart are not executed. I can't print them in the this.hooks applyPlugins method. The result of printing is as follows: We called it three times in initPresetsAndPlugins (we didn't add platform configuration here so it was three times)
 Map(1) {
  'init' => [
    {
      name: 'init',
      optionsMap: [Object],
      fn: [Function: fn],
      plugin: '..../taro/packages/taro-cli/dist/presets/commands/init.js'
    }
  ]
}
* 3
Through the get method, name the first and second transmissions are onReady and onStart are directly returned initialVal , passed in for the third time init , which matches the ---6bb0515---f150f559 which we mounted on kernel init before
 // packages/taro-service/src/Kernel.ts
    const hooks = this.hooks.get(name) || []
    if (!hooks.length) {
      return await initialVal
    }
// packages/taro-cli/src/cli.ts (这里是挂载init到kernel)
// 针对不同的内置命令注册对应的命令插件
if (commandPlugins.includes(targetPlugin)) {
kernel.optsPlugins.push(path.resolve(commandsPath, targetPlugin))
} After matching, continue to execute in the second half of the applyPlugins method as follows
 // packages/taro-service/src/Kernel.ts
   // 实例化AsyncSeriesWaterfallHook实例一个异步钩子,会传递返回的参数
   const waterfall = new AsyncSeriesWaterfallHook(['arg'])
   if (hooks.length) {
      const resArr: any[] = []
      for (const hook of hooks) {
        waterfall.tapPromise({
          name: hook.plugin!,
          stage: hook.stage || 0,
          // @ts-ignore
          before: hook.before
        }, async arg => {
          // 在这里把我们的插件方法给执行了,也就是执行了上面打印的init里的fn
          // init插件所在的位置packages/taro-cli/src/presets/commonds/init.ts
          const res = await hook.fn(opts, arg)

          if (IS_MODIFY_HOOK.test(name) && IS_EVENT_HOOK.test(name)) {
            return res
          }
          if (IS_ADD_HOOK.test(name)) {
            resArr.push(res)
            return resArr
          }
          return null
        })
      }
   }
   return await waterfall.promise(initialVal)
This is our built-in command input init , when I input help、build... is the same process, both are 初始化项目配置、参数 => 收集项目的插件集和插件 执行钩子 .
init
packages/taro-cli/src/presets/commonds/init.ts
通过插件init kernel applyPlugins fn ,在init里主要的作用就是引入和实例化Project , execute create
 // packages/taro-cli/src/presets/commonds/init.ts
import { IPluginContext } from '@tarojs/service'

export default (ctx: IPluginContext) => {
  ctx.registerCommand({
    name: 'init',
    optionsMap: {
        ...
    },
    async fn (opts) {
      // init project
      const { appPath } = ctx.paths
      const { options } = opts
      const { projectName, templateSource, clone, template, description, typescript, css, npm } = options
      // 引入和实例化Project
      const Project = require('../../create/project').default
      const project = new Project({
         ...
      })
      // 执行create
      project.create()
    }
  })
}
Project
packages/taro-cli/src/create/project.ts
Project Creator ,在init 0d1902f17b92ae09f5ca3b0c45744f32---插件中被实例化并调用了---341760c0bd34bd1acbf8fae46866f61b---方法,主要的作用就是Taro项目创建前create Fill in the project information, and then execute createApp
The core method of Project is create
 async create () {
    try {
      // 填写项目名称、介绍、选择框架等
      const answers = await this.ask()
      const date = new Date()
      this.conf = Object.assign(this.conf, answers)
      this.conf.date = `${date.getFullYear()}-${date.getMonth() + 1}-${date.getDate()}`
      // 当所有的都已经在控制台询问完成后执行write
      this.write()
    } catch (error) {
      console.log(chalk.red('创建项目失败: ', error))
    }
  }
write (cb?: () => void) {
this.conf.src = SOURCE_DIR
// 创建项目
createApp(this, this.conf, cb).catch(err => console.log(err))
}createApp
packages/taro-cli/src/create/init.ts
Main roleChoose a template to create a project
1. Choose a template
const templatePath = creator.templatePath(template)The location of the template is about a dozen templates in packages/taro-cli/templates
2. Create the file
 // npm & yarn
  const version = getPkgVersion()

  // 遍历出模板中所有文件
  const files = await getAllFilesInFolder(templatePath, doNotCopyFiles)

  // 引入模板编写者的自定义逻辑
  const handlerPath = path.join(templatePath, TEMPLATE_CREATOR)
  const handler = fs.existsSync(handlerPath) ? require(handlerPath).handler : null

  // 为所有文件进行创建
  logs.push(
    ...createFiles(creator, files, handler, {
      ...params,
      framework,
      version,
      templatePath,
      projectPath,
      pageName: 'index',
      period: 'createApp'
    })
  )
After the main file is created, there are git and rn parts
After this process comes down, a Taro project will be created <br>The created project is under the bin file


**粗体** _斜体_ [链接](http://example.com) `代码` - 列表 > 引用。你还可以使用@来通知其他用户。